Color Flirtations Dress
By Elena Nodel
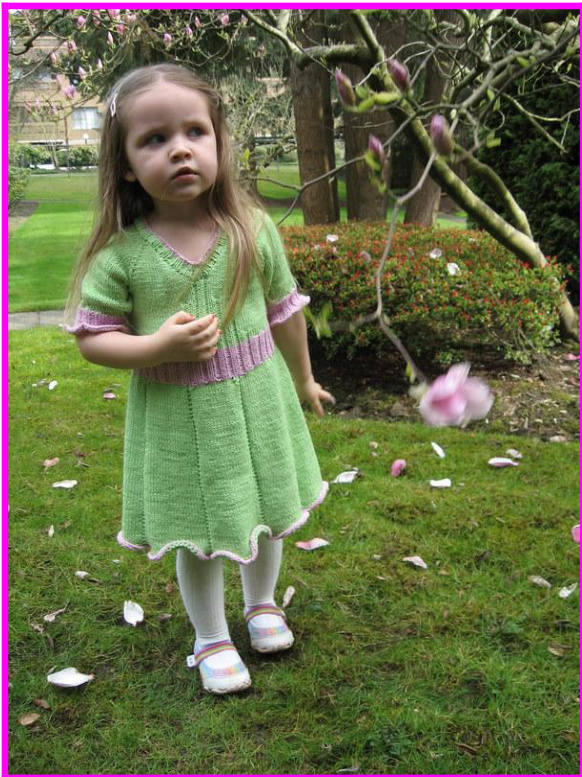
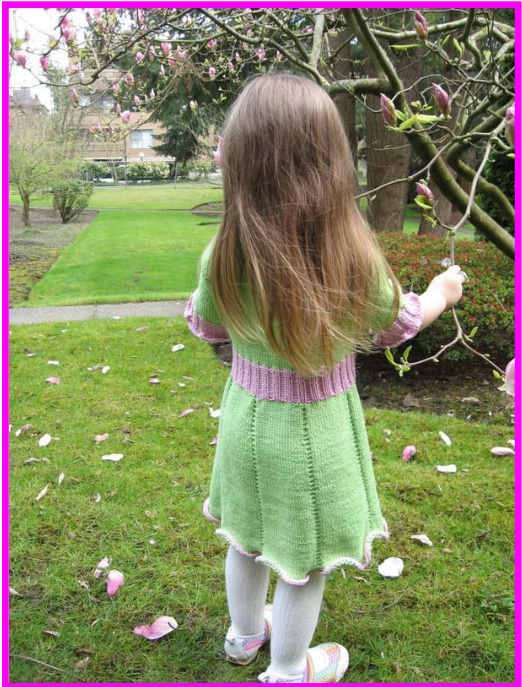
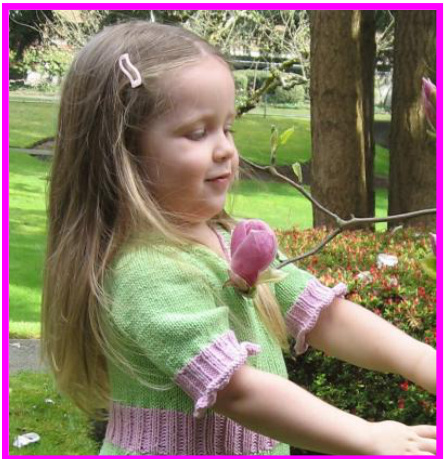
I am often inspired by the colors of the ever changing seasons to create one piece or another. Last spring the magnolia tree in our backyard had the most amazing blooms. I kept looking at it, and got inspired to create a magnolia bloom dress. The idea for all the other colorful variations came much later. Thus the first dress is - Color Flirtations: Spring.
Sizes available:
1-2 (to fit 19-20 inch chest) 3-4 (to fit 21-22 inch chest) 4-5 (to fit 23-24 inch chest) 5-6 (to fit 24-25 inch chest) 6-8 (to fit 26-27 inch chest)
Materials:
Main yarn: Dk weight cotton or wool yarn Contrast yarn: Any contrasting dk weight cotton yarn or wool yarn
| Skirt option | Short sleeve | Long sleeve |
| Spring | 550 (660, 750, 820, 900) | 660 (760, 850, 920, 1000) |
| Orchid | 500 (580, 700, 830, 900) | 520 (700, 850, 975, 1100) |
| Forget- Me-Not | 590 (690, 850, 1050,1200) | 700 (830, 990, 1200, 1400) |
| Bee Mine | 500 (515,530,600, 800) | 625 (650, 690, 750, 975) |
3.5 mm circular needles (60, 80, 30 cm in length); 3 mm double pointed needles; 2 different color markers (8 in one color for raglan markers and increases and 1 in different color for beginning of the round marker); 34 beads with wide hole (optional). Gauge: 23 sts and 31-32 rows per 4 inches in stockinette stitch on 3.5 mm needles or size to obtaingauge
Abbreviations:
kfab = knit into the front and back of stitch k2tog = knit 2 stitches together p2tog = purl 2 stitches together skp = slip one stitch, knit next one, pass the slipped stitch over the knitted one sts = stitches k = knit p= purl rnd = round
Method:
Using preferred provisional cast on method, cast on 52 (60, 64, 68, 72) sts. See reference chapter on provisional cast on. Purl and place markers as follows: p 2 (3,3,3,3), pm,p 10 (12, 13, 14, 15), pm, p 28 (30, 32, 34, 36) pm, p 10 (12, 13, 14, 15) pm, p 2(3, 3, 3, 3) Row 1: Knit and start increases (front and raglan increases). Increase row: kfab, knit to 1 sts before each marker (kfab into it), pm, kfab into a stitch after each marker, knit to last stitch (kfab into it). 10 sts increased. In other words you will be increasing into the stitches before and after each marker and into the first and last st of the row.
Row 2: purl
Repeat increases (row 1&2) till there are 1-2: 26/34/52/34/26 sts 3-4: 27/36/54/36/27 sts 4-5: 29/39/58/39/29 sts 5-6: 31/42/62/42/31 sts 6-8: 33/45/66/45/33 sts After the last increase row do not turn over to purl a row, but instead, join in the round and knit one round. The beginning of the round is going to be at the center front for the time being. Place a marker there to mark the beginning of the round. The following round will be knit in the round; you will be doing raglan increases as well as starting central front decorative ribbing. You will no longer increase into the first and last stitch of the work. Raglan increase rnd: kfab into stitch before and after each marker. DO NOT increase around the beginning of the round marker (8 sts increased). Note: k2 highlighted in red are one stitch before the end of the round and one after the end of the round. The ribbing can be knit intarsia style, please see Reference chapter for Seamless Intarsia in the Round.
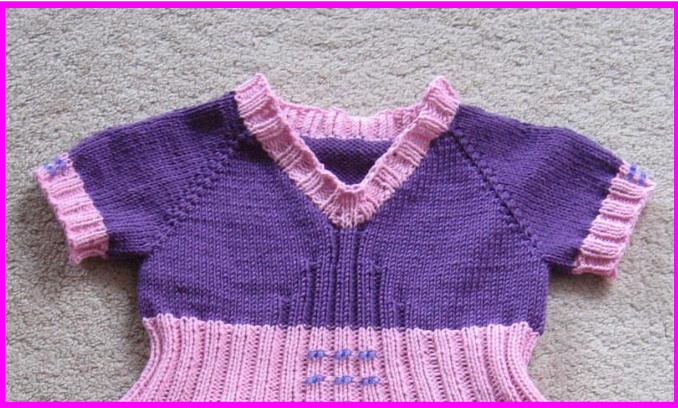
Central Front Decorative Ribbing:
The center 2 sts at the front are the focal point (two central knit stitches = k2). You will be adding ribbing stitches as follows: Start with [p2, k2, p2] for 8 rnds [p2,k2, p2,k2, p2, k2,p2] for 8 rnds [p2,k2, p2,k2,p2,k2,p2, k2, p2,k2, p2] for 8 rnds and so on.... till it is time to switch colors. Rnd 1: Raglan increase round.
Rnd 2: knit
Continue knitting rnd 1&2 till you have this number of stitches between markers: 1-2: 38/56/38/56 3-4: 42/60/42/60 4-5: 45/64/45/64 5-6: 48/68/48/68 6-8: 51/72/51/72 Knit to the first section of 38 (42, 45, 48, 51) sts after the beginning of the round marker and separate sleeves by putting those 38 (42, 45, 48, 51) sts on hold or waste yarn, cast on 0 (4, 4, 4, 4) sts, knit across 56 (60, 64, 68, 72) sts, put next 38 (42, 45, 48, 51) sts section on hold or waste yarn, cast on 0 (4, 4, 4, 4) sts, knit across 56 (60, 64, 68, 72) sts. Join in the round, place marker right in the middle of the left underarm. Total number of stitches should be 112 (128, 136, 144, 152). Continue knitting in the round in the main color till the desired length to contrast color waist band is reached. My suggestion is to knit in main color for 2 (2.5, 3, 3.5, 4) inches before starting the contrast waist band.
Waist Band:
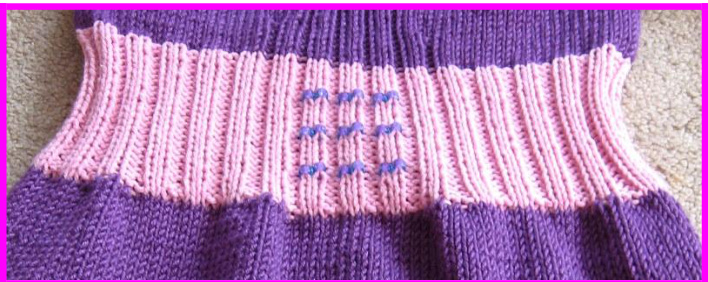
Switch to the contrasting color and knit one round, but purl purls and knit knits of the central decorative ribbing. Next round: start 2x2 ribbing. To make it flow with the central ribbing, figure out the order of the stitches as if a continuation from the central ribbing. Work in 2x2 ribbing for the desired length. My suggestion is to knit for 2 (2.5, 2.5, 3, 3.5) inches. Beads: this is optional. I placed mine in the middle of the decorative ribbing (k2 sts), and in the middle of the waist band. See reference chapter on how to work with beads.
Skirt Set up Rounds:
Regardless of the type of skirt, it is divided into 8 sections. Switch to the main color and knit one round, placing markers in the following manner: Starting from the one that marks the beginning of the round, place marker after 7 (8, 8, 9, 10) sts, then every 14 (16, 17, 18, 19) sts, then there will be 7 (8, 9, 9, 9) sts left before marker. Next round knit and kfab into 2 sts before each marker and into 2 sts after each marker, exception being the one that marks the beginning of the round (DO NOT increase around it). Thus you increase by 4 sts around each marker. Total number of stitches should be 144 (160, 168, 176, 184).
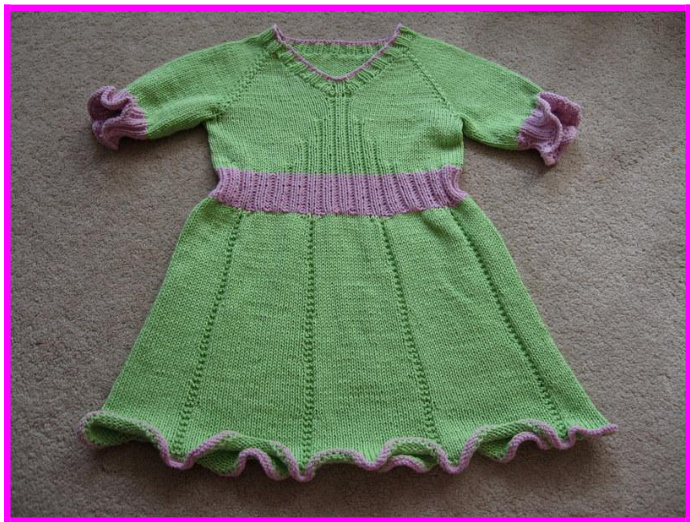
Spring Skirt:
After the set up rnds, you will be setting up the skirt segments in the following manner: Rnd 1: purl 1 sts before and after each marker, except the one that marks the beginning of the round.
Rnd 2: knit
Thus one round the stitches around the markers are purled and next round knitted, and so on. After a while, if you become comfortable, you can remove the markers and keep going in this pattern without them. Skirt increases are done every 16th round. It also alternates which side of the marker the increase is done on. If the first increase was done before the marker, then the next set will be done after the marker. You can use any method you prefer to introduce the increase here, but do not work the increase on the stitches before and after each marker as they form the pattern that segments the skirt into 8 pieces. I use my favourite method by knitting into the stitch below of the working stitch on the left needle (directional lifted increase - see reference chapter for tutorial). Each increase set will increase the stitch count by 8. Knit in this manner till the desired length. My suggested length is 13 (15, 17, 18, 19) inches from the underarm. But each child is individual and all vary in height. Next rnd: kfab into every stitch. Switch to contrast yarn, knit for 2 rnds, and then bind off.
Orchid Skirt:
After the set up rnds, you can remove all the markers you have just placed. Next round set up a marker in different color in the middle of the right underarm (mirrors the position of the marker that marks the beginning of the round). The skirt increases are done every 11th round in the following manner: knit into the stitch below of the 3rd stitch before each marker, and do the same with the 3rd stitch after each marker (lifted
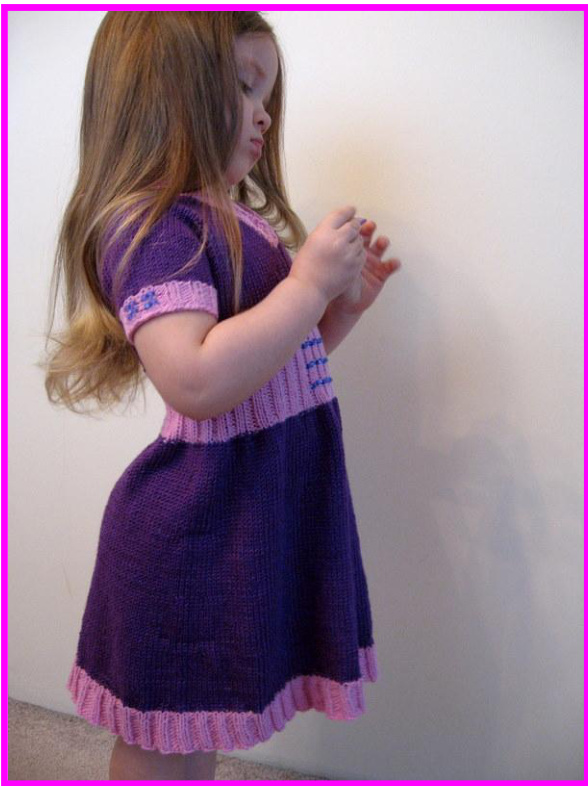
increase). Thus the stitch count is increased by 4. Knit in this manner till the desired length minus 1.5 (2, 2.5, 3, 3) inches. My suggested length is 11.5 (13, 14.5, 15, 16) inches from the underarm. But each child is individual and all vary in height. Switch to the contrast color and knit one round. Rnds 1-2: work in 2x2 rib (\*k2, p2\*) Rnd 3: \*k2, pbaf (purl into the back and front of the stitch), p1\*, repeat \* to the end of the round Rnds 4-6: \*k2, p3\*, repeat \* to the end of the round Rnd 7: \*k2, p1, pbaf, p1\*, repeat \* to the end of the round Rnds 8-12: \*k2, p4\*, repeat \* to the end of the round If you want the contrasting hem to be longer, add a few more rounds as in rnds 8-12. Bind off in pattern.
Bee Mine Skirt:
Worked the same as Orchid Skirt till the length is 11.5 (13, 14.5, 15,16) inches from the underarm. But each child is individual and all vary in height, so you might want to adjust the length. Then knit one rnd and reduce sts evenly to 144 (160, 168, 176, 184) sts.
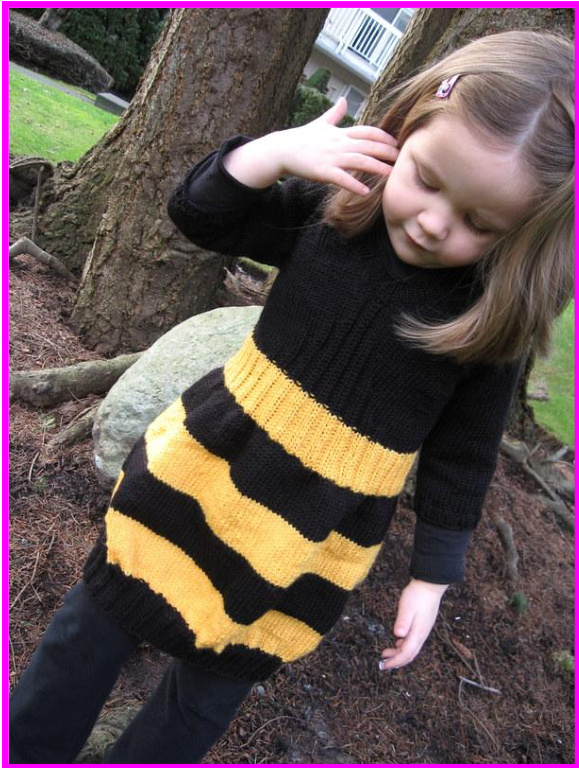
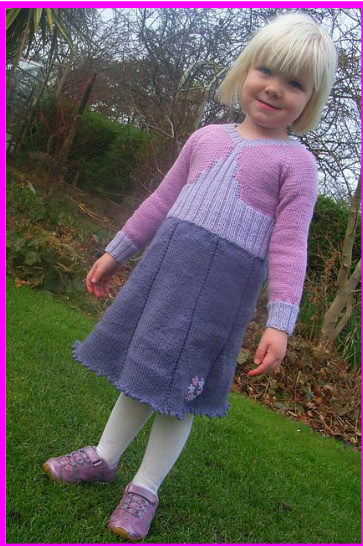
If you like the dress to taper down even more, then you can reduce more stitches, just as long as the final number is a multiple of 4. Switch to the contrast color and smaller needles, and knit one round. Then work in 2x2 rib (\*k2, p2\*) for \~ 2-2.5 inches. Bind off in pattern. Note: size 4-5 is shown on the picture here, stripes are 2 inches wide each.
Forget-me-not Skirt:
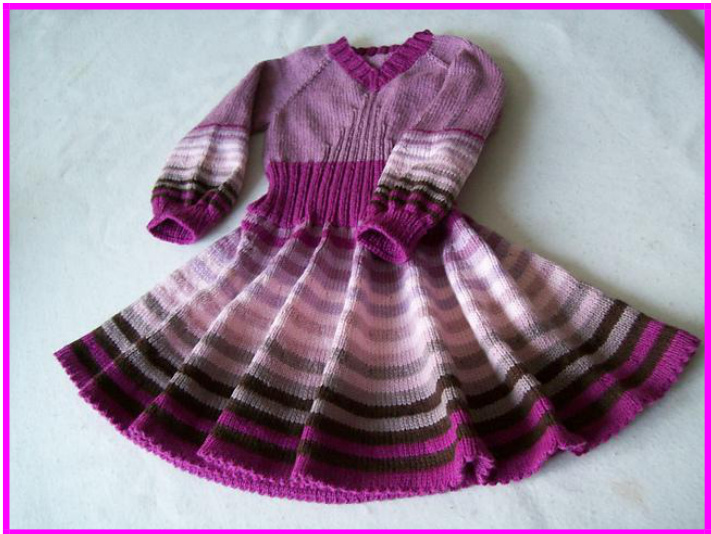
This skirt option looks great if worked in stripes. After the set up rnds, you can remove all the markers you have just placed. Knit for 1 (1.5, 2, 2, 2) inches. Next round: \*knit 4 sts, make 1 by knitting into the stitch below\*, continue \* to the end of the round. Knit in stockinette stitch for 14 rnds (\~ 2 inches). Next round: \*knit 5 sts, make 1 by knitting into the stitch below\*, continue \* to the end of the round. Knit is stockinette stitch for 14 rnds (\~ 2 inches). Next round: \*knit 6 sts, make 1 by knitting into the stitch below\*, continue \* to the end of the round. Continue knitting and increasing in this manner until the skirt is desired length. Make sure you have an even number of sts on the needles, if not, then adjust accordingly. Next rnd: \*p2tog, yo\*, repeat \* to the end of the round. Knit for the next 7 rnds. Bind off. Fold at the yo round and sew or whipstitch to the inside.
Sleeves (Option 1):
Using larger needles, pick up 38 (42, 45, 48, 51) sts from holder, then pick up from the cast on underarm edge 2 (6, 7, 6, 7) sts. Total number of stitches should be 40 (48, 52, 54, 58). You can either use 30 cm circular needles or dpns (3.5 mm). Knit for 2 (3, 3, 4, 5) rnds. Next rnd: k1, k2tog, knit to last 3 sts, skp, k1. Total number of stitches is 38 (46, 50, 52, 56).
Color Flirtations Dress - 7 -
Knit for 3 rnds, then repeat the decrease rnd (36, 44, 48, 50, 54 sts).
Switch to 3 mm needles and contrast yarn, and knit 1 rnd. For sizes 5-6 and 6-8 only: k1, k2 tog, p2, then do [k2, p2] to last 3 sts, p2tog, p1. (Decreased to 48, 52sts) All other sizes start 2x2 rib (k2, p2). Work in 2x2 rib for 7-8 rnds, then bind off in pattern.
Sleeves (Option 2):
Using larger needles, pick up 38 (42,45,48,51) sts from holder, then pick up from the cast on underarm edge 2 (6, 7, 6, 7) sts. Total number of stitches should be 40 (48, 52,54, 58). You can either use 30 cm circular needles or dpns (3.5 mm).
Knit for 5 (8, 8, 9, 9) rnds. Next rnd: k1, k2tog, knit to last 3 sts, skp, k1. Total number of stitches is 38(46, 50, 52, 56). Knit for 5 rnds, then repeat the decrease rnd (36, 44, 48, 50, 54 sts) For sizes 5-6 and 6-8 only: knit for 5 rnds, then do another decrease (48, 52 sts) All sizes: switch to 3 mm needles and contrast yarn, and knit for 1 rnd. Start 2x2 rib (k2, p2). Knit in rib for 10 (12, 15, 15, 17) rnds. Next round: kfab into every stitch. Knit for 2 rnds, bind off.
Sleeves (Option 3 - long sleeves):
Using larger needles, pick up 38 (42, 45, 48, 51) sts from holder, then pick up from the cast on underarm edge 2 (6, 7, 6, 7) sts. Total number of stitches should be 40 (48, 52, 54, 58). You can either use 30 cm circular needles or dpns (3.5 mm). Knit for 5 rnds. Next rnd (decrease round): k1, k2tog, knit to last 3 sts, skp, k1. Total number of stitches is 38 (46, 50, 52, 56). Knit for 5 rnds, then repeat the decrease rnd (36, 44, 48, 50, 54 sts). For sizes 3-4 and up: Repeat one more time (36, 42, 46, 48, 52 sts). For sizes 5-6 and 6-8 only: knit for 5 rnds, then do another decrease (46, 50 sts)
Color Flirtations Dress - 8 -
Stitch count for all sizes should be 36 (42, 46, 46, 50) sts. Knit for about 1 inch, then start sleeve increases as follows: 1. Increase round: evenly increase by 6 sts; 2. Knit for 6 rnds. 1-2 and 3-4: Repeat 1&2 two more times. 4-5 and up: Repeat 1&2 three more times. Stitch count should be 54 (60, 70, 70, 74) sts. Knit till the sleeve measures about 6.5 (8, 9, 9.5, 10) inches from the underarm. Next round: knit and evenly decrease by 20 (20, 30, 30, 30) sts. Do s0 by evenly spacing k2tog. Stitch count should be 34 (36, 40, 40, 44) sts. Knit for 5 rnds. Then either in main or contrast color knit for 1 rnd. Next round: switch to smaller sized needles and start 1x1 ribbing or 2x2 ribbing, and knit in ribbing for 1-1.5 inches.

Bind off in pattern. Average measurements for full length sleeve: 8.5 (10, 11, 11.5, 12) inches from the underarm.
Color Flirtations Dress - 9 -
Neckband:
Unravel the crochet chain and pick up 52 (60, 64, 68, 72) sts. With the right side facing you, attach yarn (contrast color or main color) to the left side shoulder. Pick up 12 (14, 16, 18, 20) sts along the left front side, then 12 (14, 16, 18, 20) sts along the right front side. Place the marker to mark the beginning of the round. Knit one round. The total number of stitches should be 76 (88, 96, 104, 112). The two front central stitches should be k2 as in the decorative front ribbing; and based on that, figure out how to start your 2x2 ribbing. Rnd 1: work in 2x2 ribbing. Rnd 2: knit to 2 stitches before central k2, p2tog, then p2tog after the central k2 sts, rib to the end Rnd 3: knit in pattern [p1, k2, p1] Rnd 4: knit to 2 stitches before central k2, skp, then k2tog after the central k2 sts, rib to the end Rnd 5: knit in pattern [k2, k2, k2] Rnd 6: work to 2 stitches before center k2; skp, then k2tog after the central k2 sts, rib to the end Rnd 7: knit in pattern [p2, k1, k2, k1, p2] Bind off relatively loosely in pattern for sizes 1-2 and 3-4 only. All other sizes: repeat rnd 2&3. Bind off in pattern. See reference chapter for stretchy bind off. Note: on the green dress the last rnd of 2x2 rib was done in contrast color, then bound off in contrast color.
Pockets:
(Feel free to experiment with colors) Cast on 18 (18, 20, 22, 24) sts. Work till the pocket measures 2.5 (3, 3, 3.5, 4) inches. Then switch to smaller sized needles and knit in 1x1 rib for 8 rows. Bind off in pattern. Repeat for the second pocket.

Sew on the pockets: Lie dress flat and pin pockets in place where required (about 2-3 shorter than recommended sleeve length from the underarm), then sew in place.
1. Provisional Cast On:
http://www.youtube.com/watch?v=GSwG6SJ1z2I&feature=rel ated (I use the second technique shown in this video) 2. Directional Increases: http://www.youtube.com/watch?v=CnrVoUf2cLk&NR=1
3. Working with Beads:
http://www.knitty.com/ISSUEspring06/FEATseducedby beads.html (scroll to “Hooking beads as you go")
4. Stretchy Bind Off:
http://www.knitty.com/ISSUEfallo9/FEATjssbo.php 5. Seamless Intarsia in the Round http://www.ravelry.com/patterns /library/seamless -intarsia-in-the-round
Acknowledgments:
Heartfelt thanks and my deepest gratitude go to my wonderful group of testers (Barb, Charlotte, Eve, Inna, Janet, Karen, Lori, Marion, Melissa, Sarah, Sheena, Sofia, and Valerie), whose hard work and most valuable input made this pattern possible. Special thanks go to Janet for helping me with the presentation and editing of this pattern, and for providing a “Seamless Intarsia in the Round" technique.
Copyright
Please respect my designer rights, and as such the copyright of this pattern will always remain with me. I am providing this pattern for personal home use only. You may make garments from it as gifts or donate to charities and fundraisers. Commercial use of this pattern is a violation of the copyright. Selling products madefrom this pattern or distributing this pattern in any manner is prohibited under the copyright unless I, Elena Nodel, have granted express written permission.
Contact Information:
Email:ElenaNodel@gmail.com Pattern Designs: http:/www.ravelry.com/designers/elena-nodel Colour Adventures Yarns on Etsy: http://anadiomena.etsy.com Blog: http://anadiomenadesigns.blogspot.com Ravelry Username:Anadiomena Ravelry Group: Anadiomena's Adventures Facebook: http://www.facebook.com/AnadiomenasDesigns Twitter: http://twitter.com/Anadiomenasdesi


