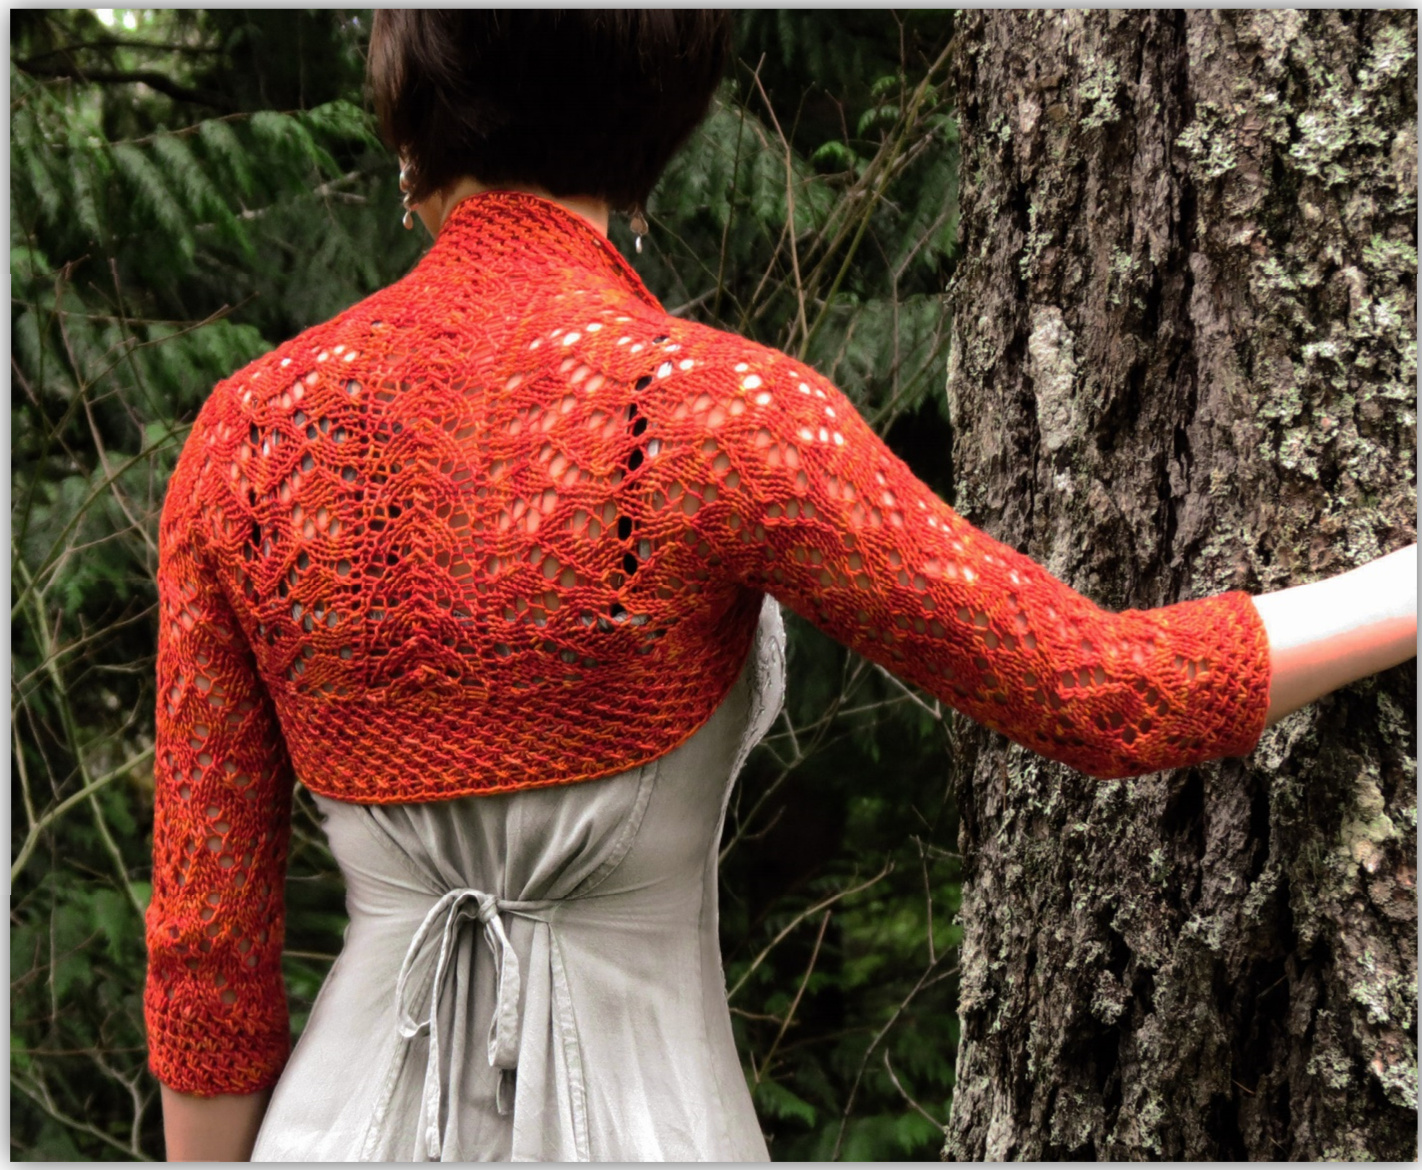
EMBERBOLERO
A knitting pattern By Alana Noritake
Introduction:
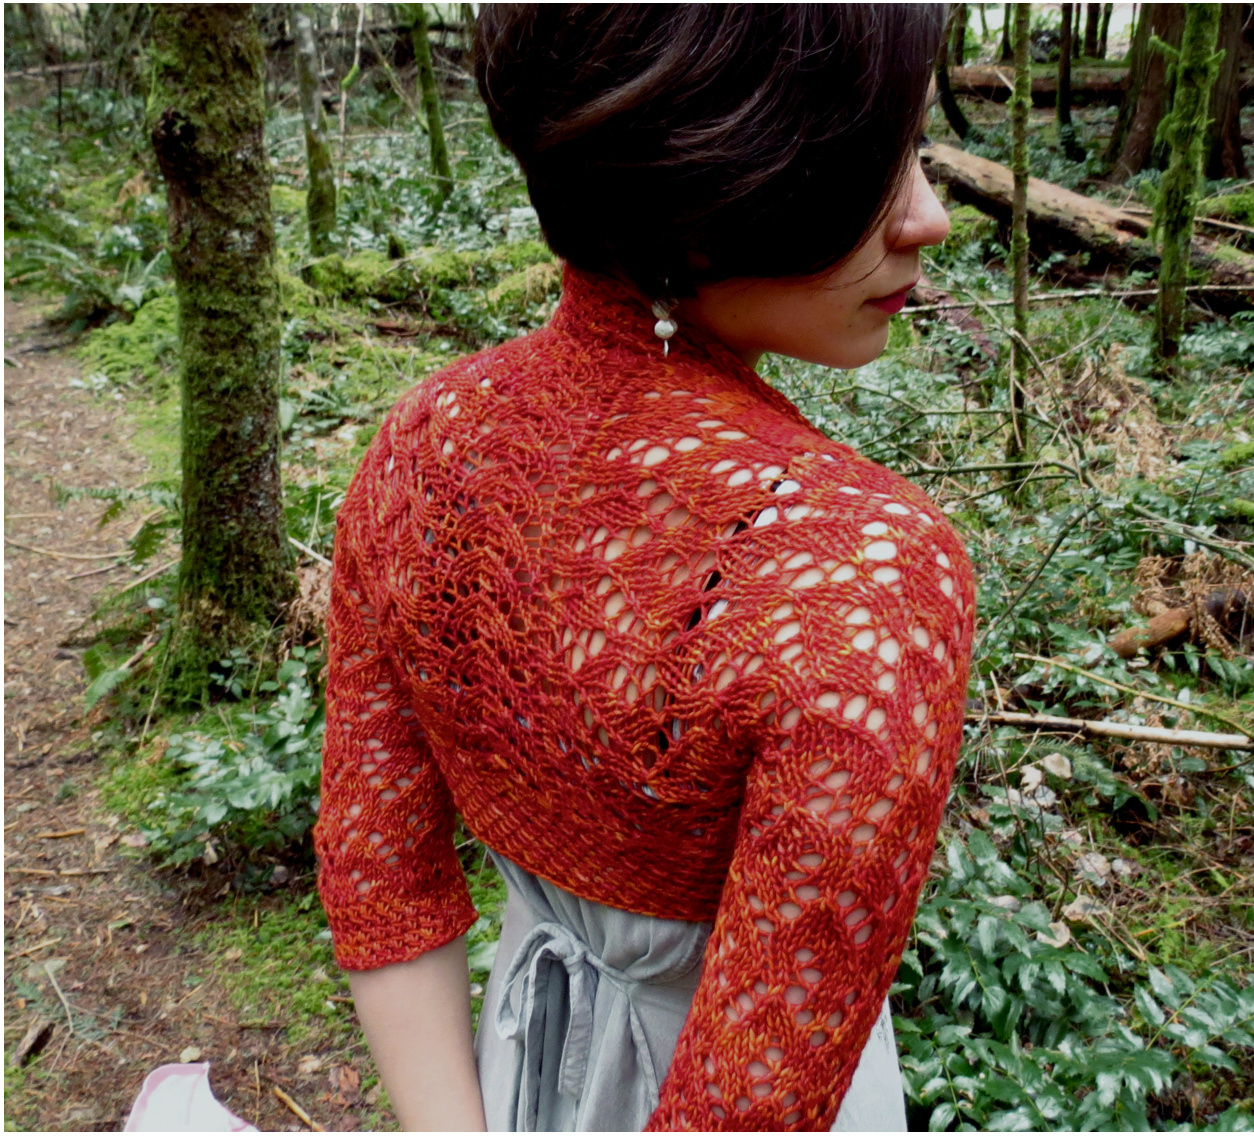
This 3/4length lace bolero is worked from the sleeve cuffs up and then joined together by a lace back panel. The piece is blocked flat, then the edges sewn together to form sleeves. The collar is then finished in the round and blocked separately. This pattern is written for size small but with adjustments for medium and largewithdirections denoted as S(M,L).

Materials:
Yarn - Worsted weight yarn, about 400 yards. (Pictured bolero made with 1 skein of Neighborhood Fiber Co. Worsted, color way "Old Town") Knitting Needles - US size 7, straight and circular Yarn needle Large Holding needle Gauge and Measurements: Stockinet gauge: 4.5 stitches per inch 6 rows per inch
Lace Motif:
after blocking, each lace flame adds (with stretch): 6 stitches = 1.5 (2.25) inches 10 rows = 2.25 (3) inches Small, Medium, Large sizing: Determined by upper arm circumference (UAC) alone. The fabric is quite stretchy, so the sizing has some overlap: Small: UAC 10 to 12.5 inches Med: UAC 12 - 15.5 inches Large: UAC 15 - 18 inches Both sleeves begin at the hem. The lace pattern is started and ended at different rows of the chart so that the “flames" are mirror images of each other.
FOR BOTH SLEEVES:
Using knit cast on, C0 51(59,68) stitches and then purl 1 row. Repeat following 4 rows until you've completed row 9 (RS): Row 1 (RS): K1, \*sl1, Kfb, psso\* repeat until end of row Row 2: purl all stitches Row 3: \*sl1, Kfb, psso\* repeat until 1 stitch remains, K1 Row 4: purl all stitches On Row 10 (WS) decrease down to 39(45,51) stitches by evenly distributing decreases across this purl row: \*P2, P2tog\* repeat, purl any remaining stitches at end of row On next row (RS) begin the lace chart.
For Sleeve A:
Begin RS row labeled “A start" (Row 1). First stitch of every row is slipped. Chart only shows RS rows. Purl across ws. Each RS row, slip the first stitch of the chart, then repeat the 6 stitches between the asterisks until two stitches remain, then complete the 2 stitches on the chart row outside asterisks. The 20 rows of the chart create 1 pattern repeat. Complete 4 full pattern repeats. Begin 5th repeat, but stop at line labeled “A end" (row 15) Purl the WS row. DO NOT BO. Cut yarn. Transfer to holding needle/yarn.
For Sleeve B:
Begin on RS after “B start"(Row 11). Continue to repeat the chart, each time you reach the "B start" line you've completed 1 pattern repeat (every 20 rows). Complete 4 pattern repeats. On 5th repeat, stop at the "B end" (Row 5). Purl the WS row. DO NOT BO OR CUT YARN
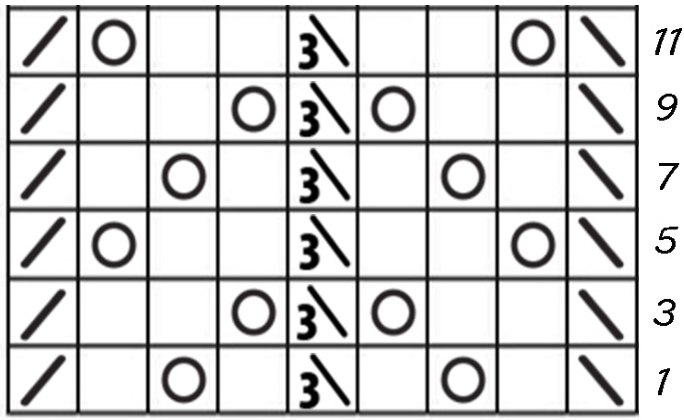
Sleeve Lace Chart
ONLY RS ROWS ARE SHOWN IN THE CHART. FOR WS ROWS, PURL ALL STITCHES. FOR BOTH RS AND WS, ALWAYS SLIP FIRST STITCH PURLWISE WYIF
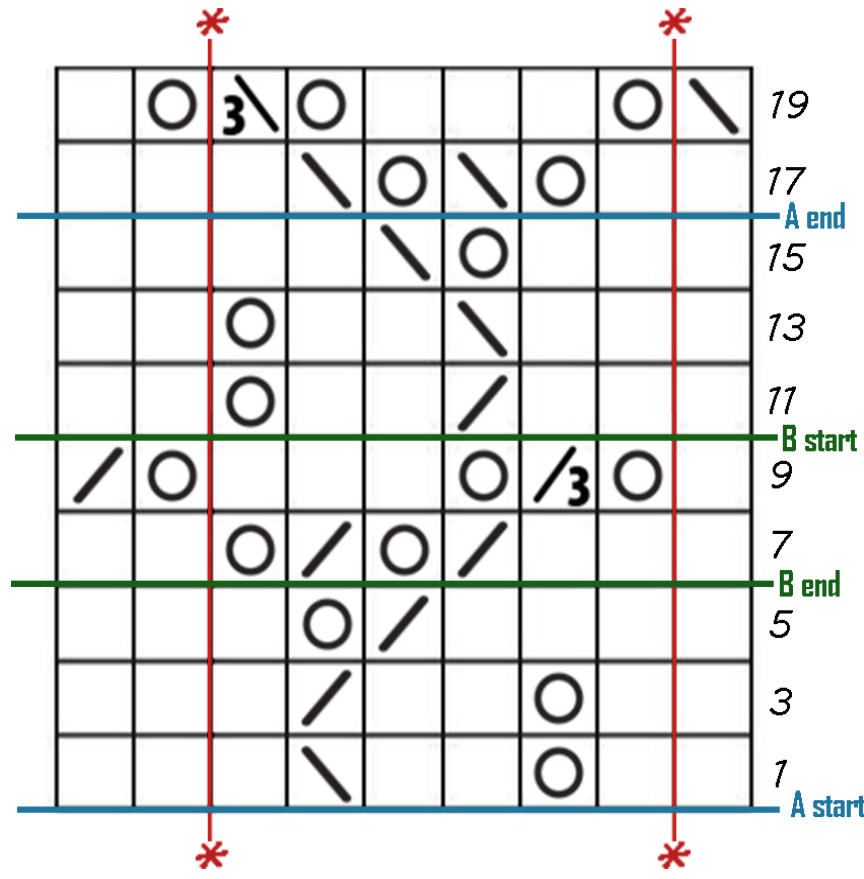
Symbol Key: O - Yarn over / - K2tog \-SSK /3 - K3tog 3\ - SK2togPss0
Written instructions:
Row 1: Sl \*K1, yo, K2, SSK, K1\* repeat from \* until end of row then K2 Row 3: Sl \*K1, yo, K2, K2tog, K1\* K2 Row 5: Sl \*K3, K2tog, yo, K1\* K2 Row 7: Sl \* K2, K2tog, yo, K2tog, yo\* K2
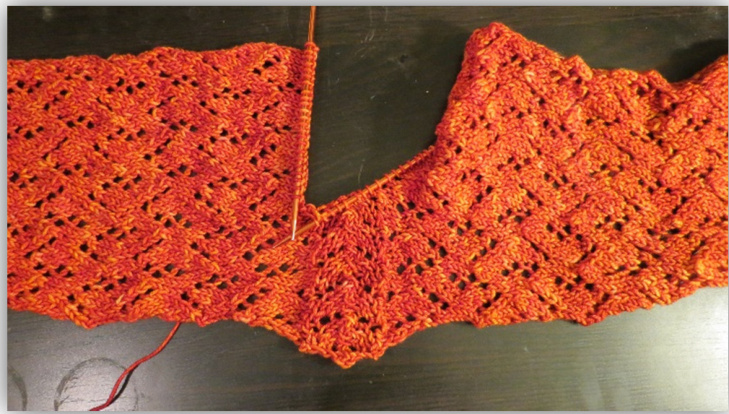
JOINING THE SLEEVES:
Arrange the sleeves on your knitting needles as shown in the picture: Sleeve A on the right, sleeve B on the left.
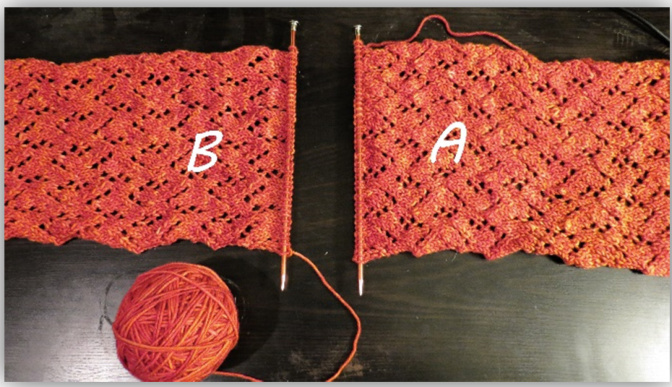
BACK LACEPANEL
On the left needle, CO 9 stitches as shown:
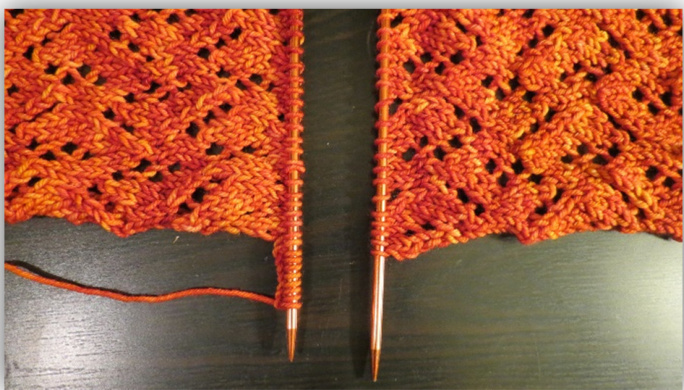
Do not turn, you will knit back across the 9 CO stitches. Begin the back lace panel as follows: The following lace panel is worked as short rows up the back. The first and last stitch of each RS row knits together one active stitch from a sleeve and one of the 9 back panel stitches. Chart only shows RS rows. All WS stitches are purled, do not include anysleeve stitches onWS.
Written instructions:
Row 1: SSK (1 sleeve stitch, one center stitch), K1, YO, K1, SK2togPss0 , YO, K1, K2TOG (1 sleeve stitch, one center stitch) Row 3: SSK, K2, YO, SK2togPss0, YO, K2, K2TOG ROW 5: SSK, YO, K2, SK2togPss0, K2, YO, K2TOG
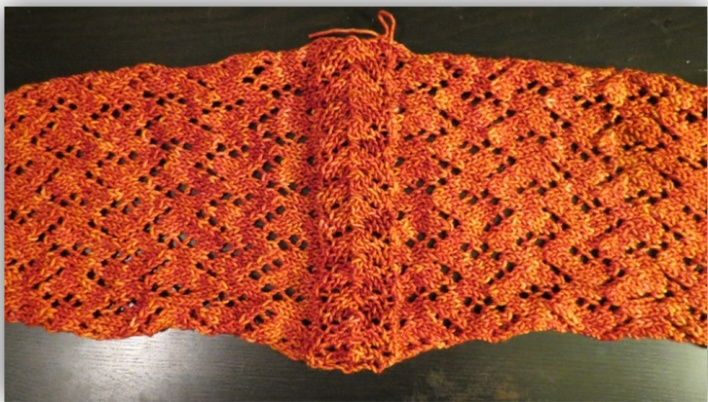
COLLAR
Repeat this pattern up the spine of the work (see picture)
Continue until all the sleeve stitches have been used up. Then BO loosely.
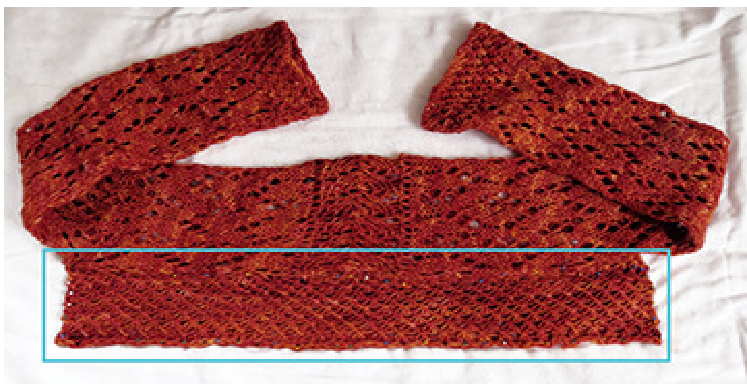
Weave in ends, hand wash gently and block flat. After blocking, use a piece of your yarn and a yarn needle to stitch the inside of each sleeve from hem to armpit - as in the picture:
Using US 7 circular needles, pick up all the edge slipped stitches around the body opening. You will be repeating the pattern used on the sleeve hems, so we will need to increase the number of stitches. For the first row: \*K2, Kfb\* all the way around. Make sure you have an EVEN NUMBER of stitches by the end. NOTE: in order to create the diagonal patterm effect in the round, the first stitch of each psso row will be Kfb and you will use the last stitch from your all-knit row as your slipped stitch. In the round, knit 8 repeats of the following pattern (16 rows): Row 1: Kfb, pass last regular knit stitch over, \*Kfb, psso\* until end of row. Row 2: knit all stitches. After completing row 18 (an all knit row), BO VERY LOOSELY with a knit bind off. Cut yarn, weave in ends. Because the collar portion is tighter and will tend to curl, I recommend blocking it. While a hassle, blocking the collar will greatly help with fit and lay. You do not need to re-wash or re-block the whole piece (see picture)
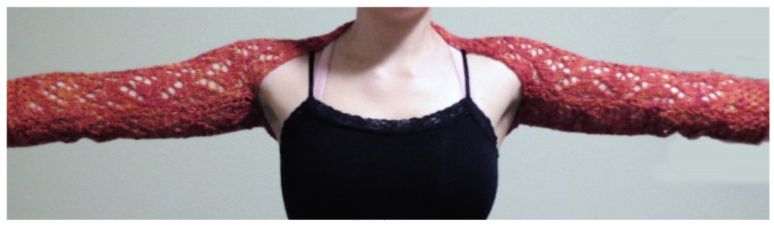
Your Ember Bolero is finished! Time to show it off..
Abbreviations:
BO - Bind off (knit bind off recommended) CO - cast on (knit cast on recommended) K - Knit Kfb - increase by knitting in front and back loop of same stitch K3tog - decrease by knitting 3 stitches together P - Purl PSSO - pass slipped stitch over the worked stitch(es) and off the needle P2tog - decrease by purling 2 stitches together RS - right side SI - Slip a stitch purl wise SK2togPsso - decrease by slipping one stitch, knitting next 2 stitches together, and passing the slipped stitch back over SSK - decrease by slip, slip, knit UAC - upper arm circumference WS - wrong side WYIF - with yarn in front, as if to purl YO - yarn over Thank you for your interest in this pattern! I'm dedicated to only selling the highest quality patterns that I can produce, so please - if you find any errors or are unable to follow any part of these instructions, you can contact me at lani.rae.86@gmail.com sincerely-Lani


