FOUR-STRANDED KNITTING:
It's Easier Than You Think by Deborah Tomasello
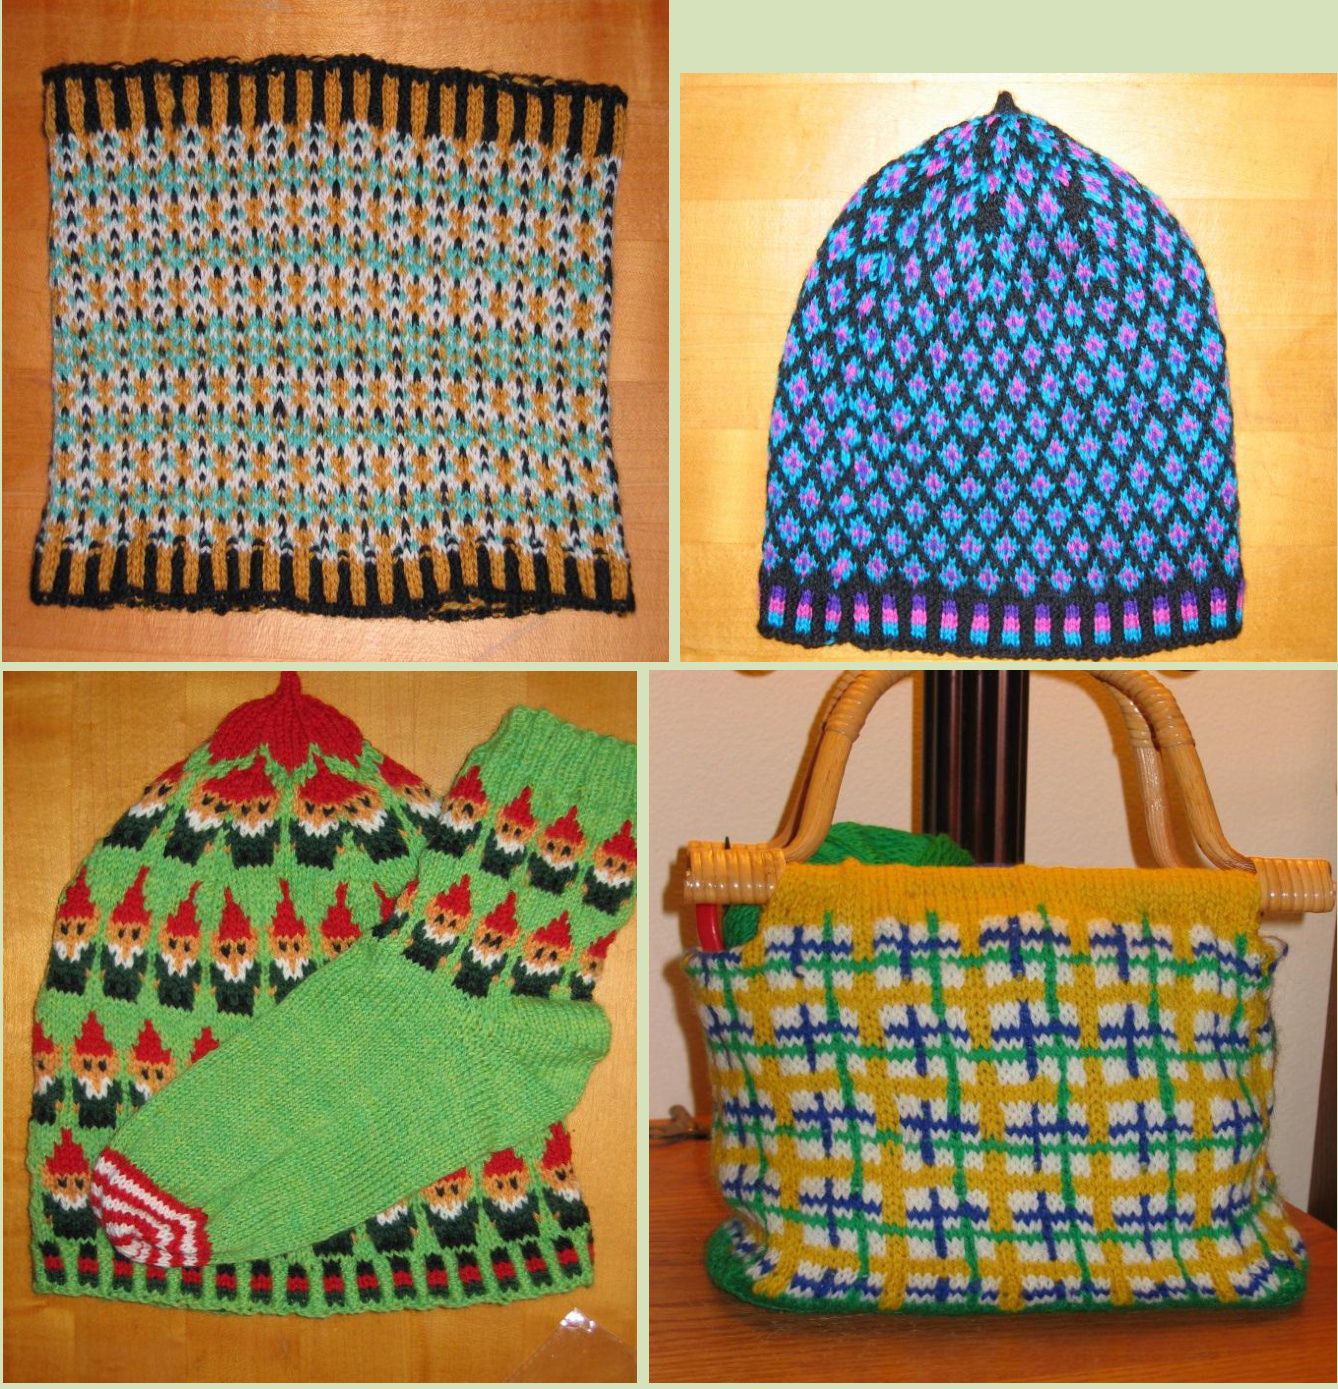
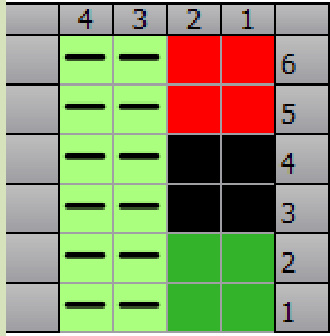
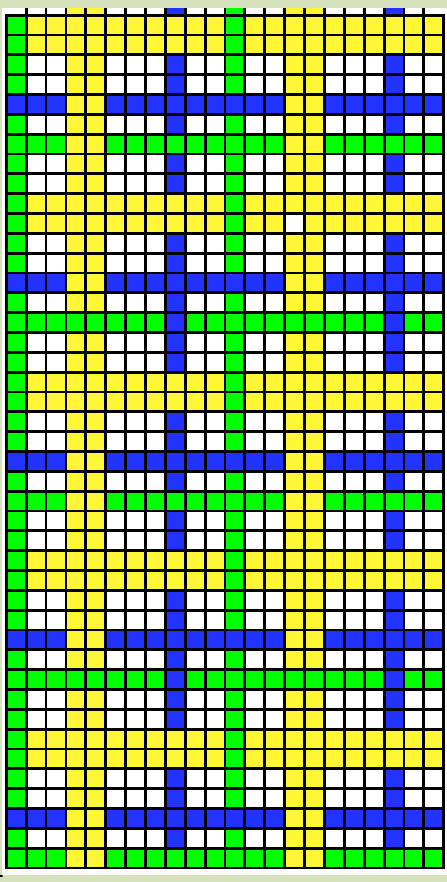
FOUR-STRANDED KNITTING: It's Easier Than You Think It's true for most subjects that the more you know, the more you realize you don't know. There's always more to learn. And, of course, the same holds true for knitting. Just when I think I've mastered some aspect of knitting, I bump into a new twist, a new technique. I am intrigued and I press on to master it, as well. So, I was chatting with Wendy Preston (the same Wendy who opened my eyes to the wonderful world of Fair Isle by showing me her Mardi Gras sweater), and she explained a nifty method for knitting with four strands at a time. Whoa! Carry four strands? NOOOO! Better! Way better! Pure genius. Trouble is, neither Wendy nor I can nail down a source for the method. We don't even have a name for it! I thought this method might be common knowledge to those who double-knit, but, given that I was born with only two hands and the same 24-hour days as all of you, double-knitting is a technique I have not attempted yet. And now, having researched double-knitting since I typed the last sentence, I can tell you it's an altogether different process, anyway. But I digress... So, I am going to name the method herein described. After much thought, I have come up with the very obvious, if not so clever, name for the process. Are you ready? Here it is: Four-Stranded Knitting. Are you blown away? By merely adding one more color into the mix, I have been able to come up with completely new and stunning designs. It's simply amazing what an additional strand of color can accomplish! Again, I have included five patterns in this publication so you can get a good taste for knitting with four strands: Stained Glass Hat, Santa's Elves: Christmas Stocking Cap, Santa's Elves: The Socks, It's a Plaid, Plaid Project Bag, and FourStranded Cowlette. You have learned that, when knitting with two strands, you must evenly carry the unused strand across the back as you knit with the other. Perhaps you have dared to knit with three strands. It employs the same method...you carry the two strands you aren't using. This can be awkward, however, especially with long pattern repeats. And it becomes downright cumbersome with four strands. But that doesn't make it impossible to knit with four strands. There is a way. Get ready! You're really going to love this! Look at the chart below.
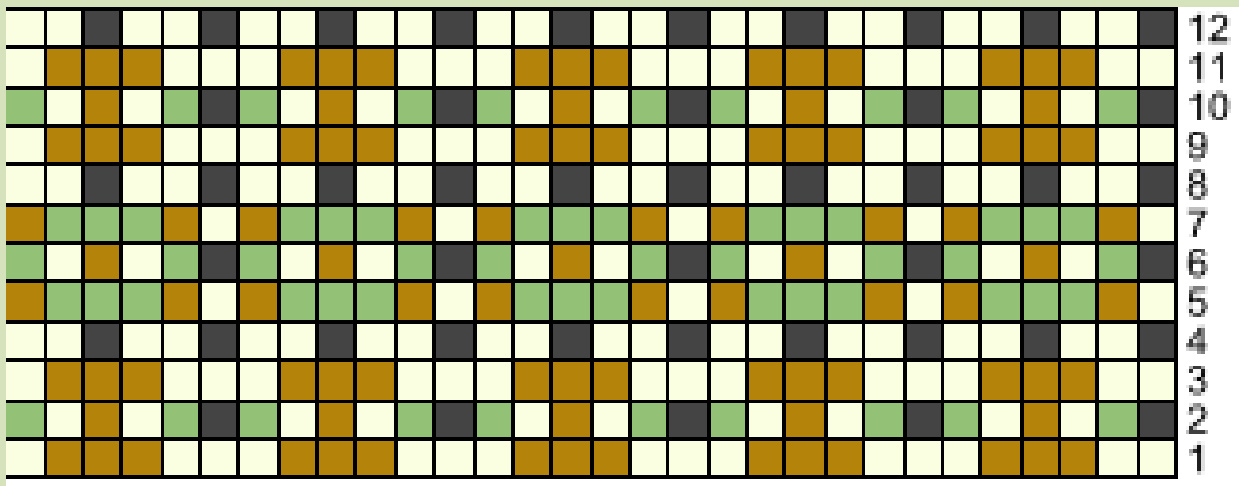
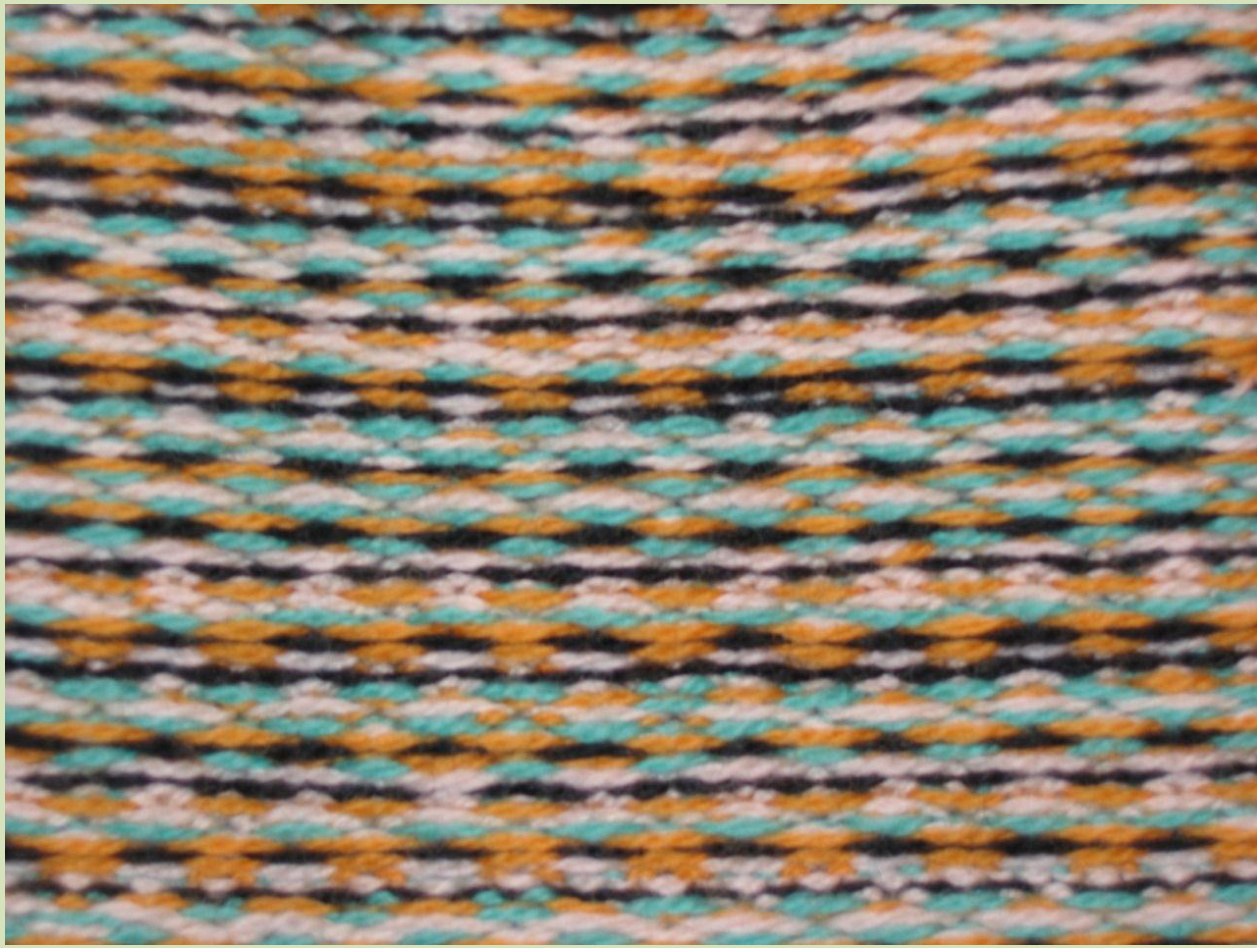
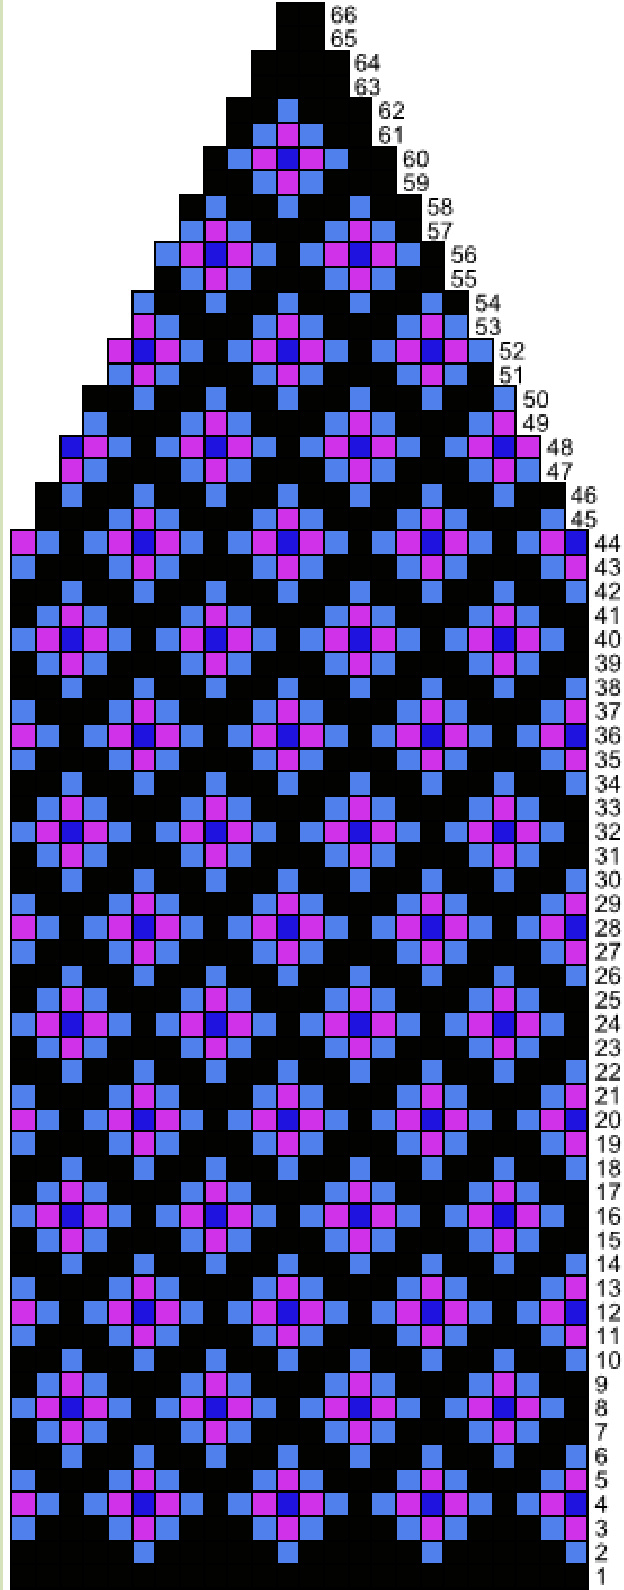
When knitting round 1, you stranded knit as normal; knit one color while you float the other in back. The same is true for rounds 3,4,5, 8, 9, 11, and 12. Although some of these rounds involve carrying three strands rather than the usual two, the repeats are close together, and as long as you keep your yarn sources from tangling, these rounds don't present a problem. Now notice rounds 2, 6 and 10. The chart shows four colors in each of these rounds. To keep from carrying all that yarn around, simply do the following: Knit the rounds once this way—knit the black st, slip the next 2 sts purlwise, knit the gold st, slip the next 2 sts purlwise and so forth all the way around. (It doesn't have to be the black and gold sts. You can choose any combination of two colors.) Now, KNIT THE SAME ROUND A SECOND TIME. This time, however, knit it this way—slip the black st you knitted the first time around, knit the green and cream sts you slipped last time around, slip the gold st previously knit and knit the cream and green sts previously slipped. Simple! And it looks so smooth on the back, too, as you can see in this picture.
Now is a good time to watch my short YouTube tutorial and see this great method as it's worked.
http://www.youtube.com/watch?v=EVczfDl18Oo
A REMINDER ABOUT TENSION Remember, when you are working with multiple strands, tension is the key element. You must keep your work loose and even. To avoid puckers on the front of the work, the floats you create when you carry yarn in the back must not be pulled too tightly. Also, it's the nature of stranded knitting to pull a piece in, so you might want to consider going up a needle size or concentrating on knitting looser than normal for you. The pulling in of the knitted fabric is even more evident, for me at least, when knitting with four strands. Until you get a good feel for your own knitting, it's a good idea to swatch. Now, if you're like me, “swatch" is a dirty word. I rarely take the time because I am so eager to dive right into the new project. But, I have paid the price at the other end for not having taken time to swatch and check my gauge. The fact is, you will knit differently with four strands than you will with one or two.
ADVANTAGES
So then, what are the advantages of knitting with four strands? For one thing, the designs and patterns you can derive from using four colors in a round as opposed to two are limitless. The use of four strands lends detail and design that cannot be achieved with only two strands. Also, the fabric knitted is thicker (obviously so because more yarn is used) and therefore warmer for winter hats, cowls, scarves. Likewise, the fabric in a project bag will be thicker and stronger. You will have less drape knitting with four strands than you will with two, and for this reason, I use it on the leg part only of my sock patterns. However, you could make the ultimate in warm wool socks or slippers by knitting them in a four-stranded design pattern! You would simply need to add more stitches and perhaps increase needle size to achieve a proper fit. Experiment. Play around with the idea! And now, as promised, I give you my first five four-stranded patterns!
STAINED GLASS HAT by Deborah Tomasello
(FOUR-STRANDEDKNITTINGPATTERN)
www.PatchworksByDebi.com Size: Adult 21"- 23" Materials: 1 ball each of KnitPicks Palette: Black, Cosmopolitan, Cyan and French Lavender. One 16" #3 circular needle, four #3 DPNs (or size needed to obtain gauge), stitch marker, and tapestry needle Gauge: 32 stitches and 32 rounds = 4" using #3 needles. Abbreviations: K2TOG = Knit two stitches together. SSK = Slip one stitch, then slip the next. Insert left needle into the front loops of the slipped stitches and knit them together from this position. Instructions: With circular needle, CO 136 sts using Black. Join to work in round, placing stitch marker and being careful not to twist stitches. Knit six rounds corrugated rib (see CHART A) using Cyan, Cosmopolitan and French Lavender for knit sts and Black for purl sts. Increase round: (Round 1 of CHART B) Using Black, inc evenly to 168 sts (knit 4 sts, knit 4 make 1, around until last 4 sts, knit last 4 sts.) Follow CHART B (7 repeats per round) for 66 rounds, decreasing as indicated and switching to DPNs when necessary. (Each dec round has 2 decreases next to each other; k2tog for first dec, and ssk for second each time.) After round 66, with 14 sts on the needles, k2tog around. 7 sts remain. Knit last seven sts for five rounds; cut yarn leaving a tail several inches long. Move all sts from needles to tapestry needle, and pull tightly. Secure from the inside. Finishing: Tie and weave in or trim all color change ends. Wash and block to fit.
CHART A
Use Cyan, Cosmopolitan and French Lavender for knit sts and Black for purl sts.
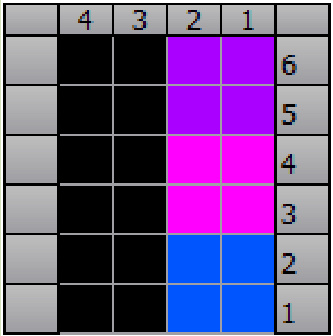
CHART B
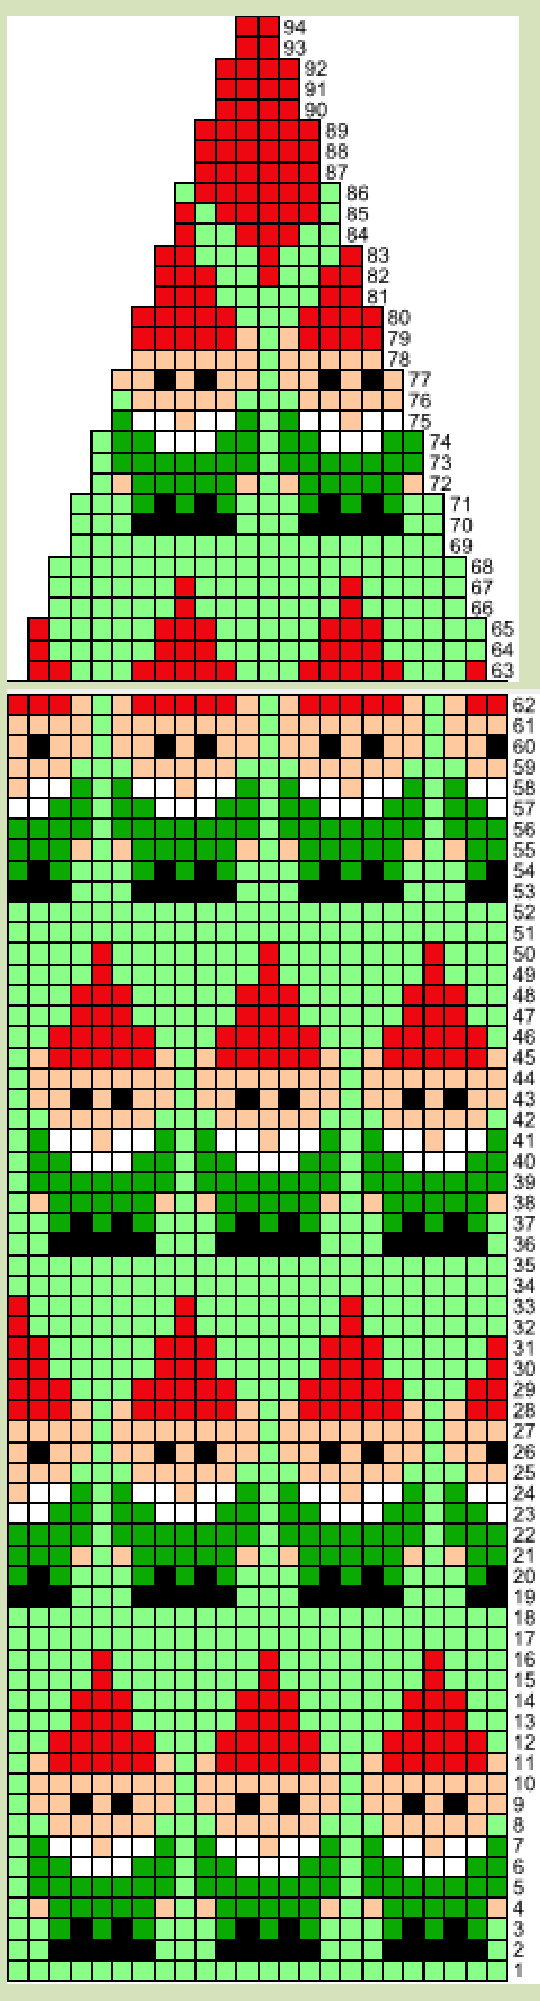
SANTA'SELVES:STOCKINGCAP
by Deborah Tomasello
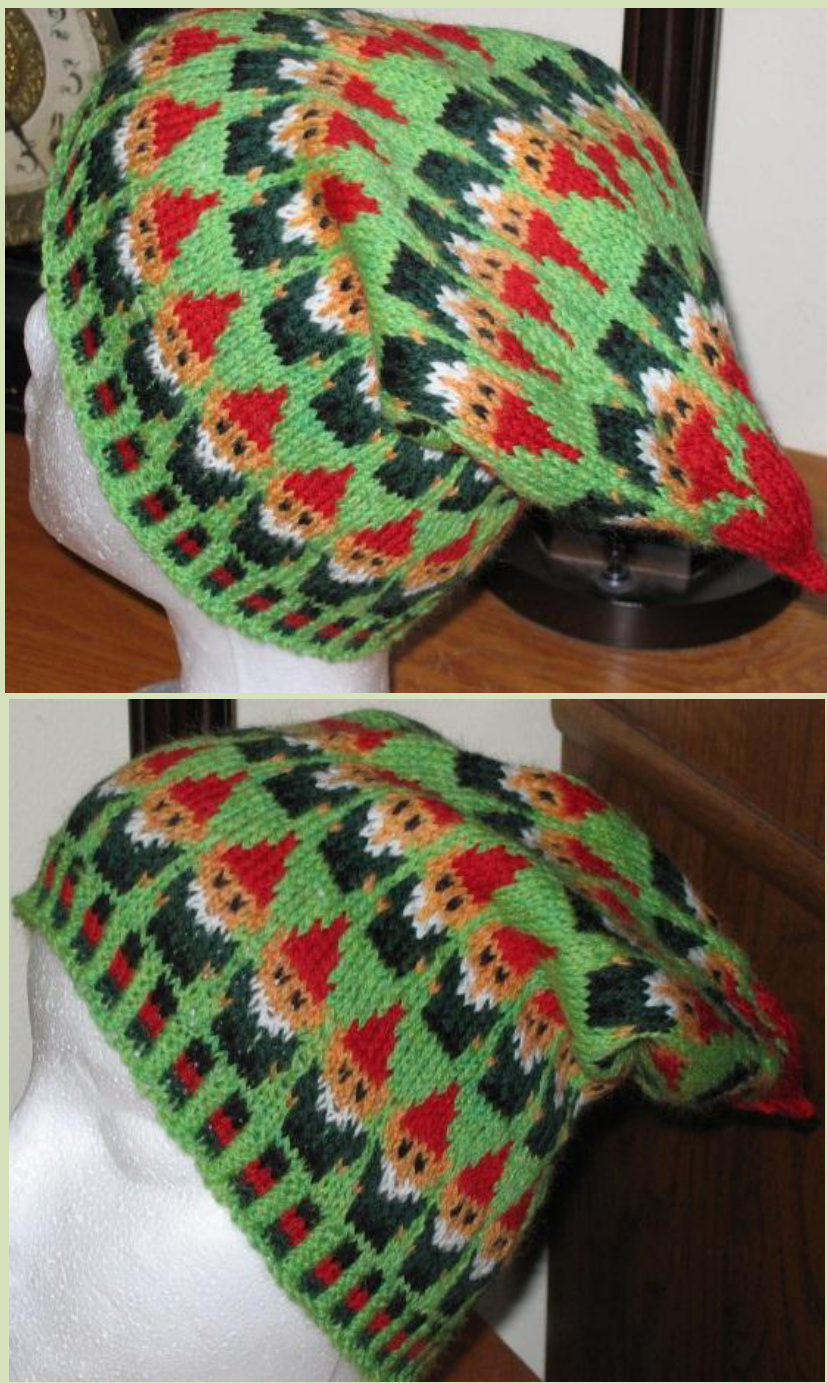
www.PatchworksByDebi.com Child 18" - 20" Materials: 1 ball each of KnitPicks Palette: Limeade Heather, Aurora Heather, Golden Heather, Serrano, White and Black. (Most colors will take less than a ball for one hat) One 16" #3 circular needle, four #3 DPNs (or size needed to obtain gauge), stitch marker, and tapestry needle Gauge: 32 stitches and 32 rounds = 4" using #3 needles. Abbreviations: K2TOG = Knit two stitches together. SSK = Slip one stitch, then slip the next. Insert left needle into the front loops of the slipped stitches and knit them together from this position. (Cover photo shows child's hat.) Instructions: With circular needle, CO 136 sts using Limeade Heather. Join to work in round, placing stitch marker and being careful not to twist stitches. Knit eight rounds corrugated rib (see CHART A) using Aurora Heather, Serrano and Black for knit sts. and Limeade Heather for purl sts. Increase round: (Round 1 of CHART B) Using Limeade Heather, inc evenly to 168 sts (knit 4 sts, knit 4 make 1 around until last 4 sts, knit last 4 sts.) Follow CHART B. Knit rounds 19-35. Then start with round 2 again (7 repeats per round) for 94 rounds, decreasing as indicated and switching to DPNs when necessary. (Each dec round has two decreases next to each other; k2tog for first dec, and ssk for second each time.) After round 94, with 14 sts on the needles, k2tog around. 7 sts. remain. Knit last seven sts for 5 rounds; cut yarn leaving a tail several inches long. Move all sts from needles to tapestry needle, and pull tightly. Secure from the inside. Finishing: Tie and weave in or trim all color change ends. Wash and block to fit.
CHILD
Instructions: With circular needle, CO 136 sts using Limeade Heather. Join to work in round, placing stitch marker and being careful not to twist stitches. Knit six rounds corrugated rib (see CHART C) using Aurora Heather, Serrano and Black for knit sts and Limeade Heather for purl sts. Increase round (round 1 of CHART B): Using Limeade Heather, inc 8 st around evenly to total 144 sts. Follow CHART B (6 repeats per round) for 94 rounds, decreasing as indicated and switching to DPNs when necessary. (Each dec round has two decreases next to each other; k2tog for first dec, and ssk for second each time.) After round 94, with 12 sts on the needles, k2tog around. 6 sts remain. Knit last six sts for 5 rounds; cut yarn leaving a tail several inches long. Move all sts from needles to tapestry needle, and pull tightly. Secure from the inside. Finishing: Tie and weave in or trim all color change ends. Wash and block to fit.
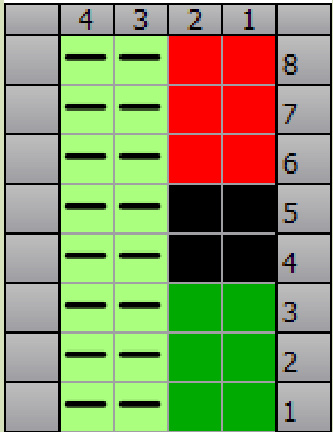
CHART A
Use Aurora Heather, Serrano and Black for knit sts and Limeade Heather for purl sts. Dash in st means purl.
CHART
Use Aurora Heather, Serrano and Black for knit sts and Limeade Heather for purl sts. Dash in st means purl.
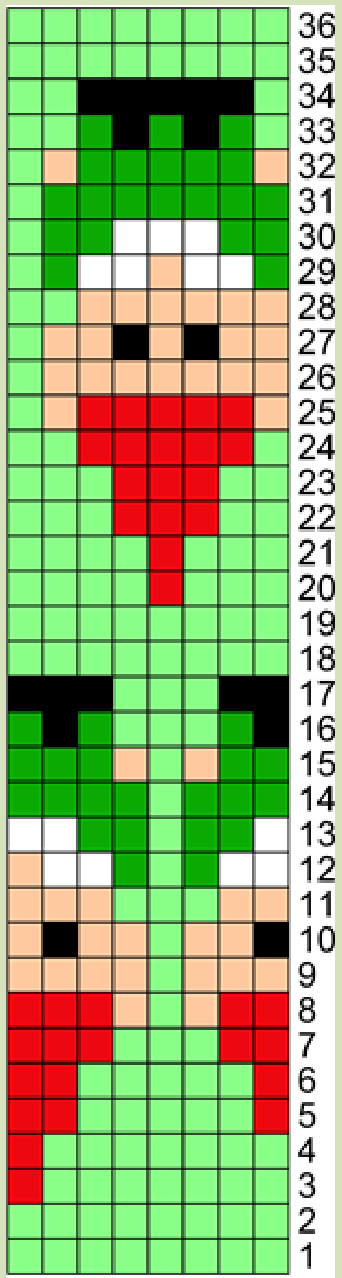
SANTA'S ELVES: THE SOCKS
by Deborah Tomasello www.PatchworksByDebi.com Ig Cat Bordhi's innovative, new Sweet Tomato Heel!

Size: Woman's Medium-Large Child's Medium (age 5-7) Size: Woman's Medium-Large Materials: 1 ball each of KnitPicks Palette: Limeade Heather, Aurora Heather, Golden Heather, Serrano, White and Black.) One each #2 and #3 long circular needle, two circular needles each size, or 5 DPNs, size#2 and #3 or whatever size gives you the correct gauge working in the round; two stitch markers; tapestry needle Gauge: 32 stitches and 32 rounds = 4" Abbreviations: K2TOG= knit 2 stitches together SSK= slip one stitch, then slip the next. Insert left needle into the front loops of the slipped stitches and knit them together from this position. Instructions: Socks are worked top-down
LEG Woman's Sock
With smaller circular needle or DPNs, CO 64 sts using Limeade Heather (16 sts on each of 4 DPNs). Join to work in round, placing marker and being careful not to twist stitches. Knit 14 rounds 2x2 rib. Switch to larger needle. Follow CHART A once through, 8 sts per repeat, 8 repeats per round (2 repeats per needle) for 36 rounds. Note that rounds 12 and 29 are fourstranded rounds. Rearrange sts on 36th round as you go, setting up for the heel as follows: knit 16 sts on Needle 1 plus 5 more from Needle 2. This gives you 21 sts on the Needle 1. Now, on next Needle 2, knit 11 stitches. On Needle 3, knit 11 stitches and move the last 5 sts to Needle 4. Knit those 5 plus the 16 already on Needle 4 for a total of 21 sts on Needle 4. Needle 1 has 21 sts Needle 2 has 11 sts Needle 3 has 11 sts Needle 4 has 21 sts NOTE: Remember to create floats every 3 or 4 sts on socks so toes don't get caught when putting on the sock!
HEEL
No more gussets! This pattern features Cat Bordhi's ingenious Sweet Tomato Heel (STH). Cat Bordhi developed her STH over many months, working closely with over a hundred test knitters of all skill levels. During this time she distilled her illustrations and explanations again and again, until her test knitters and tech editor agreed the instructions were as clear and perfect as possible. In order to be sure that her work is not misrepresented, Cat asks that designers who wish to use her heel in their patterns send their readers directly to her free videos as well as to purchasing links for her eBook, Cat's Sweet Tomato Heel Socks (\$20), and to the eBook's individual patterns (\$6 each). She is encouraged that many knitters have been able to work from the free videos alone; if not, the eBook or individual patterns will give you the detailed instructions, illustrations, and explanations you need. Links: (Copy and paste into your web browser.) Video: Sweet Tomato Heel: http://tinyurl.com/4x4xmp2 Video: Padded Sweet Tomato Heel: http://tinyurl.com/3dayxlt To purchase eBook: http://catbordhi.com/books/cats-sweet-tomato-heel socks-3/ To purchase individual patterns: http://catbordhi.com/category/patterns/socks/
SOCK
Once you understand Cat Bordhi's STH, proceed with sock. Following Cat Bordhi's heel instructions, and switching to small needle again, knit heel with Limeade Heather. Work three wedges on the 42 sts. Work wedges leaving 8 stitch pairs on each side (10 heel sts left unpaired between pairs). Work across instep rounds with Limeade Heather.
FOOT Woman's Sock
Working all sts on smaller circular needle or split evenly on DPNs as with leg, 16 sts on each of the 4 DPNs. Knit using Limeade Heather for 7", or desired foot length (minus 1.5 inches for toe). If you want a little longer on the foot, repeat a few rounds more of Limeade Heather.
TOE Woman's Sock
Alternating between Serrano and White (2 rounds of each), decrease for toe as follows: Needle 1: K to last 3 sts of Needle 1, K2TOG, K1 Needle 3: K to last 3 sts, K2TOG, K1 Needle 4: K1, SSK knit to last 3 sts of Needle 1 Repeat this until there are 8 sts left on each needle. Place sts from Needles 4 and 1 onto one needle (16sts). Place sts from Needles 2 and 3 onto another needle (16 sts). Graft the remaining stitches together using Kitchener st, and weave in all ends. Finishing: Tie and weave in or trim all color change ends at beginning and ends of rounds. Wash and block to fit. Size: Child's Medium (5-7 yrs) Materials: 1 ball each of KnitPicks Palette: Limeade Heather, Aurora Heather, Golden Heather, Serrano, White and Black.) One each #2 and #3 long circular needle, two circular needles each size, or 5 DPNs, size#2 and #3 or whatever size gives you the correct gauge working in the round; two stitch markers; tapestry needle Gauge: 34 stitches and 34 rounds = 4" NOTE: Remember that stranded knitting yields a denser fabric that fits more snugly. If you prefer a looser sock, consider going up one needle size. As written, the leg circumference of the child's sock is about 5"- 6". Abbreviations: K2TOG= knit 2 stitches together SSK= slip one stitch, then slip the next. Insert left needle into the front loops of the slipped stitches and knit them together from this position. Instructions: Socks are worked top-down
LEG Child's Sock
With smaller circular needle or 3 DPNs, CO 48 sts using Limeade Heather (16 sts on each DPN). Join to work in round, placing marker and being careful not to twist stitches. Knit eight rounds 2x2 rib. Switch to larger needles. Follow CHART A (6 repeats per round) for 36 rounds. Note that rounds 12 and 29 are four-stranded rounds. Set up for heel by knitting round 36 as follows. You will be knitting the heel on Needles 1 and 3, Needle 2 will be holding the 16 instep sts, and you will only knit across them between wedges. NOTE: Remember to create floats every 3 or 4 sts. on socks so toes don't get caught when putting on the sock!
HEEL
No more gussets! This pattern features Cat Bordhi's ingenious Sweet Tomato Heel (STH). See Cat Bordhi's STH instructions above. Once you understand Cat Bordhi's STH, proceed with sock. Following Cat Bordhi's heel instructions, and switching to small needle again, knit heel with Limeade Heather. Work three wedges on the 32 sts. Work wedges leaving 6 stitch pairs on each side (8 heel sts left unpaired between pairs). Work across instep rounds between wedges using LimeadeHeather.
FOOT: Child's Sock
Working all sts on smaller circular needle or split evenly on DPNs as with leg, 16 sts per needle, knit foot in Limeade Heather for desired foot length minus 1.5 inches for toe.
TOE Child's Sock
Alternating between Serrano and White (2 rounds of each), decrease for toe as follows: Move sts to 4 DPNS, 12 sts per needle Needle 1: K to last 3 sts of Neelde 1, K2TOG, K1 Needle 2: K 1, SSK, knit until the last 3 stitches of Needle 3 Needle 3: K to last 3 sts, K2TOG, K1 Needle 4: K1, SSK knit to last 3 sts of Needle 1 Repeat this until there are 5 sts left on each needle. Place sts from Needles 4 and 1 onto one needle (10 sts). Place sts from Needles 2 and 3 onto another needle (10 sts). Graft the remaining stitches together using Kitchener st, and weave in all ends. Finishing: Tie and weave in or trim all color change ends at beginning and ends of rounds. Wash and block to fit.
CHART A
It's a Plaid, Plaid Project Bag!
by Deborah Tomasello
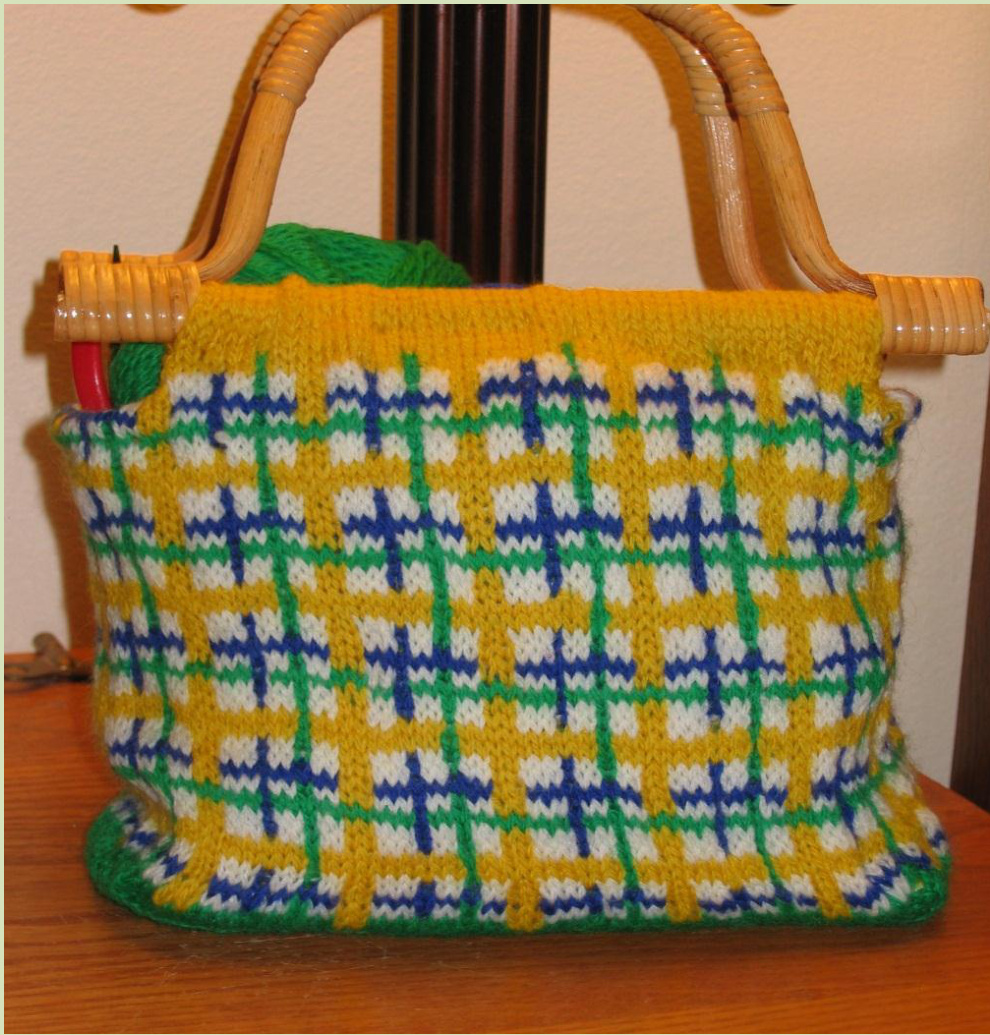
http://www.ravelry.com/designers/deborah-tomasello FEATURES: Stranded-knit wool bag with fabric lining. End pocket for needles and extras. Key ring loop. Sturdy bottom insert. 7" deep by 7.5" long and 3" wide. Wooden handles.
PLEASE READ THROUGH ALL INSTRUCTIONS CAREFULLY BEFORESTARTING
MATERIALS: 1 ball each of KnitPicks Palette: White, Macaw, Canary. and Celestial. One 16" #3 circular needle, four #3 DPNs, #3 straight needles, (or size needed to obtain gauge), stitch marker, and tapestry needle, % yard lining fabric, thread, 1 pair rectangular handbag handles (8-1/8" X 4"), sturdy cardboard, glue stick, key ring or key loop. Gauge: 32 stitches and 32 rounds = 4" using #3 needle Instructions: With straight needles, CO 60 sts using Macaw. Knit garter st for 24 rows. Then, using DPNs, pick up 24 sts on short side of garter piece, with another DPN, pick up 60 sts on other long side and, with yet another DPN, pick up 24 sts on the other short side for a total of 168 sts. Knit using DPNs all 168 sts in pattern (See CHART A) for several rounds and then switch to a circ. needle. Add marker and join, taking care not to twist sts. Knit 59 pattern rounds. \*\* work stockinette back and forth on 60 sts as indicated for 14 rows. BO, leaving a long piece of yarn with which to hand sew later. Attach yarn and work stockinette back and forth on next (end) 24sts for 4 rows. BO.\*\* Repeat between \*\* once more. Tie and trim all color change ends. Wet block with damp cloth and steam iron to smooth and flatten stockinette edges. Proceed to Lining Instructions.
LAYOUT
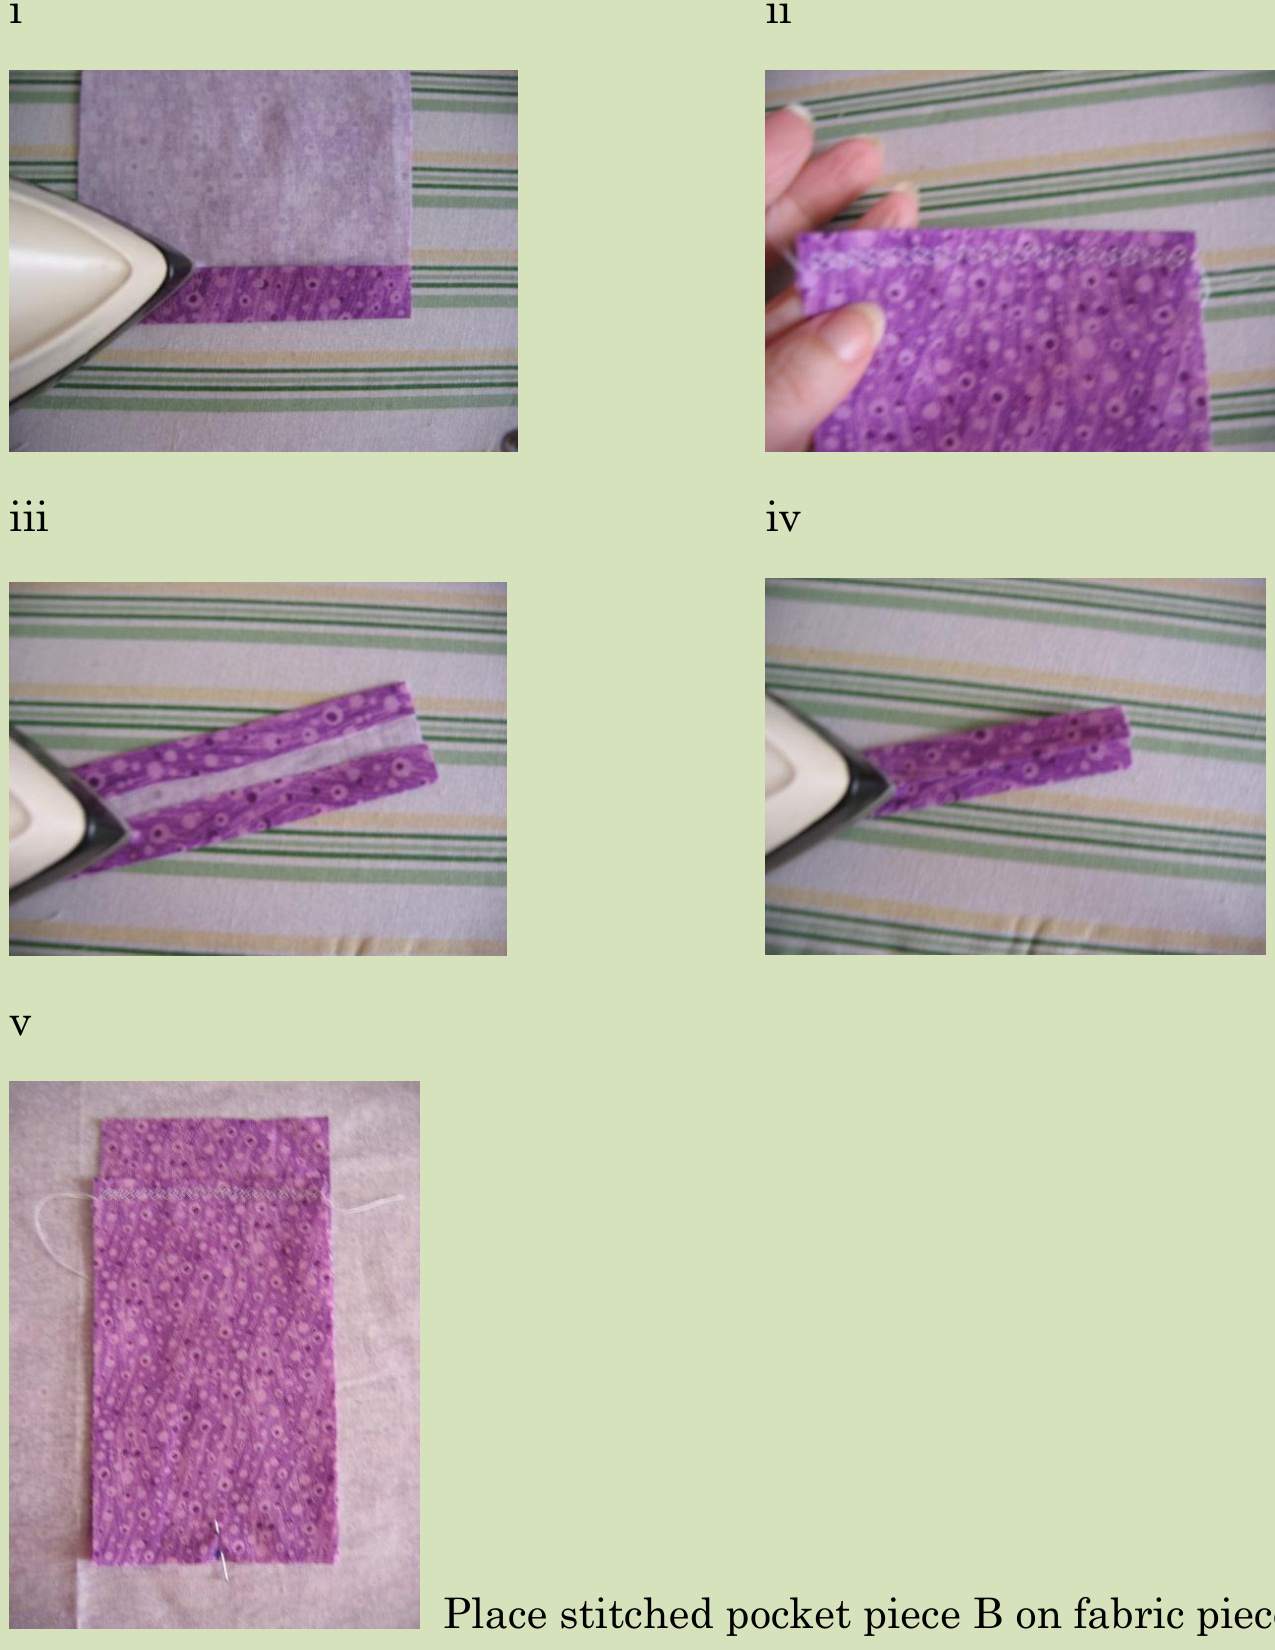
LINING INSTRUCTIONS: Cut one fabric piece (A) 8.5 inches wide (allowing for 1%-inch seams) and 21 inches long This will become the lining for the bottom and wide sides of the bag. Cut three fabric pieces (B) 4x7 inches. On one piece B, turn top edge under and turn under again. Press and stitch across turned edge. This will become the end pocket. See photos i and ii. The other two B pieces will become the short end sides of the lining. Cut one fabric pieces (C) 3x6 inches. Fold in outer edges of long side toward center, then fold in half and press. Stitch in place. See photos iii and iv. This will become the key ring loop.
Cut one piece fabric (D) to cover cardboard, cut to fit in the bottom of the bag. With glue stick, glue fabric to cardboard and place in bottom of bag. See photo v.
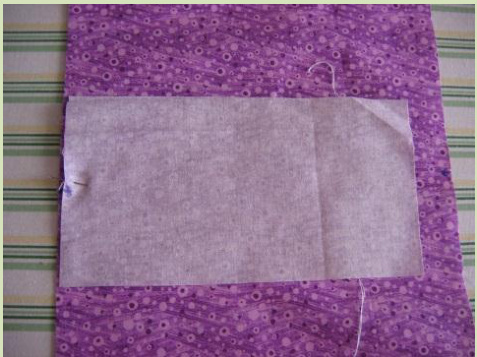
Pin pieces B and B together in center of fabric piece A as shown. Stitch only across the part where all three pieces join at bottom of B pieces. Turn pocket and end piece 90° and stitch up side. Turn so other side edges meet and stitch together to form lining shape. Repeat with other side, pinning stitched key loop (D) before stitching. g in knitted bag. Place fabric-covered cardboard in botton Finishing: Place handle in position, wrap lined knitted piece around handle and hem stitch in place using long yarn left over from BO. Repeat on other side. Turn end edges over lining and hem stitch with long yarn piece left over from BO.
Four-Stranded Cowlette.
by Deborah Tomasello www.PatchworksByDebi.com Size: Adult Medium
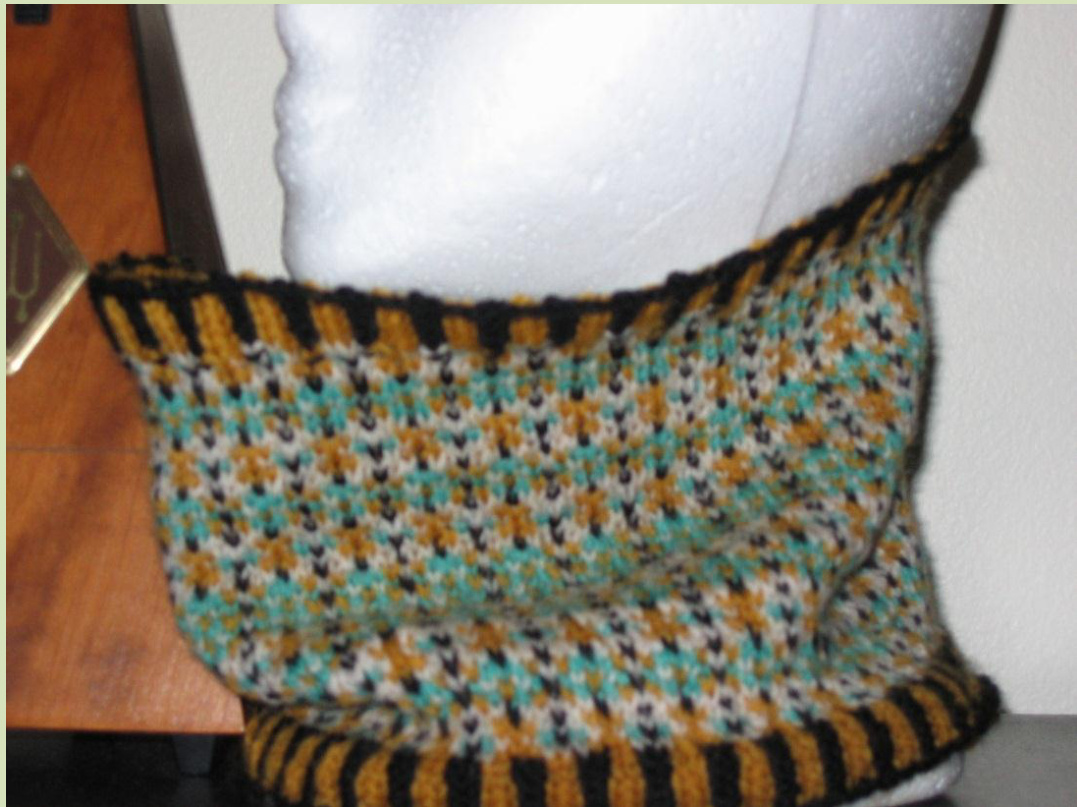
Materials: 1 ball each of KnitPicks Palette: Oyster Heather, Black, Caribbean, and Turmeric. One 16" #3 circular needle, four #3 DPNs (or size needed to obtain gauge), stitch marker, and tapestry needle Gauge: 32 stitches and 32 rounds = 4" using #3 needles. NOTE: Remember that stranded knitting draws in the work. You might want to add sts to the CO and/or increase one needle size for looser fit. By adding sts in multiples of 6, you can make the cowlette as long as you'd like! Instructions: With circular needle, CO 168 sts (or more, in multiples of 6, for longer cowlette) using Black. Join to work in round, placing stitch marker and being careful not to twist stitches. Knit six rounds corrugated rib (see CHART A) using Turmeric for knit sts and Black for purl sts. Follow CHART B (6 st repeat; 28 repeats per 168 st round) for 45 rounds (or more if knittinga taller cowlette). Then repeat ribbing according to CHART A. Bind off. Finishing: Tie and weave in or trim all color change ends. Wash and block to fit.
CHART A
Use Turmeric for knit sts and Black for purl sts.
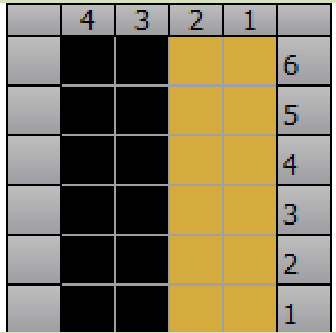
CHART B
Deborah Tomasello's contact information: E-mail: CoeDeborah@aol.com Ravelry Group: PatchworksByDebi Ravelry: PatchworksByDebi My Original Designs Deborah Tomasello Web Site: www.PatchworksByDebi.com


