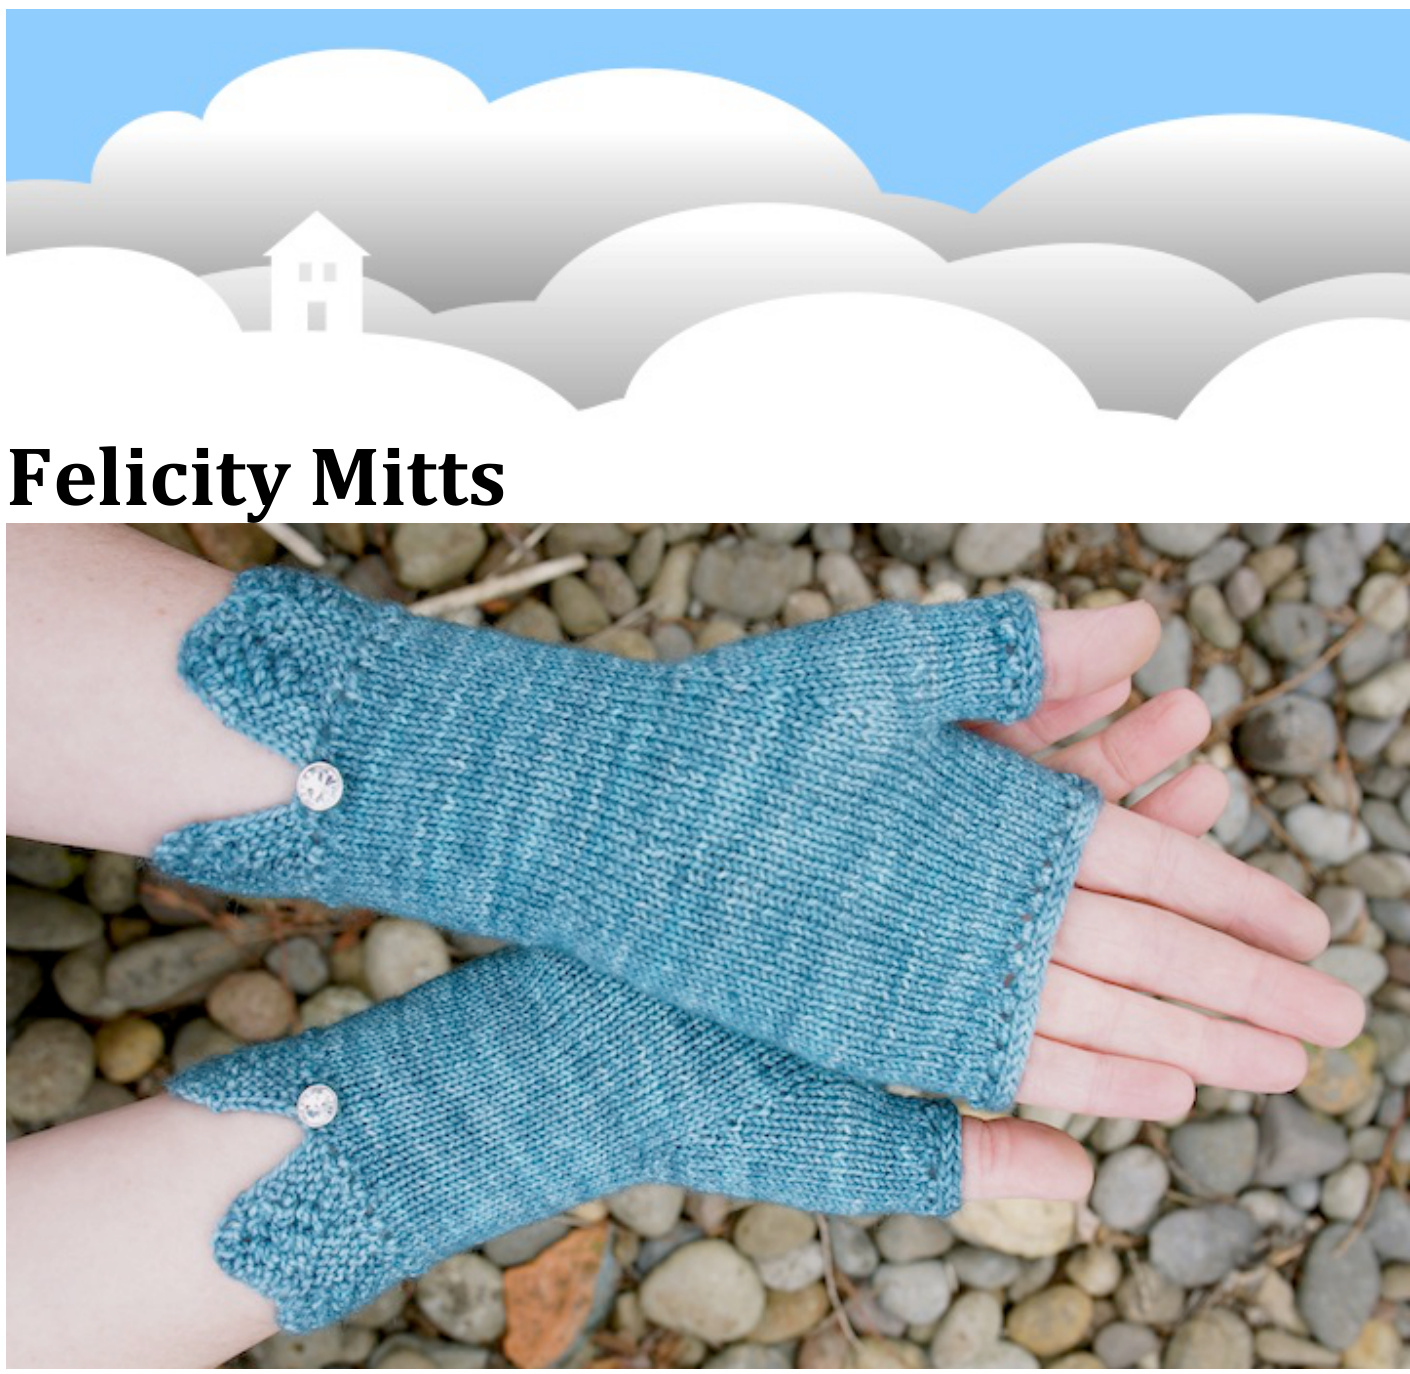
tts made with Madelinetosh Sock, colorway “Happ These elegant and close-fitting fingerless gloves feature a mid-length lace-trimmed cuff, eyelet detailing, and I-cord edging at palm and thumb. While designated as "left" and "right" in the pattern, these mitts are versatile and can be worn on either hand. Add a sparkling button or I-cord laces for a bit of flair at either your inner or outer wrist. The lace trim is knit flat then the mitt is continued in the round on picked up stitches. The buttons are decorative, so there are no button holes. Just pull them on and wear with happiness. Required skills include knitting, purling, increasing, decreasing, and picking up stitches. Other techniques used are knitted or cable cast on, I-cord bind off, and grafting stitches. Sizing for these mitts is achieved through gauge.
Materials:
Fingering weight yarn: 200-250 yards Set of double pointed needles (see chart below for size) Stitchmarkers Small stitch holder or waste yarn. Locking stitch markers or safety pins are an alternative. Optional embellishments: 2 buttons, 4 beads, and/or 10 yards of a contrasting color for I-cord laces.
| Size | Measurement | NeedleSize | Gauge | Measurepalmcircumference |
| Small | 6 to 7" circ. | US 1.5(2.5mm) | 34 sts/ 46rows = 4" | |
| Medium | 7 to 8"circ. | US 2 (2.75mm) | 33sts/47rows=4" | |
| Large | 8 to9"circ. | US2.5(3.00mm) | 32sts/49rows=4" |
Abbreviations:
K - knit K2tog - knit two together K2tog tbl - knit two together through back of the loops M1L -make one left M1R - make one right P - purl sl - slip stitch from left to right needle st(s) - stitch(es) YO - yarn over Rnd - round RS - right side of fabric WS - wrong side of fabric PM - place marker SM - slip marker DPN - double pointed needle [Brackets] indicate stitch sequences to be repeated and are followed by the number of times to repeat the sequence
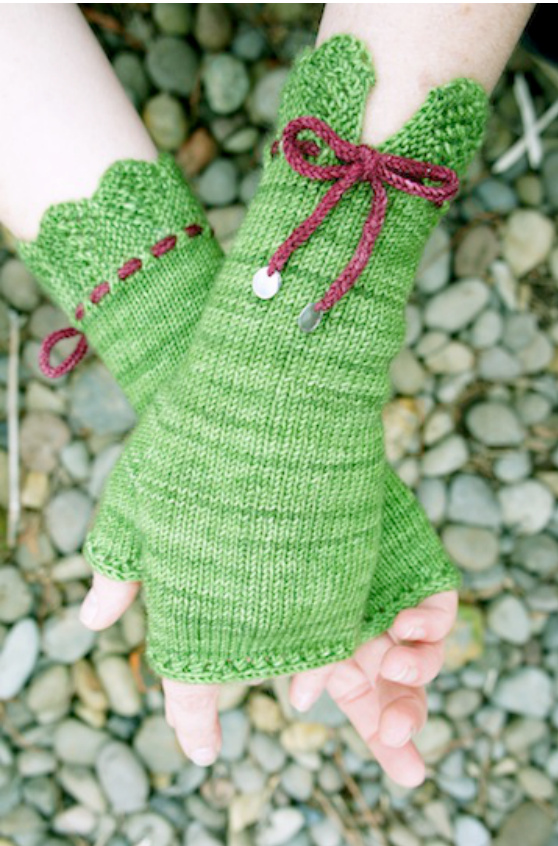
MittswithI-cord laces andshell paillettes.Made in The Plucky Knitter Primo Fingering, colorway: "Oz"and"Bleedin'ArmadilloGroom'sCake"
PATTERN
Lace Trim
(Worked flat on two needles.) Cast on 8 sts Row 1 (WS): sl1, K5, YO, K2 (9 sts) Row 2 (RS): YO, K2tog, K7 Row 3: sl1, K4, Y0, K2tog, Y0, K2 (10 sts) Row 4: Y0, K2t0g, K8 Row 5: sl1, K3, [YO, K2tog] twice, YO, K2 (11 sts) Row 6: YO, K2t0g, K9 Row 7: sl1, K2, [YO, K2tog] three times, YO, K2 (12 sts) Row 8: Y0, K2tog, K10 Row 9: sl1, K2, K2tog, [YO, K2tog] three times, K1 (11 sts) Row 10: Y0, K2t0g, K9 Row 11: sl1, K3, K2tog, [Y0, K2tog] twice, K1 (10 sts) Row 12: Y0, K2tog, K8 Row 13: sl1, K4, K2tog, Y0, K2tog, K1 (9 sts) Row 14: Y0, K2tog, K7 Row 15: sl1, K5, K2tog, K1 (8 sts) Row 16: Knit Repeat rows 1-16 four times Repeat rows 1-15 one time Bind off knit-wise leaving one stitch on needle
Cuff
Starting with the one remaining stitch from lace trim on your right-hand needle, pick up and knit 47 stitches on the long straight edge of trim piece. You will be working with right side of trim piece facing you. (48 sts total) Divide stitches evenly on DPNs and join in the round, placing marker at beginning of the round. Rnd 1: [YO, K2tog] repeat to end of round Rnd 2-34: knit all rounds Continue to section for thumb gusset making one mitt for the left hand and one for the right. Thumb Gusset for LEFT Mitt Rnd 35: K11, PM, M1L, K1, M1R, PM, knit to end of round (50 sts) Rnd 36: knit Rnd 37: K11, SM, M1L, K3, M1R, SM, knit to end of round (52 sts) Rnd 38: knit Rnd 39: K11, SM, M1L, K5, M1R, SM, knit to end of round (54 sts) Rnd 40: knit Rnd 41: K11, SM, M1L, K7, M1R, SM, knit to end of round (56 sts) Rnd 42-43: knit Rnd 44: K11, SM, M1L, K9, M1R, SM, knit to end of round (58 sts) Rnd 45-46: knit Rnd 47: K11, SM, M1L, K11, M1R, SM, knit to end of round (60 sts) Rnd 48-49: knit Rnd 50: K11, SM, M1L, K13, M1R, SM, knit to end of round (62 sts) Rnd 51-52: knit Rnd 53: K11, SM, M1L, K15, M1R, SM, knit to end of round (64 sts) Rnd 54-55: knit Rnd 56: K11, SM, M1L, K17, M1R, SM, knit to end of round (66 sts) Rnd 57-60: knit Rnd 61: K11, remove stitch markers and place 19 stitches of thumb gusset on small stitch holder or waste yarn. Cast on 5 sts on right hand needle. Join with stitches from far side of thumb gusset and knit to end of round (52 sts) Continue to section for palm. Thumb Gusset for RIGHT Mitt Rnd 35: K36, PM, M1L, K1, M1R, PM, knit to end OBS! For varje gang det vands mitt pa st, stramas traden at lite extra innan det fortsatts sa att Rnd 36: knit Rnd 37: K36, SM, M1L, K3, M1R, SM, knit t0 end of round (52 sts) Rnd 38: knit Rnd 39: K36, SM, M1L, K5, M1R, SM, knit to end of round (54 sts) Rnd 40: knit Rnd 41: K36, SM, M1L, K7, M1R, SM, knit to end Fortsatt som tidigare fram och tillbaka over dessa m tills det har stickats ca 2 cm efter de Rnd 42-43: knit Rnd 44: K36, SM, M1L, K9, M1R, SM, knit to end Sticka sedan rata fram och tillbaka pa st (varv 1 = ratsidan), men pa vart 4:e varv (dvs pa Rnd 47: K36, SM, M1L, K11, M1R, SM, knit to end of round (60 sts) Rnd 48-49: knit Rnd 50: K36, SM, M1L, K13, M1R, SM, knit to end of round (62 sts) Rnd 51-52: knit Rnd 53: K36, SM, M1L, K15, M1R, SM, knit to end of round (64 sts) vartannat varv fran ratsidan) vands det fore markoren sa att det stickas farre varv over tan Rnd 56: K36, SM, M1L, K17, M1R, SM, knit to end of round (66 sts) Rnd 61: K36, remove stitch markers and place 19 stitches of thumb gusset on small stitch holder or waste yarn. Cast on 5 sts on right hand needle. Join with stitches from far side of thumb gusset and knit to end of round (52 sts) Continue to section for palm
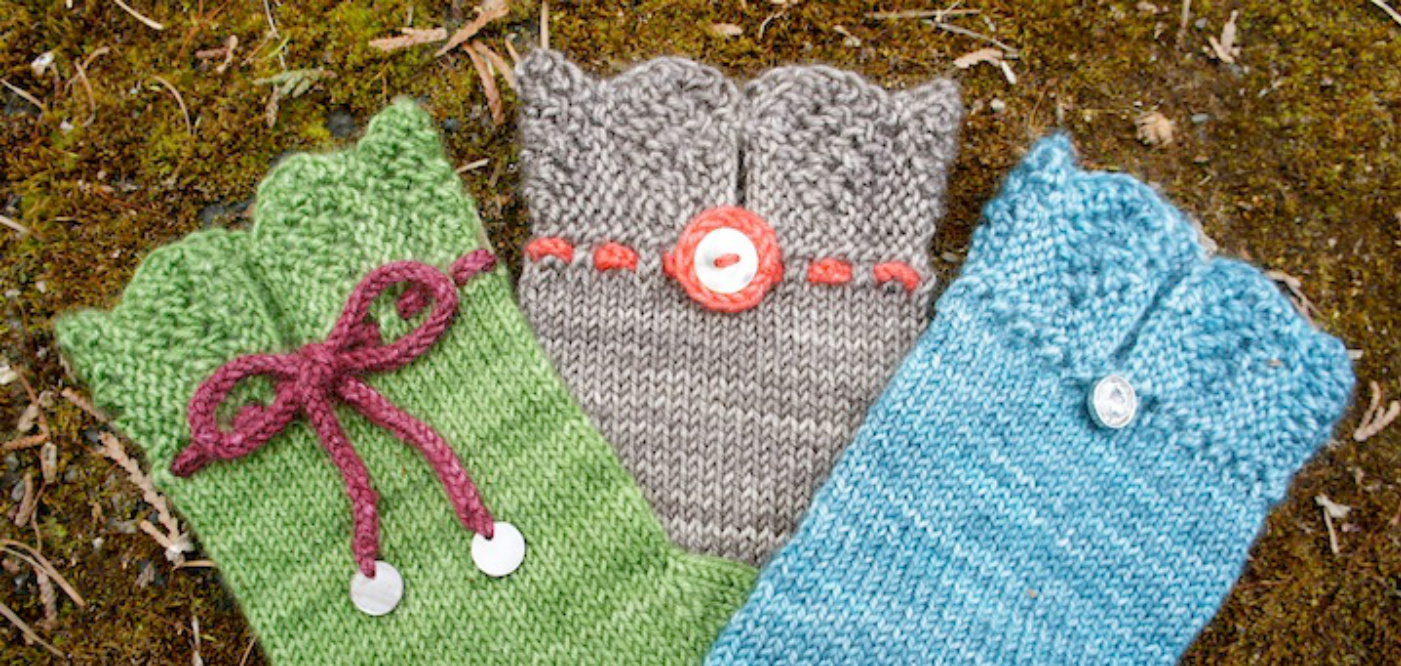
Embellishment ideas: I-cord laces trimmed with shell paillettes or beads (left), I-cord trim with crocheted diskto frame a beautiful shellbutton (center), or a rhinestone button (right).
Palm Rnd 62-85: knit all rounds Rnd 86: [Y0, K2tog] repeat to end of round Rnd 87: knit Rnd 88: I-cord bind off (see instructions, below)
Thumb
Set up: Place 19 sts from small stitch holder or waste yarn back on DPNs, dividing the stitches evenly between two needles. Using a third DPN, join working yarn and pick up and knit 5 sts from cast on edge. Knit to one stitch from end of round. Shift last stitch to third DPN knitwise and mark as beginning of round. (24 sts total) Rnd 1: SSK, K3, K2tog, knit to end of round (22 sts) Rnd 2-9: knit all rounds Rnd 10: [YO, K2tog] repeat to end of round Rnd 11: knit Rnd 12: I-cord bind off (see instructions below)
I-cord Bind Off
1) Cast on 3 sts to left needle at beginning of round using a knitted or cable cast on 2) K2, K2tog tbl, sl3 sts back onto left needle 3) Repeat step 2 until 3 sts remain Break yarn leaving a 12-inch tail for grafting stitches
Finishing
Using the tail of each I-cord bind off, graft the last three live stitches with first three cast on stitches of the I-cord for an invisible seam. Weave in tails, using tail at thumb to cinch up any gaps if needed. Embellishment ideas: · Sew a decorative button at the cleft in the lace cuff. · Make two 2-stitch I-cord laces about 16" long, weave them through the eyelets around the cuff and tie in a bow. Add beads or paillettes to the endsofthelacesif desired. · Crochet a flat disc to frame a button. Stack the disc and button and sew at the cleft in the lace cuff. Accent with a 2-stitch I-cord laced through the eyelets around the cuff and joined behind the button. Be sure to lace the I-cord loose enough that you can easily slip your hand in. @2013 - Mary McVein / Cloud House Studio -- All text, photographs and diagrams. NOTE: Web resources with instructions for how to make an I-cord and how to crochet a flat disc can be found at the end of this pattern. On-line Resources for Techniques used in this pattern: Many of the links found here are from the New Stitch A Day website. I am not affiliated with New Stitch A Day, but I find their video demonstrations very clear and easy to follow. I hope you find them useful, too. Beginning a row with a Yo http://newstitchaday.com/start-row-with-yarn-over/ Make One Increases M1L: http: //newstitchaday.com/make-one-left-increase/ M1R: http: //newstitchaday.com/make-one-right-increase/ Cable and Knitted Cast On http://newstitchaday.com/cable-cast-on/ http://newstitchaday.com/knitted-cast-on/ I-cord Bind Off http://newstitchaday.com/how-to-knit-the-i-cord-bind-off/ GraftingStitches In this pattern you will graft three live stitches to three bound off stitches. I could not find a video tutorial for this technique, however, the concept is the same as that of these videos: http://newstitchaday.com/how-to-knit-seaming-two-bind-off-edges-together/ http://newstitchaday.com/kitchener-stitch/ You can find a great pictorial explanation of this method from Rachel Erin here: http://www.rachelerin.com/grafting-live-stitches-to-a-cast-on/ Making an I-cord http://newstitchaday.com/i-cord/ Crocheting a Flat Disc http://www.wikihow.com/Crochet-in-the-Round


