
Snowflake Headband
Try your artistic hand at this simple headband pattern. The secret recipe is Combining two hand dyed yarns; One is multi-hued... the other, a contrasting solid. You will love "painting" your own unique headband. Wear it “as is" or make it the band of a hat of your own creation!
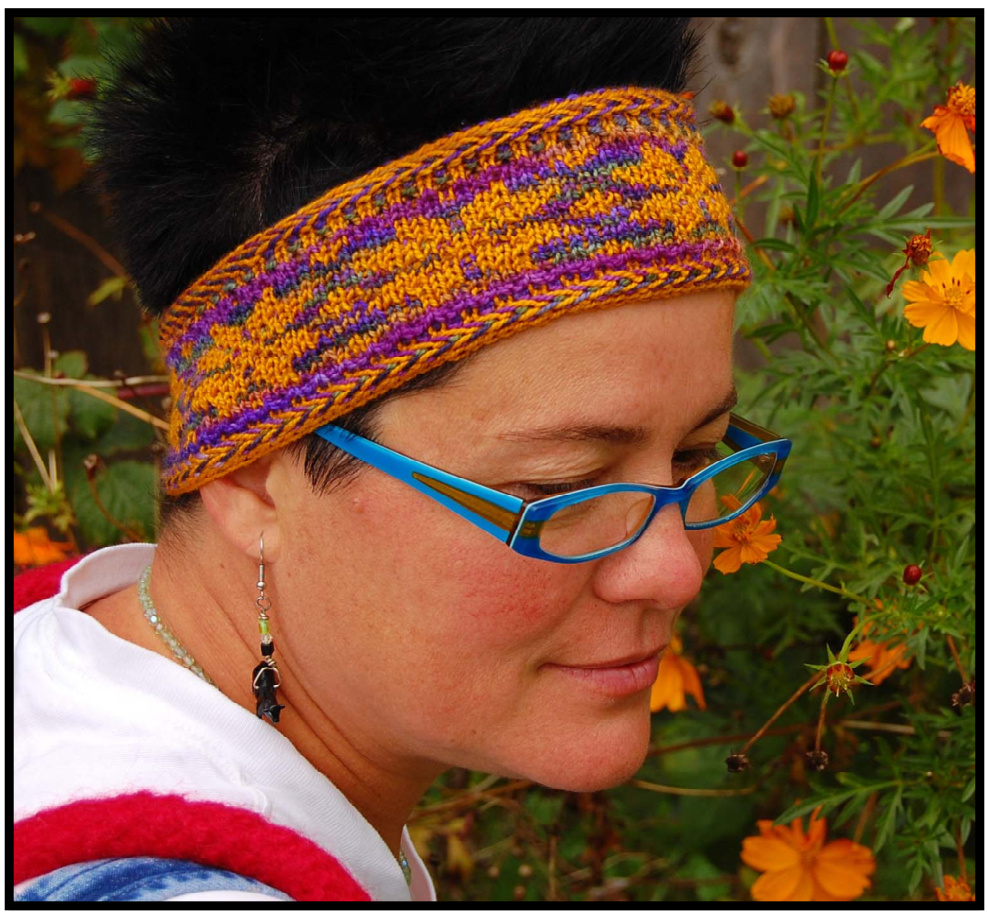
Finished Size 17.5" circumference $\mathrm{\textbf{X}}3{\cdot}5^{\circ}$ wide Yarn 50 yards each of 2 colors of fingering weight sock yarn. Shown in Claudia Hand Painted Yarns Purple Earth and Koigu KPM color1200 Needles and Notions US 3 (3.25mm) circular needles, 16" Tapestry needle Stitch marker Ambitious Beginner Select one multi-hued and one solid hand dyed. Choose colors with high contrast. Gauge Unblocked 7.25 sts/inch, Blocked 6.5 sts/inch
The Beginning Edge
CO 112 sts using: Two Strand, Two Color Cast On: Make a slip knot 4 inches from end of both balls of yarn. Place the double stranded knot on the needle. (This slip knot will be removed before knitting the first round). Now cast on as for Long Tail cast on with the MC over your thumb and the CC over the index finger. This will make the edge of your knitting in your pattern color and the background color cast onto the needle. Place marker and join for working in the round.
Twined Herringbone Border
Round 1: k1 MC, k1 CC, repeat to end of round Rnd 2: Bring both yarns to the front of your work, $\bf{\Psi}^{*}\mathrm{p}\bf{1}\,\bf{M}\mathrm{C}$ Set yarn just worked down to the left and bring CC over, p1 $\mathrm{CC^{*}}$ , rep from \* to \* to end of round. The working yarn will become very twisted after working this round; it will be untwisted as you work round 3. Rnd 3: ${\bf\nabla}^{*}{\bf P1}$ MC, P1 CC, setting yarn just worked to the right and bringing the yarn to be worked under it\* , rep from \* to \* to end of round.
"put the knitting down, walk to the kitchen, and eat an entire bar of chocolate!
Corrugated Rib, 1 X 1
Rnds 4 & 5: \* k1 MC, p1 CC \*, repeat \* to \* to end of round Rnd 6: Knit in CC (do not carry MC behind, just let it wait at beg of rnd)
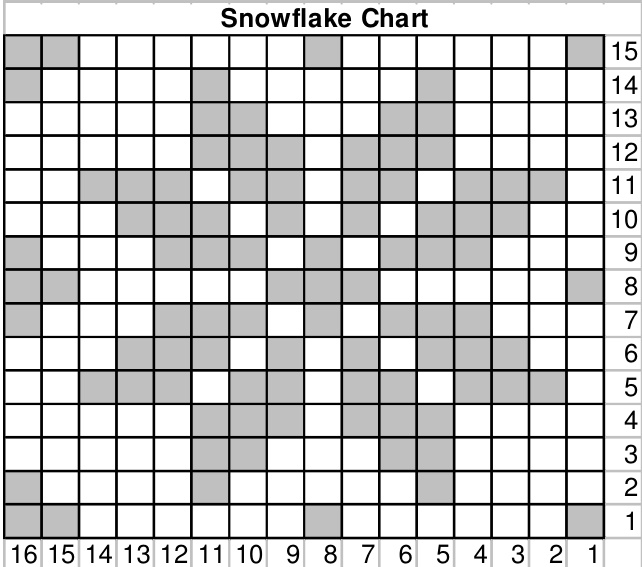
Rnds 7-21: Begin working from Snowflake Chart. You will be making 7 repeats of the chart on each round. Place markers, if desired, to mark your repeats. Rnd 22: Knit in CC (do not carry MC behind, just let it wait at beg of rnd).
Corrugated Rib, 1 x 1
Rnds 23 & 24: \* k1 MC, p1 CC \*, repeat \* to \* to end of round
Twined Herringbone Border
Rnd 25: K1 MC, K1 CC, repeat to end of round Rnd 26: Bring both yarns to the front of your work, \* p1 MC. Set yarn just worked down to the left and bring CC over, p1 CC \*, rep from \* to \* to end of round. The working yarn will become very twisted after working this round; it will be untwisted as you work Round 27. Rnd 27: \* p1 MC, P1 CC, setting yarn just worked to the right and bringing the yarn to be worked under it \*, rep from \* to \* to end of round. Bind off in MC Weave in ends and Wet Block. For more fun with Karendipity Knitwear Patterns, visit www.karendipity.etsy.com or contact Karen at karendipitydoo@gmail.com ravelry user name: karen
Some Helpful Information
Wet Blocking
Abbreviations
beg - beginning BO -bind off CO - cast on dec - decrease dpn - double pointed needle(s) Inc - increase k2tog - knit 2 stitches together k or K - knit LH - left hand LLinc $=$ left lifted increase M1 - make one increase ndl - needle p or $\mathbf{P}$ - purl patt - pattern pm - place marker rem - remain, remaining rep - repeat RH - right hand RLinc - right lifted increase rnd - round RS - right side sl - slip st purlwise sl1-k1-pso: slip 1 sts knitwise, knit next st, pass slipped st over ssk - slip 1 st knitwise, slip next st knitwise, knit through back loop st st - stockinette stitch st(s) - stitch(es) WS - wrong side [] repeat instructions within brackets number of times stated () repeat instructions inside parentheses number of times stated Wet blocking is an important step in the color stranding process. Knitting tension can be more uneven with color stranded knitting. Even it you think the finished item looks decent, blocking can almost always improve the appearance of your knitting and adjust the size. Blocking involves wetting your knitting and then manipulating it into shape. Immerse your work in a basin of tepid water. Give it a couple of gentle squeezes and pats to get the wool to absorb the water. Allow it to sit for about 10 minutes. Remove knitting and allow excess water to drip out (avoid rough handling) and wrap it up in a thick, absorbent towel. Gently press the water out of the knitting with the towel. Remove the knitting from the towel and lay it flat. Arrange your knitting on your blocking surface (table top or padded surface free of dyes). Manually arrange the knitting into the desired shape and size. Use pins or blocking wires to straighten edges. Allow knitting to dry. Avoid direct sunlight and heat.


