Crochet Your Own
Snowflake Diamond Mittens
Designed by Rebecca Lueck at Adorkable Crochet http:/ /adorkablecrochet.etsy.com
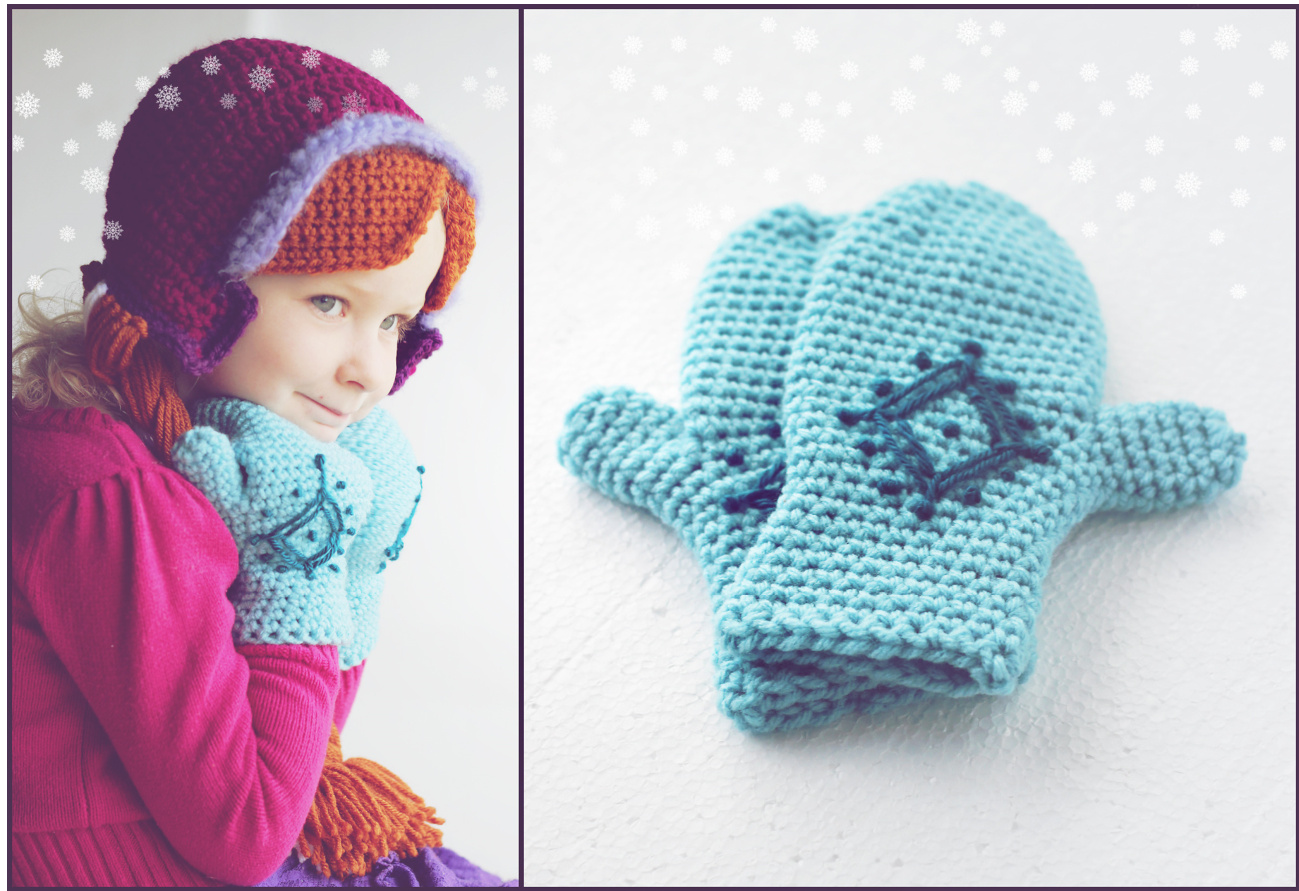
Your little girl's hands will be warm and stylish while wearing these cozy, cute, crocheted mittens... she will be so excited! Mittens have a handstitched diamond snowflake on the top.
What You Need:
Crochet Hook: Size H-8 5.00MM or 1/9 5.50MM depending on size. Yarn: color1: Red Heart with Love in Iced Aqua (or another Medium/4 yarn that is on the thicker side, like Vanna's Choice. If you use a thinner one like Caron Simply Soft, they will be small.) - About 120 yards. Color2: Small amount of Caron Simply Soft in Pagoda (or any other yarn of equal or less thickness. This is for the embroidery) Other: Embroidery needle
Tip:
Remember to count your stitches to make sure you have the correct amount in each row.
Abreviations:
Ch/chs-chain/chains st/sts-stitch/stitches sl st-slip stitch sc-single crochet sc2tog-single crochet 2 together BLO-back loop only rnd-Round Rpt-Repeat Sp-space Sk-skip
Special Stitches:
Foundation Single Crochet(fsc)- http: / /www.crochetspot.com/how-tocrochet-foundation-single-crochet-fsc Go to this link for step-by-step instructions and photos. This makes the foundation of your mittens stretchy! Don't just make a regular foundation chain!
Gauge Swatch
6.5 stitches and 8 rows = 2 inches row 1-with 1/9 hook, ch 11, sc in 2nd ch from hook and each st across, turn. row 2-ch 1, sc in each st across, turn. rows 3-12-Rpt row 2 (Measure in the middle of the swatch for most accurate results) 2-3 Years- (2 years use H hook, 3 years use I hook) Make 2: Worked from the bottom up Rnd 1: fsc 18. Sl st to first fsc to form ring (18 fsc) Rnd 2-8: Ch 1, sc in each st around, sl st to first sc. (18 sc) Rnd 9: ch 1, sc in first 2 sts, 2 sc in next st (sc in next 4 sts, 2 sc in next) 3 times, sl st to first sc (22 sc) Rnd 10: ch 1, sc in each st around, sl st to first sc. (22 sc) Rnd 11: ch 1, sc in first 3 sts, 2 sc in next st (sc in next 5 sts, 2 sc in next) 3 times, sl st to first sc (26 sc) Rnd 12: ch 1, sc in each st around, sl st to first sc. (26 sc) Rnd 13: Right Mitten only- ch 1, sc in first 16 sts, ch 2, sk next 4 sts, sc in last 6 sts, sl st to first sc. (22 sc, 2 ch) Left Mitten only- ch 1, sc in first 6 sts, ch 2, sk next 4 sts, sc in last 16 sts, sl st to first sc. (22 sc, 2 ch) Rnd 14: Right Mitten only- ch 1, sc in first 16 sts, sc in BLO of next 2 chs, sc in last 5 sts, sl st to first sc. (24 sc) Left Mitten only- ch 1, sc in first 6 sts, sc in BLO of next 2 chs, sc in last 16 sts, sl st to first sc. (24 sc) Rnd 15-19: ch 1, sc in each st around, sl st to first sc. (24 sc) Pause this for a bit and pull loop long so it doesn't get unraveled. Stitch diamond snowflake onto front of mitten (see end of pattern for snowflake instructions, then come back and continue pattern) Rnd 20: ch 1, sc2tog over first 2 sts, sc in next 10 sts, sc2tog over next 2 sts, sc in last 10 sts, sl st to first st. (22 sc) Rnd 21: ch 1, sc in each st around, sl st to first sc. (22 sc) Rnd 22: ch 1, sc2tog over first 2 sts, sc in next 2 sts, (sc2tog over next 2 sts, sc in next 4 sts) 3 times, sl st to first st (18 sc) Rnd 23: ch 1, sc in each st around, sl st to first sc. (18 sc) Rnd 24: ch 1, sc2tog over first 2 sts, sc in next st, (sc2tog over next 2 sts, sc in next 3 sts) 3 times, sl st to first st (14 sc) Rnd 25: ch 1, sc2tog over first 2 sts, sc in next 2 sts, (sc2tog over next 2 sts, sc in next 2 sts) 2 times, sc2tog over last 2 sts, sl st to first st (10 sc) Rnd 26: ch 1, sc2tog over first 2 sts, sc in next st, (sc2tog over next 2 sts, sc in next st) 2 times, sc in last st, sl st to first st (7 sc) Fasten off, leaving a sewing length of about 10 inches.
Thumb:
Rnd 1: Attach color1 to left side of thumb hole on rnd 12, ch 1, 9 sc around thumb hole, sl st to first sc (9 sc) Rnd 2-5: ch 1, sc in each st around, sl st to first sc (9 sc) Rnd 6: ch 1, sc in first st, (sc2tog over next 2 sts) 4 times, sl st to first st (5 sc) Fasten off, leaving 5 inch sewing length. Turn inside-out, sew thumb closed. Then sew the top of mitten closed (I use a whipstitch). Weave in all ends (when weaving in the end at the bottom, use it to close up the hole created when you made your beginning fsc) and turn right-side out. Done! 4-6 Years- (4&5 years use H hook, 6 years use I hook) Make 2: Worked from the bottom up Rnd 1: fsc 20. Sl st to first fsc to form ring (20 fsc) Rnd 2-10: Ch 1, sc in each st around, sl st to first sc. (20 sc) Rnd 11: ch 1, sc in first 4 sts, 2 sc in next st (sc in next 4 sts, 2 sc in next) 3 times, sl st to first sc (24 sc) Rnd 12: ch 1, sc in each st around, sl st to first sc. (24 sc) Rnd 13: ch 1, sc in first 5 sts, 2 sc in next st (sc in next 5 sts, 2 sc in next) 3 times, sl st to first sc (28 sc) Rnd 14-15: ch 1, sc in each st around, sl st to first sc. (28 sc) Rnd 16: Right Mitten only- ch 1, sc in first 17 sts, ch 2, sk next 4 sts, sc in last 7 sts, sl st to first sc. (24 sc, 2 ch) Left Mitten only- ch 1, sc in first st, ch 2, sk next 4 sts, sc in last 23 sts, sl st to first sc. (24 sc, 2 ch) Rnd 17: Right Mitten only- ch 1, sc in first 17 sts, sc in BLO of next 2 chs sc in last 7 sts, sl st to first sc. (26 sc) Left Mitten only- ch 1, sc in first st, sc in BLO of next 2 chs, sc in last 23 sts, sl st to first sc. (26 sc) Rnd 18-21: ch 1, sc in each st around, sl st to first sc. (26 sc) Pause this for a bit and pull loop long so it doesn't get unraveled. Stitch diamond snowflake onto front of mitten (see end of pattern for snowflake instructions, then come back and continue pattern) Rnd 22-25: ch 1, sc in each st around, sl st to first sc. (26 sc) Rnd 26: ch 1, sc2tog over first 2 sts, sc in next 11 sts, sc2tog over next 2 sts, sc in last 11 sts, sl st to first st. (24 sc) Rnd 27: ch 1, sc in each st around, sl st to first sc. (24 sc) Rnd 28: ch 1, sc2tog over first 2 sts, sc in next 4 sts, (sc2tog over next 2 sts, sc in next 4 sts) 3 times, sl st to first sc (20 sc) Rnd 29: ch 1, sc in each st around, sl st to first sc. (20 sc) Rnd 30: ch 1, sc2tog over first 2 sts, sc in next 3 sts, (sc2tog over next 2 sts, sc in next 3 sts) 3 times, sl st to first sc (16 sc) Rnd 31: ch 1, sc2tog over first 2 sts, sc in next 2 sts, (sc2tog over next 2 sts, sc in next 2 sts) 3 times, sl st to first sc (12 sc) Rnd 32: ch 1, sc2tog over first 2 sts, sc in next st, (sc2tog over next 2 sts, sc in next st) 3 times, sl st to first sc (8 sc) Fasten off, leaving a sewing length of about 10 inches.
Thumb:
Rnd 1: Attach color1 to the left sc of thumb hole in rnd 16, ch 1, 10 sc around thumb hole, sl st to first sc (10 sc) Rnd 2-6: ch 1, sc in each st around, sl st to first sc (10 sc) Rnd 7: ch 1, sc2tog over first 2 sts, (sc2tog over next 2 sts) 4 times, sl st to first st (5 sc) Fasten off, leaving 5 inch sewing length. Turn inside-out, sew thumb closed. Then sew the top of mitten closed (I use a whipstitch). Weave in all ends (when weaving in the end at the bottom, use it to close up the hole created when you made your beginning fsc) and turn right-side out. Done! 7-10 Years- (7&8 yrs use H hook, 9&10 yrs use I hook) Make 2: Worked from the bottom up Rnd 1: fsc 21. Sl st to first fsc to form ring (21 fsc) Rnd 2-10: Ch 1, sc in each st around, sl st to first sc. (21 sc) Rnd 11: ch 1, sc in first 5 sts, 2 sc in next st (sc in next 4 sts, 2 sc in next) 3 times, sl st to first sc (25 sc) Rnd 12: ch 1, sc in each st around, sl st to first sc. (25 sc) Rnd 13: ch 1, sc in first 6 sts, 2 sc in next st (sc in next 5 sts, 2 sc in next) 3 times, sl st to first sc (29 sc) Rnd 14-16: ch 1, sc in each st around, sl st to first sc. (29 sc) Rnd 17: Right Mitten only- ch 1, sc in first 18 sts, ch 2, sk next 4 sts, sc in last 7 sts, sl st to first sc. (25 sc, 2 ch) Left Mitten only- ch 1, sc in first st, ch 2, sk next 4 sts, sc in last 24 sts, sl st to first sc. (25 sc, 2 ch) Rnd 18: Right Mitten only- ch 1, sc in first 18 sts, sc in BLO of next 2 chs, sc in last 7 sts, sl st to first sc. (27 sc) Left Mitten only- ch 1, sc in first st, sc in BLO of next 2 chs, sc in last 24 sts, sl st to first sc. (27 sc) Rnd 19-24: ch 1, sc in each st around, sl st to first sc. (27 sc) Pause this for a bit and pull loop long so it doesn't get unraveled. Stitch diamond snowflake onto front of mitten (see end of pattern for snowflake instructions, then come back and continue pattern) Rnd 25-27: ch 1, sc in each st around, sl st to first sc. (27 sc) Rnd 28: ch 1, sc2tog over first 2 sts, sc in next 12 sts, sc2tog over next 2 sts, sc in last 11 sts, sl st to first st. (25 sc) Rnd 29: ch 1, sc in each st around, sl st to first sc. (25 sc) Rnd 30: ch 1, sc2tog over first 2 sts, sc in next 5 sts, (sc2tog over next 2 sts, sc in next 4 sts) 3 times, sl st to first sc (21 sc) Rnd 31: ch 1, sc in each st around, sl st to first sc. (21 sc) Rnd 32: ch 1, sc2tog over first 2 sts, sc in next 4 sts, (sc2tog over next 2 sts, sc in next 3 sts) 3 times, sl st to first sc (17 sc) Rnd 33: ch 1, sc2tog over first 2 sts, sc in next 3 sts, (sc2tog over next 2 sts, sc in next 2 sts) 3 times, sl st to first sc (13 sc) Rnd 34: ch 1, sc2tog over first 2 sts, sc in next 2 sts, (sc2tog over next 2 sts, sc in next st) 3 times, sl st to first sc (9 sc) Fasten off, leaving a sewing length of about 10 inches.
Thumb:
Rnd 1: Attach color1 to the left sc of thumb hole in rnd 16, ch 1, 10 sc around thumb hole, sl st to first sc (10 sc) Rnd 2-6: ch 1, sc in each st around, sl st to first sc (10 sc) Rnd 7: ch 1, sc2tog over first 2 sts, (sc2tog over next 2 sts) 4 times, sl st to first st (5 sc) Fasten off, leaving 5 inch sewing length. Turn inside-out, sew thumb closed. Then sew the top of mitten closed (I use a whipstitch). Weave in all ends (when weaving in the end at the bottom, use it to close up the hole created when you made your beginning fsc) and turn right-side out. Done!
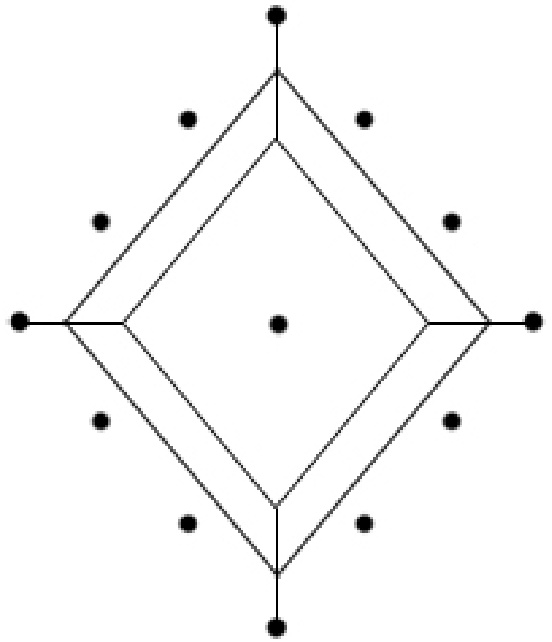
Diamond Snowflake Instructions:
Trace or print this template onto a normal sheet of paper (I have also included the template separately if you want to print it alone):
Secure with safety pins on front of mitten (If you'd like to place your design higher on the mitten, you can work 2 or more rows of the pattern, then come back to this section, the placement is up to you). For the right glove, it goes to the right of the thumb hole, for the left, it goes on the let of the thumb hole, so the example below is the left mitten.
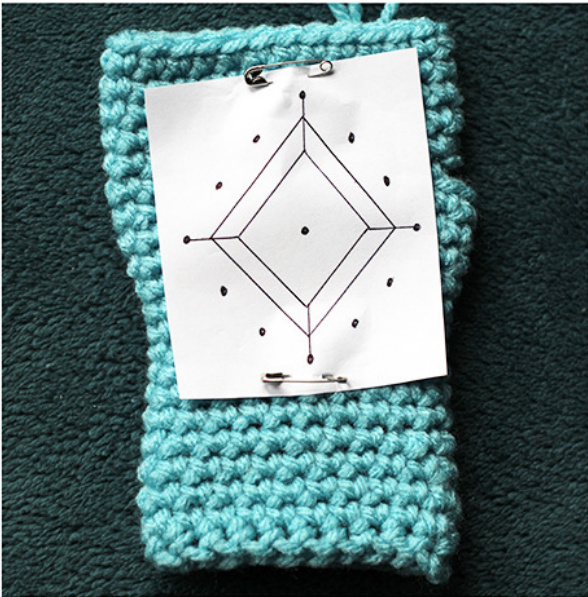
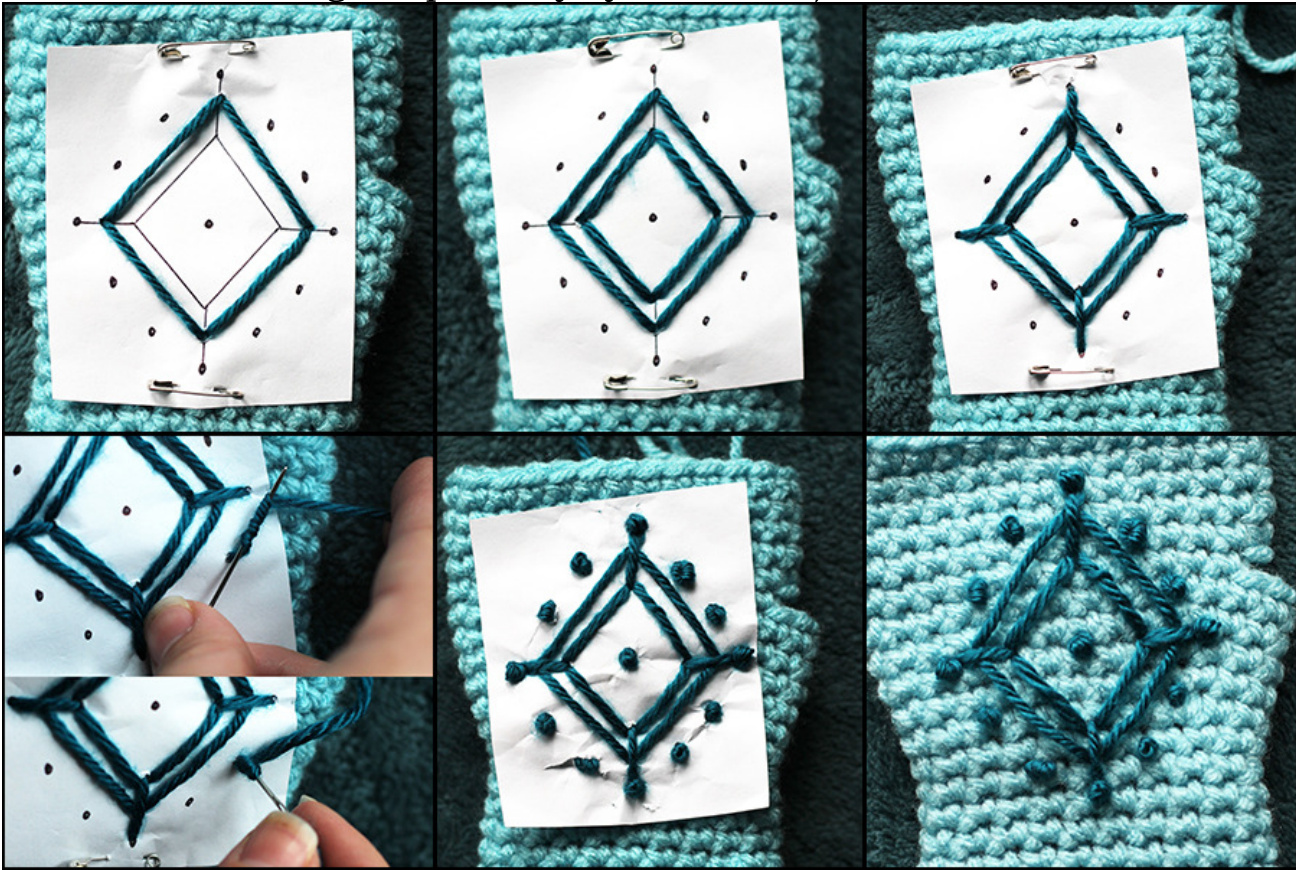
Thread 80 inches of color2 onto embroidery needle, start from the inside and poke through the top of mitten and the paper template and embroider the pattern on, as shown in photos below. Embroider it a little tight, but not too tight. For the dots, make a French Knot, Colonial Knot, or any kind of embroidery knot you feel comfortable with. When you are done, tie off each of the ends and weave in, then carefully tear away the template paper. (You can also stitch the pattern on without the template, but it is harder to get it perfectly symmetrical.)
Now go back and finish your mitten in the place you left off.

Copyright Info
You may do whatever you want with the finished product, including selling it for profit. I just ask that you please do not post my patterns on the Internet or sell my pattern to anyone. If you do sell the finished product online, I would appreciate a link back to my pattern ( https://www.etsy.com/listing/195473069/pdf-crochet-pattern-forelsa-hat-toddler ), but it is not required.


