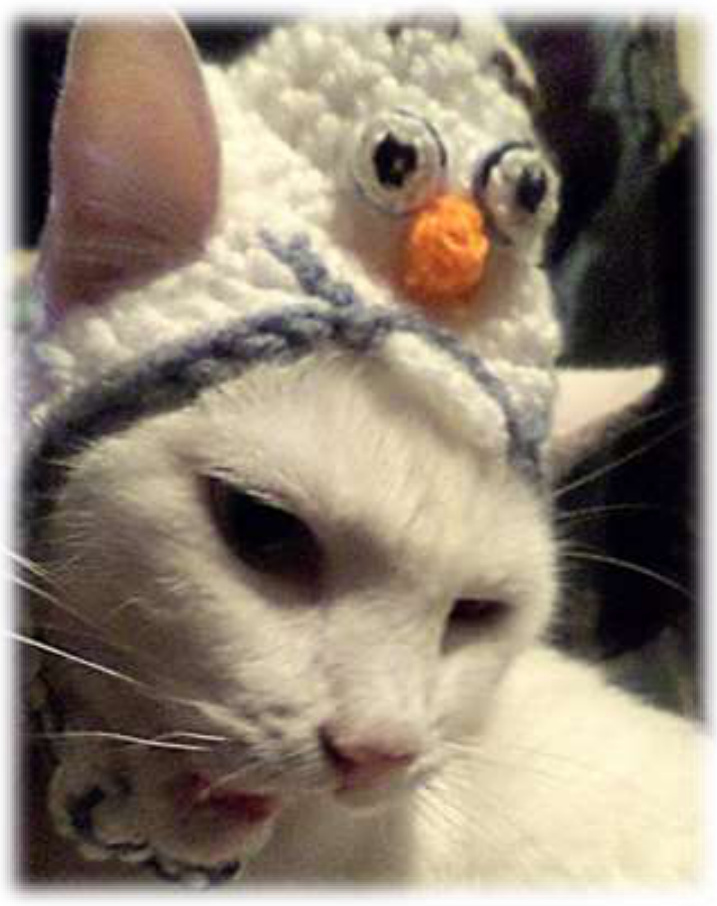
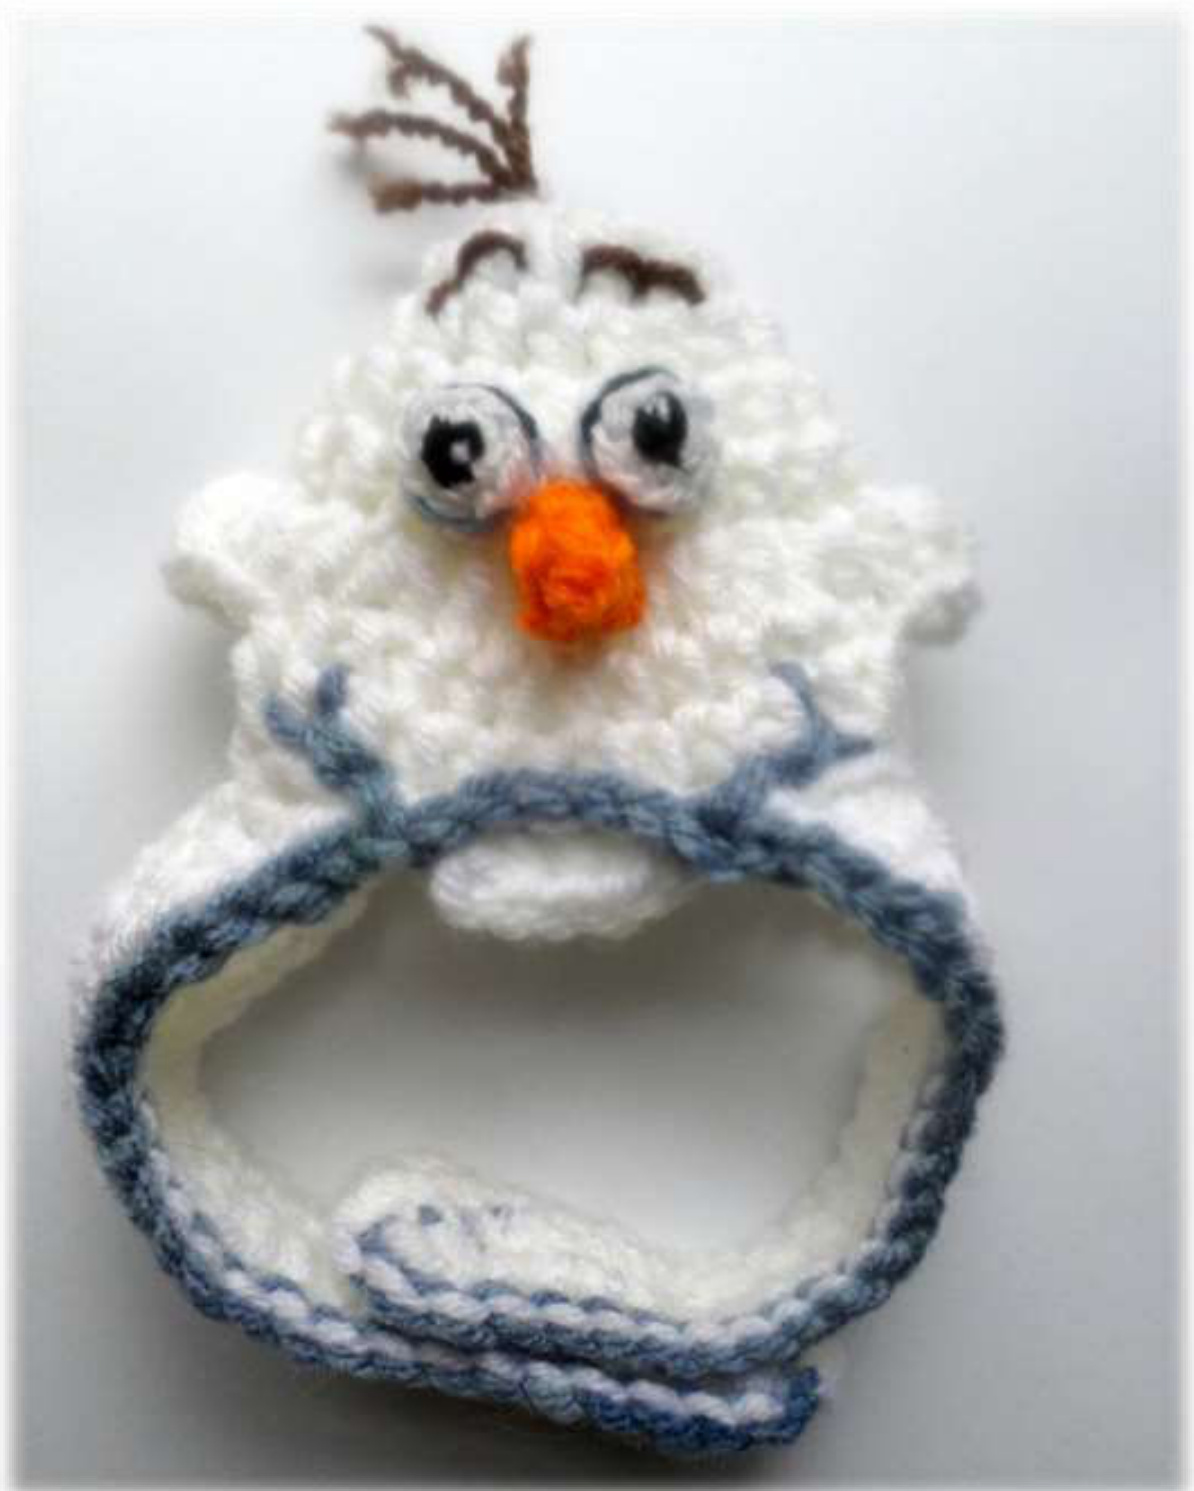
By Jenna Wingate I made this hat by request, so wrote down the pattern as I went as I always do. My kitty Titus was not too happy about modelling it. He says I always pick on him because he's a squishy marshmallow cat and doesn't resist. Some kitties don't mind hats, though, and even if it turns out they won't wear it, it is fun to make and will give you a laugh! This hat might even work on some small dogs. It has an adjustable chin strap and the opening for the ears is pretty roomy, so this hat should fit most adult-size cats. It can be made entirely with features that are safe for pets with suggestions for an easier, quicker alternative. Olaf Kitty Hat By Jenna Wingate Skill Level: Easy American Crochet Terms Size: One size fits most Abbreviations: MC Magic Circle Slst Slip Stitch Sk skip Sc Single Crochet Hdc Half Double Crochet Dc Double Crochet BLO Back Loop Only FLO Front Loop Only Hdc2tog Half double crochet 2 together Sc2tog Single crochet 2 together KNOT Explained later FO Finish Off Materials: #4 (Medium) Weight yarn White (100yds) Light Blue (4yds) Brown (scrap) Orange (2yds) \*Embroidery Thread White (2yds) Black (1yd) Light Blue (1yd) Crochet Hooks F/5 (3.75mm) D/4 (3.25mm) Tapestry Needle Sewing Needle White thread Hook and Loop Tape (2inch) Optional Light blue felt scrap 2 googly eyes Hot Glue \*In place of embroidery thread, you can use 4-ply yarn split in half
Pattern Notes:
Beginning chain does not count as a stitch. Made in joined rounds. Do not turn unless instructed. Hat Shell: With White and the F hook 1 - In a MC, ch1 and make 12hdc. Join with a slst to first hdc. Pull the tail to close, but not completely. You will want room to push your hook through later. Do not sew in this beginning tail until instructed. (12) 2 - Working in the BLO, ch1, (2hdc in the next stitch, hdc in the next 3 stitches) 3 times. Join with a slst to the first hdc. (15) 3 - Working through both loops now, ch1, (2hdc in the next stitch, hdc in the next 4 stitches) 3 times. Join with a slst to the first hdc. (18) 4 - Ch1, (2hdc in the next stitch, hdc in the next 5 stitches) 3 times. Join with a slst to the first hdc. (21) 5 - Ch1, (2hdc in the next stitch, hdc in the next 6 stitches) 3 times. Join with a slst to the first hdc. (24) 6 - Working in the FLO, ch1, (2hdc in the next stitch, hdc in the next) around. Join with a slst to the first hdc. (36) 7 - Ch1, hdc in the first 5 stitches. \*hdc2tog. Ch21. Sc in the 2"d chain from the hook in in the next 14 chains. Leaving the last 5 chains unworked, skip 5 stitches from round 6 and (being careful not to twist!) hdc2tog over the next 2 stitches.\* Hdc in the next 9stitches. Repeat from \* to \* once more. Hdc in the last 4 stitches. Join with a slst to beginning hdc. The next round is quite long, so I have broken it up into separate sections to help you keep your place better. 8 - Ch1. Sc in the same stitch. Sc2tog. Sc in the next. Working over the last stitch and the first chain, sc2tog. Sc in the next 4 chain. (Nloxt you will ho workina into tho hottom theftyodetionpehoinfram rtund 7Dotton O Sc in the next 14 stitches. In the last stitch (sc, hdc, dc). Rotate to work up the other edge of the strap. (Dc, hdc, sc) in the first stitch. Sc in the next 9 stitches. Hdc in the next 5 stitch. Dc in the next 5 chains. Sk the next stitch, slst in the next 3. Ch3. Hdc BLO in the next 3 stitches. Ch2, slst in the next 3 stitches. Sk the next stitch. Dc in the first 5 chains. (Again, working into the bottom of the chain) Hdc in the next 5 stitches. Sc in the next 9 stitches. (Sc, hdc, dc) in the last. Rotate to work up the other edge of the strap. (Dc, hdc, sc) in the first stitch. Sc in the next 14 stitches. Sc in the next 4 chains. Sc2tog over the last chain and the first stitch. Sc in the next stitch. Sc2tog. Join with a slst to beginning sc. FO.
Disenado por Rosaura Valdez
With Light Blue, slst BLO all around the front, beginning at the bottom of the left (facing) chin strap and in each stitch to before the teeth. Ch1 and sk the ch2 from the previous round and slst in the 3 free loops in front of the teeth. Sk the next ch2 and resume slst BLO down the other strap to the end. FO and sew in the ends.
Special Knotting Method:
When working with dropped colors (yarns you don't FO but leave dangling until needed again) you can knot them by removing your hook and pulling out a large loop and passing your work through the loop. Pull it snugly. Sometimes it is necessary to pass the ball of yarn through the loop. This will prevent gaps cause by changing colors in the last pull-through and also eliminated some of the extra ends caused by cutting and joining again. This is instructed as KNOT in the pattern.
Crochet Eyes:
Note: This is the preferred method, but I won't pretend that it is tedious work being so small. If you prefer the easy method (described later), please never leave the hat with your pet unattended. Plastic parts can beachokinghazard. With white and the D hook 1 - Make 8sc in a MC. Join with a slst to the beginning sc and KNOT. 2. Black. Leaving a long beginning tail, slst in the BLO of 4 stitches. FO, leaving a long tail. Pull the tails through the beginning and last stitches to hide. Leave for later embroidery. 3. Light Blue. Join anywhere and slst in the BLO all the way around- in the 4 black stitches and in the 4 remaining white stitches. FO. Thread tail onto needle and pass beneath the first stitch and then back down through the last stitch. On the back side, tie these together, being careful not to misshapen, and cut the ends short. 4. Picking up white again, Slst in the BLO all the way around. FO, leaving a long tail. Finish the same as you did the blue, sewing under then back through to close the color gap. With one black tail, embroider a pupil into the center of the eye. Refer to pictures. Sew in this tail on the wrong side and cut short. With remaining white tail, embroider an eye glint into the black pupil. Refer to pictures. Leave remainder of tail to sew to hat. Repeat for the 2nd eye. Position eyes, touching, to where they set just on the top of round 6 of the hat (the FLO part). Using the white tail, stitch through the white edge to attach. The long black tail that is left can be pulled through to the inside of the hat and out of your way. Once both eyes are attached, use these black tails to embroider the eyebrows. Refer to pictures. Secure the ends and trim.
Googly Eyes:
Cut a circle from the light blue felt slightly larger than your googly eye. Glue the felt to the hat and the eye to the felt. Position with just a tiny bit of space between them, to resemble the eye placement in the pictures.
Nose:
Orange and F hook 1 - Ch4. Slst in 2nd chain from hook. Sc in the next chain. Hdc in the next. Ch1, turn. 2 - Hdc in the first stitch, sc in the next, slst in the last. FO, leaving a long tail. Using the tail, sew the edges together from tip of nose to base, closing it into a coneshape. Use remaining tail to sew to face just below the eyes. Refer to pictures.
Branch:
Cut a piece of brown yarn about 10 inches long. Fold in half and make a large knot in the center. Using your crochet hook, pull the ends up through the center of the top of the hat where you left the MC open just a bit. The knot in the brown should be inside the hat and the tails sticking out of the top. Pull the beginning MC tail to finish closing. Sew this tail in now, tacking the brown into place in the process. Turn the 2 brown ends that are sticking up into 4 by splitting the yarn plies in half. Tie tight knots somewhere in each length at about 2 - 2.5 inches. Don't make them all the same length- you want them a bit wonky. Trim off the excess just above each knot. Refer to pictures.
Smile:
With Light Blue, embroider on either side of the face coming up from the blue trim a few lines to resemble a smile. Refer to pictures.
Closure:
With your sharp sewing needle and white sewing thread, sew the hook and loop tape to the straps. You may need a thimble. Alternatively, you can hot glue them into place.
A note about cats and Velcro:
They hate it. You will want to make a point of opening the straps in another room, way before approaching the cat, and then close it to fit once you have the hat in place. If you need to readjust, pull the hat off without opening the tape in front of them!
Merry Christmas from Jenna and the Critters!
I hope you all had a great year and will have another! It is completely a coincidence that I gave away a dog hat last year and a cat hat this year. You can get the dog hat pattern HERE. There's still a sale going on at the website- Ravelry coupons- and a giveaway. That expires with the year, but there's a sale every month! Be sure to drop by and sign up for the NEWSLETTER! Get the latest in your Email where you are sure not to miss it!
Connect with me!
JennaWingateDesigns.com
Be sure to drop by and sign up for the Newsletter, check for coupons, giveaways, and more!! Beginning in January, there will be a monthly how-to series on pattern-tweaking and finishing! JennaWingateDesigns onFaceBook Ravelry Pattern Store Craftsy Pattern Store
Pattern Usage:
This pattern is intended for pampering and fun. Please do not use this pattern for profit. Please do not reproduce it or use any images. If you are involved in a charity, please write to me to learn about special concessions. Include details of your charity and event. Thanks! This pattern has only been tested by me. If you find any errors, please let me know. If you need help, please EMAIL ONLY.


