Tunisian Stripes Baby Blanket
A crochet pattern by Staci Perry, www.verypink.com
Getting Started.
Size: 36" wide by 40" long (easily modified, info on modifying at end of pattern) Hook: Size K (6.5mm) Tunisian crochet hook with 24" cord attached, additional 40" cord, two end stoppers (scrap yarn can be used instead of 40" cord if you aren't using an interchangeable set) Yarn: Any worsted weight yarn in three colors, 660 yards each color, plus one extra skein in your color of choice for fringe (details below on the yarns I used) Additional Materials: tapestry needle for cross stitching design and weaving ends Gauge: 3.5 stitches and 3.5 rows per inch
INFORMATION ON MODIFYING THIS BLANKET IS AT THE END OF THE PATTERN.
Yarns used in the sample blankets:
Pink, Blue, and Green blanket: Knit Picks Brava Worsted Blush - 3 skeins Sky - 4 skeins (extra skein for fringe) Mint - 3 skeins Sock Monkey Colors blanket: Lion Brand Wool-Ease Worsted Wheat- 3 skeins Cranberry - 3 skeins (extra skein for fringe) Oxford Grey - 2 skeins
Abbreviations:
BO-bind off CC1 - contrasting color #1 CC2 - contrasting color #2 MC - main color (also color in center panel)
Video Links.
Video Part 1 - Intro: http://youtu.be/u1u82pLE7u0 Video Part 2 - Working Tunisian Crochet, changing colors: http://youtu.be/u1u82pLE7u0?t=2m56s Video Part 3 - Working cross stitch, binding-off: http://youtu.be/u1u82pLE7u0?t=13m51s Video Part 4 - Making fringe: http://youtu.be/u1u82pLE7u0?t=24m3s
Directions.
ASSIGNING COLORS
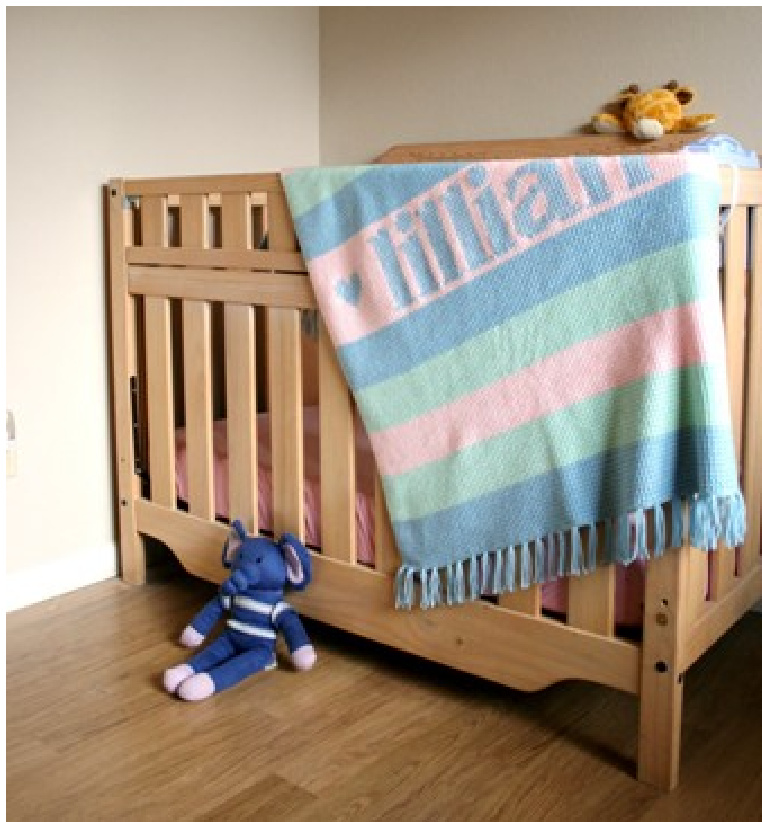
You'll need to choose the order of the colors, and assign each one a name. The color in the center panel (with the cross stitching) is your Main Color, or MC. The color you use in the first stripe is CC1, (Contrasting Color #1), and the third color is CC2 (Contrasting Color #2). In the photo above, pink is the MC, blue is CC1, and green is CC2. To help keep yourself on track, make a quick note of your colors here: is my Contrasting Color #1
STARTING CHAIN & FIRST COLOR SECTION
Starting with CC1, chain 126 stitches, pick up 126 stitches in "spine" of crochet chain (127 stitches total on hook). Work your first Tunisian left-to-right row, completing the first row of stitches. Work 11 more completed rows of CC1, then break yarn after working last left-to-right row, one stitch on hook. (A "completed row" means working a right-to-left row, then a left-to-right row.) Change to CC2, and work 12 completed rows.
WORKING STRIPES, FIRST HALF OF BLANKET
Work the stripes as follows: CC1 - 12 rows (first color section, described above, includes starting chain) CC2 -12 rows MC -12 rows CC2-12rows CC1 - 12 rows Center Panel - 20 rows (or height necessary to accommodate design you choose to cross On last row of Center Panel, attach 40" cord to hook, work right-to-left row, leaving all of the stitches on the hook/cord. You can remove the hook at this point and replace it with an end stopper to complete the cross stitching. Do not break MC yarn.
CROSS STITCHINGDESIGN
The design is much easier to cross stitch after working the center panel, before you have the second half of the blanket flopping around and getting in your way. Use a steamer or a steam iron (without pressing down!) to smooth out the blanket and make it flat. You can cross stitch any design that will fit into the blanket. If you do a Google Image search for "cross stitch alphabets" or "cross stitch motifs", you will get hundreds of results, most of them free online. Here are links to the alphabets I used. Alphabet on "Lillian" blanket: http://rucniprace.cz/k v/vzory/pismo2 r3.gif Alphabet on "Tippy" blanket, links to both upper- and lower-cases: http://www.my-cross-stitch-patterns.com/view-alphabet arial font lowercase height 20 stitches cross stitch patte rn free.html http://www.my-cross-stitch-patterns.com/view-alphabet arial font uppercase heiqht 20 stitches cross stitch patte rn free.html When choosing an alphabet, take into consideration the length of the name, and the width of the letters. I allowed two spaces between each letter, and there are 126 stitches total to work with. Depending on the design you choose, you may need to adjust the height of the Center Panel to accommodate your design. Centering Your Design: Find the center of your blanket, mark with a clippie marker or safety pin Count the width of each letter, add them up, include spaces between letters Find the center of your design, mark that spot Begin cross stitching close to center to save yourself endless counting! Work cross stitching from top down

WORKING STRIPES, SECOND HALF OF BLANKET
Using MC, work your last left-to-right row to complete Center Panel, break MC Complete the rest of the stripes as follows: CC1 - 12 rows CC2 - 12 rows MC - 12 rows CC2 - 12 rows CC1 - 12 rows - BO on last right-to-left row.
Finishing.
FRINGE
Cut a square of cardboard about 1.5" longer than you'd like your finished fringe. (I used a 4.5" piece of cardboard for a 3" fringe.) Wind the yarn around the cardboard, cut the strands, and use three cut pieces of yarn for each fringe, as demonstrated in the video. the ends, and wash/block according to the instructions on the yarn label. Enjoy!
Modifying Pattern.
You can make this blanket any size, using any yarn weight or hook size you like, as long as you like the fabric you are creating. To determine your starting chain number, you'll knit to make a swatch. Using the yarn and hook size you'd like to use, chain 20 (or so), and work up a small sample. Bind-off and wash swatch, then either block or dry the swatch as you will the finished blanket. (If you choose a machine washable and dryable yarn, you can machine wash and dry the swatch.) Then measure the number of stitches you're getting per inch, and make note of that number. Multiply that number by the number of inches wide you'd like your finished blanket, and use that number as your starting chain number. Here are some standard blanket sizes from About.com: Crib: 45by 60 inches Twin/Throw: 66 by 90 inches Double: 80 by 90 inches Queen: 90 by 90 to 100 inches King: 108 by 90 to 100 inches An easy way to determine the amount of yarn you'll need is to work up your first stripe, and make note of how much yarn you used. There are 11 stripes total in the blanket. Remember to allow enough yarn for a wider Center Panel, and allow extra for fringe. Copyright 2014, Staci Perry. This pattern and pictures are the property of Staci Perry. All rights reserved. Pattern is available for personal use only. No unauthorized reproduction, in whole or in part, or distribution of this pattern or content, including text or pictures is allowed. No commercial reproduction of garments from this pattern is allowed without prior permission from Staci Perry.


