Customizable Amigurumi Action Figure Pattern
byKateWood
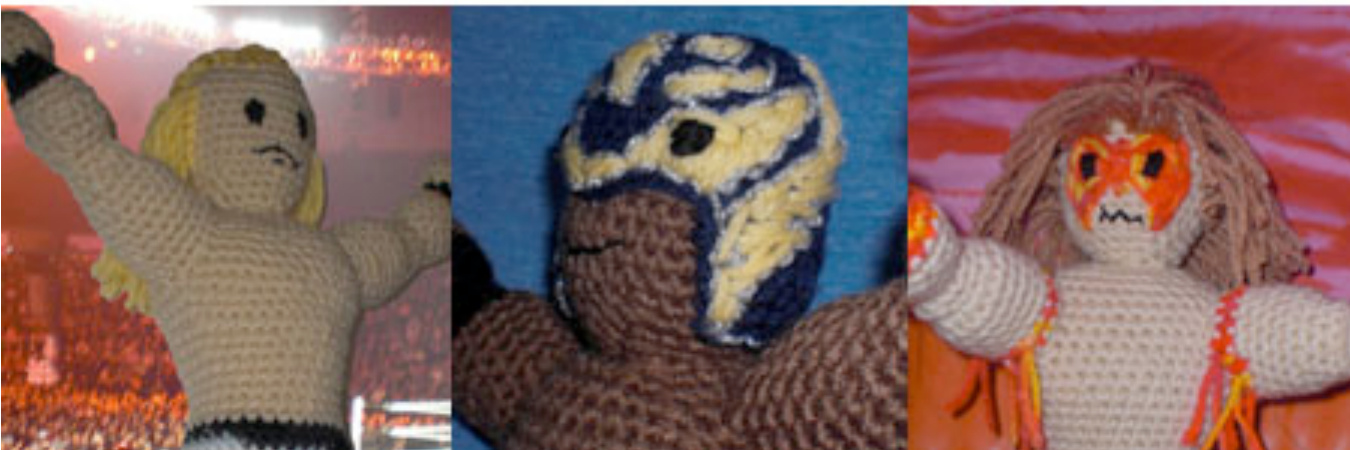
This amigurumi pattern is highly customizable, and will give you a male action-figure-type body that you can turn into pretty much any superhero, action hero, football player, you-name-it that you like. As for me, I like wrestling, so I pretty much use it to make wrestlers, as you can see.
You'll need:
Size E/4/3.5mm crochet hook Approximately 75 g of worsted weight yarn (this is very approximate - you may need more or less depending on how you choose to customize your figure. In particular, adding hair can add a bit to your yarn total) Yarn needle Embroidery floss (for any detailed features you want to add) and sewing needle AND/OR fabric paint and paintbrush Stuffing Stuffing stick (or use the back end of your crochet hook) Stitch markers
Notes:
This pattern is worked continuously in rounds except where otherwise specified. Use a stitch marker to keep track of your rounds. If you have trouble working the second round, use a slightly larger hook (l use a G/6/4.25) to do the first round (sc 6 into magic ring). Then switch to the E hook for the next round. If you'd like to make a figure you can bend and pose, you can use pipe cleaners or wire to give your figure some “bones." Bear in mind however that this modification will make your ami neither small child nor pet safe!! I've tried to mark where different body parts begin and end, helping you to know when you might want to do something to customize your ami - for example, figuring out when you need to change color, or where you could do something differently to create a different shape, or when you could pause to sew on a little extra something. Have fun!
ARMS (Make 2)
Round 1: crochet 6 sc in a magic ring Round 2: \* sc 1, 2 sc in next st. Repeat from \* 2x. (9 sts) Round 3: \* sc 2, 2 sc in next st. Repeat from \* 2x. (12 sts) Round 4: sc around (12 sts) Round 5: \*sc 2, sc2tog. Repeat from \* 2x. (9 sts) Note if you would like your ami to have wristbands, change colors here. Work in your wristband color for next 3 rounds for normal wristbands, 4 for wider ones. Round 6: \*sc 1, sc2tog. Repeat from \* 2x. (6 sts) Round 7: \* sc 1, 2 sc in next st. Repeat from \* 2x. (9 sts) Round 8: \* sc 2, 2 sc in next st. Repeat from \* 2x. (12 sts) Round 9: \* sc 3, 2 sc in next st. Repeat from \* 2x. (15 sts) Round 10: sc around (15 sts) Begin shaping for forearm Round 11: hdc 7, sc 8 (15 sts) Round 12: sc around (15 sts) Round 13: \*sc 3, sc2tog. Repeat from \* 2x. (12 sts) Next row is the elbow row Round 14: \*sc 2, sc2tog. Repeat from \* 2x. (9 sts) Round 15: \* sc 2, 2 sc in next st. Repeat from \* 2x. (12 sts) Begin shaping for upper arm Round 16: hdc 6, sc 6 (12 sts) Round 17: sc around (12 sts) Round 18: \* sc 1, 2 sc in next st, Repeat from \* 5x. (18 sts) Rounds 19-23: sc around (18 sts) Now you'll just do one last shaping row to make an arm that points up or an arm that points down. You'll want to place the hdc so that the taller part of the arm falls in the right place - across the top of the shoulder for an arm that points down, or beneath the bottom of the armpit for an arm that points up. Note that you may need to break up the sc (e.g., working 4 sc, 9 hdc, 5 sc) to get the hdc to fall in the right Spot. Round 24: hdc 9, sc 9 (18 sts) Fasten off leaving long tail for sewing. Use stuffing stick to stuff each arm. Set aside.
LEGS (Make 2)
You'l find options for two different styles of legs below. The first is for a muscular leg (e.g., for a figure wearing tights or trunks), the second has less definition and is for a leg wearing pants. The legs both start off the same way, with a foot that is worked almost as if you were making a tiny sock (a very, very tiny 2012KateWood Please send corrections or suggestions to tinypantswood@gmail.com sock - this is probably the most difficult part of this pattern). The muscular leg involves much more shaping, while the pants leg is mainly a tube. You can see photos of each style of leg on page 4.
Option A): Muscular Leg
Round 1: crochet 6 sc into a magic ring Round 2: \* sc 1, 2 sc in next st. Repeat from \* 2x. (9 sts) Round 3: \* sc 2, 2 sc in next st. Repeat from \* 2x. (12 sts) Rounds 4 and 5: sc around (12 sts) Begin working back and forth, turning work at end of row. This will create a heel for the foot by adding a rectangle onto the tube you just created. See photos at right for visual assistance! Rows 2-5: Ch 1 (counts as sc), sc 5 (6 sts). Turn work at end of each row, ending with a RS row (outside of foot should be facing you). Now we will return to working in the round. At the end of your last row of 6 sts, you will work down the side of your rectangle, across the top of the foot, up the other side of the rectangle, and then across the back of the heel. You'll work decreases into the "corners" where the heel rectangle and foot tube meet in order to shape the ankle, and begin making the vertical shape of the leg. Adjust where these decreases fall if needed in order to make sure they land in the "corners." Again, see photos at right.
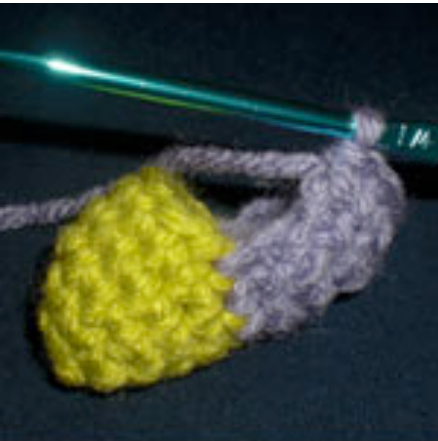
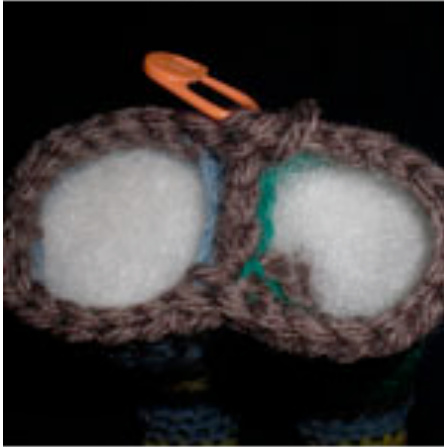
Rounds 1-5 (foot tube”) are in green; Rows 1-5 (heel rectangle’) are shown in lavendar. Round 6: Work 2 sc down edge of rectangle. Grabbing one loop from the edge of the heel rectangle and one from the foot tube, sc2tog. Sc 6 across top of foot. Grabbing one loop from the foot and one from the edge of the rectangle, sc2tog. Work 2 sc up edge of rectangle, then sc 6 across top of heel rectangle. (18 sts) If you're making a “pants" style leg, stop here and go to directions below for OptionB.
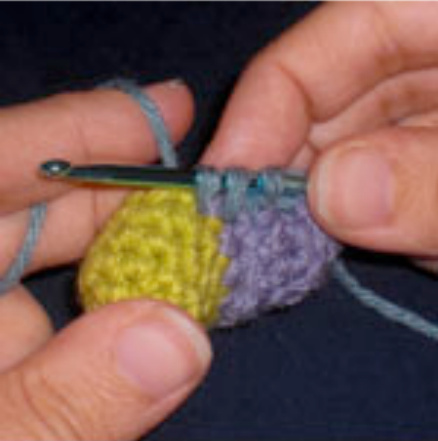
Detail of Round 6 -- picking up one loop from “heel” and one from foot” to work as sc2tog. If you're making the “muscular" leg, work rounds 7-9 in the manner of round 6, but using the appropriate stitch counts given below. Round 7: sc 2, sc2tog, sc next 5 sts, sc2tog, sc 7 (16 sts). Round 8: sc 1, sc2tog, sc next 4 sts, sc2tog, sc 7 (14 sts) Round 9: sc2tog, sc next 3 sts, sc2tog, sc 7 (12 sts) Rounds 10-16: sc around (12 sts). Note if your ami is wearing boots, row 16 should end them. With the next row, begin shaping upper leg. Adjust where the stitches fall as needed so that the hdc are on the front of the leg, above the foot. Round 17: sl st 3, hdc 6, sl st 3 (12 sts) Round 18: sc 3, hdc 6, sc 3 (12 sts) Round 19: sc around (12 sts) Round 20: \* sc 3, 2 sc in next st. Repeat from \* 2x. (15 sts)
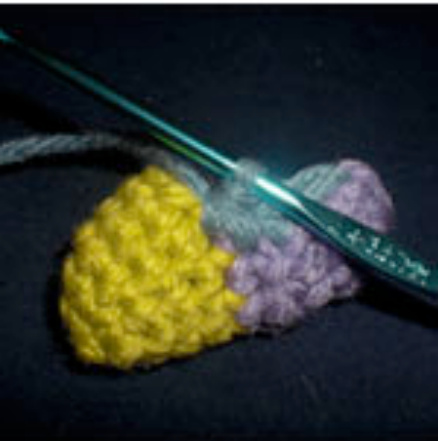
Completed sc2tog\*corner\* stitch, shown in blue. 2012KateWood Please send corrections or suggestions to tinypantswood@gmail.com Rounds 21-22: sc around (15 sts) Round 23: \* sc 4, 2 sc in next st. Repeat from \* 2x. 18 sts) Rounds 24-30: sc around (18 sts) Fasten off. Work second leg as for first, only do NOT fasten off at end. Instead, stuff both legs, then go to directions for torso.
Option B): Pants Leg
Work as for muscular leg (following instructions above) through round 6. Rounds 7 and 8 are worked in, respectively, front and then back loops only, to give the pants a little bit of a cuff. Round 7: Working in front loops only, sc 3, sl st 6, sc 3, hdc 6 (18 sts) Round 8: Working in back loops only, Sc 12, hdc 6 (18 sts) Rounds 9-31: Resume working in both loops. Sc around for 23 rows (18 sts) (Pants-style legs need to be worked one extra row to make up for the height lost by not having the hdc knee shaping.) Fasten off. Work second leg as for first, only do NOT fasten off at end. Instead, stuff both legs, then go to directions for torso.
TORSO
Pick up both legs. You will begin by joining the middle three stitches on the inside of each leg together. See photos at right for help! Pick up the working yarn on the second leg (the one you didn't fasten off). Working in the front loops only of the middle three stitches on both legs, join the legs to each other. You may need to do a few more stitches, or unravel a few stitches, on that second leg to get your hook where it needs to be. Following these stitches, begin working in the round (and resume working in both loops), traveling around both legs. Round 1: Sc around, working in unjoined stitches in both legs (30 sts) Round 2: sc around. Work 2 sc in three consecutive stitches on the back of each leg (3 increases per leg, giving the ami a butt!) (36 sts) Rounds 3-6: sc around (36 sts) Round 7: sc around, working 3 decreases per leg (sc2tog in six consecutive stitches on the back of each leg, above the increases you made in round 2) (30 sts) Rounds 8-12: sc around (30 sts)
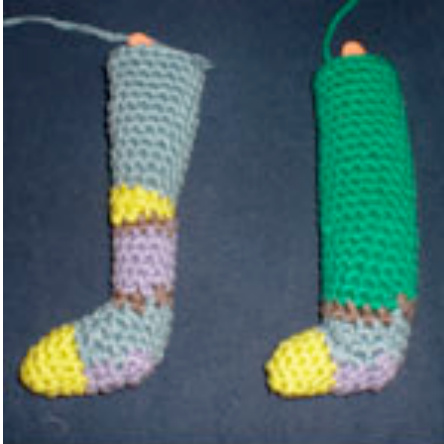
Muscular Leg (Option A) on left; Pants Leg (Option B) on right.
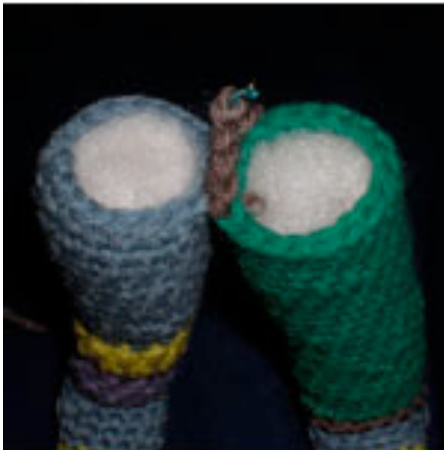
Detail of picking up middle three sc in flo from inside of each leg for Torso Round 1.
Completed Torso Round 1: 3 middle sc join legs,then sc 30 around outside to begin torso. Note that rows 9 through 12 are the waist of your ami. You may want to stuff as you complete each section of the torso, rather than having to try to cram everything in at the very end. Now begin increasing for chest. You'll need to work increases on the sides of the chest -- over the hips -- so that the chest becomes wider, and the shape of the body becomes an oval rather than a circle. Round 13: sc around, working two increases (two sc in one stitch) on each side of the body -- four increases total (34 sts) Round 14: sc around (34 sts) Round 15: work as for round 13 (38 sts) Round 16: sc around (38 sts) Round 17: work as for round 13 (42 sts) Rounds 18-23: sc around (42 sts) Now you'll begin decreasing to round off the top of the torso. Again, put your decreases toward the sides, so that you're continuing to crochet in an oval rather than a circle. This makes it so the ami's front and back will be relatively flat, and the "shoulders" will be rounded. Round 24: sc around, working two decreases (sc2tog) at each side of body -- four decreases total (38 Ssts) Round 25: work as for round 24 (34 sts) Round 26: work as for round 24 (30 sts) Round 27: sc around, working three decreases (sc2tog) at each side of body -- six decreases total (24 Ssts) Round 28: work as for round 27 (18 sts) Now is a good time to pause for some stuffing. Round 29: work as for round 27 (12 sts) Round 30: sc2tog around (6 sts) Finish stuffing firmly and fasten off
HEAD
Round 1: crochet 6 sc in a magic ring Round 2: \* 2 sc in next st. Repeat from \* 5x. (12 sts) Round 3: \* sc 1, 2 sc in next st. Repeat from \* 5x. (18 sts) Round 4: \* sc 2, 2 sc in next st. Repeat from \* 5x. (24 sts) Round 5: \* sc 3, 2 sc in next st. Repeat from \* 5x. (30 sts) Rounds 6-13: sc around (30 sts) Pause here to embroider face and attach hair, if desired. Round 14: \*sc 3, sc2tog. Repeat from \* 5x. (24 sts) Round 15: \*sc 6, sc2tog. Repeat from \* 2x. (21 sts) Round 16: \*sc 5, sc2tog. Repeat from \* 2x. (18 sts) Round 17: \*sc 4, sc2tog. Repeat from \* 2x. (15 sts) Fasten off, leaving long tail for sewing. 2012KateWood Please send corrections or suggestions to tinypantswood@gmail.com
ASSEMBLY
Sew head firmly to body. Place the arms against the torso to see where they best sit. You'll likely find downward-pointing arms should be a little lower than upward-pointing arms in order to look natural (I have found I need to place downward-pointing arms about two rows lower than right/upward-pointing arms to get them looking proper). Sew arms firmly to body. Your ami is ready for action!
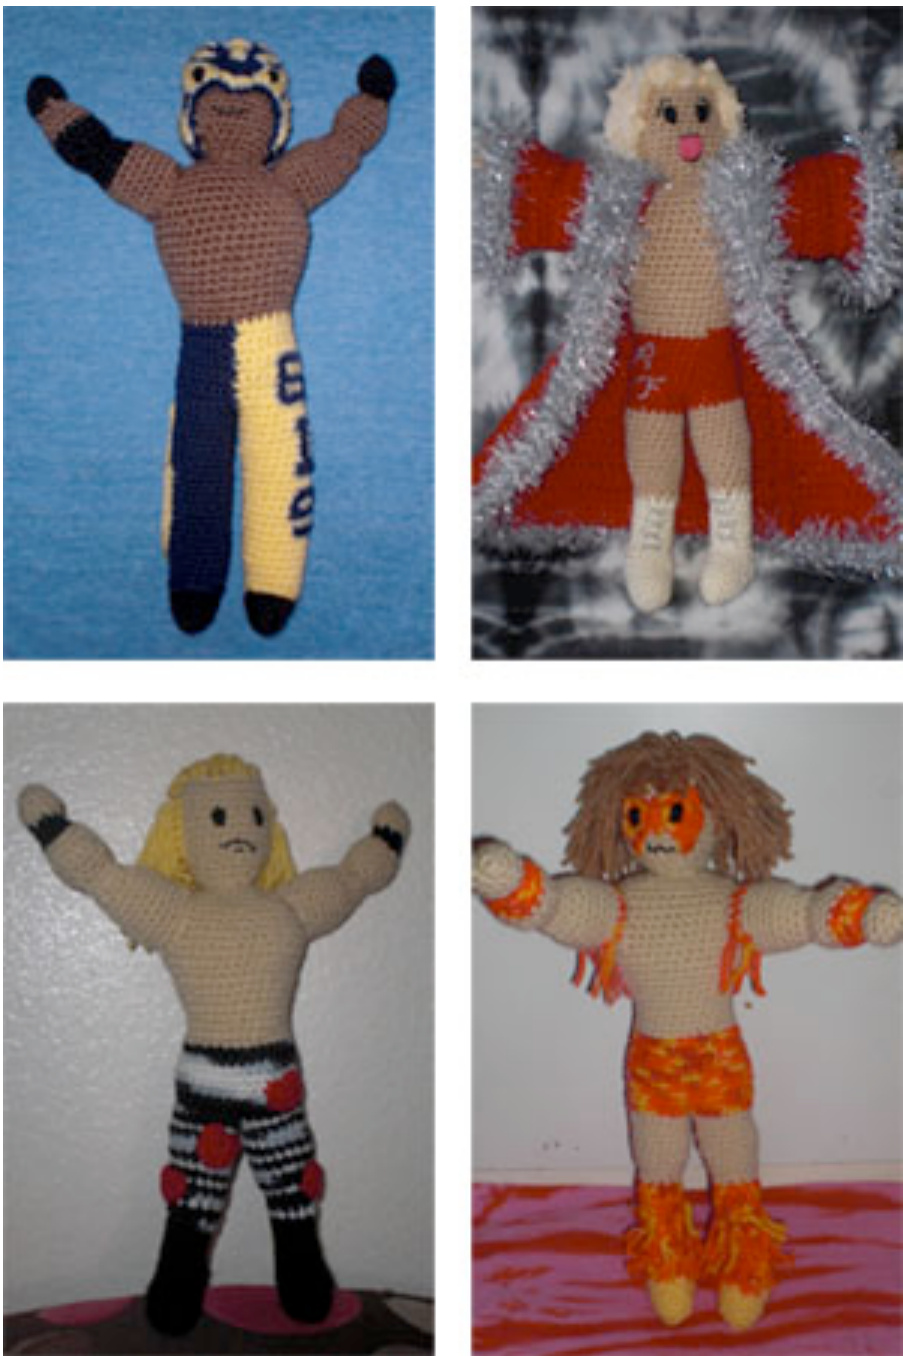
Sample wrestlers I've made testing this pattern... Top left: "Crochet Mysterio," showing off the pants-style leg Top right: "Knit Flair" - yup, you can go pretty crazy making clothes for these guys! Bottom left: "Yarn Michaels," the first wrestler I made Bottom right: "The Ulti-Knit Warrior," demonstrating another option -- making arms come forward by placing hdc at back.


