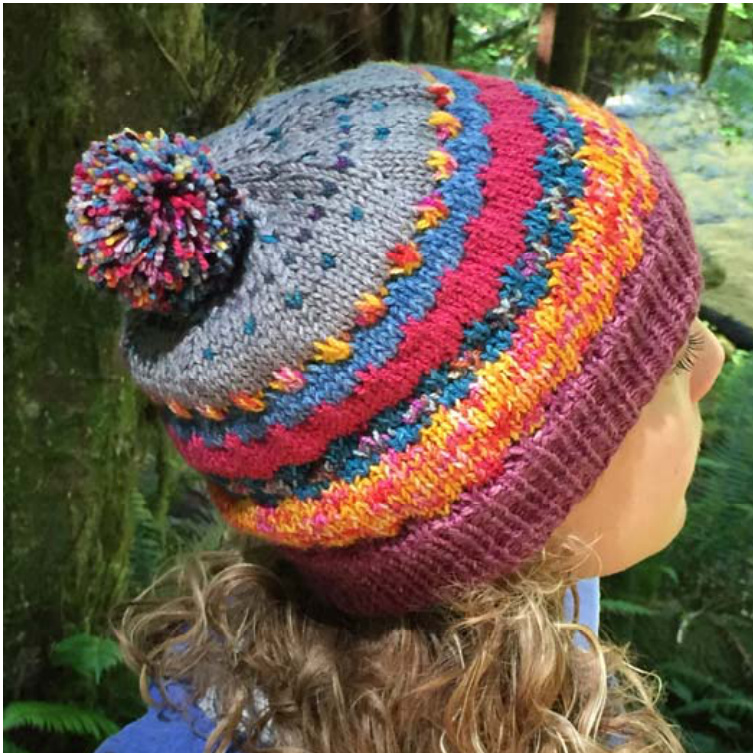
Happy Scrappy Hat By: Janine McCarty aka: yarnandewegirl ? @2015 Janine McCarty designs I don't know about you, but I have lots of leftover yarn. This yarn comes in all colors and weights. It's not enough to make a single project. I always have had a fascination with the sock yarn blanket or hex puff blanket for using up my remnants, but let's face it...that just isn't going to happen. For one I think it would take me a million years just to complete. So I decided on a quicker solution to using up that excess yarn. You can use fingering weight yarn or worsted weight for this hat. Technically the gauge is for a worsted weight version. Since I have so much fingering weight leftovers I just held them double to get that worsted gauge. One of the greatest things about this pattern is its flexibility. You can do whatever you like with the color and the color changes. Want more of a striped version just change color more often. Use this “recipe" to make whatever crazy hat you wish. Enjoy!
Details:
Yarw: Either fingering weight or worsted weight leftover yarn in many colors. Amounts will vary depending on how much leftover yarn you have of each color. Size: This hat fits 20-21inch head circumference with a depth of about 9inches Gauge: 19sts and 24 rows per 4inches in stockinette Needlex and Notionz: 1 Us Size 6 16inch circular needle, 1 US size 8 16inch circular needle. 1 set of US size 8double points, 1 tapestry needle and 1 stitch marker. (Or needles to get gauge)
Getting started:
Using smaller size needles and color you wish the hat band to be, CO 94 stitches (lf using fingering weight yarn hold yarn double) Join for working in the round taking care not to twist the stitches on the needle. Place marker for beginning of round. Work a K1, p1 rib for about 2inches or 18 rounds. (l recommend picking yarn that you have a decent amount of, that way your hat band is all one color. However, if you run out or want to add a different color to the band just add that color at the start of the round and continue working in the 1x1 rib pattern until approximately 2inches. Once you have completed this section switch to the larger circular needle. Next round: k31, m1, k31, m1, k32 (96 stitches) Now you are ready to join your first color!! (NOTE: in this and all future color changes when you are asked to slip stitches you will be holding the working yarn in the back. When you are asked to knit a stitch you will knit with the new color)
COLOR CHANGE1:
ROW 1: \*S3, k1(remember this is with the new color)\* Repeat \* to \* to the end of row. ROW 2: k1, \*s1, k3\* repeat from \* to \* to the last 3 stitches s1, k2 ROW 3: K (this should all be in the new color now) Continue to work the new color in stockinette (knitting all stitches) until you wish to change colors again. COLOR CHANGE2: ROW 1: s1, \*k1, s3\* repeat \* to \* to the last 3 stitches, k1, s2 ROW 2: \*k3, s1\* Repeat \* to \* to the end of row. ROW 3: K (all in the new color) r les deux parties des oreilles entre elles (jersey end vers I'extérieur), puis assembler au corf Continue in this manner until hat reaches approximately 7inches in length. Feel free to make your color sections be whatever you want. Be creative with color and spacing for your own unique hat.
Crown:
The crown may be worked with or without the speckled look. It is entirely up to you and your personal preference. There is a 2 color speckled crown version or a basic 1 color version. Please just follow whichever you desire for the crown decreases. Switch to double pointed needles when necessary.
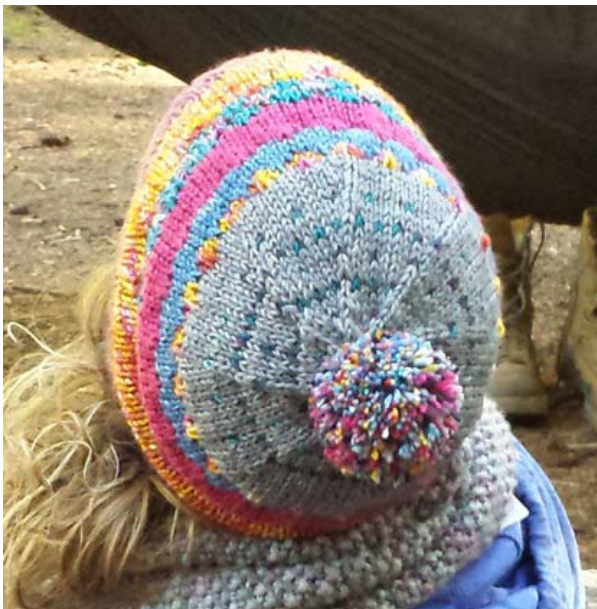
Speckled Crown Decreases:
ROW1: With color A \*k10, k2tog\* repeat to the end of row ROW2: \*k1(B), k3(A)\* repeat to the end of row ROW3: With color A \*k9, k2tog\* repeat to the end of row ROW4: k all with color A ROW5: \*(k1(A), k1(B)) 4x, k2tog\* repeat to the end ROw6: k all color A ROW7: With Color A\*k7, k2tog\* repeat to end ROW8: k2(A), k1(B) \*k3(A), K1(B)\* repeat \* to \* to the last stitch k1(A) ROW9: With color A \*k6, k2tog\* repeat to the end of row ROW10: k all with color A ROW11: \*k1(B), k1(A), k1(B), K1(A), k1(B), k2tog(A)\* repeat to the end of row ROW12: k all with color A ROW13: With color A \*k4, k2tog\* repeat to the end ROW14: k2(A), \*k1(B), k4(A)\* repeat to the last 3 stitches, k1(B), k2(A) ROW15: With color A \*k3, k2tog\* repeat to the end of row ROW16: With color A \*k2, k2tog\* repeat to the end of row ROW17: With color A \*k1, k2tog\* repeat to the end of row ROW18: With color A \*k2tog\* repeat to the end of row Break yarn leaving a 6 to 8inch tail. Thread yarn onto a tapestry needle and weave through all the remaining loops on the knitting needle. Remove knitting needle and cinch up the top of the hat. Weave in the ends and block lightly. Make and attach pompom if you wish. Wear with pride! Basic one color crown commercial purposes. Email Allie with any questions at craftieallie@gmail.com ROW1: \*k10, k2tog\* repeat to the end of row ROW2: k all ROW3: \*k9, k2tog\* repeat to the end of row ROW4: k all ROW5: \*k8, k2tog\* repeat to the end of row ROW6: k all ROW7: \*k7, k2tog\* repeat to the end of row ROW8: k all ROW9: \*k6, k2tog\* repeat to the end of row ROW10: k all ROW11: \*k5, k2tog\* repeat to the end of row ROW12: k all ROW13: \*k4, k2tog\* repeat to the end of row ROW14: k all ROW15: \*k3, k2tog\* repeat to the end of row ROW16: \*k2, k2tog\* repeat to the end of row
ROW17: \*k1, k2tog\* repeat to the end of row ROW18: \*k2tog\* repeat to the end of row
Break yarn leaving a 6 to 8inch tail. Thread yarn onto a tapestry needle and weave through all the remaining loops on the knitting needle. Remove knitting needle and cinch up the top of hat. Weave in the ends and lightly block. Make and attach pompom if you wish. Wear with pride.

@2015 Janine McCarty designs


