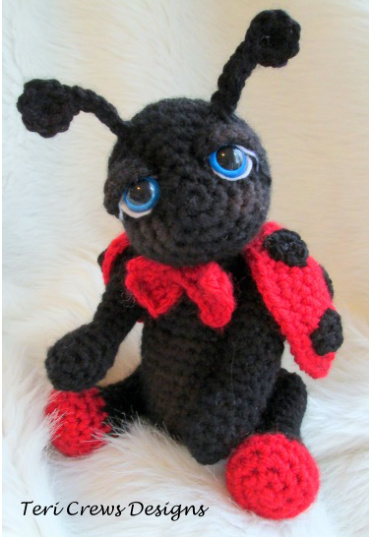
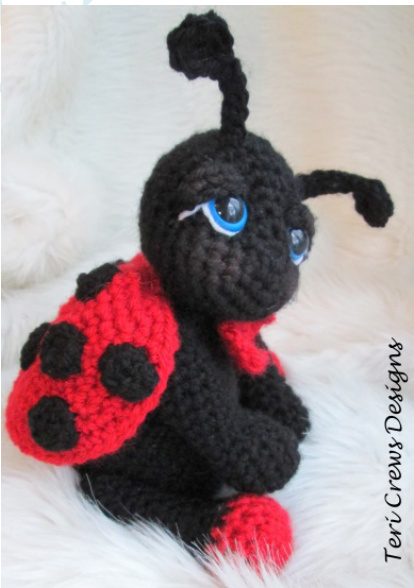
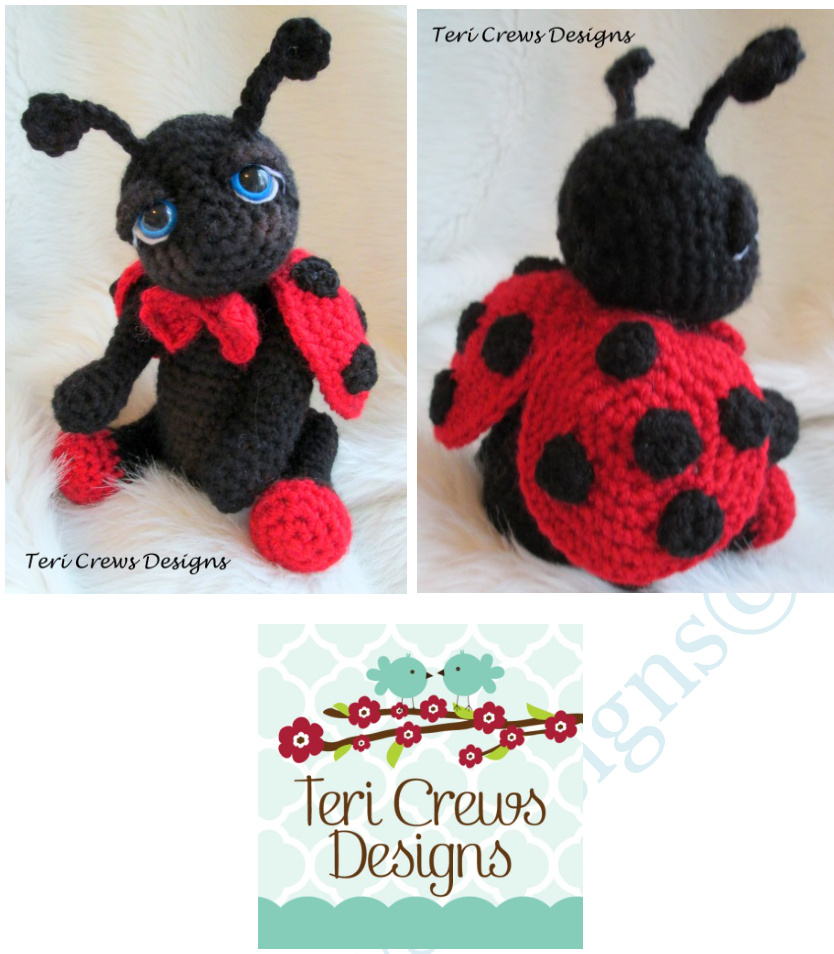
Cute Lady Bug
Crochet Pattern by Teri Crews Designs
Materials:
\~Medium Worsted Weight Yarn. Sample made with: Vanna's Choice, Scarlet and Black, tiny amount of white for mouth and eyelids \~Size G (4mm) hook \~Fiberfill \~Tapestryneedle \~One pair of size 15 mm safety eyes. If you are unable to find safety eyes at your local craft store, Annie's Attic. Com or 6o6o.etsy.com has a large selection to choose from along with several other Etsy sellers.
Optional:
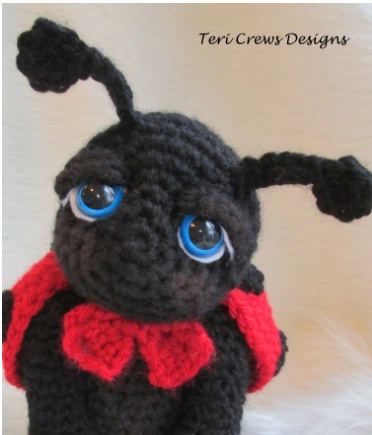
\~Small piece of white felt for under eyes (about 1-2 inches) Dry powder blush for coloring on cheeks and inside ears Finished measurements: Approx. 9 inches tall from top of head to bottom of feet, not counting ears. Abbreviations and Stitches Used: Changer pour K2 jusqu'a la derniere m, aug; 13m au total hdc=half double crochet glisser le marqueur, \*1m end, 1m env\*, répeter de \* a \*, 1m end, aug; 15m au total mesure) jusqu'a la derniere m, aug; 17m au total Avec les aiguilles 5,5mm monter 9m avec K1 sc2tog=sc 2together 1m env, 1m end, 1m env, aug; 11m au total () = repeat between O number of times indicated or all in one stitch as noted [] = repeat between brackets number of times indicated

Notes and Tips:
Helpful to read these before starting and maybe even again when it's time to put your softie together \~Do not join pieces that are crocheted in the round unless otherwise indicated \~A stitch marker will come in handy when repeating rounds or another helpful way to keep track of your rounds is to, start all pieces with a long tail, pull the tail through the beginning stitch of each round. \~Use a tiny piece of felt under eyes to help them stand out. Cut two small circles (tracing around a button, just slightly bigger than your eyes willhelp make a nice circle). Cut a small lit in the center of the circle, insert eye stem and attach to head. Remember not to close the bottom of the head until you have secured safety eye fasteners. ;mall so it's a good idea to weave in your beginning yarn tail after a few round \~Working on face: Crochet head first. Stuff head (but do not close). Cut two tiny circles from felt, just slightly bigger then eyes, (tracing around a small button will help give you a nice circle template). Cut a small slit in center of felt, insert eye stem in slit. Next decide where you want your eyes (sample lady bug's eyes were placed four rounds up from center starting hole with 5 single crochet stitches between them). Once you have decided where your eyes look best, remove stuffing and attach safety backing. After eyes are secure, re-stuff head, thread tapestry needle with long ending yarn and weave through remaining stitches, pulltight to gather and close. \~Needle sculpting will help eyes and facial features stand out. After securing eyes, sew eyelids just over top of eyes at a slight angle. Whip stitch top and sides of lids, leaving bottom on stitched. After lids are sewn on, separate a long (about 12" piece) of yarn into single plies. With two plies, thread tapestry needle (sample used white, besides shaping, needle sculpting will give your lady bug eyelids). Insert needle under the head where stitches won't be seen. Secure yarn and bring needle up in a stitch as close to the inside corner of the right eye as you can, move needle across eye to outside edge at a slight angle, insert needle and go back down under head, tug gently to slightly indent your eye and hold stitch in place, re-insert the needle and repeat for the other eye. Repeat stitches if needed. Secure yarn under head when you are finished. If you are still not sure how needle sculpting works, be sure to visit my blog for video tutorial and additional photos. \~Sew head to top center of body using tiny whip stitches, going from head to body and back up to head, going around, several times if needed to make sure head is securely attached. \~Attaching Legs and Arms: To attach legs; position near bottom center of body, making sure bottom of leg is even with bottom of body and that bear would be able to sit on legs and bottom. Thread tapestry needle, holding leg in place, insert needle about 1 inch down from the top center of the leg. Push needle all the way through to the other side, leaving a long tail on beginning side. Remove leg, insert needle back into body, bringing needle out the same stitch you started with. Tie a secure tight knot (will be hidden under leg). Pick up first leg, insert needle under 3 or 4 stitches on inside of leg (about 1 inch down from top in center). Insert needle back into body (near beginning stitch) coming out through other side (near first stitch), pick up other leg, insert needle under 3 or 4 stitches on inside of leg again, insert needle back into body coming out under other leg, tug slightly to secure, repeat sewing under leg stitches and go back and forth through body 3 or 4 more times, end on same side as you started, tying another small tight knot, hiding under leg. Attach arms the same way, note: I think it's helpful to sew on head first so that you can see where "shoulders"' should be. \~Using tiny whip stitches, sew top of wings (5-6 stitches) to back of body, leting wings just touch in the center.
Head
1: ch 2, 6 sc in 2nd ch from hook 2: 2 sc in each sc (12) 3: (sc in next sc, sc 2 in next sc) around (18) 4: (sc in each of the next 2, sc 2 in next) around (24) 5: (sc in each of the next 3, sc 2 in next) around (30) 6-10: sc in each sc (30) 11: (sc in each of the next 3, sc2tog) around (24) 12-14: sc in each sc (24) 15: (sc in each of the next 2, sc2tog) around (18), join last sc with sl st, FO, leave a long tailfor sewing. Refer to notes and tips for finishing.
Body
Starting at bottom of body 1-5: repeat rounds 1-5 of head (30) 6-15: sc in each sc (30) 16: (sc in each of the next 3, sc2tog) around (24) 17-22: sc in each sc (24) 23: . (sc in each of the next 2 sc, sc2tog) around (18), join last sc with sl st, FO, leave a long tailfor sewing. Stuff, thread tapestry needle with ending yarn, weave through remaining stitches, gather and pull tight to close.
Legs (make 2)
Staring at bottom with Scarlet 1: ch 2, 5 sc in 2nd ch from hook 2: 2 sc in each sc (10) 3: (sc in next sc, sc 2 in next) around (15), change to black 4-5: sc in each sc (15) 6: (sc in next sc, sc2tog) around (10) 7: sc in each sc 8: [sc2tog] 2 times, sc in each remaining sc (8) 9-12: sc in each sc (8) 13: 2 sc in next sc, sc in each remaining sc (9) 14: 2 sc in next sc, sc in each remaining sc (10) 15-17: sc in each sc (10), join last sc of last round with sl st FO, leave a long tailfor sewing Stuff, being sure to shape and bend as you stuff. Thread tapestry needle with ending yarn, weave through remaining stitches and pull tight to close. See notes and tips for help with placement.
Arms (make 2)
Startingatbottom
1-2: repeat 1-2 of leg (10) 3-5: sc in each sc (10) es 6: sc2tog, sc in each remaining sc (9) 7-11: sc in each sc (9) 12: sc 2 in first sc, sc in each remaining sc (10) 13-17: sc in each sc, join last sc of last round with sl st, FO, leave a long tail.for sewing Stuff arm, being sure to shape and bend as you stuff. Thread tapestry needle with ending yarn, weave through remaining stitches, pull tight to close.
Spots (make 2)
With black, make as many or as few as you like, sample has 5 spots on each wing 1: ch 2, 5 sc in 2nd ch from hook 2: 2 sc in each sc, join last st with sl st, (1o) FO, leave a long tail for sewing
Antennae (make 2)
With black,working in a row 1: 1, ch 8, sl st in 2nd ch from hook and each of the next 5 chs to last, 6 hdc in last ch, working on opposite side, sl st in next ch, FO, weave in ends, sew to top of head
Antennae (make 2)
With black, working in a row 1: . ch 8, sl st in 2nd ch from hook and each of the next 5 chs to last, 6 hdc in last ch, working on opposite side, sl st in next ch, FO, weave in ends, sew to top of head
Eyelids (make 2)
Beginning with a long tail (to use for sewing) and black yarn, working in row 1: ch 6, sc in 2nd ch from hook and each ch, turn (5), Fo, leave a long tail for sewing Using first tail, thread tapestry needle and insert needle right by inside corner of eye, bring thread down through head and back up next to beginning stitch, whip stitch top and sides of eye lid using tiny stitches, leaving bottom of lid un-sewn. Thread other yarn tail and insert needle on other side of eye, bring thread down and back up next to beginning st. Secure yarn ends, repeat for other eye.
Wings (make 2)
With Scarlet 1-5: repeat rounds 1-5 of head (30) 6: (sc in each of the next 4, sc 2 in next) around (36) 7: sc in each sc (36) 8: sc3tog, leave remaining stitches unworked, FO, weave in ends Refer to notes for placement
Bow
With Scarlet working in rows 1: ch 5, sc in 2nd ch from hook and each ch, turn (4) 2: ch 1, sc in each sc, turn (4) 3: ch 2, skip first sc, sc in next, skip next sc, sc in last, turn (2) 4-5: ch 1, sc in each sc, turn (2) 6: ch 1, sc 2 in each sc, turn (4) 7: ch 1, sc in each sc, FO, weave in ends. Cut 6" piece of Scarlet yarn, wrap around center of bow several times, tie tightly in the back. Use ends to sew to front of lady bug.

Be sure to visit my website: http://www.tericrewsdesigns.com Or Blog: http://www.tericrews.blogspot.com for tutorials, news, current promotions and pattern errata Cute Lady Bug Crochet Pattern by Teri Crews Designs?2013, 2014, 2015 Do not copy, alter, share or sell pattern, pictures or images. Copies may be made for owner's personal use only. Feel free to sell your finished items, but please do not copy, share or sell pattern.


