Iced Latte Mittens
These Mittens are based on the Fingerless Cafe au Lait Mitts by Paula McKeever, please visit her blog or Ravelry page to get the original pattern, plus all her other wonderful fingerless mitts!
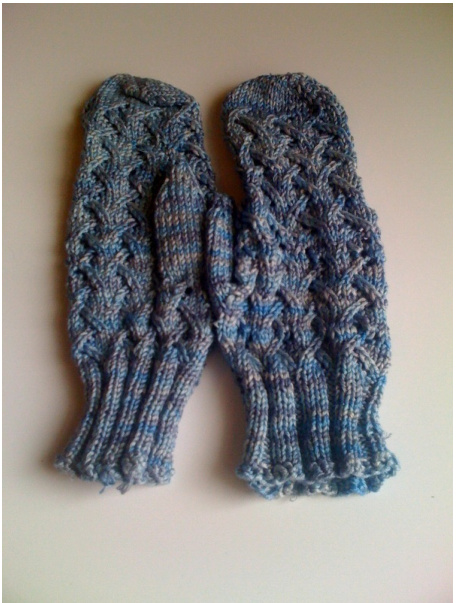
So what's different in these Mittens? They are knit Top Down They are full Mittens not Fingerless Mitts An After though Thumb has been used.
Materials;
Approx 180 yds DK / 8ply (11 wpi) weight yarn OI used hand dyed DK Silk purchased from The Knitting Goddess 2.5mm Circular needles or DPN depending on your preferred style of knitting in the round. Although the pattern is written for Magic Loop, it shouldn't be too difficult to adapt it to DPN. f+h+hiimbli Stitch markers may also be of use to mark the start of each pattern repeat.
Cross-Hatch Lace Pattern
Row 1: K3, K2tog, YO, K1, Row 2: K2, K2tog, YO, K2, Row 3: K1, K2tog, YO, K3, Row 4: K2tog, YO, K4, Row 5: K1, YO, ssk, K3, Row 6: K2, YO, ssk, K2, Row 7: K3, YO, ssk, K1, Row 8: K4, YO, ssk, Using "Judy's Magic Cast On" Cast on 24 Stitches (12 on each needle) Round 1; Knit all stitches, Round 2; \*Kfb, knit till last stitch on needle, Kfb\* repeat for $2^{\mathsf{n d}}$ needle Repeat these 2 rounds until there are 20 stitches on each needle (total 40 )
Iced Latte Mittens page 2
Once you have the 40 stitches Round 9; Knit all stitches Round 10; $\mathsf{\star K F B}_{\phantom{}}$ , Knit all remaining stitches\* repeat on needle 2 (21 stitches each needle for a Total 42 stitches) Begin the Cross-hatch Lace Pattern, you will have 7 sets of the repeat, so a little stitch juggling is needed; Needle One; 24 Stitches (4 sets of the Lace Pattern) Needle Two; 18 Stitches (3 sets of the Lace Pattern) Complete 2 full repeats of the Lace patten then you will begin increasing during repeat 3. Increase Rounds; The Increase is worked at the end of the round, so only instructions for Needle Two are written, Needle One should follow the repeats of the Cross-Hatch Lace only Round 27; \*Cross-hatch Lace Row $1^{*}$ repeat till end Round 28; [\*Cross-hatch Lace Row $^{2^{*}}$ repeat between $\ast\ast$ till end, M1] (19 sts) Round 29; [\*Cross-hatch Lace Row $^{3\ast}$ repeat between $^{**}\,\,3$ times, K1,M1] (20) Round 29; [\*Cross-hatch Lace Row $4^{*}$ repeat between $^{**}\,\,3$ times, K2,M1] (21) Round 30; [\*Cross-hatch Lace Row $5^{*}$ repeat between $^{**}\,\,3$ times, K3,M1] (22) Round 31; [\*Cross-hatch Lace Row $6^{*}$ repeat between $^{**}\,\,3$ times, K4,M1] (23) Round 32; [\*Cross-hatch Lace Row $7^{*}$ repeat between $^{**}\,\,3$ times, K5,M1] (24) Round 33; [\*Cross-hatch Lace Row $^{3\ast}$ repeat between $^{**}\,\,3$ times, K6,] (24 sts) Both Needles should have 24 stitches each for a total of 48, and 8 sets of the Cross-Hatch Lace Pattern. At this point I did a little stitch juggling and moved the First 6 stitches from Needle Two to become the Last 6 stitches of Needle 1. Needle One; 30 Stitches (5 repeats of lace) Needle Two; 18 Stitches (3 repeats of lace) Work the Increase Rounds once more, until you have a total of 54 stitches, and 9 sets of the Cross-Hatch Lace. Check the length & fit of the mitten at this point, you need it to be just to where your thumb joins with your hand. For my hand this was now, if you have longer fingers than me, then you'll need to keep going with the repeats of the lace pattern, if you have larger hands than me you may also need to add in an extra increase round.
Iced Latte Mittens page 3
Adding in the Thumb Line;
If you're following the pattern as written you should be about to start Row 1 of the lace pattern. Needle One; \*Row One\* Five times Needle Two; With the Contrasting Yarn Knit the first 6 stitches, there is no need to follow the lace pattern in the contrast yarn, slip these 6 stitches back onto the left needle purl wise, now with your Working Yarn Re Knit these 6 stitches. For the rest of the needle continue the lace pattern. Finish this repeat of the lace pattern & one more. You should have completed it a total of 6 times for the whole mitten, and should reach the point where your hand joins your wrist. Begin $_{3\times3}$ ribbing and continue for approx 2 inches. Bind off, I used Jenny's Surprisingly Stretchy Bind Off, as this works great for my socks & still manages to stay in shape.
Making the Thumb
Turn the mitten inside out, and find the purl bumps from the contrasting yarn we knit in earlier. There are a set of stitches in between the contrasting yarn, these are the ones we want. While it may be possible to do the next step with DPNIfound itmucheasiertouseacircularneedle. You need to pick up all twelve bumps, and to prevent holes at the thumb join I also picked up / made an extra two at each end of the thumb for a total of 16 stitches. Now start pulling out the waste yarn, I found this a little fiddly & had to snip at the contrast yarn, if you do snip it out take care not to cut your mitten! Slide the cable back through the mitten & turn it right side out. Knit plain until the thumb is just at the end of your thumb nail, then decrease every other round till you have one stitch left, pull the yarn through, and you're done! Go back & start again!
Abbreviations:
st - stitch K - Knit P - Purl K2tog - Knit two stitches together ssk - Slip stitch, slip 2nd stitch, slip back on left needle and knit together DPN - double pointed needle This Pattern is for Personal Use Only and is adapted from the Original Cafe au Lait Pattern Copyrighted by Paula McKeever 2008, also for Personal Use Only. Crosshatch Lace pattern from Charlene Schurch's More Sensational Knitted Socks.


