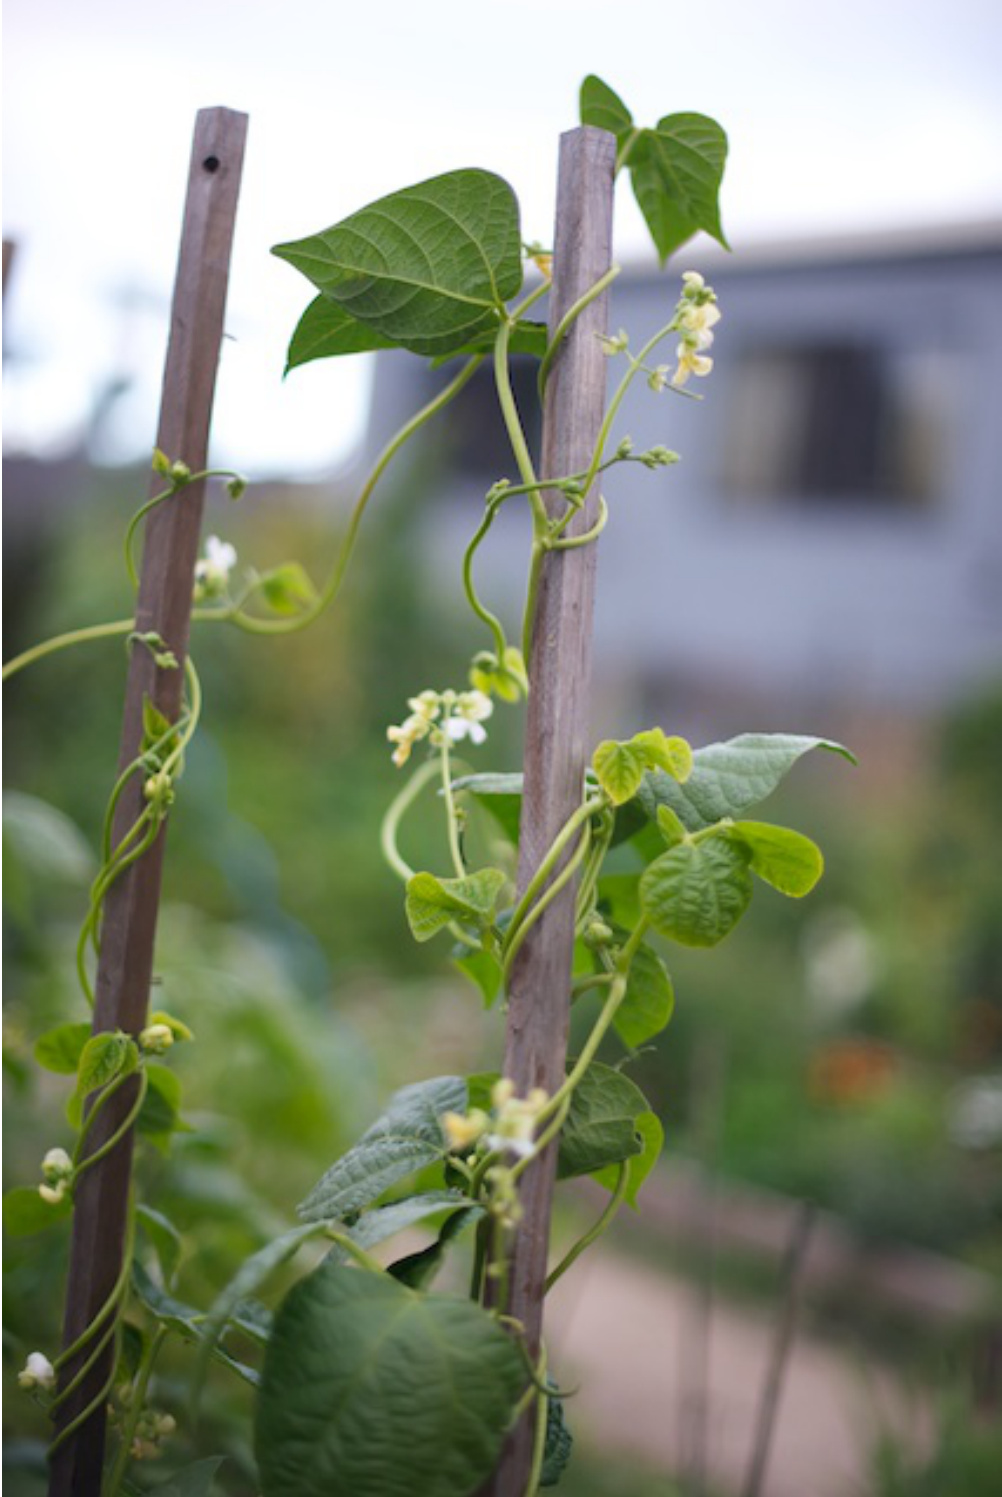
Thanks to Dan Brazelton for the lovely photo!
Beanpole
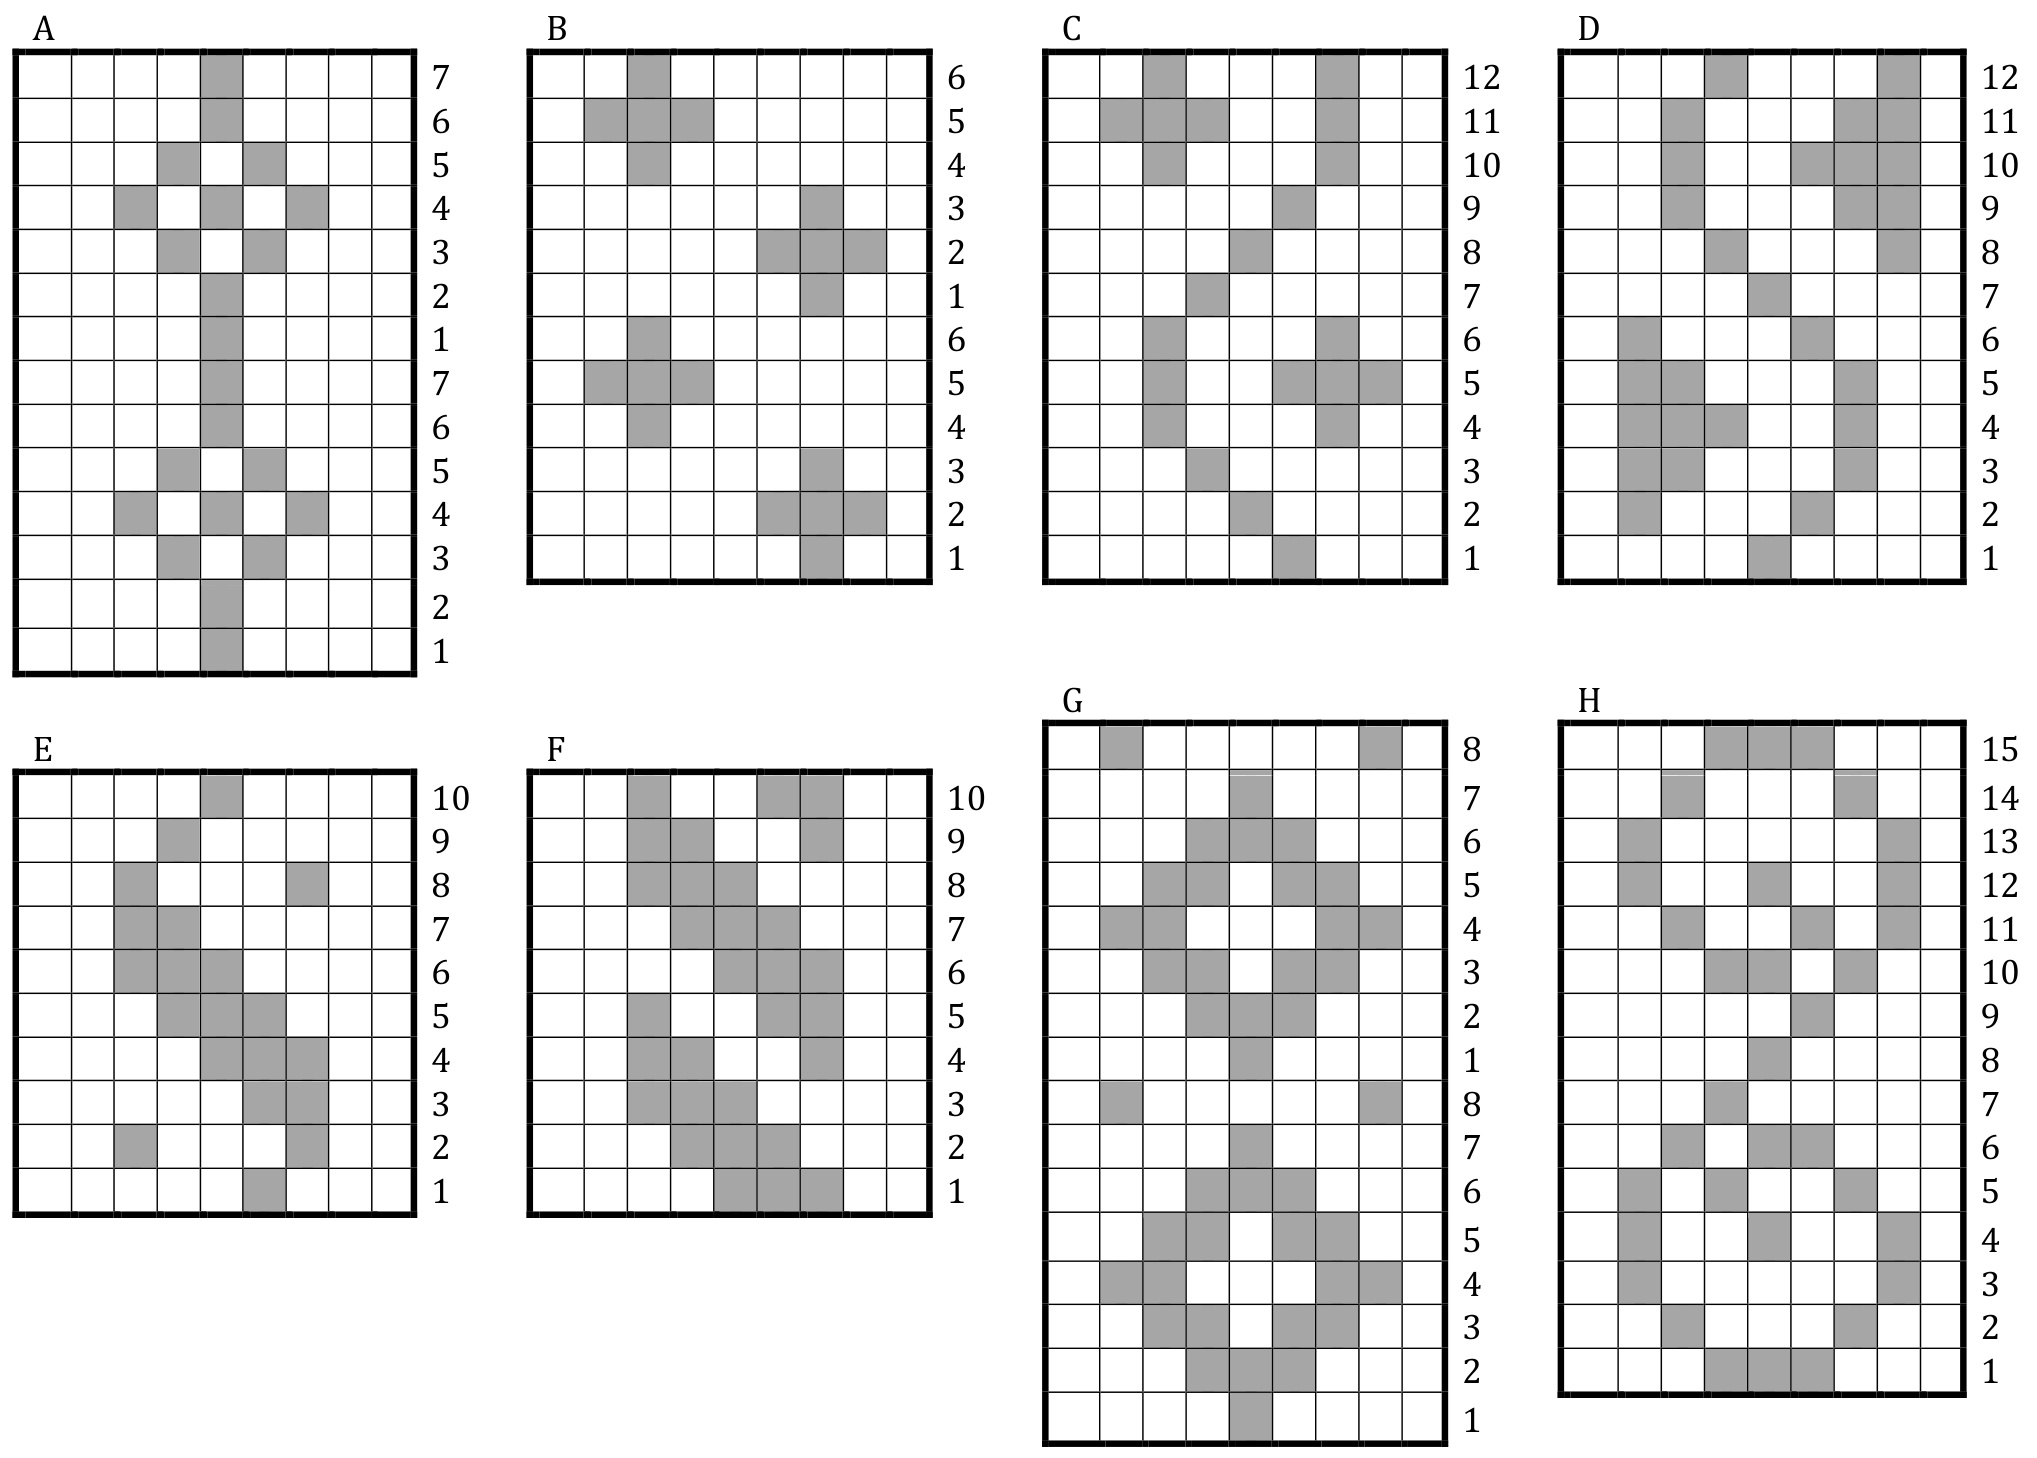
A mystery knit-a-long by Hypercycloid A mystery KAL designed for Ravelry's Odd Sock group, this sock is graced with vertical “beanpole" elements (chosen by the knitter) up the front and back of each sock. If you like fraternally unmatched socks, choose four different elements to maximize oddness. If you prefer a matched look, choose just one or two elements and use them in more than one spot.
Beanpole A Mystery Knit-a-long of the Odd Sock Group
Clue One
Gauge: 9-10 stitches/inch stranded stockinette. If you are not familiar with your personal gauge in stranded knitting, I recommend you take your plain stockinette sock “magic number” (the number of stitches you use for your sock circumference) and add 1/8 of that number of stitches as a starting point. I also recommend going up at least one needle size from your usual. (Example: I usually use 2.25 mm needles and wear a 64-stitch sock; for stranded work I use a 2.5omm or 2.75mm and 72 stitch-circumference. And I try on my work frequently as I go!) Yarn: fingering weight in two contrasting colors, 65-8o grams main color and 45-65 grams contrast color. Women's medium test-knit used 265 yards of MC and 185 yards of CC. Sizing: You will need to work this pattern over a number of stitches that is 26 plus a multiple of 8. Using 74 stitches would be appropriate for a typical women's medium, and 82 stitches for a women's large. To get larger or smaller sizes, add or subtract multiples of 8 from 74. The original pattern makes a leg that is about nine inches tall measured from the floor. The extra-long version adds about an inch to the leg height. Tools: circular needle(s) or DPNs in your chosen size to get gauge. Pattern is written from the perspective of a magic loop knitter. A few stitch markers wouldn't go amiss. Graph paper definitely recommended.
General comments:
This pattern has you choosing from a selection of vertical elements (beanpoles) that run down the front and back of your sock. These vertical elements have different numbers of rows in them. You will be doing a bit of your own charting because your beanpoles probably will not end in the same round of your sock, unless you choose to use the same beanpole design on the front and back of your sock. Because this pattern was created especially for Ravelry's Odd Sock Group, the flexibility in design choices encourages you to create fraternal (odd) socks if you wish! For one pair of socks you can choose up to four different beanpole designs. I believe the longest float in this pattern is five stitches long. Personally, I don't worry about tacking floats unless they are six stitches or longer, but some people like to catch their floats more frequently. Enough chatter, let's get knitting!
Cuff
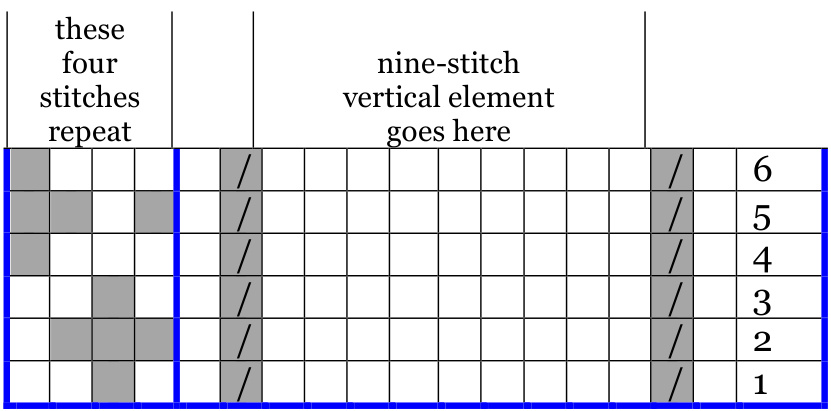
With CC, cast on 74(82) stitches in stretchy cast-on of your choice. Join to work in the round, work 1x1 ribbing in ktbl/purl for two rounds, then break CC and switch to MC. Continue until you have 12-16 rounds or as desired. Arrange stitches so you have a needle division or a stitch marker at the midpoint of your round. Then one set-up round: knit plain with MC. Fun part: choose 1-4 vertical elements (charted next page). They will run up the front and back of each sock, so you can use the same element in four places, two elements in two places, four elements so they are all different etc. The more different elements you choose, the more complicated your charting may be. These vertical elements are repeated down the leg of the sock, so when you have worked the last row of the design, start over at the bottom of the chart and continue. In between the vertical elements, there is a stranded side panel worked over a four-stitch repeat. A 74-stitch sock would have six repeats (24 stitches) between vertical elements, an 82-stitch sock would have seven repeats (28 stitches) per side.
Leg
Round 1: k1(MC), kitbl(CC), knit row 1 of your chosen vertical element, kitbl(CC), k1(MC), repeat row 1 of four-stitch chart until you are halfway around your sock. Repeat, substituting different vertical element on the other side of the sock if desired. Rounds 2-6: each round continues in the same: k1(MC), kitbl(CC), knit next row of vertical element (nine stitches), kitbl(CC), k1(MC), knit next row of four-stitch chart repeat until you are halfway around your sock. Repeat, substituting different vertical element on the other side of the sock if desired. Extra-long version: work rounds 1-6 again before going on to the next clue. (This chart depicts one half of your sock.)
| knit t with MC | |
| knit with CC | |
| ktbl with CC |
Beanpole A Mystery Knit-a-long of the Odd Sock Group
Clue Two
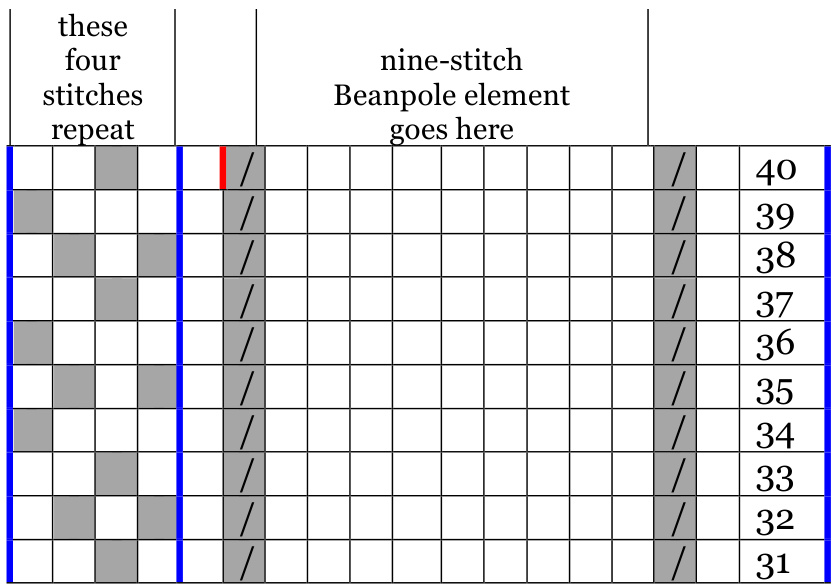
Continue leg rounds 7-3o in the same way: each round continues in the same: k1(MC), kitbl(CC), knit next row of vertical element, kitbl(CC), ki(MC), knit next row of fourstitch chart repeat until you are halfway around your sock. Repeat, substituting different vertical element on the other side of the sock as appropriate. Extra-Long Version: repeat rounds 25-30 before continuing to the next clue. This is the last modification for extra length; from now on your instructions will be the same.
| these four stitches | nine-stitch Beanpole element | |||||||||||||||||||||
| repeat | goes here | 30 | ||||||||||||||||||||
| 29 | ||||||||||||||||||||||
| 28 | ||||||||||||||||||||||
| 27 | ||||||||||||||||||||||
| 26 | ||||||||||||||||||||||
| 25 | ||||||||||||||||||||||
| 24 | ||||||||||||||||||||||
| 23 | ||||||||||||||||||||||
| 22 | ||||||||||||||||||||||
| 21 | ||||||||||||||||||||||
| 20 | ||||||||||||||||||||||
| 19 | ||||||||||||||||||||||
| 18 | ||||||||||||||||||||||
| 17 | ||||||||||||||||||||||
| 16 | ||||||||||||||||||||||
| 15 | ||||||||||||||||||||||
| 14 | ||||||||||||||||||||||
| 13 | ||||||||||||||||||||||
| 9 8 7 | 12 11 10 | |||||||||||||||||||||
| knit with MC | |
| knit with CC | |
| ktbl with CC |
Beanpole A Mystery Knit-a-long of the Odd Sock Group
Clue Three
· Read through the whole clue before you dive in! · Note that the side panel pattern continues to evolve. · Try on your sock at the beginning, middle, and at the end of this clue. · I believe in lifelines. Continue leg, using chart below for rounds 31-40. On round 40, place a stitch marker between stitches #12 and 13 of the round (indicated by red line). You only need a marker on the first half of your stitches.
| knit with MC | |
| knit with CC | |
| ktbl with CC | |
| M | make-1 increase with MC |
| M | make-1 increase with CC |
Things are about to get interesting: the side panel pattern will continue to evolve as we work our way down the leg, and on one side we will be adding increases to create heel gussets which will flare the leg out until we are ready to turn the heel. (Heel gussets are charted beginning at row 41, but if you are working a larger size and you don't want a long leg, you can start the heel gussets earlier, because your gusset will be longer. A 74-stitch sock will have 32 rounds of gusset, and an 82-stitch sock will have 36 rounds of gusset.) The first half of your stitches ("back leg") will form the heel gusset; the last half of your stitches continues in pattern with no increases, just like in Clue 2. The increases cycle every four rows: Add a MC stitch on either side of the beanpole by doing an M1 increase Knit the new MC stitches just made Add a CC stitch on either side of the beanpole by doing an M1 increase Ktbl the new CC stitches just made.
Stitches outlined in red are worked on first half of stitches only, to create heel gussets for back leg.
| repeat | Beanpolegoeshere | ||||||||||||||||||||||||||
| 7 | 56 | ||||||||||||||||||||||||||
| M | 1 | 1 | 1 | M | 55 | ||||||||||||||||||||||
| / | 54 | ||||||||||||||||||||||||||
| M | / | / | M | 53 | |||||||||||||||||||||||
| / | / | 52 | |||||||||||||||||||||||||
| M | M | 51 | |||||||||||||||||||||||||
| 50 | |||||||||||||||||||||||||||
| M | M | 49 | |||||||||||||||||||||||||
| 48 | |||||||||||||||||||||||||||
| M | / | M | 47 | ||||||||||||||||||||||||
| 46 | |||||||||||||||||||||||||||
| M | M | 45 | |||||||||||||||||||||||||
| 一 | 44 | ||||||||||||||||||||||||||
| M | M | 43 | |||||||||||||||||||||||||
| 42 41 | |||||||||||||||||||||||||||
| M | M |
For Chart-Haters! Round 41: k1(MC), m1(MC), ktbl(CC), Beanpole (9 stitches), ktbl(CC), m1(MC), slip marker, k1(MC), 4-stitch repeat to end of back leg, knit second half of round in established pattern Round 42: k2(MC), ktbl(CC), Beanpole, ktbl(CC), k1(MC), slip marker, k1(MC), 4-stitch repeat to end of back leg, knit second half of round in established pattern Round 43: k1(MC), m1(CC), k1(MC), ktbl(CC), Beanpole, ktbl(CC), k1(MC), m1(CC), slip marker, k1(MC), 4-stitch repeat to end of back leg, knit second half of round in established pattern Round 44: k1(MC), ktbl(CC), k1(MC), ktbl(CC), Beanpole, ktbl(CC), k1(MC), ktbl(CC), slip marker, k1(MC), 4-stitch repeat to end of back leg, knit second half of round in established pattern Round 45: k1(MC), m1(MC), work pinstripes as established, ktbl(CC), Beanpole, ktbl(CC), work pinstripes as established, m1(MC), slip marker, k1(MC), 4-stitch repeat to end of back leg, knit second half of round in established pattern Round 46: k2(MC), work pinstripes as established, ktbl(CC), Beanpole, ktbl(CC), work pinstripes as established, k1(MC), slip marker k1(MC), 4-stitch repeat to end of back leg, knit second half of round in established pattern Round 47: k1(MC), m1(CC), work pinstripes as established, ktbl(CC), Beanpole, ktbl(CC), work pinstripes as established, m1(CC), slip marker, k1(MC), 4-stitch repeat to end of back leg, knit second half of round in established pattern Round 48: k1(MC), ktbl(CC), work pinstripes as established, ktbl(CC), Beanpole, ktbl(CC), work pinstripes as established, ktbl(CC), slip marker, k1(MC), 4-stitch repeat to end of back leg, knit second half of round in established pattern Rounds 49-56: continue to develop pinstripe gusset in same four-row cycle, using charts to advance side panels (4-stitch repeats) and beanpoles. We will be finishing the gusset in Clue Four.
Beanpole A Mystery Knit-a-long of the Odd Sock Group
Clue Four
You will be finishing the gussets for the heel in this clue. Your number of gusset rounds depends on the size of your sock. Reference the column which matches your sock numbers!
| If you are making a | 66 | 74 | 82 90 | -stitch sock |
| you will make gusset p pinstripes until you have | 61 | 69 77 | 85 | stitches on the heel side section |
| and lyouwill s still have | 33 | 37 41 | 45 | stitchesont the instep section of the sock |
| This means you are adding | 28 | 32 36 | 40 | stitches in total; |
| that is, | 14 | 16 18 | 20 | in p pinstripes on either side of your beanpole. |
| Your last pattern row before the heel turn 1 will be | 68 | 72 76 | 80 |
In general, you will be ready to turn the heel when the heel side stitches are 5 fewer than the total circumference number you caston. The recipe for the remainder of the gusset is the same:
| Rounds 57, 61, 65... | k1(MC), m1(MC), work pinstripes as established, ktbl(CC), Beanpole (9 stitches), ktbl(CC), work pinstripes as established, m1(MC), slip marker, ki(MC), 4-stitch repeat to end of back leg, knit second half of round in established pattern |
| Rounds 58, 62, 66... | k2(MC), work pinstripes as established, ktbl(CC), Beanpole (9 stitches), ktbl(CC), work pinstripes as established, ki(MC), slip marker, ki(MC), 4-stitch repeat to end of back leg, knit second half of round in established pattern |
| Rounds 59, 63, 67... | ki(MC), m1(CC), work pinstripes as established, ktbl(CC), Beanpole (9 stitches), ktbl(CC), work pinstripes as established, m1(CC), slip marker, ki(MC), 4-stitch repeat to end of back leg, knit second half of round in established pattern |
| Rounds 6o, 64, 68... | k1(MC), ktbl(CC), work pinstripes as established, ktbl(CC), Beanpole (9 stitches), ktbl(CC), work pinstripes as established, ktbl(CC), slip marker, k1(MC), 4-stitch repeat to end of back leg, knit second half of round in established pattern |
Here are the four-stitch repeats needed to take you to the end of your gusset. You will not need all these rows unless you are making a 9o-stitch sock; keep track of the last row you use, so you can pick up in the right place after the heel turn. Increase by adding gusset stitches (two per row) on oddnumbered rows. “inc(MC)" and “inc(CC)" are written next to the chart rows as reminder - reference the recipe above for placement.
| knit (MC) | |
| knit (CC) |
| 68 | inc(CC) inc(MC) | |||||||||||
| inc(CC) | 80 | |||||||||||
| 67 | 79 | |||||||||||
| 66 inc(MC) | 78 | |||||||||||
| 65 64 | 77 | |||||||||||
| 63 | 76 | |||||||||||
| inc(CC) 62 | 75 | |||||||||||
| 61 | 74 | inc(CC) inc(MC) inc(CC) | ||||||||||
| inc(MC) | 73 | |||||||||||
| 60 | inc(CC) | 72 | ||||||||||
| 59 | 71 | |||||||||||
| 58 | inc(MC) | 70 | ||||||||||
| 57 | 69 | inc(MC) |
Try on your sock when the gusset is done!
Beanpole A Mystery Knit-a-long of the Odd Sock Group
Clue Five
Notes:
· The heel turn is completely stranded, so you will be traveling with both colors from start to finish. On wrong side rows, both strands should be held to the WS, in front of the stitches as you work them. (Stranded purling: deepest apologies!) · Description is written from the perspective of a magic-loop or 2-circs knitter - if you are using DPNs your “back needle” or "front needle" may actually be two DPNs. · Read through the whole heel before you start. The typical “last row" is omitted.
Set-up for the heel:
Knit through gusset in pinstripe pattern until you get to 9-stitch beanpole, then knit four stitches in MC. Rearrange stitches on your needles so the ends of rows divide the side panels (4-stitch repeat section) exactly in half. When this is done, you will have beanpole, framed by gussets on either side, and the gussets framed by half your side panel stitches on the back needle. Your yarn will be ready to work stitch #5 of the heel beanpole. Your other needle will have front beanpole framed by half the side panel stitches on either side.
Heel Turn:
As you do your heel turn, you are establishing a pinstripe pattern, but the decrease across the gap and the stitch after it are always worked in MC. Row 1: k1(CC), ssk(MC), k1(MC), turn Row 2: sl1, p1(MC), p1(CC), p2tog(MC), p1(MC), turn Row 3: sl1, k1(MC), k1(CC), k1(MC), ssk(MC), k1(MC) Row 4: sl1, [p1(CC), p1(MC)] twice, p2tog(MC), p1(MC), turn Row 5: sl1, [k1(CC), k1(MC)] twice, k1(CC), ssk(MC), k1(MC), turn Row 6: sl1, [p1(MC), p1(CC)] three times, p2tog(MC), p1(MC), turn Row 7: sl1, [k1(MC), k1(CC)] three times, k1(MC), ssk(MC), k1(MC), turn Row 8: sl1, [p1(CC), p1(MC)] four times, p2tog(MC), p1(MC), turn Row 9: sl1, [k1(CC), k1(MC)] four times, k1(CC), ssk(MC), k1(MC), turn Row 10: sl1, [p1(MC), p1(CC)] five times, p2tog(MC), p1(MC), turn Row 11: sl1, [k1(MC), k1(CC)] five times, k1(MC), ssk(MC), k1(MC), turn Row 12: sl1, [p1(CC), p1(MC)] six times, p2tog(MC), p1(MC), turn Row 13: sl1, [k1(CC), k1(MC)] six times, k1(CC), ssk(MC), k1(MC), turn The heel continues this way: slip the first stitch, work stitches in pinstripe pattern until one stitch before the gap, work a decrease in MC across the gap, work one more stitch in MC, turn. If a row ends with three MC stitches, you will need to establish the pinstripe pattern at the start of the next row by changing the second stitch to CC. Your last heel row is a knit row when the gap is one stitch from the end and the last two stitches are ssk'ed together. Do not turn.
Two details that may cause concern:
: There is still a gap left unbridged because we are ending on a knit row instead of a purl row. Not to worry, we take care of this in Foot Set-up Round #1. · You do not have the same number of stitches you started with. This is correct, for now. You should have two fewer stitches than you started with. We resolve this in Foot Set-up Round #2. For the foot set-up rounds, you will need a few rows of the pattern for the four-stitch repeats of the side panels on the front of the sock. Use the chart below, picking up where you left of in Clue 4.
| 84 | ||||
| 83 | ||||
| 82 | ||||
| 81 | ||||
| 80 | ||||
| 79 | ||||
| 78 | ||||
| 77 |
| 76 | ||||
| 75 | ||||
| 74 | ||||
| 73 | ||||
| 72 | ||||
| 71 | ||||
| 70 | ||||
| 69 |
Foot Set-up Round #1:
For a 74- 0r 90- stitch sock: Work across the instep in pattern, using charts for the side panels and the beanpole, and starting where you left off before the heel turn. Sole stitches: begin with k2tog(MC) to close that last gap, then continue across in established pinstripe pattern. As you work across the sole stitches in pinstripe pattern, identify the center 7 stitches of the sole and put a marker on either end of this 7-stitch group. (It should begin and end with MC.) For a 66- 0r 82-stitch sock: You will need to borrow two stitches from the sole on either side in order to make your side panel sections a multiple of four. Rearrange stitches on your needles slightly before you knit across the instep, so that the last two stitches you just knit from the heel/sole are now the first two stitches on your instep needle(s). Work across the instep in pattern, using charts for the side panels and the beanpole, and starting where you left off before the heel turn. (Remember that the two borrowed stitches are the first half of a four-stitch group!) Sole stitches: begin with k2tog(MC) to close that last gap, then ki(CC). Put those two stitches on your instep needles: you have now borrowed four stitches from the sole (two on either side), which you will work as instep stitches until you reach the toe. As you work across the sole stitches in pinstripe pattern, identify the center 7 stitches of the sole and put a marker on either end of this 7-stitch group. (It should begin and end with MC.)
Foot Set-up Round #2 (for all sizes):
You will be inserting two stitches using make-1 increases on the sole. Work across instep stitches in pattern. Work across sole stitches in pinstripe pattern until marker. Slip marker, k1(MC), m1(MC), [k1(CC), k1(MC)] twice, k1(CC), m1(MC), k1(MC), slip marker, continue across sole in pinstripe pattern. You should now be back at your original number of stitches in circumference from before heel gussets, with nine stitches between your markers. If you are working a 74- or 9o- stitch sock, your stitches will be evenly divided front and back. If you are working a 66- or 82-stitch size, the instep half of the sock will have eight more stitches than the sole.
Beanpole A Mystery Knit-a-long of the Odd Sock Group
Clue Six
Deep breath: the fiddly heel stuffis over! You will be working four-stitch repeats on either side of your front beanpole for the instep, and pinstripes on either side of your back beanpole for the sole as you work your way down the foot. As you reestablish the back beanpole on the sole (those nine stitches between your markers), start the pattern at whatever row in that motif flows best with the pinstripes, or choose a new beanpole entirely if you feel like it. Of course, the side panels on either side of the front beanpole continue to morph along. Note: the four-stitch repeats are read from the chart from right to left; the side panels are not mirror-reflected across the front beanpole.
A General Guide
Instep stitches
| continue to edge | four-stitch repeats | beanpole border | nine-stitch beanpole | beanpole border | four-stitch repeats continue to edge | ||||||||||||||||||
Sole stitches
| ·· | |||||||||||||||||||
| pinstripes to edge | nine-stitch beanpole pinstripes to edge | ||||||||||||||||||
| k1 MC | |
| k1 CC | |
| ktbl CC |
ake you mid-way down the foot - pick it up where you left off in Clue 5
| 100 | ||||
| 99 | ||||
| 98 | ||||
| Z6 | ||||
| 96 | ||||
| 95 | ||||
| 94 | ||||
| 93 | ||||
| 92 | ||||
| 91 |
| 90 | ||||
| 89 | ||||
| 88 | ||||
| 87 | ||||
| 86 | ||||
| 85 | ||||
| 84 | ||||
| 83 | ||||
| 82 | ||||
| 81 |
| 80 | ||||
| 79 | ||||
| 78 | ||||
| 77 | ||||
| 76 | ||||
| 75 | ||||
| 74 | ||||
| 73 | ||||
| 72 | ||||
| 71 |
Clue 7 will take you to the end of the foot patterning, and Clue 8 will give you instructions for the toe and completing the Sock. A note about sizing You will need about 1.75-2" for the toe. Try on your sock at the end of row 1oo and see whether you are close to 2” from the end - if you are, you may not have much knitting to do in Clue 7. Two test-knitters were knitting to 9.5" and 10" and yet found that they had 25 rows difference in length. Row gauge makes a difference, and also negative ease - if your sock is snug, your knitting will contract vertically when you put the sock on, and you will need more rows of knitting to add length, in general. If you suspect your sock may end up too long, put in a lifeline in row 90, 93, 96 or 10o, just in case. These are all fine places to start the toe early if you need to.


