FiBERSPACE Felted Baseball Cap P-3
A quick and easy knit. The crown decreases are based on six sections, just like a real baseball cap! Make cap with or without a top button. One strand of worsted weight yarn and one strand of sport weight yarn is used throughout. Results may vary if yarns are substituted. Instructions are included for one and two-color versions, a ponytail cutout in the back, and a bulky yarn version.
Materials
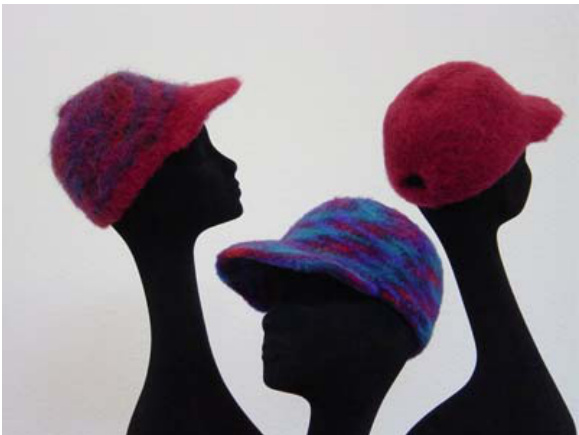
Worsted 2-color version (cap left) 1 skein (4oz/190yds) Brown Sheep Lamb's Pride Worsted in Raspberry 1 skein (134oz/81yds) Brown Sheep Handpaint Originals in Tropical Water 1 skein (134oz/184yds) Brown Sheep NatureSpun Sport in Bordeaux Worsted 1-color version (cap right) 1 skein (4oz/190yds) Brown Sheep Lamb's Pride Worsted in Raspberry 1 skein (134oz/184yds) Brown Sheep NatureSpun Sport in Bordeaux US Size 11 double pointed needles & 24" circular Ring markers, large tapestry needle Gauge before felting: 3 sts/inch in st st
Techniques
SSK: Slip the next two stitches knitwise, one at a time. Insert the left needle from right to left through the slipped stitches and knit. Knitted Cast-on: Hold the work in left hand. Insert the right needle between the last 2 stitches on the left needle. Bring yarn around back and knit, pulling the new stitch between the last two stitches and up onto the left needle. Make sure the tension is loose enough to easily insert the right hand needle between the stitches for the next cast-on stitch. Repeat until desired number of stitches have been cast on. I-Cord: When working the last 3 stitches of the cap, do not turn the work. \*Slide the 3 sts to the other end of the dpn and knit. Do not turn the work\*. Repeat \*\*.
Basic Baseball Cap
Brim - worked back and forth on circular needle With Lamb's Pride Worsted and circular needle, CO 44 sts. Attach NatureSpun Sport. Knit 2 rows. Row 3: \*SSK\* twice, k to last 4 sts, \*k2 tog\* twice. Row 4: Repeat Row 3. Row 5: SSK, k to last 2 sts, k2 tog. Repeat Row 5 until 10 sts remain. Repeat Row 3. Six sts remain. Divide evenly on two dpns. Bring the working ends loosely around the back of the last 3 sts worked. Begin band at this point (center front of cap). Band With circular needle, k 3 sts from the left dpn. Pick up and k 12 sts across decrease edge of brim, making sure to work to end of cast-on row. Turn work. Using knitted cast-on (see Techniques), loosely CO 42 sts. Turn work and join band to other side of brim, being careful not to twist sts. Pick up and k 12 sts along the brim as above. K last 3 sts on the second dpn, place marker. (72 sts) Rnd 1: Purl. Rnd 2: Knit. Rnds 3 & 4: Repeat Rounds 1 & 2. Rnd 5: Purl. If making ponytail cutout, place marker after 36th st. Crown - 2-color version: Attach Handpaint Originals and work in alternating rounds with Lamb's Pride Worsted, carrying Nature Spun Sport throughout. Knit 24 rounds or until knitting measures 6" from last purl round (Rnd 5) of the band. Crown - 1-color & bulky version: Knit 24 rounds or until knitting measures 6" from last purl round (Rnd 5) of the band.
Top decreases
Note: Switch from circular needle to double points when the knitting begins to stretch on the circular needle. Maintaining alternate color rounds, if applicable, work the following decreases. Rnd 1: \*K1, k2 tog, k7, SSK\*, repeat around. (60 sts) Rnds 2 & 3: Knit. Rnd 4: \*K1, k2 tog, k5, SSK\*, repeat around. (48 sts) Rnds 5 & 6: Knit. Rnd 7: \*K1, k2 tog, k3, SSK\*, repeat around (36 sts). Rnds 8 & 9: Knit. Rnd 10: \*K1, k2 tog, k1, SSK\*, repeat around. (24 sts) Rnd 11: Knit. Rnd 12: \*K2 tog, SSK\*, repeat around. (12 sts) Rnd 13: K2 tog around. (6 sts) The cap can be finished at this point without a button on the top. Break yarn, leaving a 4-6" tail. Using large tapestry needle, sew through last 6 sts on dpns and close top. Bring tail to inside. Knot and weave ends into top of cap.
Top Button - 2-color version
Break off Nature Spun Sport. With Lamb's Pride Worsted and Handpaint Originals, k2 tog around. (3 sts) Work I-cord for 31/2". Break yarn, leaving a 6-8" tail. With tapestry needle sew through remaining sts on dpn. Arrange I-cord in a tight circle on top of hat and sew down loosely. Bring tail to inside. Knot and weave ends into top of cap. Top Button - 1-color & bulky version: K2 tog around. (3 sts) Work I-cord as for 2-color version.
Ponytail Cutout Cap
(Not recommended for 2-color caps.) Work Basic Baseball Cap through Round 5 of the Band. Next Rnd: K to within 2 sts of center back marker. Bind off 4 sts, 2 on either side of marker, k to end. Row 1: Knit around to bind-off edge. Turn work. Row 2: Purl around to bind-off edge. Turn work. Repeat Rows 1 & 2 two more times. Row 7: CO 1 st after turning work, k to bind-off edge. Row 8: CO 1 st after turning work, p to bind-off edge. Row 9: CO 1 st after turning work, k to last st of bind-off edge. Knit in the front and the back of last st (inc) and join to opposite edge of cutout. (72 sts) K to center front marker to begin crown.
Crown for Ponytail Cutout Cap
Knit 13 rounds, or until cap measures 6" from beginning of ponytail cutout. Continue with Top Decreases to complete cap. Add Top Button, if desired.
Baseball Cap/Bulky Yarn
Materials
(Cap,center) 2 skeins_(2oz/81yds)Brown Sheep Nature's Spectrum in Sailor's Sunset Size 11 double pointed needles & 24" circular Ring markers, large tapestry needle
Gauge before felting: 3 sts/inch in st st
Knit same as for Basic Baseball Cap, using one strand of Nature's Spectrum only and no sport weight yarn.
Felting
Set washer for heavy-duty cycle, low water level and hot water. Add a few drops of liquid laundry soap to the water. Place cap in a lingerie bag and drop in the washer. Agitate. Because cap is fairly dense, it takes a lot of agitation to felt completely. Check on cap after 10 minutes of agitation, then, every 5 minutes until it is the desired size. Reset the agitation cycle as often as needed until cap is the proper size. Continue with either method listed below to finish the felting process. "Faint of Heart Method": Remove cap from washer and squeeze out excess water - do not wring. Place in tub or bowl of cool water and rinse by hand. Squeeze out excess water, shape hat and let dry.
"Living Dangerously in the Spin Cycle Method'
(Disclaimer: Do not attempt this method while talking on the phone, polishing your nails or disciplining children. Your undivided attention is an absolute necessity!) Let washer proceed to rinse cycle. Agitate cap for 10-20 seconds. Stop washer. Reset washer to pump out water and spin. Once spinning begins, spin cap for about 20 seconds. Stop washer. Reposition cap in tub so that brim and band are up against the tub wall and the top is facing the agitator. Spin for another 20 seconds. Most of the water will be spun out and there should be no unsightly creases. Shape hat and let dry.
Try This Sometime
To make cap adjustable, sew 2-3 rows of round knitting elastic for about 3-4" through the inside of the center back band of the felted and dried cap. Decorate caps with beads, sequins or your favorite team's logo. Have fun with it!
Felting Tips For First Time Felters
Felt Happens!
When aknitted piece made of 100%wool is washed inhot water with lots of agitation, and soap, felt happens. Wool fibers lock together under these conditions and, as many of you know from experience, felt is forever! Pieces knitted for felting start out loose and large and end up as a dense, fuzzy fabric that is warmand durable.“Superwash"wools,synthetics andcottons will not felt. If you are not sure a specific yarn or yarn color will felt, try a swatch first.
Knitting
Successful felted projects begin with correct knitting. Aside from following the pattern directions, make sure that your stitchesarenottootight.Wool fibers need room tomove during felting. When stitches are too tight, felting might stop too soon. If you tend to knit tightly, use a needle one size larger.
Hats
When casting on for a rolled brim hat, do so firmly. Knit the first twoorthreerows a little tighter than for the rest of the hat. Flat brimmed hats should be cast on loosely so they will not curl. Not all patterns will tell you how to cast on/off for best results.
Mittens
A loose cast on is important for felted mittens. Use a larger needle to cast on if you tend to cast on tightly.
Slippers
If possible, knit both slippers at the same time, completing a. section on one and thenrepeating it on the other.Your tension can be different every time you knit.
Finishing
Weave all tails in securely. Break the yarn instead of cutting it, since cutting leaves a blunt end. It's OK to split the yarn as you sew and helps to keep. tails from escaping. Tails that work out during felting can be trimmed off or sewn in.
On To the Washer
Put your piece(s) in a lingerie bag or pillow cover. Do not add a towel as some patterns suggest - cotton lint can become trapped in the felt and is nearly impossible to get out. Jeans work if they are not frayed. Set your washer for "Hot” and “Low" water level. Add a about a tablespoon of liquid soap. Lots of agitation is necessary for felting. Reset your machine several times, if necessary. Do not let the hot water spin out until you are finished felting. Stay nearby to check every 3-5 minutes on felting progress. When the piece is nearly ready, checkeveryminute. If you need to try the piece on, squeeze (don't wring) the water out of the piece, blot it on a towel, and try it on. When felting slippers, try on each one. Be sure to compare the two for size when making slippers for someone with a larger/smaller foot than your own. If a hat is becoming tight around the brim, but needs to come down in the crown, put your fists inside the lower edge and pull outward. The fibers will give somewhat while warm and wet. Stretch around the brim until it is larger. Put the hat back in the washer and check the progress often.
Practice Safe Felting
Never put hands in tub during agitation. Stop machine first. Keep washer clean by collecting floating fibers with an aquarium net before the first spin.
Rinsing
When pieces are felted to your satisfaction, let the washer drain out and spin. Stop the spin cycle after a minute and remove the pieces. After spinning, let machine fill for the rinse. Put the pieces back in the tub after it fills with water. Agitate about 10 seconds then reset the washer to spin. Let the water pump out and allow the spinning to begin. Stop the washer after about 10 seconds. Reposition the pieces in the tub. Spin another 10 seconds and remove. Too much spinning can cause nasty felted welts that usually end up in the worst places. If you are worried about welts or additional felting from rinsing and spinning, rinse the pieces by hand in cool water and blot them with towels. (Do not wring.)
Shaping
Shape pieces to your liking. Some hats have a definite front and back. Try the hat on to see what looks best. Or, find the beginningof thecast-on.Theretendstobeabumpatthat point which looks better at the back. Place hat on a bowl or hat shaper todry.In a hurry?Putfeltedpieceson abakingrack that is positioned over a floor register. Pieces will get good air circulation and will dry faster. Shape slippers on your feet, if possible. Otherwise stretch or shape them to resemble a foot - tapered from the big toe down to the little toe, etc., and dry as for hats. Purses can be shaped as you like.


