FIBERSPACE Slip Stitch Felted Bag P-5
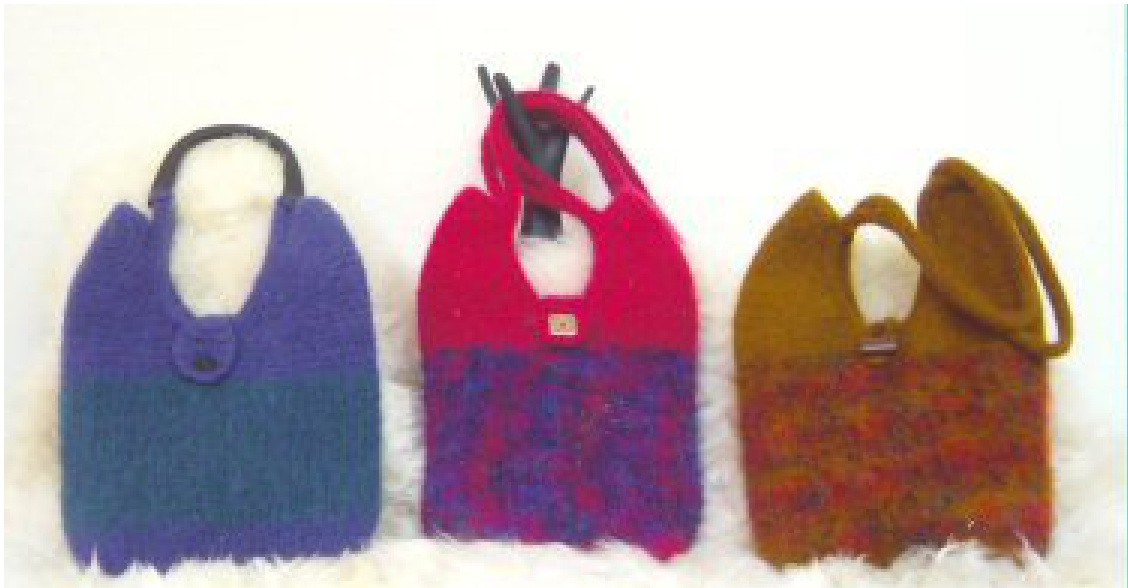
The Slip-Stitch Felted Bag is easy to knit and can be finished with purchased handles or I-cord. One strand of worsted weight yarn is used throughout. The slip stitch pattern helps to highlight hand painted yarns so that only one skein is required for a very colorful effect. Two solid colors work well also. (Pictured: Ink Blue & Pine Tree) Dimensions before felting: 22" x 141/2", after felting: 14" x 11".
Materials
MC-2 skeins (4oz/190yds) Brown Sheep Lamb's Pride Worsted (pictured: Raspberry, Bronze Patina) CC- 1 skein (1340z/81yds) Brown Sheep Handpaint Originals (pictured: Tropical Water, New England Fall) US Size 11 double pointed needles & 24" circular, smaller circular for picking up sts 7 ring markers Optional: 51/2-61/2" Lucite Purse Handle, 2-3 buttons, size 4 snap, VelcroTM or magnetic closure tapestry needle, strong sewing thread & needle
Gauge: 3 sts/inch
Slip-Stitch Rib Pattern
Rnd 1: P1, \*k1, sl 1, k1, p2; rep from \* to last 4 sts, k1, sl 1, k1, p1. Rnd 2: P1, \*k3, p2; rep from \* to last 4 sts, k3, p1. PLEASE NOTE: This rib pattern draws in somewhat and looks very strange before felting. It will, however, flatten outwhenfelted.
Techniques
m1 - make one: Make a st by picking up the loop lying between the st just worked and the next st. Knit into the back of this st. sl 1 - slip one: Slip the next st from the left needle to the right as if to purl. k2tog tbl: Knit two sts together through the back loop by inserting needle purlwise through the next two sts and knitting them together. pat: Repeat stitch pattern as written. pm - place marker. Place ring marker at designated point. ssk - slip, slip, knit: Slip the next two sts knitwise, one at a time. Insert the left needle from left to right through the slipped stitches and knit. Picking Up Stitches For Applied I-Cord: Insert smaller circular needle through outer edge of sts. For best results, pick up the same leg of each st around. I-Cord: With dpn, cast on required number of sts. \*Slide sts to the other end of the dpn and knit. Do not turn the work\*. Repeat \*\* Applied I-cord: (5 st version) \*Slide the five I-cord sts from dpn to circular. K4, k2tog tbl\*. Repeat\*\* until all sts on circular have been worked.
Bag Top
With MC and circular, cast on 11 sts. Rows: 1-4: Knit (Row 1 is RS - right side). Row 5: K1, m1, k to last st, m1, k1. Rows 6-8: Knit Rows 9-20: Repeat Rows 5-8, three times. (19 sts) Row 21: Repeat Row 5 Row 22: Knit. Repeat Rows 21 & 22 until there are 35 sts, ending with a WSrow. Next Row: Repeat Row 5 until there are 45 sts. Next Row: Knit. Break yarn, leaving a 4-6" tail. Leave bag top just knitted on circular. Second Bag Top: With dpn and MC, cast on 11 sts for second top. Transfer sts to circular as follows: With RS of completed top facing, slide sts onto right end of circular needle. Knit second bag top beginning with Row 1 of Bag Top. Do not break yarn after final row. Body of Bag Knit across the 45 sts just worked. Secure tail from first. top section and k across the next 45 sts. Place marker for beg of rnd and mark as bag back. (90 sts) Rnd 1: Knit. Rnd 2: Purl. Rnds 3 & 4: Repeat Rnds 1 & 2. Rnd 5: Work Round 1 of Slip Stitch Rib Pattern with MC. Rnd 6: Join CC, work Rnd 2 of Slip Stitch Rib Pattern. Work Slip Stitch Rib Pattern in alternating rounds of MC and CC until body of bag measures 11-12". When CC yarn is used up, work with MC only. Bag Decreases Rnd1: Pat 16 sts, \*pm, k4, k2tog, pm, k1, ssk, k4, pm\*, pat 32 sts, rep \*\*, pat to end of rnd. Rnd 2: Pat to first marker, \*slip marker and k to second marker, slip marker and k to third marker, slip marker\*, pat to next marker, repeat \*\*, pat to end of rnd. Rnd 3: Repeat Rnd 2. Rnd 4: Pat to first marker,\*slip marker, k to 2 sts before second marker, k2tog, slip second marker, k1, ssk, kto third marker, slip marker\*, pat to next marker, repeat \*, pat to end of rnd. Rnds 5 & 6: Repeat Rnds 2 & 3. Rnds 7-9: Repeat Rnds 4-6. Rnds 10 & 11: Repeat Rnds 4 & 5 only. Rnds 12 & 13: Repeat Rnds 4 & 5. (70 sts) Rnd 14: Knit, removing decrease markers. Bind Off Round: K18, begin binding off loosely from this point. Bind off all sts. Leave 14" tail and use it to sew bottom of bag together. Work tail to inside of bag. Cord for Lucite Handle Bag Back - With RS of back facing, use extra circular to pick up edge stitches as follows: Pick up 22 sts along edge,3 sts at bag center, and 22 sts along opposite edge (47 sts). Set aside. With dpn, cast on 3 sts. Rows 1-5: Knit (garter st, not I-cord). Row 2: K1, m1, k1, m1, k1. (5 sts) Begin I-cord on these 5 sts and work for 2". Begin appliec I-cord on bag edge and work across all47 sts. Work loosely to avoid puckering during felting. Work 2" I-cord. Next Row: K1, (k2tog), twice. (3 sts) Repeat Rows 1-5. Bind off & work in tails. Bag Front - Repeat as for bag back, working I-cord for only 1" after increases (Row 2) and before decreases. I-Cord Handles Make 2. With extra circular, pick up bag top edge stitches as in directions above and set aside. With dpn, cast on 5 sts and work I-cord for 14-18". Begin applied l-cord on bag edge and work loosely across all 47 sts. Work 14-18" of I-cord. Break yarn, leaving 6" tail. Use tail to weave sts off dpn while attaching to cast on edge. Be careful not to twist cord. Work tails into I-cord.
Closures: Button Loop
With dpn, cast on 3 sts. Work I-cord for 10". Break yarn and use tail to weave sts off dpn and join to cast on edge. Form into a figure eight and use tail to secure the shape. Work tails intoI-cord.
Button Flap
Cast on 5 sts. Rows 1, 3, 6-10, 12, 14-17, 19, 21-25, & 27: Knit. Row 2: K1, m1, k3, m1, k1. (7 sts) Row 4: K3, bind off 1, k to end. (6 sts) Row 5: K1, m1, k2, CO 1 using overhand cast on, k2, m1, k1. (9 sts) Row 11: K1, k2tog, k3, ssk, k1. (7 sts) Row 13: K1, k2tog, k1, ssk, k1. (5 sts) Row 18: K1, m1, k3, m1, k1. (7 sts) Row 20: K1, m1, k5, m1, k1. (9 sts) Row 26: K1, k2tog, k3, ssk, k1. (7 sts) Row 28: K1, k2tog, k1, ssk, k1. (5 sts) Bind off. Work in tails.
Felting
Set washer for heavy-duty cycle, low water level and hot water. Add a few drops of liquid laundry soap to the water. Place bag and button loop/flap in a zippered bag and drop in the washer. Agitate. Check on bag after 7-10 minutes of agitation, then, every 3-5 minutes until it is the desired size. Reset the agitation cycle as often as needed to accomplish this. Continue with either method listed below to finish the felting process. "Faint of Heart Method": Remove bag and button loop/flap from washer. Squeeze out excess water - do not wring. Place in tub or bowl of cool water and rinse by hand. Squeeze out excess water, shape and let dry. "Living Dangerously in the Spin Cycle Method": (Disclaimer: Do not attempt this method while talking on the phone, polishing your nails or disciplining children. Your undivided attention is an absolute necessity!) Let washer proceed to rinse cycle. Agitate bag and loop/flap for 10-20 seconds. Stop washer. Reset washer to pump out water and spin. Once spinning begins, spin for about 20 seconds. Stop washer. Position bag in tub so that it stands up flat against the tub wall. Spin for another 20-30 seconds. Most of the water will be spun out and there should be no unsightly creases. Shape and let dry.
Finishing
Lucite Handle - Bring back cord through handle slots and overlap onto front cord. Secure with button or use hidden stitches to tack the flat edges of the cord together. Button Loop - With strong thread, sew loop down to back of bag at top center. Attach button or toggle to front. Button Flap - With strong thread, sew flap down to back of bag at top center. Attach snap, button, VelcroTM, or magnetic closure to flap.


