Knitting pattern

If you need any help with the patterns please contact me at marie@mukicrafts.com
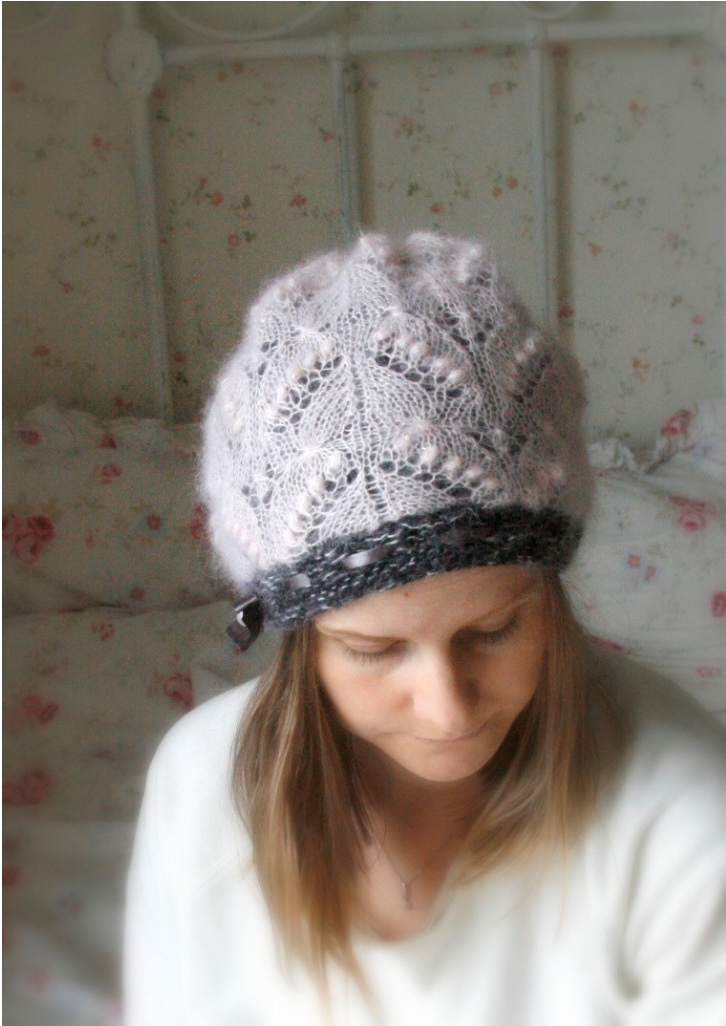
KNITTING PATTERN for Silvia hat
Sizes: woman With head circumference: 22"(56)
You need:
Worsted yarn (50-75 g) Mohair yarn (15-25g) Knitting needles US 4 (3.5 mm) Knitting needles US 8 (5 mm) Ribbon and a bead for decorating
Gauge:
US 8 (5 mm) 10 x 10 cm =16 sts x 24 rows (worsted yarn) US 4 (3.5 mm) 10 x 10 cm =26 sts x 34 rows (mohair yarn)
Hat
Pattern M1 (20 rows): Row 1 (RS): k1 (edge),\* ssk, k4, yo, k1, yo, k1, k2tog, k1, ssk, k1, yo, k1, yo, k4, k2tog\*, repeat from \*-\* till the last stitch: k1 (edge) Row 2 (WS) and every alternate row: p all sts (remember to purl the bobble sts tog!) Row 3: k1 (edge),\* ssk, k3, yo, k1, yo, “make a bobble” (knit 7 sts out of one [knit, yarn Over, knit, yarn over.] On WS purl these 7 sts together), k1, k2tog, k1, ssk, k1, make a bobble, yo, k1, yo, k3, k2tog\*, repeat from \*-\* till the last stitch: k1 (edge) Row 5: k1 (edge),\* ssk, k2, yo, k1, yo, “make a bobble", k2, k2tog, k1, ssk, k2, make a bobble, yo, k1, yo, k2, k2tog\*, repeat from \*-\* till the last stitch: k1 (edge) Row 7: k1 (edge),\* ssk, k1, yo, k1, yo, “make a bobble", k3, k2tog, k1, ssk, k3, make a bobble, yo, k1, yo, k1, k2tog\*, repeat from \*-\* till the last stitch: k1 (edge) Row 9: k1 (edge),\* ssk, yo, k1, yo, “make a bobble", k4, k2tog, k1, ssk, k4, make a bobble, yo, k1, yo, k2tog\*, repeat from \*-\* till the last stitch: k1 (edge) Row 11: k1 (edge),\* k2, “"make a bobble", k5, k2tog, yo, k1, yo, ssk, k5, “make a bobble", k2\*, repeat from \*-\* till the last stitch: k1 (edge) Row 13: k1 (edge),\* k7, k2tog, yo, k3, yo, ssk, k7 \*, repeat from \*-\* till the last stitch: k1 (edge) Row 15: k1 (edge),\* k2, "k 5 stitches out of 5” (k5tog but before slipping them from left needle work: yo, k1, yo, k1), k2, yo, sl1, k2tog, passo, yo, k2, “k 5 stitches out of 5", k2\*, repeat from \*_\* till the last stitch: k1 (edge) Row 17 and 19: k all stitches Repeat rows1-20 Note! You can use an extra needle for making the bobbles by putting the extra needle on top of your right hand needle when knitting the 7 sts out of one. This way the sts will be loose enough.
Worked back and forth in two layers. Inner layer yarn - A, top - B
Cast on with both yarns 72 sts with needles US 4 (3.5 mm) and work garter stitch for 6 rows Row 7 (RS): \*k2tog, yo, k1\* till end Row 8-10 work garter stitch. Now put yarn B to side (don't cut), change to US 8 (5 mm) needles and continue with yarn A and stocking stitch (inner layer). On the first RS row increase after every 4 stitches. Work in stocking stitch till the piece measures about 6" (15 cm), then on the next RS row work: \*k3, k2tog\* till end When the piece measures 8" (2o cm) continue: Row 1: \*k2tog, k1\* till the end Row 2: p all sts Row 3: \*k2tog \* till the end Row 4: p all sts Row 5: \*k2tog\* all sts Row 6: p all sts Cut the yarn, pull it through the remaining sts, tighten tog and fasten. For the top layer take needles US 4 (3.5 mm) and pick up where you finished working in garter stitch with yarn B 107 sts. Work stocking stitch for 2 rows, then continue with pattern M1 and work the pattern 3 times, then: Row 1: \*k2tog, k1\* till the end Row 2: p Row 3: \*k2tog, k1\* till the end Row 4: p all sts Row 5: \*k2tog\* all sts Cut the yarn, pull it through the remaining sts, tighten tog and fasten. Now first sew together the inner layer and the garter stitch part of the hat, then the top layer. Decorate the hat with a ribbon pulling it through the loops of the band (Row 7), tie it into a bow.

\*\* Note: You can sllfinished items made from this pattern but please do not resell the patterns as I have put a lot of effort into designing and testing them. Thank you! \*\*\*
How to get in touch?
www.mukicrafts.com/subscribe www.mukicrafts.com www.twitter.com/mukicrafts ? www.facebook.com/mukicrafts www.google.com/+MukiCraftsPage


