Ruffly Muffly Scarf
By Lise Stoessel @ 2013
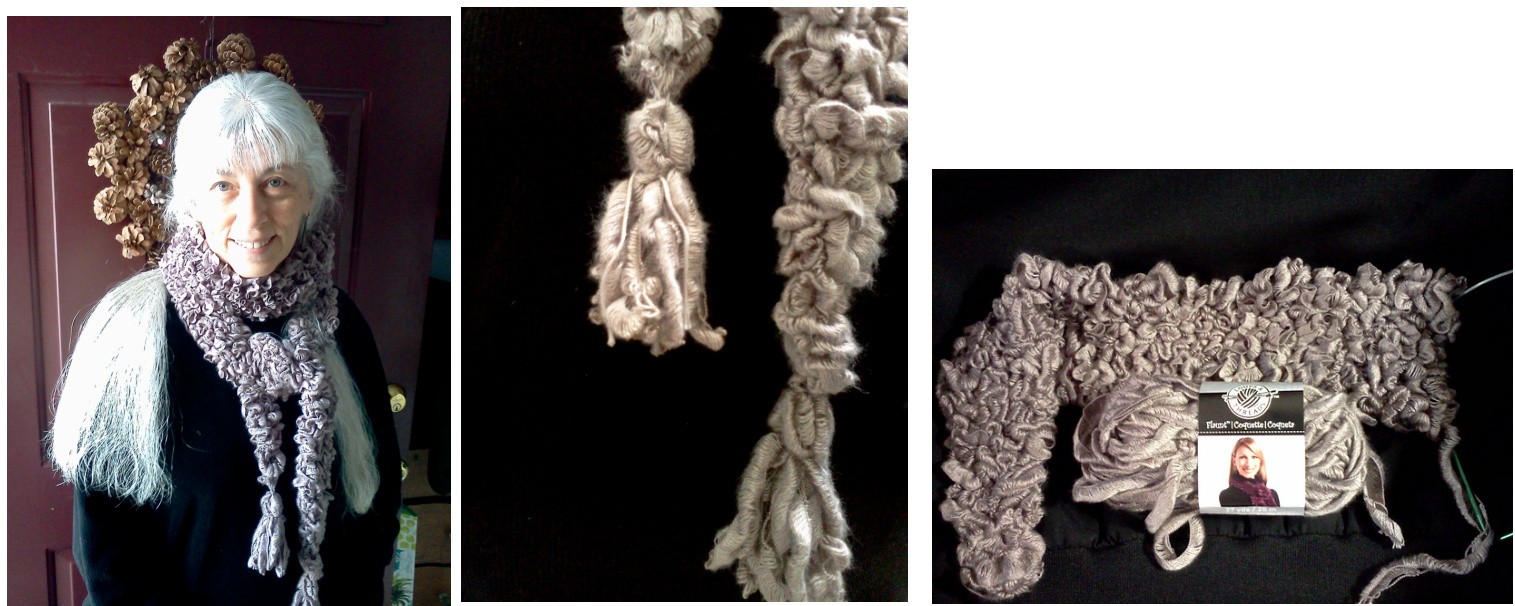
Materials: · 3 skeins Flaunt Coquette (I used “mushroom” colorway) · size 5 knitting needles (straight or circular, doesn't have to be a long needle) · 1 skein of matching embroidery thread · yarn needle for attaching tassels · crochet hook for weaving in ends (not essential, but helpful) Finished Measurements: 62" long (without tassels) x 3” wide (Scarf is pretty stretchy lengthwise, and will probably tend to get longer with use.) Skills needed: garter stitch, decreasing (knit 2 together) Difficulty: easy (but fiddly) Instructions: Knit in garter stitch throughout. cast on 3 stitches by picking up the eyelets. To avoid a raw edge at the edge of your work, fold th ribbon yarn back about an inch and pick up the stitches from the folded ribbon. (see link to the tutorial below for a demonstration of this). Increase one stitch at the end of every 3rd row by just picking up an additional eyelet. This will increase the width of the work evenly on each side of the scarf, yielding the tapered end. Continue until you have a total of 14 stitches on your needle. Knit until scarf measures 56"'. Start decreasing: K2tog at beginning of row, every third row, until you have 3 stitches left. (I placed a safety pin on my decreases to help me keep track.) Bind off the way you normally would. Cut the yarn about 2” from the end and using the crochet hook, pull the end through the last loop to tie it off. You can then just continue to pullit up through the body of the scarf to hide the end. O Cut four 8" pieces of embroidery thread. Set aside. oUsing the remaining yarn (if you stick with my instructions you'll have just the right amount left), cut the yarn in half. OTake one of the pieces, and fold it in half. Then again. Then again. (You can adjust the folds according to your personal taste to make a long thin tassle, or a short chubby one.) 0Take one piece of embroidery thread and tie off the top fold, bisecting your looped/folded yarn. OSmooth the tied-off yarn bundle so that the embroidery tie is at the top and the loops hang down evenly. Tug a little and straighten the loops, if necessary. Take another piece of embroidery thread and tie it around the loop bundle about 3% from the top. Fasten with a double knot. Then, wrap the threads back around and tie on the other side, just for extra security. You can either leave these threads loose, or weave the ends into the top of your tassel if you want to hide them. O Cut the bottoms of the loops and trim as necessary. Use your yarn needle and the top tie to fasten it to the end of the scarf. Weave it through the end stitches of the scarf left to right and right to left, first with one end of the embroidery thread, then the other. Go back down into the tassel and up again into the scarf so that there's more than one thread connecting the tassel to the scarf. OYou can “finish" the cut ends of the tassel by holding them close to a candle flame, one at a time. Since the fiber is synthetic, it melts, and will prevent fraying. O Make second tassel the same way. All done! Wrap up and enjoy!
Notes:
Knitting with Flaunt Coquette: 0As with other ribbon yarns you knit into the eyelet, not using the whole strand. This is what creates the ruffly effect. Here's a good tutorial: http://www.youtube.com/watch?v=dzTXrHGWHeo OIt is fiddly, but easy once you get the hang of it. And you have to really watch each stitch; not something you can knit without looking. You do NOT want to find that you've dropped a stitch with this yarn! One thing I've noticed about Flaunt is that some skeins have the ribbon nice and flat (good!) and others have the ribbon sort of folded (difficult to find the eyelet). Next time I'll choose the skein more carefully. 0 Don't let the ribbon twist. Some people like to wind the skein onto a cylinder (toilet paper roll?) before knitting, to help keep the ribbon flat. I've read that some people even iron the ribbon before knitting, which I think goes beyond the call of duty! Pay attention, when you turn your work, to not skip an eyelet when starting your next row. If you do, you'll end up with a loose loop at the edge. I learned this the hard way ;-) If you do, you can just take some sewing thread and tack it in. Each skein yields 21" of work in this pattern.


