Budgie Bloomers" v 3.0
by: Bridget McKenzie
THE STORYBEHIND THE BLOOMERS. \*\*Feel free to jump to the next page and read thisome other time ;) Iwas inspired a year or so ago to this pattern. 've had alove ofknitting wool clothing ever since my youngest of 5 children (ason,born in 00)was about a year old. I started cloth diapering for the first time and aftermuch educatin from my wonderful friend, Katherine, Iwas opened up to the fabulous world ofusing woolas cloth diaper covers! BUT also being from Maine, wool was perfet for cold winter days yet breathable for warm summer days! I was hooked! After earchnpatpatnnldfdiffnt tquywathnnvida lots of questions, I began to go off on my own with different ideas! One day I was daydreaming about a favorite childhood collction, Raggedy Ann. I thought how cute it would be to design a pattern based on the famous ragdoll. I finally ventured out on my own into the world of design and came up with my 1st trial version of a pair ofbloomer longies. (More like abunch of pencil scratches on random pieces of paper!l) I wanted the bottom ofthe bloomer legs to have a“strped sock" look and decided to add a skirt that somewhat matched the print of the ragdolls dress. I also knit little heart under the skirt because I used to LOVE the hidden heart on my dolls! Ialsohave a softspot for seeinglittle girls inbloomers! My daughters both wear hand sewn pantaloons under their dresses and the lttleruffl below their knees always gives my heart tug! They look SO sweet and feminine! Wellthanks tmydibnainfien a I iddtgetmat pnupfhes tj Thank you, myfried! Ifit wasn'tfor you, I would have continued to rorastinat! Iveyu! I consider this an intermediate" patern for those who have a basic understanding of knitting, BUT beginners willhave a fun challenge (as I did when I first ventured out into the world of online tutorials!) and advanced knitter's wil have a new project to knit up! Yay! Ifyou do not understand some techniques, there are so many wonderful online resources! Also feel free to contact me (find my contact info. on Page 13!) with any questions or if you need to be pointed in the right direction for online tutorials! Ive made a few beginning knitter online videos and plan to make more,but for now I can lead you to places I have found extremely helpful in the past! .. now onto the pattern.
READY TO GET STARTED?
Abbreviations used in this pattern are: $\mathbf{CO=}$ cast on DPN's $=$ double pointed needles $\mathbf{LH}=$ left hip (start of round) $\mathbf{RH}\!=$ right hip ${\bf W}{\bf C}=$ waist color $\mathbf{BC}=$ bloomer (pants) color $\ \mathbf{SC}=$ skirt color $\mathbf{K}=\mathrm{knit}$ $\mathbf{P}=\mathbf{purl}$ ${\bf M I R}=$ make one right ${\bf M}{\bf L}=$ make one left $\mathbf{KFB}=\mathbf{\Gamma}$ knit front and back K2tog $=$ knit two together $\mathbf{BO}\!=$ bind off
HERE'S WHAT YOU'LL NEED:
O\~WoolClassic $\mathbf{100\%}$ certified organic merino wool (or any other similar weight $\mathbf{100\%}$ wool that will work up at the same \*\*gauge\~\~ Cestari Fine Merino is another favorite of mine!)\*the amount rally depends on what style and how many colors you choose! It's always better to have more than you need, so I would recommend making sure to have at least 2 skeins for the smallest size and 4 for the largest. (And more if you want more than 2 colors!l) You can always use the leftovers for a fun pair of shorties or longies later! $^{\ast\ast}\mathbf{Gauge}=\pmb{5}$ stitcharoushwor $4^{\prime\prime}$ by $4^{\prime\prime}$ swatehtbe sureyourguageisriht onl NEEDLES. Size 5, 16" circular needles (for casting on waist stitches) Size 8, 16" circular needles (for body of longies and skirty) Size 8, 12" circular needles (for legs) \*\*You CAN use DPN's but Ifind ircularst be muchfaster and easierto work with! Two Size 8DPN's (for grafting, which Iexplain later)(you can use smalle sizes, but I find it easier with $8^{\prime}\mathbf{s}$ Two Size 2 DPN's (for knitting thei-cord drawstring. You can use any other size depending onhowthick you want the i-cord to be! I like smaller needles for a thinner cord!) optional - set of four, size 8 DPN'S for ruffles (or you can use your $16"$ circular. I use DPN's so that my 16" circular can stay put holding my $2^{\mathrm{nd}}$ leg stitches while I knit the first leg!) ALSO: 2 smallstitch holders (my favorite being diaper pins!) Stitch markers (1 for start of round and a total of4 others) measuring tape tapestry needle (for grafting and weaving in ends) 2 safety pins Optional for pattern storage: Page Protectors for easy dry erase note taking!
Techniques used:
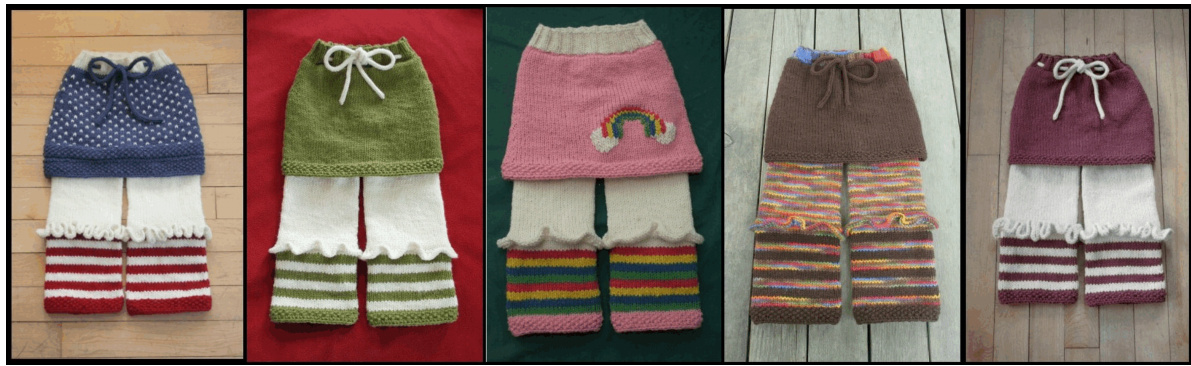
Long Tail Cast On, Basic “knit" and “purl" stitches “in the round", short rows (Ill explain the most invisible short row technique I've found),\*make one right” & “make one leff increases, JoglessJog (to keep stripes as straight as possible while knitting in the round), Kitchener stitch for grafting the crotch guset stitches), and i cords! “Duplicate stitching" (explained on Page 13) is an option used to add any designs to the Bloomers after they are knit! (Such as the speckles on the skirt o the $1^{\mathrm{st}}$ photo and the rainbow on the $2^{\mathrm{nd}}$ pairpictured at the beginning of this pattern!) Please visit my blog: www.homeschoolblogger.com/TheEastSide for tutorial links! Either they will be my video or photo tutorials, or other great ones Ifind on the internet!
LET ME EXPLAIN THE KNITTING PROCESS FOR THESE PANTS:
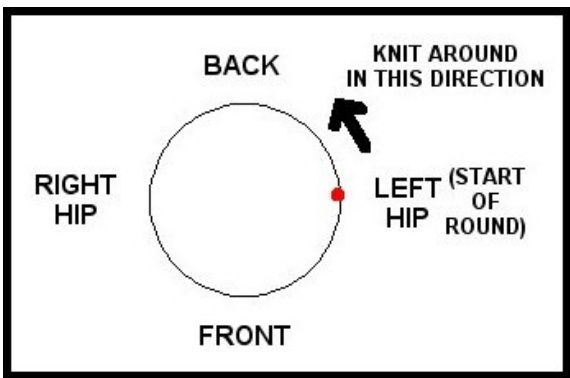
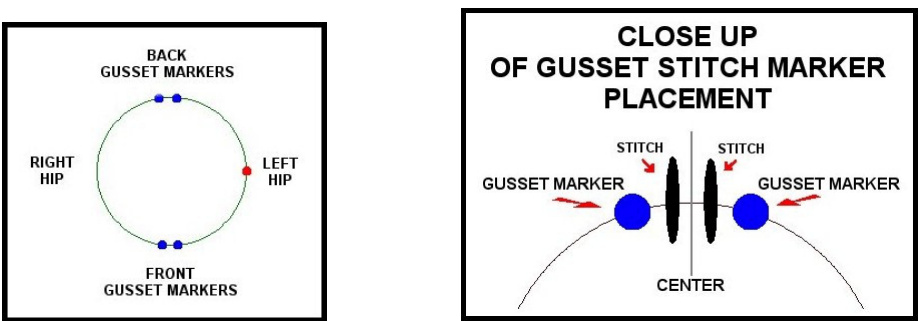
My start of the round is always at the LEFT HIP (LH) ofthe pants. (This makes for a less obvious place to do colorchanges and increasesl) As you knit along past the beginning stch marker youll b kniting theback of the pants first and then the front.
Ifyouareknitting these fora child whowears clothdiaers ORifyou endupdoing yourwmath anddthe child's \*back” measurement larger than the “front', you willbe adding 3 short rows tothe back section to accommodate the child's chunky buns!
You will also be knitting a gusset” which consists of adding stitches to the crotch section for a more comfy fit. You willbe increasing for several rows, 2 stithes at time, in the front middle and back middle sections. Adding a gusset is also nice for increasing yourlg size sinceyou are adding quite a fewstitches. Not ALL of these will be needed for the“gusset” so a few with add to your leg width! This is helpful for children with really chunky thighs and leaves room for growth for any child! Afterknitting yu gusset yuwillbeakfandknit th lgIfskirt is dere, that willbethLAT thin you knit!
BASIC SIZING GUIDELINES.
IfI am kniting abasic size without the child's measurements, I follow the standards below. I knit the rise (front where top front of pants willrest, under crotch, and back up to whereback of pants willrest) and waistline the same. The inseam is the measurement from the crotch down to the ankle. I personallylike to knit the first length for a perfect fit OR the second length for a cuff that can be turned up and then let down as child grows. \*\*For those of youthat would like tofigure your own mathbased on your child's measurements, I provide pages at the back of the pattern for you to do your planning! (Pages 14 15)
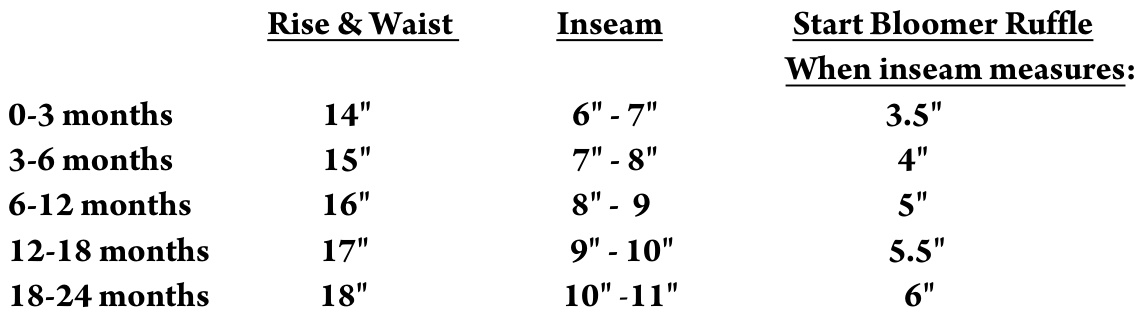
Ifyouare using myasi izing guidelines, these aretheTotalFront and BackLengths ofpants/bloomer: (FRONT is top front of waist down to crotch and BACK is top back of waist to crotch)

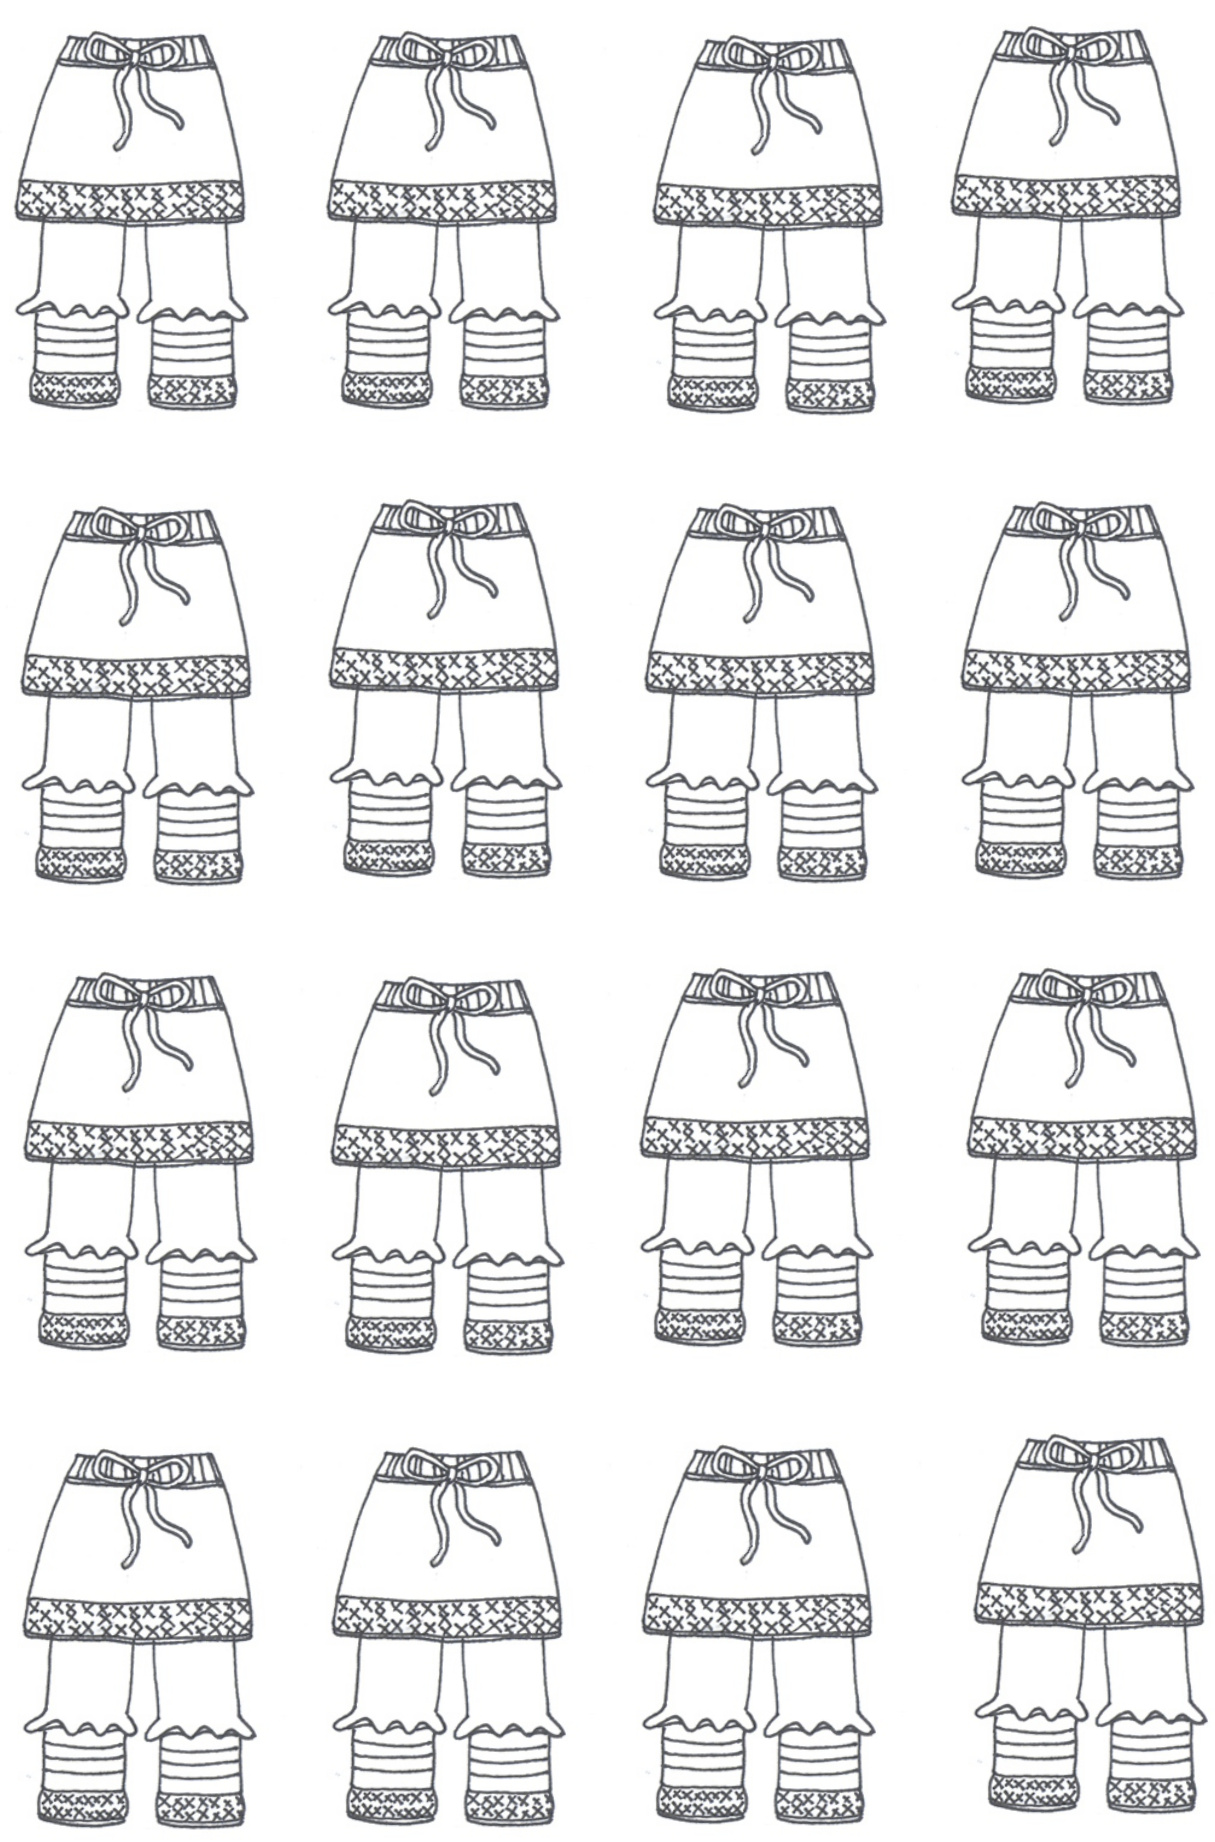
Feel like coloring???
${^{\ast\ast}\mathrm{I}}$ amavery visual person andsketh ou allofmydesigsbefore beginknitting!Ifyou are alsosomee ho needs to see it before ya doit, I've added a litte coloring section foryou on the very last page (p.15) $\sim$ Let that inner child go crazy! Youmayalso want to add the appropriate abbreviationsbeside your artwork areas for reference while you are knitting! ${\bf W C}=$ waistcolor $\mathbf{SC}=$ skirtcolor $\mathbf{BC}\!=$ bloomer (pant) color
THE PATTERN.
This is how the sizing guidelines will look throughout the pattern: (Ignore any underlined sections unless you are doing your own math!) (0-3, 3-6,6-12, 12-18, 18-24) your math
CASTING ON.
Using WC, Size 5 - 16" circulars needles and the Long Tail Cast-on method (to insure an stretchy waistline), CO:(72,76, 80, 88, 92) your math Placetithtmaininfrudtkt bntdedst length. I prefer about to 1.5 inches. Switch to size8, $16"$ circulars (or DPN's) choose the optio that applies:

continue knitting in WC adding one “purl” round. (This will be used later to start the skirt!) Option#2- IF YOUR SKIRT COLOR WILL BE DIFFERENT FROM WAIST: Switching to SC, knit one round and then “purl" one round. (To pick up later for skirt) Now you will switch to your BC. Continue knitting for: (36,38, 40, 44, 46) cast on stitches divided by 2 stitches and place marker (RH). Continue knitting around for approximately 1 inch (or 6-7 rounds). \*\*IF YOU ARE NOT DOING SHORT ROWS, SKIP THIS PART AND MOVE TO THE BOTTOM OF PG. 6\~\~Adding Stitch Markers For The Gusset!\*\* Now it is time to ADD YOUR FIRST SHORT ROW! like to place mine after 6-7 rounds in order to gradually increase the back area. I've tried a few different types of short rows and I always ended up with a hole at some point on one side! I finally found a short row technique that is the most invisible yet!
ADDING A SHORT ROW.
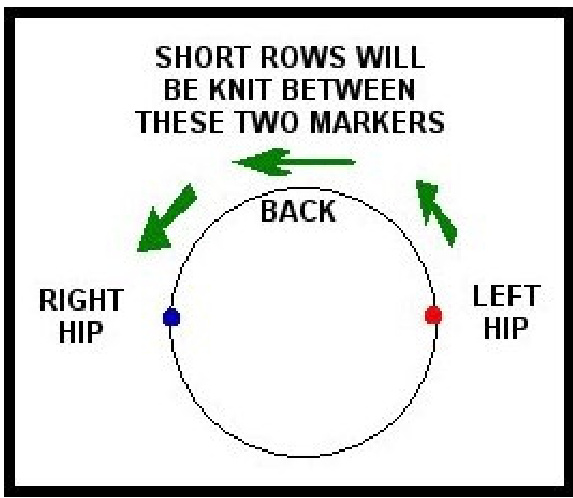
For those who are new to short rows, what you are doing is adding litte extra room in the back by adding a ew "short" rows JUST to the back section. In order to do this, you need to knit from the LH area to the RH area, turn your work, purl back to LH area, turn your work and continue kniting. At each “turning point” there will be a gap that needs to be closed up. (Unlike the typical short rows where you “"wrap" a stitch or Japanese Short Rows that require safety pins, this technique is byfar the easiest and most invisible that Ihave seen! They may be confusing to start, but please be patient because the results are worth it!)
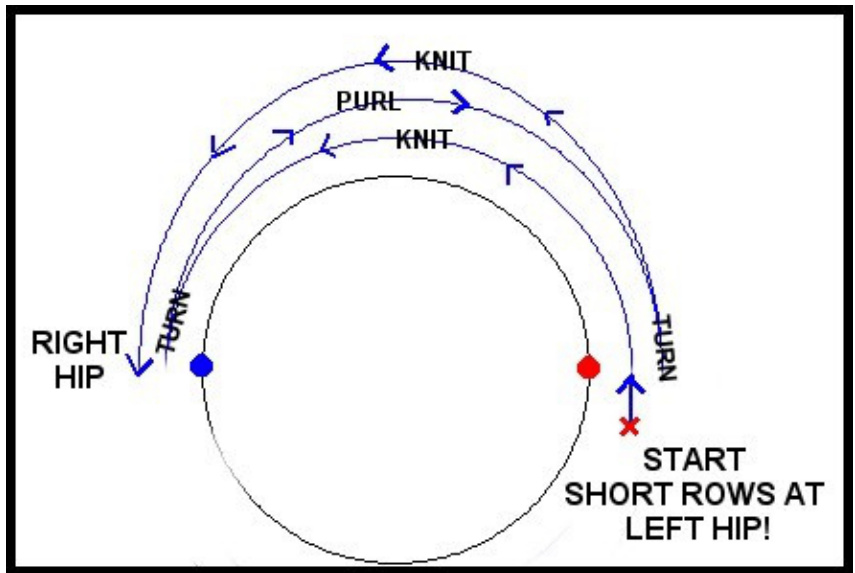
READY???
StartingatyourHmarker bginin ofroud\*d dot),knit acrosst stitchesbefre yourRHmark.Turn your work. Slip the next stitch, as ifto purl", onto the right needle. Purl across to 2 stitches before the LH marker. Turn your work. Slip next stitch, as ifto “PURL", onto right needle. Knit across to 3 stitches before RH marker. Slip the next stitch, asi to pur. Using your leteedle picku the BACK stith below the $1^{\mathrm{st}}$ stch on your right needle by going into the back of the stitch and leave it on your left needle.
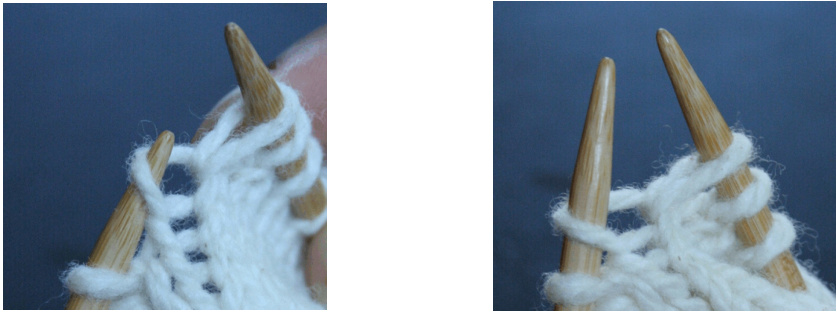
Slip the $1^{\mathrm{st}}$ stitch on the right needle directly onto the left needle and knit this stitch as normal. Knit the next stitches together and continue to knit until stitch past the LH marker. Slip the next stith, as ifto “KNIT", onto the right needle. With your right neede, pickup the back loop below the LEFT needle (by going into it through the back) and place it onto the left needle.
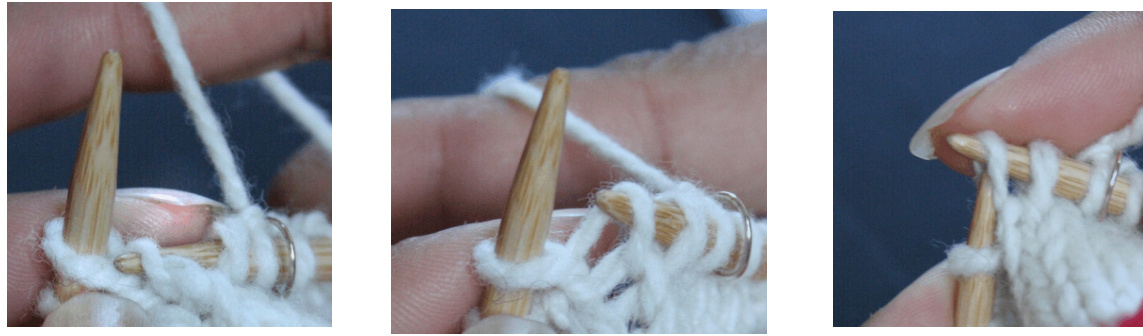
Slip the $1^{\mathrm{st}}$ stitch on right needle back over to the left needle and knit the next 2 stitches together THROUGH THE BACK.
口 Continue knitting another 6-7 rounds and then add another SHORT ROW. Continue again for another 6-7 rounds and add your LAST short row!
ADDING STITCH MARKERS FOR THE GUSSET.
At this point youwil knit aroudadding afwmarkers, tobeusedlater for th gusst. From the beginning marker (LH), knit: (17, 18, 19, 21, 22) Gusset Marker Measurement (p. 15) stitches and place marker. Knit 2 stitches and place another marker. Knit to your RH marker and from there knit (17, 18, 19, 21, 22) Gusset Marker Measurement (p. 15) stitches and place marker. Knit 2 stitches and place another marker and continue knitting to LH marker. \*\*At this point counthe sitches etwen the LH marker and the $1^{\mathrm{st}}$ gusset marker AND counthestitches between the RH marker and the next gusset marker to make sure they match the numbers figured from above (17,18,19,21, or 22)\*\* You should now have a beginning marker (LH), 2 stitch markers with 2 stitches between (Back Mid Section) and 2 stitch markers with 2 stitches between (Front Mid Section)
Continue knitting until TOTAL FRONT (FROM TOP OF WAIST DOWN) measures: $\left(5.5",6",6",6.5",7"\right)$ \*\*For those doing their own math, refe to page 14for your 'Start addingusst" number, measure your work, and make sure to stop knitting when the front of your work is the amount you figured for your
INCREASING FOR THE GUSSET.
Round 1: On the first increase round only: 1. Knit to the first stitch marker and slip marker to right needle. 2. Increase before next stitch (I use MIR which I describe in the abreviations section on PAGE 2 but you can use your favorite increase. I do not use “KFB" because i leaves a littl “purl" bump that is very noticeable.) 3. Knit one stitch and increase before last stith and then knit the last stitch. Repeat at next set of gusset stitches.
On all other increase rounds:
Knit to the first stitch marker, slip the marker and knit one stitch. Increase one. Knit to one stitch before next marker and do another increase. Round 2: Knit even. (No increases) Continue knitting these 2 rounds TWO more times (for sizes 0-3 & 3-6) and FOUR more times (for sizes 6-12, 12-18 & 18-24) and your FRONT should measure approximately (comparabl to chart at bottom of pg. 4): (6.5", 7", 7.5", 8", 8.5")

Finishyoulast“knit”rundandcontinekiting ast thLHmarkeruntilyoureachth $I^{s t}$ gusset marker.
SPLITTING FOR THE LEGS.
Continue knitting past the $1^{\mathrm{st}}$ gusset marker for (6, 6,9, 9, 9) stitches. The last $(4,4,6,6,6)$ stitchsyu kit cansldtstitThewilgraf the crotch. Change to your size $8-12"$ circulars and continue knitting, from where you leftoff, removing $2^{\mathrm{nd}}$ gusset marker as yougopastit. Kit arouduntilou gettothe ext setfgusset markrs andknit (2,2,333) stithes past th $1^{\mathrm{st}}$ markawhai $1^{\mathrm{st}}$ leg Now you can le all ofthe stitches stil on the $16"$ circularjusthang theeuntil yuarereadytoknit h $2^{\mathrm{nd}}$ leg!
LEG NUMBER ONE.
Joining “in the round” and placing a marker to mark the start ofthe round (which for this leg is at the crotch or mid section) and continue kniting the $1^{\mathrm{st}}$ leg untilyour leg measures: $\left(3.5",4",5",5.5",6"\right)$
\*\*or your "RUFFLE” measurement from page 15.
At this point, starting with the knit "V” stitches right under the “purl” row below waist, count how many rows I have knit up to this point. Count the “V"s and count the stitch on the needle and write this amount down. You will use this later to insure that your ruffles end up in the same spot on both legs! Mark your measurement here:
Front Rows Up To Ruffle
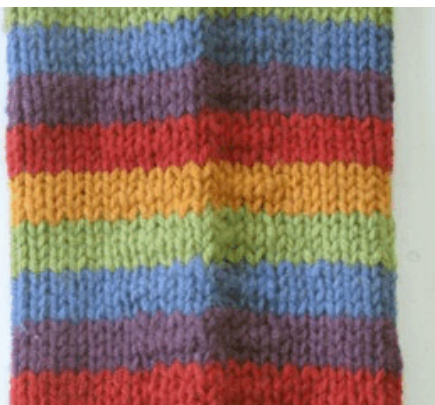
Now you will add a purl" row (as you did under the waist) and this wilbe picked up later to knit the rufle! Continue to knit 4 rows with BC (I do this because it will be hidden by the ruffl, so Ilike thefirst visible stripe tobeina contrastin color!) You willnowbe using the Jogless Jog” method to start your striping! For those not familiar with the “Jogless Jog", here's a quick tutorial: This photo shows a lot of color changes using the joglessjog"(what appears to be a "seam" is where the "jogless jog" occurred. This is the side ofthe pants and once washed and blocked it won't be as noticeable!)
\*\* after kitin neround wth new colorand whenyu are at yur sitchmarkeragain, pick up from thebackl the priorcolor'sstrand that sitsclosetothe right side ofthenewcolor's Ist stitch.Place thisontheleft needle and thn knit the2stitchestogether.henafeknittingafewmorestitchesfromtheack ofyourwork,tugabit ntheloe yarn thide thefrst titch and thncontie knittin untilyou arereadyto switch colors againandreeathe procs! Usingthe “Jogless Jog", alternate BC and SC for 3-4 rows each untilyou have reached (6, 7,8, 9, 10) inches or your desired INSEAMLENGTH (minus the cuf) - from page 15 \*\* like y cufto be knit withthe SC so usuall sketch out the amount o rows acording to my guage) that I'll need to finish the legs (without the cuff) and plan it so Iend the striping in the SC. I explain this in detail on page 16 in the section called \~ “FIGURE YOUR STRIPES"!\*\*
BUT..
Toavoiddnanathastillinueyouuf wille deSjustittyu diedeenth thecuffandifyouenin,thnu areallsetokit thefffyueninSust kit emore t in BC and THEN knit the cuff. Your pants willjust be $^{1\!}/\!\!\!\frac{\prime\prime}{2}$ longer than planned. Not really a big deal!
THE CUFF.
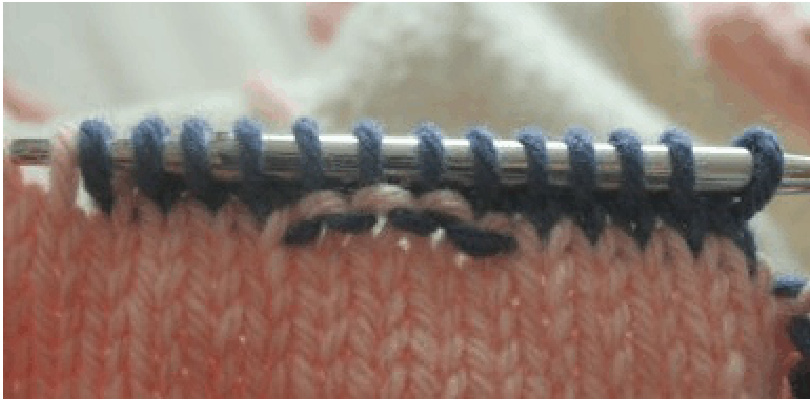
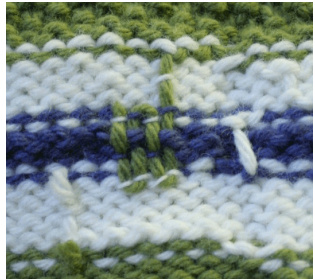
Make sure that you knit 2 rounds before starting your cuff design. The frst knit round of the new color is to insure that you will not have any ICKY DOTS: (\*icky dots" are formed when you change colors and “purl” a stitch into a “knit” stitch ofthe other color. To prevent this, you just need to “knit” one round in the new color before doing any “purl" stitches in thenewcolor!) This photo shows where I switched to blue without a “"Knit” round and did a few “purl"stitches The “icky dots" are the blue spots in the middle under the pink stitches. You DON'T want these!
The $2^{\mathrm{nd}}$ knit roudlptomakureyouare aletmothlynishtheGLEGcolrchangefor startingu cufftexture. You could do just one knit round, but I find to just be abit easier. I usually use seed stitch for the cuffs and do at least 5 rows before binding off! You can use whatever BO method you prefer, but I like a stretchy BO so I $\mathrm{}^{\ast}\mathrm{K}2$ tog through the back and slip the stitch from the right needle back to the left\* and repeat all the way around until you have just one stitch remaining. Pull up on your needle a bit to enlarge stitch, cut your yarn leaving at least $8{\cdot}12^{{\prime}{\prime}}$ (to weave in on the backside of your work) and then just pullthe lose tail right up and out of your work! I used to draw the yarn up through the stitch, but this causes a knot and I don'tlike knots!! Speaking of knots, INEVEREVER knot my work! Knots can easily come undone and then your garment will unravel!! With the leg cuffs, Iturn thelg inside out abit andbring theyarn tail tothebackbybringit down intoapurl bump. Ithen weaveit up and down through the stitches as shown in the photos below. Iweave ALL ends in this manner! Down Up Done Weaving!
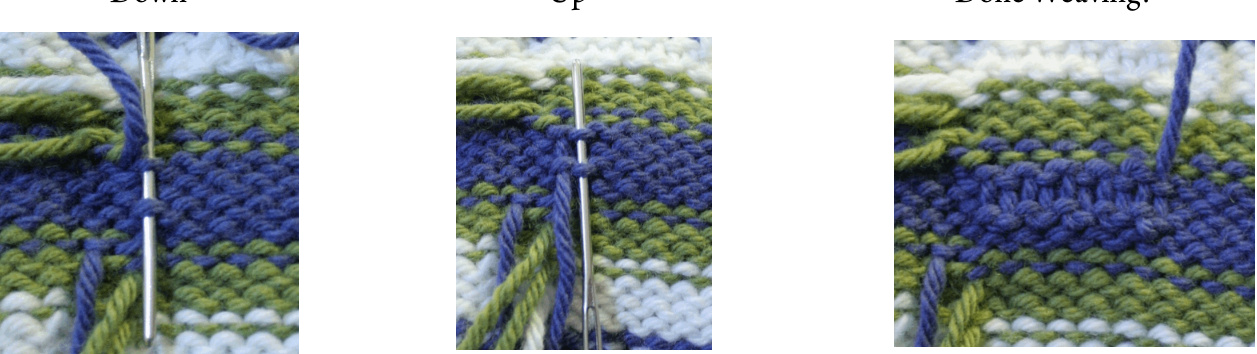
I always check the front of the work to make sure none of the woven stitches show through! This can happen at times when you are weaving a dark yarn into or close to lighter colored stitches. In this case, I usually don't go under the whole stitch, but only into 1 strand of the yarn.
Page 11 \*\*f yodtkt thlfekitijstsastts
LEG NUMBER TWO.
The $2^{\mathrm{nd}}$ leg stitches ae till on the $16"$ circular, sousing your C skein and leaving along “tail about $18^{\prime\prime}$ long (used later to graft the gusset),start knitting at the gusset. You will knit ll sitches (leaving the original LH marker in place! THIS will be the “start of the round" for leg $^{\#2,}$ instead of the mid crotch section, as with leg #1!) and continue knitting past the LH marker until you're back where you started. Before knitting “in the round" DON'T FORGET TO MOVE GUSSET STITCHES TO STITCH HOLDER! Take the first $(4,4,6,6,6)$ offthe left hand needle and place on stitch holder. Now you willjoin in the round and start knitting the next leg as you did the $1^{\mathrm{st}}$ ! Make sure to \*\*refer back to page 9 and knit the exact number of Front Rows Up To Rufle before doing your $2^{\mathrm{nd}}$ leg bloomer rufle “purl” row. When you have the correct number of rows make sure you start the “purl" row right after the original LH stitch marker and continue as with leg $\#1!$
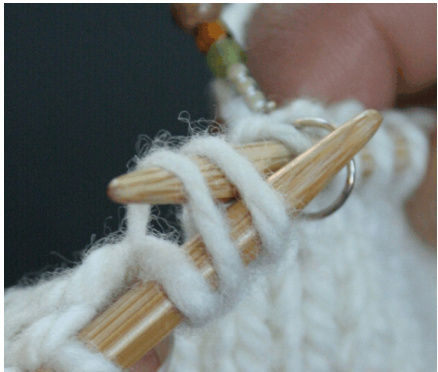
GRAFTING THE GUSSET.
You are now finished both legs and it's time to close the hole created at the crotch section where the “gusset” stitches remain active on the needles. Transfer the 2 sets of gusset stitches to 2 DPN's. To insure there willbe no holes on either side ofthe gusset, like to pick up one stitch on either end of both DPN's. You can just stick the DPN'sinto a stitch near the end, making sure to choose one that is lose and doesn't ceate a hole when you pick i up. Now,with qua amut fstitches n eachPNhldingthm paralle tak thlong taillet frmwhenyou attachd your BC yarn to start the $2^{\mathrm{nd}}\log$ (or just attach BC yarn, behind work at the right side of parall eedles, leaving an $18^{\prime\prime}$ tail forsewing th gust andthreaditntataestryedHdingthDPN's cletoachther, nert the tpest needle into the first stith ofthe DPN closest to you as ifto“purl" (through the back) and draw it through. Then insert the tapestry needle into the frst stitch ofthe back DPN as ifto \*knit” and draw it through. Now you have set your stitches and are ready to do the “Kitchener stitch" and graft your gusset! Working with the DPN closest toyou, insert tapestry needl in the frst stitch as ifto“knit” (drawing it through) and slip thestch OFF the DPN Leaving the next stitch ON the DPN, draw the tapestry nedle into i as ifto purl and pull snug. Working with the back DPN, insert the tapestry needle in the first stitch as ifto “purl" and take it OFF the DPN. Insert the tapestry needle into the next stitch as ifto “knit", leaving it ON the DPN. Continue in this manner untilallstitches have been worked and there is only I stitch on each DPN. Working with DPN closest to you, insert needle as ifto “knit” and slide it ofthe needle. Insert needle as ifto“purl into the rmaining sitch onback needle and pulloffneele and pull tightly. You can now insert the needle into the side ofthe gusset to draw the yarn to the inside of your bloomers. Before weaving in the end ofthe grafting yarn, I like to look at the gusset to see if anyholes were left on the sides. If so, when I turn my garment inside out to weave in the end, I also take the yarn and sew a few stitches on the sides to close the holes.
KNITTING THE BLOOMER RUFFLES.
Itistime to pickup the“purl bumps on thelegs to start yourbloomer ruffles! Using your $12^{\mathfrak{m}}$ circula needle you ill start picking u stitches at the beginningof theround aeaof ach Ieg. Attach BC yarn and knit one round. For SIMPLE RUFFLE, Switching to $16^{\ensuremath{\circ}}$ circulars or size 8 DPN's, increase in each stitch by kniting in the front and back of each. (KFB) To do this, you knit into the stitch and without taking it off the needle, you knit into the back ofthe stitch and THEN take the stitch off Repeating this with every stitch will double the number of stitches on the needle. Knit one more round and then BO allstitches. For EXTRA RUFFLY RUFFLES: knit as for simple ruffles" but instead ofBO allstitches, KFB ofall stitches AGAIN (this can get tricky! I usually use my circular needle AND DPN's because you willdouble the amount of stitches AGAIN!),knit one final round and BO all stitches.
THE SKIRTY.
It is now time to pick up the “purl” stitches below your waist stitches! This is how you miraculously attach the skirt to the pants! Starting at the LH, you will be picking up the purl bumps" all along the waistline as you did for the ruffles! When finished, you should have the same number of stitches on your needles as the original“cast on" amount. I usually count mine and find I am one shy and have one more bump to pick up :) Seems it always hides on me! Place your LH marker and then continue knitting to the opposite side and place your RH marker as you did when knitting the body. (After half of the total number of stitches on your needle!) Now you will want to keep track of your “knit” and “increase” rounds because you will want them to be spaced evenly! I prefer to add one increased stitch, on each side, every $5^{\mathrm{th}}$ row. SO, youll want to knit 4 rounds even and then have an increase round. I use a MIR at the RH marker and a MIL at the LH marker. I'll leave spacebelow for you to keep track. 4 Knit rounds and 1 increase round: (You most likely won't use all of these!) □□□□口□□□□口□□□□口□□□□口□□□□口□□□□口□□□□口□□□□口□□□□口□□□□口□□□□口□□□□口□□□□口□□□□口□□□□口You wil only have to do as many knit and increase rounds asit takes until your measurement from cast on edge downto bottom edge of skirt measures approximately: $\left(6.5",7",7.5",8",8.5"\right)$ Youwillthe stoandad about a cuf I prefer edstchforthskity cufThiswillinsure that yur skirt wil come down a bit past the crotch. Now you can admire allof your hard work and get ready to knit your i-cord drawstring!
A FEW NOTES ABOUT I-CORDS.
I prefer a thinner i-cord, so Ilike to use two size 2 DPN's forthe i-cord, but you can use any size you wish. The larger the needles, the thicker the drawstring. This really does not change the function or stability since you are using the same amount ofstitches,it just makes the stitches arger,therefore only adding to the thickness. Using smaller needles may take a bit longer, but the trim size is less bulky and especially nice if you have a “belly sleeping” child who willsleep in their Budgie Bloomers! No matte what, an i-cord makes a great drawstring AND if you make it a bit longer than usual, many children like to play with theirs and chew on them! FUN!! To secure the drawstring for added safety if you are worried the drawstring could be a safety hazard if pulled out of pants, you can take a smallamount of yarn anda tapestry needles and secure it withafew sewn stitchesin theback!)
THE I-CORD.
Ifyou'd like to view my online tutorial, visit my blog and click on the link in my post! http://www.homeschoolblogger.com/theeastside/693220/ Knit an i-cordlong enough to string through the ribbed waist and tobe able to tie anicebow! Iusuallknit mine twice the amount ofthe waist and then (without taking the stitches offthe needle) thread the cast-on edge fthe-cord through the ribbing and ifit isn't long enough, I knit a bit more and then BO!
YOU ARE ALMOST FINISHED!!!
You will want to “block" your knitting so that it looks just right"! Your ruffes will not lay right unless you pin them, spritz them with water, and allow them to dry! Ijust lay my Budgie Bloomers on a towel, pin each ruffle the way I want them to dry, and then spritz them with a spray botte! You want to wet it enough to relax the fibers! You can also do this anywhere on the Budgie Bloomers that you' ike to even the knitting out, as in the jogless jog” areas. Any decorativ titches used after knitting are “DUPLICATE STITCHED". What you are doing is covering the knit “V"s with anther color ofya. As you would embroider, take your yarn that hasbeen threaded intoatapestry nede and frm th inside of your work come out at thebottom ofthe “V”, goup to the top right of the V” and go downinto it, aross the back to come out the top leftof the “V", and then back down into the bottom! Continue anywhere you'd like to add a contrasting decorative stitch! Giveyourgielomer abisquze,ut thn thelukyltleipint and plese sedme pts fory!! I'd LOVE to see them!! $\copyright$ 2009BridgetMcKenzie TheEastSide www.HyenaCart.com/TheEastSide \*Pleasenoethat this atterm isfor PERSONAL UE ONLY. DO NOT sel tis attemn oranything made ron this pattern!Ifyoupost photosofBudgieBloomersthat you'veknit anywhereontheinternet,make suretopost alinktomy Hyena Cart \~ www.HyenaCart.com/TheEastSide \~\~THANK YOU! Make sure to also join my Flickr group, Budgie Bloomer, to post photos of your creations! http://www.flickr.com//groups/1129139@N24/ And please remember tofeel freto email me ANYTIME if youhave questions, problems, find any mistakes, et! TheEastSide@hotmail.com Continue onto the next 4 pages for measurement math problems and coloring page!
THE WAIST.
The total NEEDS tobe divisibleby4! Either you will measure the child's waist and multiplyit times the gauge (stitches per inch) and then round UPto the nearest number divisible byfour OR you can cast on according to my guidelines ( which will be listing in the “Casting On”" section.) Use this space to do your math: Gauge Stitches Per Inch Child's Waist Measurement TOTAL Take your TOTAL and divide it by $4=$ then round UP to nearest number divisible by 4, such as: 72, 76, 80, 84, 88, 92, and 96 and you have your: # of cast on stitches $=$ THE RISE. Make sure to measure the child while they are diapered. Measure from above the front of the diaper, between the legs, on up to above the back where you will want to pants to reach.\*\*If the child wears disposable diapers or is potty trained, you can also measure just from the front down to the crotch and then from the back to the crotch. If there is not much different (for instance,the front measures 7" and the back measures 7", you will not need to add any bulk to the back of the pants, and this means no short rows"! Yippeee!) Use this spaceifyou'd like to keep track or your measurements: Top of fronto crotch Top of back to crotch Total Rise \*\*\*\*\*\*\*\*\*\*\*\*\*\*\*\*\*\*\*\*\*\*\*\*\*\*\*\*\*\*\*\*\*\*\*\*\*\*\*\*\*\*\*\*\*\*\*\*\*\*\*\* \*\*\*\*\*\*\*\*\*\*\*\*\*\*\*\*\*\*\*\*\*\*\*\*\*\* Ifthediffeetween thfrt thbackis onverae, thrt rwsil js I fndthatftgageiscorret, thsrwsddabot whichs letyfrm peillycewl will stretch a bit! Averyhelpful thingtowrite down at thispoint is the fnished rise measurement ofthe front compared to the back (for future use). To figure this out, do this little math equation:
#1 FOR PANTS WITH 3 SHORT ROWS:
divided by $2=$ minus ${_{\!/}}{_{\!/}}{^{\epsilon}}=$ TotalRise TotalFrontLength Total Front Length Total Back Length
#2 FOR PANTS WITHOUT SHORT ROWS:
Total Rise Total Front Length and Total Back Length THE GUSSET. Youll eed a measurement fr where you wil stop knitting in order tostrt ading gusset stitches. IfI am making the smaller sizes, Istop when my TOTAL FRONT measures 1" less than it should. IfI am making larger sizes, I stop when my TOTAL FRONT measures 1.5" less than it should. Here's the math for when to start adding the gusset stitches: (choose one) Total Front Length - $1"=$ (for sizes 0-3 or 3-6 months) "Start adding gusset" Total Front Length - $1.5"=$ (for sizes 6-12, 12-18, & 18-24) "Start adding gusset"
THE GUSSET.
You ndtalittemath tfurout where topt yurstithmarks foryurusst!Adyufgu the empty line and use it as you work the pattern! CO stitches divided by 4 minus $\mathbf{1}\!=$ Gusset Marker Measurement (for instance, $80/4=20\cdot1=I9_{\cdot}$
THE INSEAM.
Measure from the crotch down to where you want the pants to rest. For longies,Ilike to measure past the ankle because I think they look so cute covering the top of the child's foot a bit! Then I knit the leg THAT long and add 1" to $1.5^{\prime\prime}$ of cufthat can be turned up to “actual size” and then turned down as the child grows. BUT that is MY preference. If you prefer knitting them the “actual size", just take your inseam measurement, subtract your desired cufflength, knit to that point and then start cuff. THE BLOOMER RUFFLE. Measure from the crotch down to where you would like the rufle to start. I prefer right below the kne, but you may prefer above or further below! If you want to have a measurement to go by, Ilike to take the actual inseam length, divide it by 2 and add a half inch\*\* for inseams 6-7"" and a whole inch\* for larger inseams. So,ifyour inseam was 8 inches, divided in half it would be $4^{\prime\prime}$ plusan inch would make the ruffle start at $5"$ down from crotch.
HOW TO PICK UP STITCHES.
With yourBudgielomers pointing away from you waist closestoyou and legs pointin away you willinsert your knitting needle down into the “purl bumps that are directly above the next “knit”'row. There willbe “purl bumps closer to you RIGHT above the ones you are to pick up but you don't wantto pick THOSE up. Take your BC (for bloomer rufle) or SC (for skit) skein and whileneedl is inserted into the purl bump, yarn around the needl (as ifto knit) and draw the yarn through (to create your frst stitch ofthe round) and continue with every purl bump in the same line. Once you have gone allthe way around and have all of your stitches on your needle, count them to make sure you have the correct amount and if you don't, there may be one or two hidden purl bumps at the end!
FIGURE YOUR STRIPES.
Ifyour augeis corretyoushuhave7rows pe 1 ofknitinFurehowmanynche pastyourrf need to finish yourBudgie Bloomers, minus 1" for the cuff and then multiply that by 7. For examle: 5 (inches pat rufl) minus $1"\ (\mathrm{cuff}){=}4$ multipied by 7 rows per inch $=28$ stripingrows Now you divide the number of rows per stripe (I do either 3 or 4) into the “striping rows" amount. For instance, if my stripes are 4 rows per color, then 28 divided by 4 is 7. That means you willhave 7stripes before the cuff. If you are doing 3 rows per color, then it won't divide evenly. 28 divided by 3 is 9 with 1 remaining. So,you'd need 8 stripes of 3 rows of color and 1 stripe with 4 rows of color. I would do 4 rows (instead of 3) under the ruffle and then the remaining 8 stripes with 3 rows! Andif you are like me you'lhave litlestriede sketchdout allover th laceas youlnyou striping colors! Iofte sketch litl leg with the amout ofstripes I need plus the cuff I then colorin the cufwith my SC and every other stripe as I work mywayup the legto figure what would work best! Once you get the hang of it, you'l have fun adding more colors to the mix!
SKETCH ALL YOU WANT RIGHT HERE!!!
Page 17
Get out those colored pencilsand create your Budgie Blomers! Isn'thisfun? Yippee! (And anotherbig THANK YOU to my friend, Shipa,for her awesome artwork!l)