Page:1
Budgie BloomersTM v 8.0 by: Bridget McKenzie Designs
THE STORY BEHIND THE BLOOMERS
This is a very versatile pattern! You can knit original Budgie Bloomers OR basic shorties, capris or longies! Have fun creating Budgie Bloomer shorties or capris (without adding the bottom striping)! Use your imagination and go nuts! I was inspired in 2008 to create this pattern. I've had a love of kniting wool clothing ever since my youngest son was about a year old. I started cloth diapering for the first time and after much education from my wonderful friend, Katherine, I was opened up to the fabulous world of using wool as cloth diaper covers! Being from Maine, wool was perfect for cold winter days yet breathable for warm summer days! I was hooked! Aftersearching forpattenafter pattern and learning loads of different techniques bywatching online videos and asking lots of questions, I began to go off on my own with different ideas! One day I was daydreaming about a favorite childhood collection, Raggedy Ann. I thought how cute it would be to design a pattern based on the famous ragdoll. I finally ventured out on my own into the world of design and came up with my 1st trial version of a pair of bloomer longies. (More like a bunch of pencil scratches on random pieces of paper!l) I wanted the bottom of the bloomer legs to have a "striped sock" look and decided to add a skirt that somewhat matched the print of the ragdoll's dress. I also knit a little heart under the skirt because I used to LOVE the hidden heart on my dolls! Ialso have a soft-spot for seeing little girls in bloomers! My daughters have worn hand sewn pantaloons under their dresses and the little ruffle below their knees always gives my heart a tug! They look SO sweet and feminine! Well, thanks to my incredibly encouraging friend, Shipra, I decided to get my pattern printed up for others to enjoy! Thank you, my friend! If it wasn't for you, I would have continued to procrastinate! I love you! I consider this an "rintermediate" pattern for those who have a basic understanding of knitting, BUT beginner's will have a fun challenge (as I did when I first ventured out into the world of online tutorials!) and advanced knitter's will have a new project to knit up! Yay! If you do not understand some techniques, there are so many wonderful online resources! Also feel free to contact me (find my contact info. on Page 13!) with any questions or if you need to be pointed in the right direction for online tutorials! I've made a few beginning knitter online videos and plan to make more, but for now I can lead you to places I have found extremely helpful in the past! ... now onto the pattern.
Page: 2
LET'S GETSTARTED!
Abbreviations used in this pattern are:
cO = cast on DPN's = double pointed needles LH = left hip (start of round) RH = right hip WC = waist color HSK = hip skirty color BC = bloomer(pants) color SC = skirt color (full skirt only) K= knit P= purl MIR = make one right (with left needle, pick up leg of stitch right below first stitch on right needle through the back. Knit as normal.) M1L= make one left (withright needle, pickup leg of stitch right below first stith on lft needle through the front. Knit through back.) KFB = knit front and back K2tog = knit two together BO = bind off YO = yarn over
HERE'SWHATYOU'LLNEED:
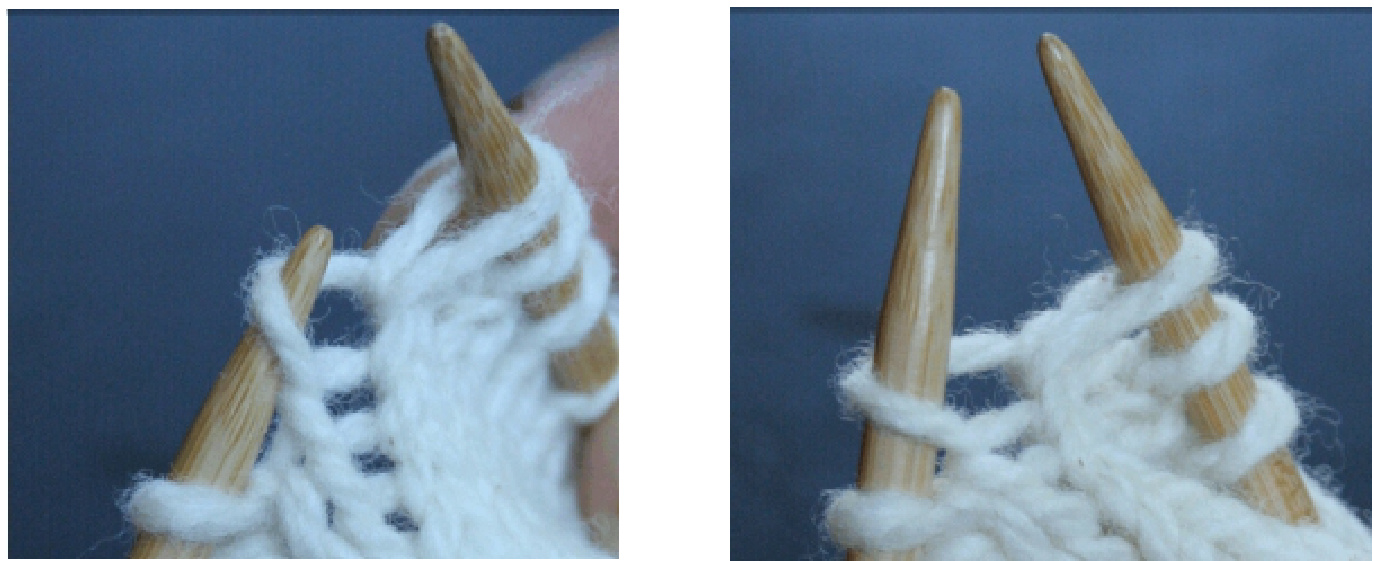
100% soft wool yarn \~ My original pattern was for yarns such as worsted weight O-wool, Cascade 2200 & Mountain Meadow yarns (guage = 5 stitches and 7 rounds per inch), but I've added directions (in red) for worsted yarns such as Cestari Fine Merino & Malabrigo (my absolute favorites!) that work up at a guage of 4-4.5 stitches and 6 rows per inch! \*The amount realy depends on what style and howmany colors you choose!I have calculated approximate yardage for both yarn guages and have broken down all areas of your Budgie Bloomers so that you can add up the yardage depending on your color choices and desired design! Skoot down to PAGE 19 & 20 to get an idea of how many yards youll need! (work up a 4" by 4" swatch to be sure your guage is right on!) NEEDLES. Size 5, 16" circular needles (for casting on waist stitches) Size 8, 16" circular needles (for body of longies and skirty) \*\*If you choose to do a “hip” skirty you wil need either alarger circular or 2 circulars because you end up doubling your stitches and then doubling again! I use my Size 8,16" circular until I double the 2"d time and then I use two 16" circulars, each holding half the stitches, or for larger sized woolies, I switch to a Size 8, 32" circular) Size 8, 12" circular needles (for legs) \*\*You CAN use DPN's but I find circulars to be much faster and easier to work with!\*\* Two Size 8 DPN's (for grafting, which I explain later)(you can use smaller sizes, but I find it easier with 8's) Two Size 2 DPN's (for knitting the i-cord drawstring. You can use any other size depending on how thick you want the icord to be! I like smaller needles for a thinner cord!) optional - set of four, size 8 DPN'S for leg ruffles (or you can use your 16" circular. I use DPN's so that my 16" circular can stay put holding my 2"d leg stitches while I knit the first leg!) ALSO: 2 small stitch holders (my favorite being diaper pins!) Stitch markers (1 for start of round and a total of 4 others) measuring tape tapestry needle (for grafting and weaving in ends) 2 safety pins Optional for pattern storage: Page Protectors for easy dry erase note taking!
Page: 3
TECHINQUES USED:
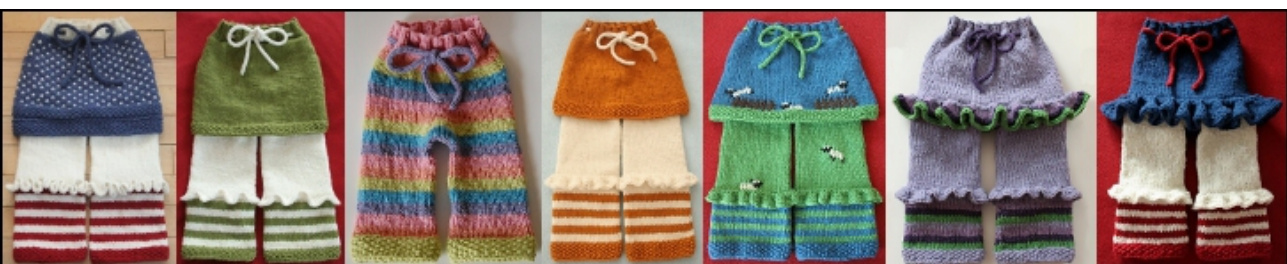
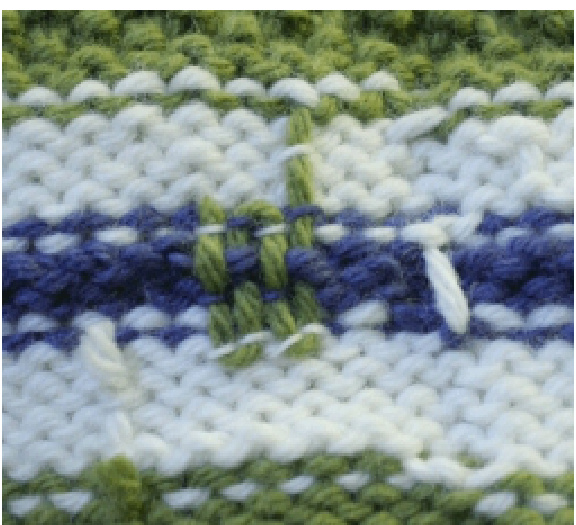
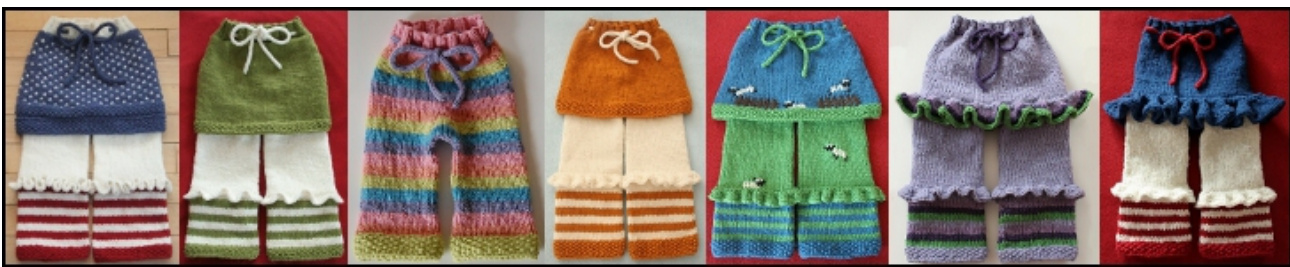
Long Tail Cast On, Basic “knit" and "purl" stitches “in the round", short rows (Ill explain the most invisible short row technique I've found), "make one right" &“make one left increases , Jogless Jog (to keep stripes as straight as possible while knitting in the round), Kitchener stitch (for grafting the crotch gusset stitches), and i-cords! “Duplicate stitching" (explained on Page 14) is an option used to add any designs to the Bloomers after they are knit! (Such as the speckles on the skirt of the 1st photo and the sheep & fences on the 5th pair pictured at the beginning of this pattern!)
LET ME EXPLAIN THE KNITTINGPROCESSFORTHESEPANTS:
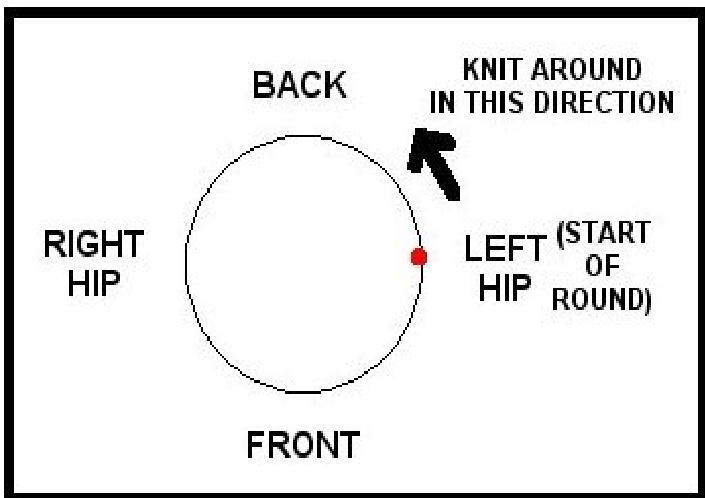
My start of the round is always at the LEFT HIP (LH) of the pants. (This makes for a less obvious place to do color changes and increases!) As you knit along past the beginning stitch marker, you'll be knitting the back of the pants first and then the front.
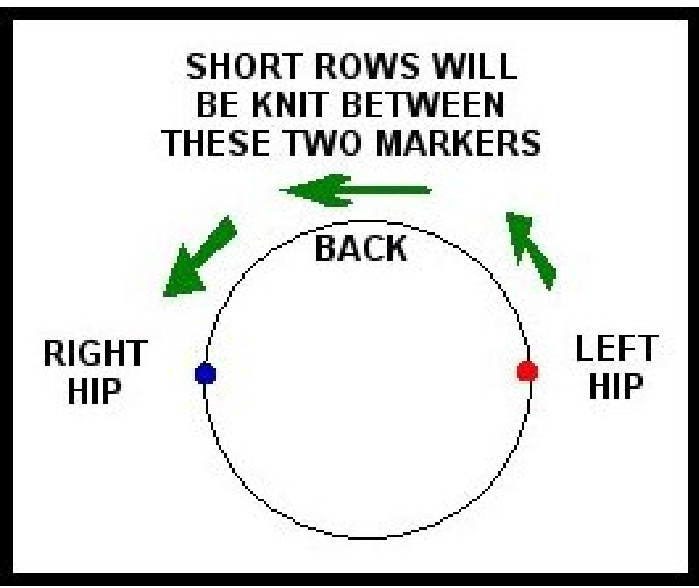
If you are knitting these for a child who wears cloth diapers OR if you end up doing your own math and find the child's "back" measurement larger than the "front", you willbe adding 3 short rows to the back section to accommodate the child's chunkybuns!
You wilalso be knitting a “gusset” which consists of adding stitches to the crotch section for a more comfyfit. You will be increasing for several rows, 2 stitches at a time, in the front middle and back middle sections. Adding a gusset is also nice for increasing your leg size since you are adding quite a few stitches. Not ALL of these will be needed for the “gusset” so a few with add to your leg width! This is helpful for children with really chunky thighs and leaves room for growth for any child! After knitting your gusset, you will break off and knit the legs. If ruffes and a skirt are desired, they will be the LAST things you kni
Page: 4
BASIC SIZING GUIDELINES.
If I am knitting a basic size without the child's measurements,I follow the standards below. I knit the rise (front where top front of pants will rest, under crotch, and back up to where back of pants willrest) and waistline the same. The inseam is the measurement from the crotch down to the ankle. I personally like to knit the first length for a perfect fit OR the second length for a cuff that can be turned up and then let down as child grows. \*\*For those of you that would like to figure your own math based on your child's measurements, I provide pages at the back of the pattern for you to do your planning! (Pages 15 & 16) Sizing.
| Rise & Waist | Inseam | Start Bloomer Ruffle | |
| Wheninseammeasures: | |||
| 0-3 months | 14" | 6" - 7" | 3.5" |
| 3-6 months | 15" | 7" - 8" | 4" |
| 6-12 months | 16" | 8" - 9 | 5" |
| 12-18 3months | 17" | 9"-10" | 5.5" |
| 18-24 months | 18" | 10"-11" | 6" |
If you are using my basic sizing guidelines, these are the Total Front and Back Lengths of pants/bloomers: (FRONT is top front of waist down to crotch and BACK is top back of waist to crotch)
| FRONT | BACK |
| 0-3 6.5" | 7.5" |
| 3-6 7" | 8" |
| 6-12 7.5" | 8.5" |
| 12-18 8" | "6 |
| 18-24 8.5" | 9.5" |
FEEL LIKE COLORING?
\*\*I am a very visual person and sketch out all of my designs before I begin knitting! If you are also someone who needs to see it before ya do it, I've added a little coloring section (full of photos like the ones below!) for you on (p.18) \~ Let that inner child in you go crazy! You may also want to add the appropriate abbreviations beside your artwork areas for reference while you are knitting! WC = waist color SC = skirt color BC = bloomer (pant) color
Page: 5
THEPATTERN.
This is how the sizing guidelines will look throughout the pattern: (Ignore any underlined sections unless you are doing your own math!) (0-3, 3-6, 6-12, 12-18, 18-24) your math CASTINGON. Using Wc , Size 5 - 16" circulars needles and the Long Tail Cast-on method (to insure an stretchy waistline), \*\*remember the black numbers are fora gauge of 5 stitches per inch and the red numbers are fora gauge of 4.5 stitches per inch!\* CO:(72 or 64 , 76 or 68 , 80 or 72,88 or 80, 92 or 84 ) your math Place stitch marker to mark beginning of round and continue to knit around in K2, P2 ribbing to desired waist length. 1 prefer about 1 to 1.5 inches. Switch to size 8, 16" circulars (or DPN's) choose the option that applies: \*\*You now have the choice of eithera FULL SKIRTas in the original Budgie loomers, ora HIP SKIRTY, as in the last 2 photos at the top of this pattern. If you don't want a skirt, skip FULL SKIRTY DIRECTIONS\*\* If you will be knitting a HIP SKIRTY.. skip the next section, “FULL SKIRTY DIRECTIONS" and continue right below it. FULL SKIRTY DIRECTIONS. (skip this section if doing a hip skirty or a pair without a skirty) Option#1- IF YOUR WAIST AND SKIRT WILL BE THE SAME COLOR: continue knitting in WC adding one “purl" round. (This will be used later to start the skirt!) Option#2- IFYOUR SKIRT COLORWILL BEDIFFERENT FROMWAIST: Switching to SC, knit one round and then “purl" one round. (To pick up later for skirt) Now you will switch to your BC. Continue knitting for: (36 or 32, 38 or 34, 40 or 36, 44 or 40, 46 or 42) stitches cast on stitches divided by 2 and place marker (RH). Continue knitting around for approximately 1 inch (or 6-7 rounds). \*\*IF YOUARENOT DOING SHORT ROWS,SKIPTHISPARTANDMOVETOTHEBOTTOM OF PG.6\~\~Adding Stitch Markers ForTheGusset!\*\*
Now it is time toADDYOUR FIRST SHORT ROW!
Ilike to place mine after 6-7 rounds in order to gradually increase the back area. My short rows are the most invisible short rows I've found! After trying many that left holes, these were a breath of fresh air!!
Page: 6
ADDING A SHORT ROW.
For those who are new to short rows, what you are doing is adding a little extra room in the back by adding a few "short" rows JUST to the back section. In order to do this, you need to knit from the LH area to the RH area, turn your work, purl back to LH area, turn your work and continue knitting. At each “turning point" there will be a gap that needs to be closed up. (Unlike the typical short rows where you “wrap" a stitch or Japanese Short Rows that require safety pins, this technique is by far the easiest and most invisible that I have seen! They may be confusing to start, but please be patient because the results are worth it!)
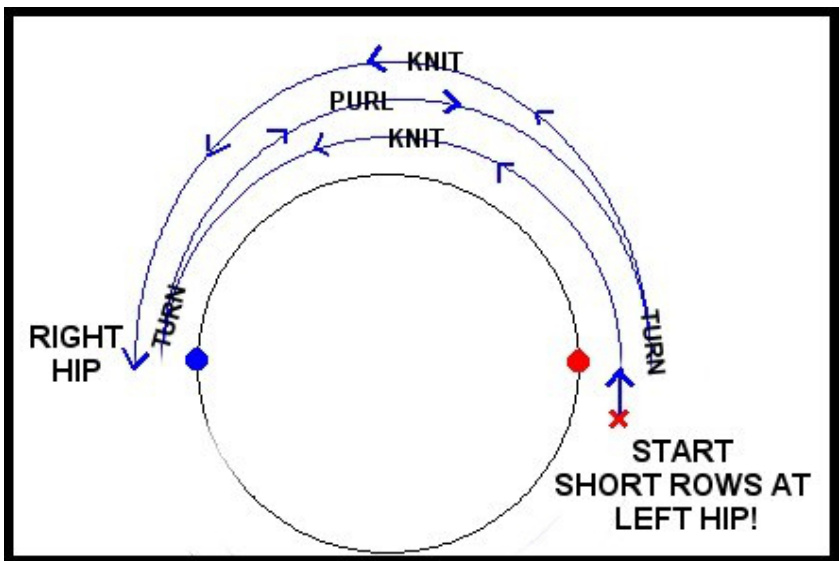
READY???
Starting at your LH marker (beginning of round \*red dot\*), knit across to 2 stitches before your RH marker. Turn your work. Slip the next stitch, as if to "purl", onto the right needle. Purl across to 2 stitches before the LH marker. Turn yourwork. Slip next stitch, as if to "PURL", onto right needle. Knit across to 3 stitches before RH marker. Slip the next stitch, as if to “pur". Using your left needle, pick up the BACK stitch below the 1st stitch on your right neede by going into the back of the stitch and leave it on your left needle.
Page: 7
Slip the 1st stitch on the right needle directly onto the left needle and knit this stitch as normal. Knit the next 2 stitches together and continue to knit until 1 stitch past the LH marker . Slip the next stitch, as if to “KNIT", onto the right needle. With your right needle, pick up the back loop below the LEFT needle (by going into it through the back) and place it onto the left needle.
Slip the 1st stitch on right needle back over to the left needle and knit the next 2 stitches together THROUGH THE BACK.
Continue knitting another 6-7 rounds and then add another SHORT ROW. Continue again for another 6-7 rounds and add your LAST short row!
ADDINGSTITCHMARKERSFORTHEGUSSET.
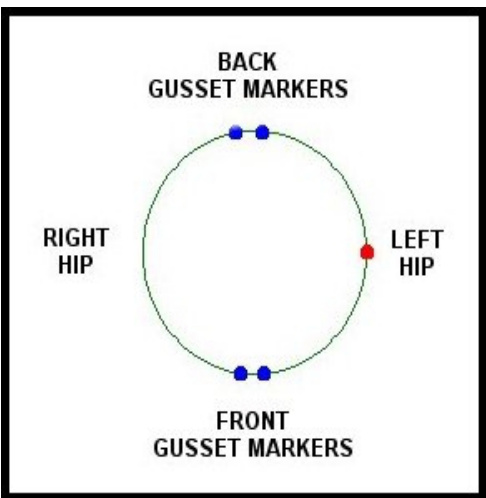
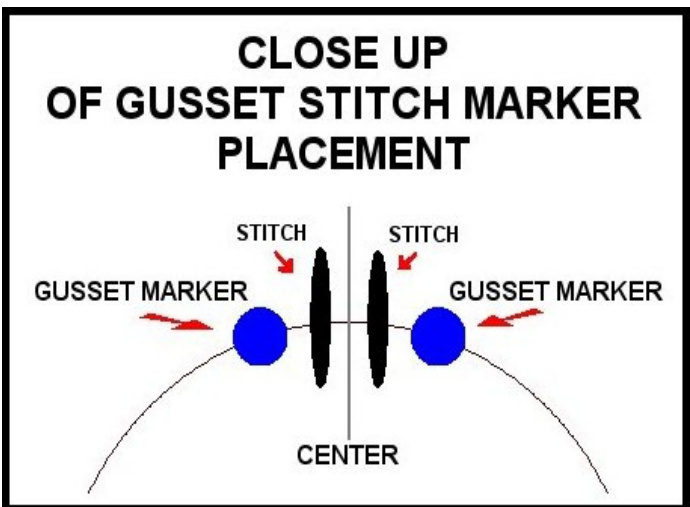
At this point you will knit around adding a few markers, to be used later for the gusset. From the beginning marker (LH), knit: (17 or 15, 18 or 16, 19 or 17, 21 or 19, 22 or 20) Gusset Marker Measurement (p. 16) stitches and place marker. Knit 2 stitches and place another marker. Knit to your RH marker and from there knit (17 or 15, 18 or 16, 19 or 17, 21 or 19, 22 or 20) Gusset Marker Measurement (p. 16) stitches and place marker. Knit 2 stitches and place another marker and continue knitting to LH marker. \*\*At this point count the stitches between the LH marker and the 1st gusset marker AND count the stitches between the RH marker and the next gusset marker to make sure they match the numbers figured from above (17 or 15,18 or 16,19 or 17,21 or 19, or 22 or 20)\*\* You'd hate to find out you counted wrong and your gussets aren't exactly across from each other! Page: 8 You should now have a beginning marker (LH), 2 stitch markers with 2 stitches between (Back Mid Section) and 2 stitch markers with 2 stitches between (Front Mid Section)
CONTINUE WITH ONE OF THE TWO SECTIONS BELOW..
#1 THIS SECTION FOR HIP SKIRTYS ONLY:
continue knitting until TOTAL FRONT (FROM TOP OF WAIST DOWN) measures: (4.5", 5", 5”, 5.5", 6") \*\*For those doing their own math, refer to page 16's GUsSET SECTION for your "Start adding gusset" number, measure your work, and make sure to stop knitting when the FRONT of your work is 1" less than the amount you figured for your BudgieBloomersize! Option 1: (if you want the skirty to be knit with the same color as the area below the waist) \~ PURL 1 ROUND. Switch to color you desire for under the skirty and knit until FRONT measures (5.5", 6", 6", 6.5", 7") Option 2: (if you'd like a different colored hip skity) \~ KNIT 1 ROUND with new color and then PURL 1 ROUND. Switch to color you desire for under the skirty and knit until FRONT measures (5.5", 6", 6", 6.5", 7")
#2 THIS SECTION FOR FULL SKIRTYS Or NO SKIRTYS:
Continue knitting until TOTAL FRONT (FROM TOP OF WAIST DOWN) measures: (5.5", 6", 6", 6.5", 7") \*\*For those doing their own math, refer to page 16 for your "Start adding gusset”" number, measure your work, and make sure to stop knitting when the front of your work is the amount you figured for your Budgie Bloomer size!
INCREASING FOR THE GUSSET.
Starting at LH marker: On the first increase round only: 1. Knit to the first stitch marker and slip marker to right needle. 2. Increase before next stitch (l use MIR which I describe in the abbreviations section on PAGE 2 but you can use your favorite increase. I do not use “KFB" because it leaves a litle “purl" bump that is very noticeable.) 3. Knit two stitches and increase (l use a MIL, also described on PAGE 2) before the stitch marker. Repeat at next set of gusset stitches. On all other increase rounds: Knit to the first stitch marker, slip the marker and increase one. Knit all stitches between the marker and increase one before the marker.
Page: 9
ROUND 2:
Knit even. (No increases) Continue knitting these 2 rounds TWO more times (for sizes 0-3 & 3-6) or FOUR more times (for sizes 6-12, 12-18 & 18-24) and your FRONTshouldmeasure approximately: (6.5", 7", 7.5", 8", 8.5") comparable to chart in the mid section of pg. 4 (if not, just knit the 2 rounds againl) \*\*or until you have reached your TOTAL FRONT AND BACK measurements from the bottom of page 15!\*\* I have included “check off" boxes below if you'd like to use them! Sizes 0-3 & 3-6 month: additional boxes for sizes 6-12, 12-18 & 18-24 months: Round 1: Round 1: Round 1: Round 1: Round 1: Round 2: Round 2: Round 2: Round 2: Round 2: Finish your last “knit” round and continue kniting past the LH marker until you reach the 1st gusset marker.
SPLITTINGFORTHELEGS
Continue knitting past the 1st gusset marker for (6, 6, 10, 10, 10) stitches. The last (4, 4, 8, 8, 8) stitches you JUST knit can be slipped onto a stitch holder. These willbe later "grafted" for the crotch. Change to your size 8- 12" circulars and continue knitting, from where you left off, removing 2nd gusset marker as you go past it. Knit around until you get to the next set of gusset markers and knit (2, 2, 2, 2, 2) stitches past the 1st marker. The stitches that are now on your size 8- 12" circular are the stitches that will make the 1 st leg. Now you can let all of the stitches stillon the 16" circular just hang there until you are ready to knit the 2nd leg! LEG NUMBER ONE. Joining "in the round" and placing a marker to mark the start of the round (which for this leg is at the crotch or mid section) and continue knitting the 1st leg until your leg measures: Option #1 For pant legs without ruffles simply knit: (6", 7", 8", 9", 10") If knitting stripes, read the “JOGLESS JOG" section below! Option #2 Knitting legs with a ruffle under the knee: (3.5", 4", 5", 5.5", 6") \*\*or your "RUFFLE” measurement from page 16. At this point, starting with the knit "V" stitches right under the "purl" row below waist, I count how many rows I have knit up to this point. Count the "V"s and count the stitch on the needle and write this amount down. You willuse this later to insure that your ruffles end up in the same spot on both legs (or that your legs are the same length)! Mark your measurement here: Front Rows Up To Ruffle or (Before Cuff on longies without ruffles) Rufflesonly: Now you will add a "purl'"' row (as you did under the waist) and this will be picked up later to knit the ruffle! Continue to knit 4 rows with BC (I do this because it will be hidden by the ruffle, so Ilike the first visible stripe to be in a contrasting color!) You wil now be using the “Jogless Jog" method to start your striping! For those not familir with the “Jogless Jog", here's a quick tutorial: For Even Stripes: The “JoGLESS JOG" method helps to make sure your stripes stay as straight as possible when kniting in the round! You'll notice that when you change colors and finish the first round of the new color that your last stitch is one row higher than the first! Here's the solution:
Page: 10
strand that sits close to the right side of the new color's 1st stitch. Place this on the left needle and then knit the 2 stitches together. Then after knitting a few more stitches, from the back of your work, tug a bit on the loose yarn to hide the first stitch and then continue knitting until you are ready to switch colors again and repeat the process! Using the "Jogless Jog", alternate BC and SC for 3-4 rows each until you have reached ( 6, 7, 8, 9, 10) inches or your desired INSEAM LENGTH (minus the cuff - from page 15 \*\*I like my cuff to be knit with the SC so I usually sketch out the amount of rows (according to my guage) that Ill need to finish the legs (without the cuff) and plan it so I end the striping in the SC. I explain this in detail on page 16 in the section Called\~"FIGUREYOUR STRIPES"!\*\* BUT... To avoid doing any math and stil insure your cuff will be done in SC, just knit to your desired inseam length minus the cuff and if you end in BC, then you are all set to knit the cuff. BUT if you end in SC just knit one more stripe in BC and THEN knit the cuff. Your pants will just be I2" longer than planned. Not really a big deal!
THE CUFF.
Make sure that you knit 2 rounds before starting your cuff design. The first knit round of the new color is to insure that you will not have any ICKY DOTS: (\*icky dots" are formed when you change colors and "“purl"' a stitch into a “knit' stitch of the other color. To prevent this, you just need to "knit" one round in the new color before doing any “purl" stitches in the new color!) This photo shows where I switched to blue without a “knit"round and did a few“purl" stitches The “icky dots" are the blue spots in the middle under the pink stitches. You DON'T want these!
The 2nd knit round helps to make sure you are able to smoothly finish the JOGLESS JOG color change before starting your cufftexture. You could do just one knit round, but I find 2 to just be a bit easier. I usually use seed stitch for the cuffs and do at least 5 rows before binding off! To knit a seed stitch cuff: ROUND 1: \*K1, P1" around, ending with a K1. Since you most likely have an even amount of stitches, you'l want to MIL right before the marker (to increase one stitch). Round 2: \*P1, K1" around. Continue in this manner until cuffis desired length! You can use whatever BO method you prefer, but I like a stretchy BO so I \*K2 tog through the back and slip the stich from the right needle back to the left\* and repeat allthe way around until you have just one stitch remaining. Pullup on your needle a bit to enlarge stitch, cut your yarn leaving at least 8-12" (to weave in on the backside of your work) and then just pullthe loose tail right up and out of your work! I used to draw the yarn up through the stitch, but this causes a knot and I don't like knots!! Speaking of knots, INEVER EVER knot my work! Knots can easily come undone and then your garment will unravel!! With the leg cuffs, I turn the leg inside out a bit and bring the yarn tail to the back by bring it down into a “purl" bump. I then weave it up and down through the stitches as shown in the photos on the following page. I weave ALL ends in this manner!
Page: 11
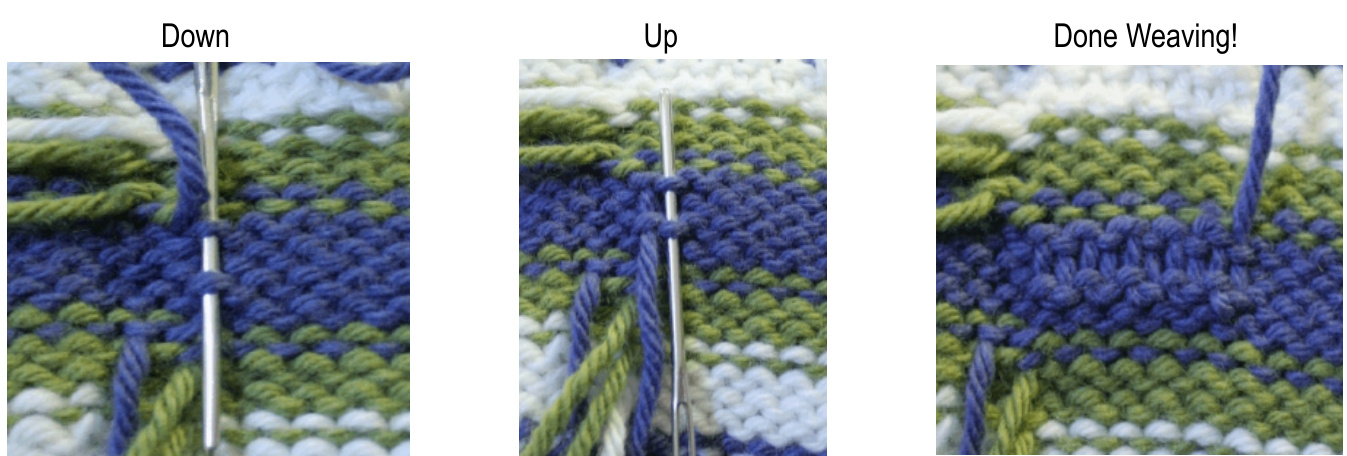
I always check the front of the work to make sure none of the woven stitches show through! This can happen at times when you are weaving ? dark yarn into or close to lighter colored stitches. In this case, I usually don't go under the whole stitch, but only into 1 strand of the yarn.
\*If you'd lie toknit the blmerrulebfore kniting lg#, just skippast the next 2 section!
LEG NUMBER TWO.
The 2nd leg stitches are stil on the 16" circular, so using your BC skein and leaving a long 'tail" about 18" long (used later to graft the gusset), stat knitting at the gusset. You will knit alstitches (leaving the original LH marker in place! THIS will be the “"start of the round" for leg #2, instead of the mid crotch section, as with leg #1!) and continue knitting past the LH marker until you're back where you started. Before kniting “in the round" DON'TFORGETTOMOVEGUSSETSTITCHESTOSTITCHHOLDER! Iane ulie Iist (4, 4, O, Oo, o) ull ue ieillallu leeuie allu plaue ull suull uiuei. Now you will join in the round and start knitting the next leg as you did the 1st! Make sure to \*refer back to page 9 and knit the exact number of Front Rows Up To Ruffle before doing your 2nd leg bloomer ruffle “purl" row. When you have the correct number of rows make sure you start the "purl" row right after the original LH stitch marker and continue as with leg #1!
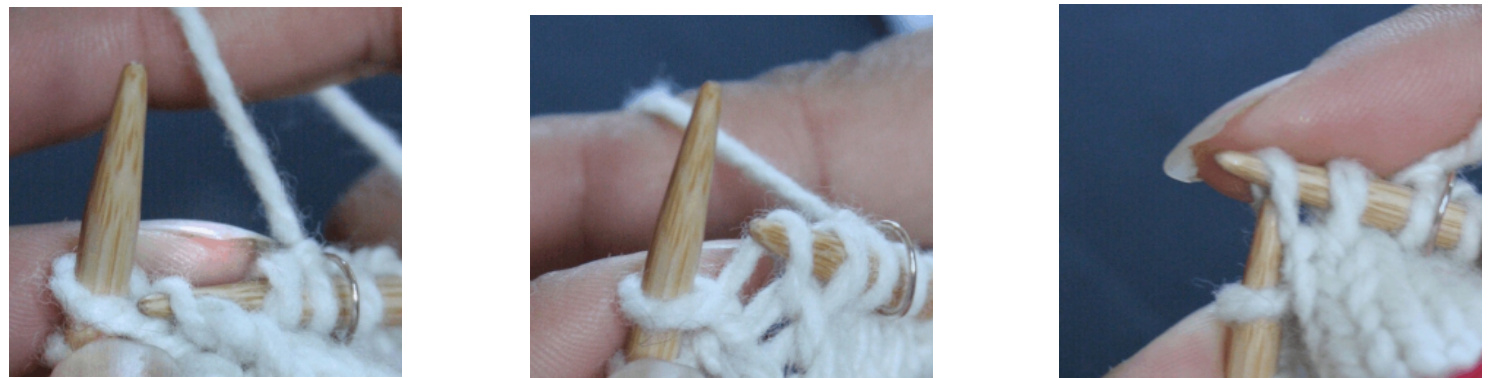
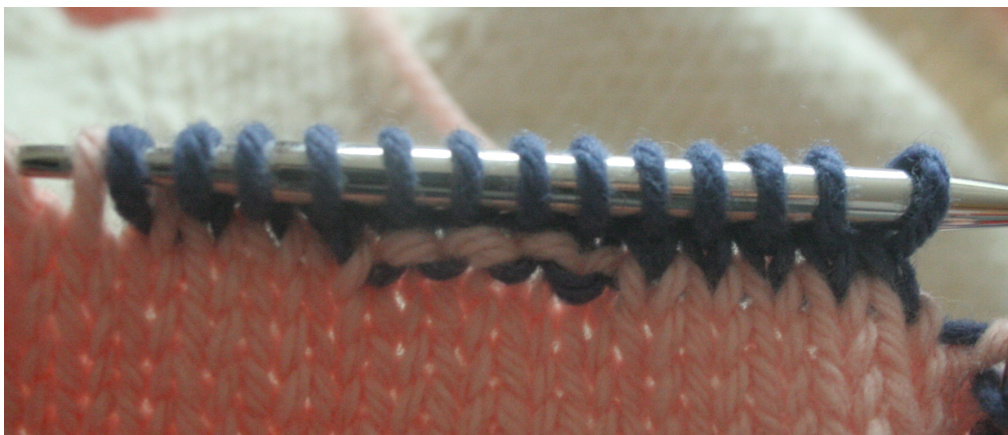
GRAFTINGTHE GUSSET.
You are now finished both legs and it's time to close the hole created at the crotch section where the gusset" stitches remain active on the needles. Transfer the 2 sets of gusset stitches to 2 DPN's. To insure there will be no holes on either side of the gusset, I like to pick up one stitch on either end of both DPN's. You can just stick the DPN's into a stitch near the end, making sure to choose one that is close and doesn't create a hole when you pickit up. Now, with equal amount of stitches on each DPN, holding them paralle, take the long tail lft from when you attached your BC yarn to start the 2nd leg (or just attach BC yarn, behind work at the right side of parallel needles, leaving an 18" tail for sewing the gusset) and thread it onto a tapestry needle. Holding the 2 DPN's close to each other, insert the tapestry needle into the first stitch of the DPN closest to you as if to “purl" (through the back) and draw it through. Then insert the tapestry needle into the first stitch of the back DPN as if to “knit" and draw it through. Now you have set your stitches and are ready to do the “Kitchener stitch" and graft your gusset!
Page: 12
Working with the DPN closest to you, insert tapestry needle in the first stitch as if to “knit" (drawing it through) and slip the stitch OFF the DPN. Leaving the next stitch ON the DPN, draw the tapestry needle into it as if to “purl" and pull snug. Working with the back DPN, insert the tapestry needle in the first stitch as if to “purl" and take it OFF the DPN. Insert the tapestry needle into the next stitch as if to “knit'", leaving it ON the DPN. Continue in this manner until all stitches have been worked and there is only 1 stitch on each DPN. Working with DPN closest to you, insert needle as if to “knit"” and slide it offthe needle. Insert needle as if to “purl" into the remaining stitch on back needle and pulloff needle and pull tightly. You can now insert the needle into the side of the gusset to draw the yarn to the inside of your bloomers. Before weaving in the end of the grafting yarn, Ilike to look at the gusset to see if any holes were left on the sides. If so, when I turn my garment inside out to weave in the end, I also take the yarn and sew a few stitches on the sides to close the holes.
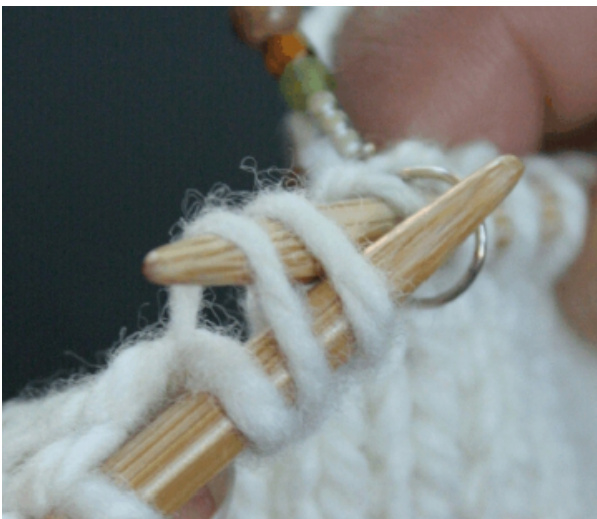
KNITTING THE BLOOMER RUFFLES
It is time to pick up the “purl" bumps on the legs to start your bloomer ruffles! Using your 12" circular needle and BC you willstart picking up stitches at the beginning of the round area of each leg. (refer to the bottom of page 16 to learn how to PICK UP STITCHES properly!) My original pattern only offered the next 2 ruffle styles which need to be blocked in order to look nice after washing. They DO look super cute, so they are worth it if you want that ribbon candy looking effect, but I now prefer a pleated ruffle, which does NOT have to be blocked. I have included the instructions below the other 2 styles! If you look at the photos at the top of my pattern, the 1st photo shows the EXTRA RUFFLY, the 2nd shows the SIMPLE RUFFLE and the last 4 show the PLEATED RUFFLES. SIMPLE RUFFLE: Switching to 16" circulars or size 8 DPN's,increase in each stitch by kniting in the front and back of each. (KFB) To do this, you knit into the stitch and without taking it off the needle, you knit into the back of the stitch and THEN take the stitch off. Repeating this with every stitch will double the number of stitches on the needle. Knit 3 rounds and then BO all stitches. EXTRA RUFFLY RUFFLES: Knit as for "simple ruffles" but instead of “Knit 3 rounds and then BO allstitches", knit 2 rounds, KFB of all stitches AGAIN (this can get tricky! I usually use my circular needle AND DPN's because you will double the amount of stitches AGAIN!), knit one final round and BO all stitches. PLEATED RUFFLES: You first have to make sure that the number of stitches on your needle is divisible by 4. If not, you will add the extra stitched you need as you knit the first round. Round 1: \*(P3, K1) around. \*If you need to add a stitch or 2, just add them randomly (you'll never notice in the end) when you have to "K1". Instead of knitting the next stitch, pick up the yarn between the needles. I usually end up needing to add 2, so I add one on the side of the leg and then one right at the end of the first round! Round 2: \*(P3, K1) around. Round 3: You wil now be increasing on either side of the “K1" row from the last round. \*(P3, inc, K1, inc) all the way around. (1 prefer to do a MIR and then a MIL) Round 4: \*(P3, K3) around. Round 5: \*(P3, inc, K3, inc) around. Round 6: \*(P3, K5) around. Stop here and BIND OFF for a small ruffle OR..if you prefer a longer more pleated ruffle, you just continue adding 2 rounds at a time until it's the length and effect you'd like and then bind off! Longer ruffle: Round 7: \*(P3, inc, K5, inc) around. Round 8: \*(P3, K7) around. Bind off or continue for a longer ruffle! Even longer ruffle: Round 9: \*(P3, inc, K7, inc) around. Round 10: \*(P3, K9) around.
Page: 13
THE SKIRTY.
It is now time to pick up the “purl" stitches below your waist stitches! This is how you miraculously attach the skirt to the pants! Starting at the LH and using your size 8 \~16" circular needle, you will be picking up the purl "bumps" allalong the waistline as you did for the ruffles! When finished, you should have the same number of stitches on your needles as the original “cast on" amount. I usually count mine and find I am one shy and have one more bump to pick up :) Seems it always hides on me! Place your LH marker and then continue kniting to the opposite side and place your RH marker as you did when knitting the body. (After half of the total number of stitches on your needle!) \*My original Budgie Bloomer pattern offered just a FULL SKIRTY, but Ihave added the option of a HIP SKIRTY, so choose whichever directions apply to YOUR desired skirty! Directions for both on next page. . .
FULLSKIRTYDIRECTIONS:
Now you will want to keep track of your “knit" and “increase" rounds because you will want them to be spaced evenly! I prefer to add one increased stitch, on each side, every 5"h row. SO, you'll want to knit 4 rounds even and then have an increase round. I use a MiR at the RH marker and a MIL at the LH marker. I'll leave space below for you to keep track. 4 Knit rounds and 1 increase round: (You most likely won't use all of these!)

You will only have to do as many knit and increase rounds as it takes until your measurement from cast on edge down to bottom edge of skirt measures approximately: You wil then stop and add about a 1" cuff(I prefer seedstith for the skity cuf) This willinsure that your sirt will comedown abit past the Crotch.
HIPSKIRTYDIRECTIONS:
For this fun flirty skirty, you knit in this manner: Round 1: \*(knit 1, YO) all the way around, doubling your stitches! Round 2 and 3: knit Round 4: using your longer circular needle (l use a 30") or your desired method of kniting a large amount of stitches in the round, \*(k1, YO) around, doubling your stitches AGAIN! (PHEW.that's a LOT of stitches, but SO worth it in the end!! Don't get discouraged! You will LOVE the result!l) Rounds 5 and 6: knit in seed stitch (so the edges don't cur when you bind off!) Bind Off all stitches! (BE PATIENT. This is the hardest part!I) WOO!! The hardest part is over!! Breath, admire your fine handiwork, and get ready to knit the drawstring!
AFEWNOTES ABOUTI-CORDS.
I prefer a thinner i-cord, so I like to use two size 2 DPN's for the i-cord, but you can use any size you wish. The larger the needles, the thicker the drawstring. This really does not change the function or stability since you are using the same amount of stitches, it just
Page: 14
makes the stitches larger, therefore only adding to the thickness. Using smaller needles may take a bit longer, but the trim size is less bulky and especially nice if you have a “belly sleeping" child who will sleep in their Budgie Bloomers! No matter what, an i-cord makes a great drawstring AND if you make it a bit longer than usual, many children like to play with theirs and chew on them! FUN!! To secure the drawstring (for added safety if you are worried the drawstring could be a safety hazard if pulled out of pants, you can take a small amount of yarn and a tapestry needles and secure it with a few sewn stitches in the back!)
THE I-CORD.
If you'd like to view my online tutorial, click this link: How to Knit an I-cord \~My YoutubeVideo Knit an i-cord long enough to string through the ribbed waist and to be able to tie a nice bow! I usually knit mine twice the amount of the waist and then (without taking the stitches offthe needle) thread the cast-on edge of the i-cord through the ribbing and if it isn't long enough, I knit a bit moreand thenBo! YAY!! You are ALL done! Well unless you have a little blocking to do if you have done ruffles that need a little tweaking or if you want to add some fun duplicate stitched designs!! You will want to “block" your knitting so that it looks just right"! Your simple or extra ruffly ruffles will not lay right unless you pin them, spritz them with water, and allow them to dry! I just lay my Budgie Bloomers on a towel, pin each ruffle the way I want them to dry, and then spritz them with a spray bottle! You want to wet it enough to relax the fibers! You can also do this anywhere on the Budgie Bloomers that you'd like to even the knitting out, as in the "jogless jog"areas. Any decorative stitches used after knitting are “DUPLICATE STITCHED". (refer to the bottom of page 20 to see how I create my designs and to try it out yourself on my Free Kniting Graph Paper!!l) What you are doing is covering the knit "V"s with another color of yarn. As you would embroider, take your yarn that has been threaded into a tapestry needle and from the inside of your work, come out at the bottom of the "V", go up to the top right of the "V" and go down into it, across the back to come out the top left of the "V", and then back down into the bottom! Continue anywhere you'd like to add a contrasting decorative stitch! Give your Budgie Bloomers a big squeeze & put them on the lucky litle recipient @ 2009 Bridget McKenzie Designs \*\*Pleasente that tispttemis forPERALUEONLYDONOTsethis patternoranthingmade from thispttem!Ifyou post photos of Budgie Bloomers that you've knit anywhere on the internet, make sure to post a link to my Etsy shop\~ MAINEGIRLFIBERART If you are a memberof Ravelry, add your Budgie Bloomers to your Ravelry projects for allto see! Add me as a friend too! My Ravelry name is "TheKnittingManiac". If you aren't a member, join! It's free and wonderful! And please remember to feel free to email me ANYTIME if you have questions, problems, find any mistakes, etc! Even if you thin it's the silliest question on the planet, I won't think so! MaineGirilFiberArt@gmail.com
Page: 15
Do Your Own Math!!
THE WAIST.
The total NEEDS to be divisible by 4! Either you will measure the child's waist and multiply it times the gauge (stitches per inch) and then round UP to the nearest number divisible by four OR you can cast on according to my guidelines (which will be listing in the "Casting On" section.) Use this space to do your math: X Gauge Stitches Per Inch Child's Waist Measurement TOTAL Take your TOTAL and divide it by 4 = then round UP to nearest number divisible by 4, such as: 72, 76, 80, 84, 88, 92, and 96 and you have your:
of cast on stitches =
THE RISE. Make sure to measure the cild whil they are diapered. Measure from above the front of the diaper, btween the legs, on up to above the back where you will want to pants to reach. \*\*f the child wears disposable diapers or is potty trained, you can also measure just from the front down to the crotch and then from the back to the crotch. If there is not much different (for instance, the front measures 7" and the back measures 7", you will not need to add any bulk to the back of the pants, and this means "no short rows"! Yippeee!) Use this space if you'd like to keep track or your measurements: Topoffront tocrotch Topofbacktocrotch Total Rise \*\*\*\*\*\*\*\*\*\*\*\*\*\*\*\*\*\*\*\*\*\*\*\*\*\*\*\*\*\*\*\*\*\*\*\*\*\*\*\*\*\*\*\*\*\*\*\*\*\*\*\*\*\*\*\*\*\*\*\*\*\*\*\*\*\*\*\*\*\*\*\*\* If the difference between the front and the back isn't a perfect 1", on average,the 3 short rows willbe just fine. I find that i the gal is correct, the 3 short rows add about 1", which is plenty of room especially since the wool willstretch a bit! A very helpful thing to write down at this point is the finished rise measurement of the front compared to the back (for future use). To figure this out, do this little math equation: #1 FOR PANTS WITH 3 SHORT ROWS: divided by 2 = minus %“ = Total Rise Total Front Length plus 1 inch = Total Front Length Total Back Length (math equation “FOR PANTS WITHOUT SHORT ROWS" on next page!) #2FOR PANTS WITHOUT SHORT ROWS: divided by 2 = Total Rise Total Front Length and Total Back Length
Page: 16
THE GUSSET. Youll need a measurement for where you wilstop kniting in order tostart ading gusset stitches. If l am making the smaller sizes, I stop when my TOTAL FRONT measures 1" less than it should. Ifl am making larger sizes, I stop when my TOTAL FRONT measures 1.5" less than it should. Here's the math for when to start adding the gusset stitches: (choose one) Total Front Length - 1" = (for sizes 0-3 or 3-6 months) "Start adding gusset" Total Front Length - 1.5" = (for sizes 6-12, 12-18, & 18-24) "Start adding gusset"
THEGUSSET MARKERS.
You need to do a little math to figure out where to put your stitch markers for your gusset! Add your figure to the empty line and ust as you work the pattern! CO stitches divided by 4 minus 1= Gusset Marker Measurement (for instance, 80 / 4 = 20 - 1 = 19)
Gusset Marker Measurement
THE INSEAM.
Measure from the crotch down to where you want the pants to rest. For longies,Ilike to measure past the ankle because I think they look so cute covering the top of the child's foot a bit! ThenI knit the leg THAT long and add 1" to 1.5" of cuff that can be turned up to "actual size" and then turned down as the child grows. BUT that is MY preference. If you prefer knitting them the “actual size", just take your inseam measurement, subtract your desired cuff length, knit to that point and then start cuff. write your desired INSEAM LENGTH (minus the cuff) here THE BLOOMER RUFFLE. Measure from the crotch down to where you would like the rufle to start. I prefer right below the knee, but you may prefer above or further below! If you want to have a measurement to go by, I like to take the actual inseam length, divide it by 2 and add a half inch\*\* for inseams 6-7" and a whole inch\*\* for larger inseams. So, if your inseam was 8 inches, divided in half it would be 4", plus an inch would make the ruffle start at 5" down from crotch. divided by 2 = Inseam measurement Half of Inseam Half or Whole inch\*\* “"RUFFLE"
HOW TO PICK UP STITCHES.
With your Budgie Bloomers pointing away from you (waist closest to you and legs pointing away) you willinsert your kniting needle down into the "purl" bumps that are directly above the next “knit"” row. There will be “pur" bumps closer to you RIGHT above the ones you are to pick up but you don't want to pick THOSE up. Take your BC (for bloomer ruffl) or SC (for skirt) skein and while needle i inserted into the purl bump, yarn around the needle (as if to knit) and draw the yarn through (to create your first stitch of the round) and continue with every purl bump in the same line. Once you have gone all the way around and have all of your stitches on your needle, count them to make sure you have the correct amount and if you don't, there may be one or two hidden purl bumps at the end!
Page: 17
FIGUREYOURSTRIPES
If your gauge is correct, you should have either 6 or 7 rows per 1" of knitting. Figure how many inches past your ruffle you need to finish your Budgie Bloomers, minus 1" for the cuff and then multiply that by 6 or 7. For example: 5 (inches past ruffle) minus 1" (cuff)= 4 multipied by 6 rows per inch = 24 striping rows 5 (inches past ruffle) minus 1" (cuff)= 4 multiplied by 7 rows per inch = 28 striping rows Now you divide the number of rows per stripe (l do either 3 or 4) into the "striping rows" amount. For instance:
If 6 rows per inch:
If my stripes are 4 rows per color, then 24 divided by 4 is 6. That means you willhave 6 stripes before the cuff. If you are doing 3 rows per color, then 24 divided by 3 is 8. So, you'd need 8 stripes of 3 rows of color.
If 7 rows per inch:
If my stripes are 4 rows per color, then 28 divided by 4 is 7. That means you willhave 7 stripes before the cuff. If you are doing 3 rows per color, then it won't divide evenly. 28 divided by 3 is 9 with 1 remaining. So, you'd need 8 stripes of 3 rows of color and 1 stripe with 4 rows of color. I would do 4 rows (instead of 3) under the ruffle and then the remaining 8 stripes with 3 rows! And if you are like me, you'llhave little striped legs sketched out all over the place as you plan your striping colors! I often sketch a little leg with the amount of stripes I need plus the cuff. I then color in the cuff with my SC and every other stripe as I work my way up the leg to figure what would work best! Once you get the hang of it, you'll have fun adding more colors to the mix! HOW TO KNIT OTHER OPTIONS. (These may seem obvious to some, but I know many kniters who like things written out clearly so they can really understand each step! Bear with me!)
Longies:
If you'd rather knit basic longies, just skip the “purl" row on page 5 under "FULL SKIRTY DIRECTIONS." and page 8's sections numbered 1 and 2! AND skip the added purl row for the leg ruffle on page 9 at the bottom where it says, “"Now you will add a “"purl" row." Simple. Just don't add ANY purl rows because you don't need to add ANY ruffles!
Capris:
Same as longies, just measure your child and knit the legs so that they will pass their knees! Shorties: Same as longies and capris, just make sure they are knit to above their knees! Budgie Bloomer longies, capris, or shorties: When I don't knit ruffles below the knees: For a fullskirty, I knit the legs entirely striped. Fora hip skirty pair, I start the striping right under the purl row you create on page under the sectiontitled, “THIS SECTION FOR HIP SKIRTYS ONLY". This can get alitle tricky since you are striping the gusset, so try this when you are more comfortable knitting gussets!
Page: 18
SKETCH ALLYOUWANT RIGHT HERE!!!
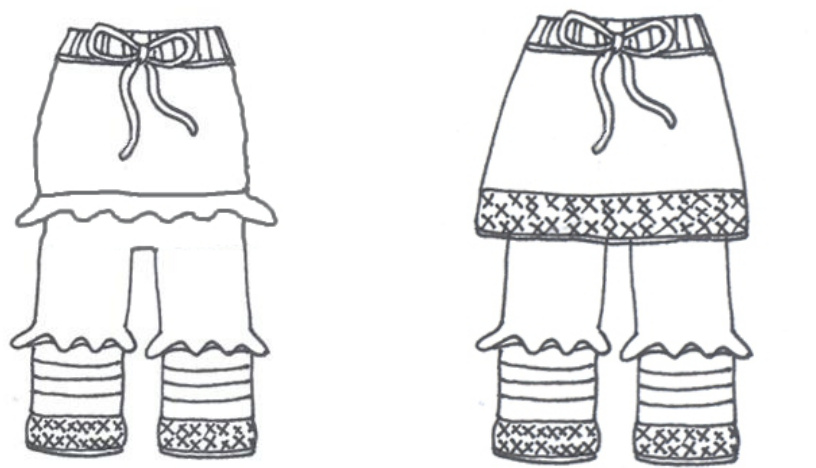
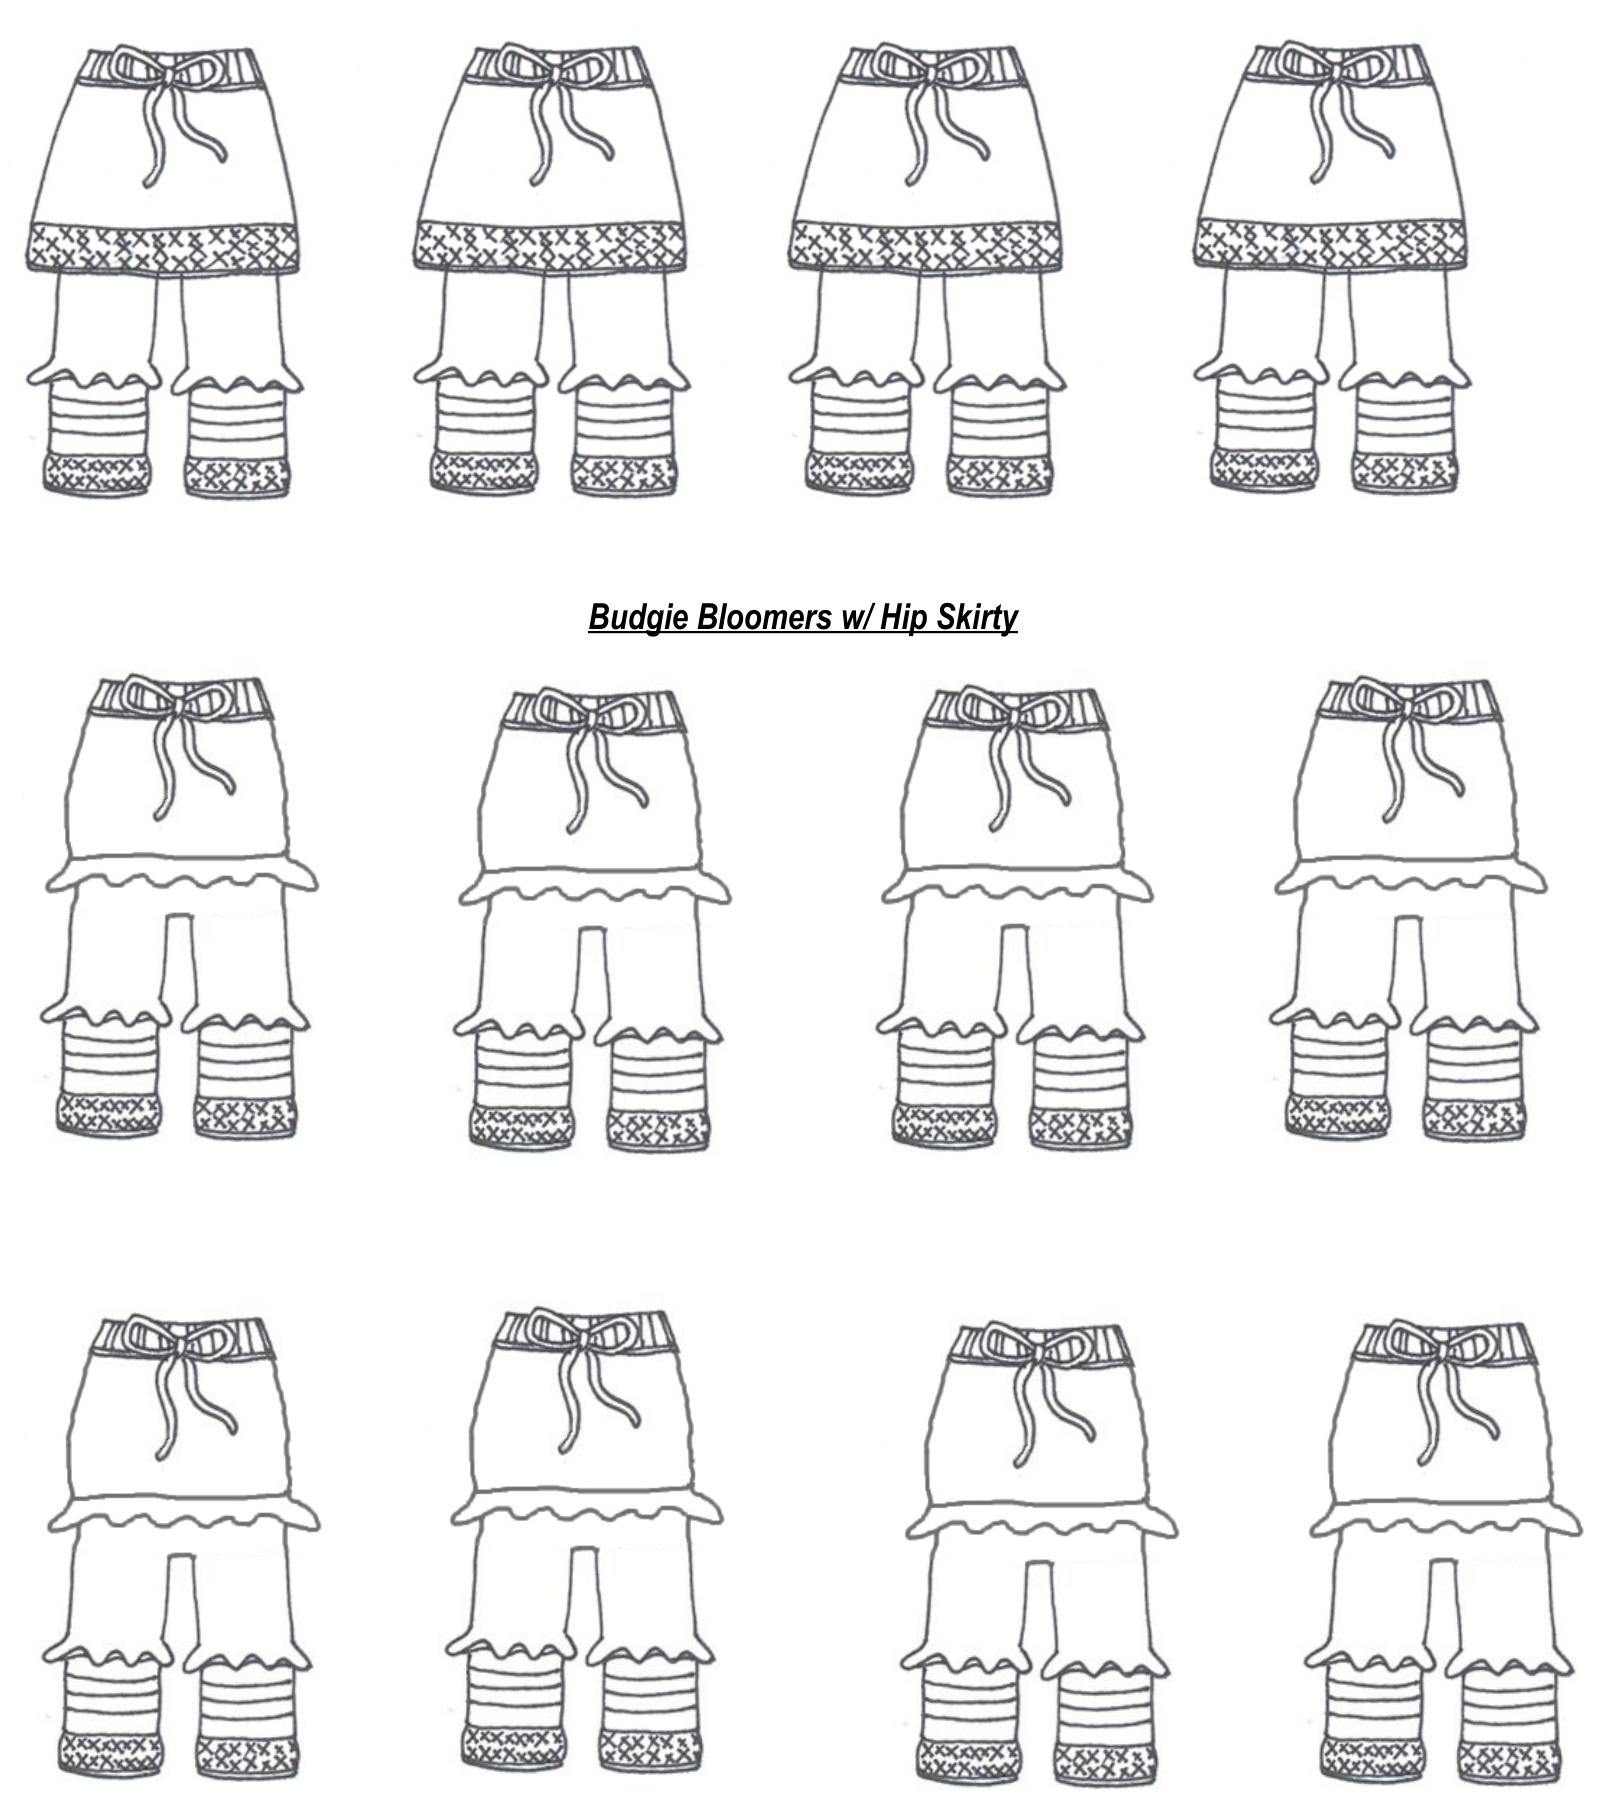
Get out those colored pencils and create your Budgie Bloomers! Isn't this fun? Yippee! (And another big THANK YOU to my friend, Shipra, for her awesome artwork! I modified her artwork a bit to create the “Hip Skirty" version!)
Budgie Bloomers w/ Full Skirty
Page 19 Approximate Yardage
I have broken them down in sections so that you can figure your yardage based on the certain size, style and amount of colors you are using! Grab your colored pencils and have fun coloring your woolies and then decide how much of each color you will need before starting your project! Remember, these are approximate calculations. I am good at number crunching, but nobody's perfect and no one knits exactly the same! Make sure to “over-buy" just to insure you'llhave enough!

MYYARDAGE CALCULATIONS
I calculated stitches per yard (on size 8 needles) for O-wool guaged yarn is 44 stitches and Cestari guage is 40 stitches. That may help you in figuring, but my approximate yardage is below. Here are my approximate calculations! \*\*\*And please ROUND UP from these numbers to be on the safeside! Based on the sizing of: 0-3 (3-6, 6-12, 12-18, 18-24 months ) O -wool guage is in black and Cestari guage in red! Waist - yds: 16-18(17-19, 18-20, 19-21, 20-23 (Full Skirty Option Only) - Body Section under waist - yds: 92- 50 ( 98- 59, 110- 67, 128- 80, 141- 91) Full Skirt Yards: 102- 82 ( 112- 93, 127- 104, 145- 122, 162- 135) Page20 (Hip Skirty Option Only) - Body Section under waist, up to start of hip skirty - yds: 69- 30 ( 73- 37, 7 39,92-49,103-58) (Hip Skirty Option Only) - Body Section under hip skirty, including gusset - yds: 25- 22 ( 27- 23, 35- 29,38-32,40-34) Hip Skirty - yds: 38- 38 (40- 41, 42- 43, 46- 47, 49- 50) Both Legs Yardage total, up to start of ruffle: 41- 38 (49- 46, 64- 60, 78- 72, 88- 82) Ruffles (pg. 12) - yds: Simple 20- 11 ( 20- 11, 22- 12, 22- 13, 24- 14 ) Extra ruffly 36- 18 ( 36- 19, 38- 20, 38- 21, 42- 22 ) Pleated: if binding offafter row 6: 19- 11, (19- 11, 20- 12, 20- 14, 22- 14). if binding off after row 8: 25- 16 (25- 16, 28- 18, 28- 20, 30- 20 ). if binding off after row 10: 33- 22 (33- 22,36- 24, 36- 27, 40- 27 ) Both Legs Yardage total, under ruffle: 30- 28 (37- 36, 39- 38, 50- 46, 59- 56) Both Cuffs Yardage total (1" cuff): 14- 12 (15- 13, 16- 14, 17- 15, 18- 16 ) I-cord - yds: 14- 15(15- 16, 16- 17,17- 18, 18- 19)
Adding duplicate designs to your woolies!
As I stated at the beginning of my pattern, I have always loved to add a little heart under the skirty of my Budgie Bloomers, when I knit a full skirt. But I ventured out into the world of design by adding other duplicate stitched designs to the skirt itself, to the front, to the back, to the legs...whereever I thought something cute would look good! I've done frogs, sheep, flowers, etc. and used to design them all with the basic knitting graph paper I'd find online. The only problem was that each graph paper “rectangle" didn't actually look like a knit stitch! So when I was done stitching my designs, they didn't look quite like my creations!! SO...I took an evening and worked until my eyes bugged out and designed the graph paper you will find on the next few pages! They are available on my knitting blog,“The Knitting Maniac", and come in a few different variations! Check them out here: FREE PRINTABLE KNITTING GRAPH PAPER! You can open it in “Gimp" (all explained on my blog) and actually paint out your designs and then print them out! This is how I designed the little heart I like to add to my Ragdoll style Budgie Bloomers..

You can try your hand, at designing, using the kniting graph paper on the next 3 pages!


Budgie Bloomer Knitting Pattern Lifetime Cottage License
This cottage license allows the purchaser to knit and sell an unlimited amount of woolies from my pattern for a lifetime. My only stipulation is that you mention in your listing, that you knit using my Budgie Bloomer pattern, under a cottage license! I would love to see any items you create! Please send photos to: MaineGirlFiberArt@gmail.com I would love to link to your shop! Let me know that you are selling, and Ill also post a link on myFacebook pages also! Thank you for purchasing my pattern and cottage license! Budgie Bloomers TM is an original design by Bridget McKenzie. License allows sales of final knit product only and does not allow sales of my pattern itself! If you ever have any questions regarding my pattern or this license make sure to contact me through the email provided above! HAPPY KNITTING!!! Bridget


