
FromLambtoSweater The Relay
Relay sweater in 5 pieces
This little sweater in size 2 years can be knitted by five persons in parallel, and thus be finished in an evening. It is possible since it is designed in five modules which then are assembled. It is a classic raglan cut sweater, for which the sleeves and front and back are worked from the bottom up, and the yoke is worked top down. The pattern was originally written to be used at Ulldagarna in Osterbybruk, Sweden, on August 15-16, 2015, a wool fair arranged by the network Ull i Uppland. On the first day of the fair all visitors were welcomed to participate in the relay From Lamb to Sweater. Roundabout 50 people gave a hand in transforming washed but not carded wool to an assembled, washed and blocking for display sweater. We made it in incredible 4 hours and 15 minutes. Can we top this next year? If you make this sweater with your knitting group, please share your moment! There is a dedicated thread for this in my Ravelry group; AnitaYarn's Knitting Lounge.
Materials
Yarn: 200 g wool yarn, 200 m / 100 g Needless and notions: 2 sets of double pointed needles, 2 pairs of regular needles and one 60 cm / 24 inches circular needle in size 5 mm / US 8 2 sets of double pointed needles, 2 pairs of regular needles and one 40 cm / 16 inches circular needle in size 4 mm / US 6 4 stitch markers Gauge: 18 stitches / 28 rows of stockinette stitch = 10 cm / 4 inches Size: 2 years, chest 55 cm / 22 inches, finished length neck to bottom 35 cm / 14 inches

From Lamb to Sweater The Relay
Front and back Cast on 52 stitches on regular needles size 4 mm / US 6. Work garter stitch for 18 rows (knit all from both right and wrong side of fabric). Switch to regular needles size 5 mm / US 8. Work stockinette stitch but let one stitch on each side be the edge stitch. Like this: Right side: Knit all, turn. Wrong side: K1 (this is the edge stitch) purl all to last stitch, k1 (the other edge stitch), turn. Keep working stockinette stitch until your work measures 22 cm / 9 inches.
From Lamb to Sweater The Relay
Sleeves Cast on 36 stitches on double pointed needles size 4 mm / US 6. Distribute the stitches on 4 double pointed needles. Mark the beginning of round and work rib, k2:p2 for 14 rounds. Switch to double pointed needles size 5 mm / US 8. Round 1: K1, make1, knit all to last stitch, make1, k1. Work stockinette stitch for 48 rounds, or until sleeve measures 25 cm / 10 inches.

From Lamb toSweater The Relay
Yoke Cast on 76 stitches using a circular needle size 4 mm / US 6. Mark the beginning of round and work rib, k2:p2 for 14 rounds. Switch to circular needle size 5 mm / US 8. Round 1: Knit all. Round 2: Purl all. Round 3: K12, place marker, k28, place marker, k12, place marker, k24.
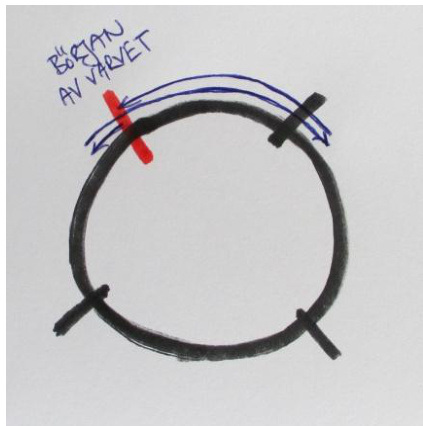
Now there will be a few short-rows to form the shape of the shoulders and neck opening, and at the same time the raglan increases start. First these two short-rows across the back of the neck to the shoulder: Short-round 1: K1, make1, k2, turn, slip 1 with yarn in front (wyif), purl to marker, slip marker, p1, make1, purl to last stitch before marker, make1, p1, slip marker, p1, make1, p2, turn, slip 1 with yarn in back (wyib), knit to marker, slip marker, knit to marker. Short-round 2: K1, make1, knit to 3 stitches after the previous shortrow turn (gap), turn, slip 1 wyif, purl to marker, slip marker, p1, make1, purl to last stitch before marker, make1, p1, slip marker, p1, make1, purl to 3 stitches after the gap, turn, slip 1 wyib, knit to marker, slip marker, knit to marker. Then there will be three short-rows forming the neck opening at front: Short-round 3: K1, make1, knit to last stitch before marker, make1, k1, slip marker, k1, make1, k2, turn, slip 1 wyif, (purl to marker, slip marker) twice, (p1, make1, purl to last stitch before marker, make1, p1, slip marker) twice, make1, p1, slip marker, p1, make1, p2, turn, slip 1 wyib, knit to marker, slip marker, knit to marker.
AnitaGrahn For private use only! To stay updated on my latest designs and classes follow AnitaYarn on Facebook!

FromLambtoSweater The Relay
Short-round 4: K1, make1, knit to last stitch before marker, make1, k1, slip marker, k1, make1, knit to 3 stitches after the gap, turn, slip 1 wyif, (purl to marker, slip marker) twice, (p1, make1, purl to last stitch before marker, make1, p1, slip marker) twice, p1, make1, purl to 3 stitches after the gap, turn, slip 1 wyib, knit to marker, slip marker, knit to marker.
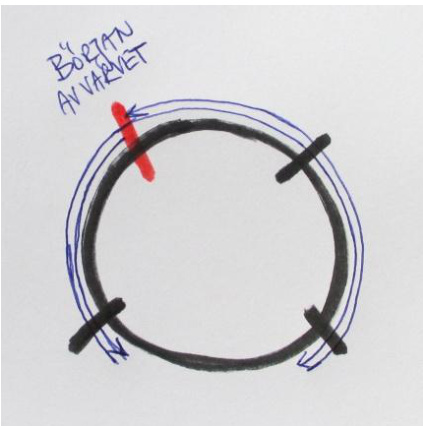
Short-round 5: K1, make1, knit to last stitch before marker, make1, k1, slip marker, k1, make1, knit to 3 stitches after the gap, turn, slip 1 wyif, (purl to marker, slip marker) twice, (p1, make1, purl to last stitch before marker, make1, p1, slip marker) twice, p1, make1, purl to 3 stitches after the gap, turn, slip 1 wyib, knit to marker, slip marker, knit to marker. There should now be 20+34+20+34 stitches between markers. Now we will return to knitting in the round with raglan increases: Round 1 (increase round): (K1, make1, knit to last stitch before marker, make1, k1, slip marker) 4 times.
Round 2: Knit all.
Work rounds 1 and 2 another 3 times, until there are 28+42+28+42 stitches between markers. Round 3 (increase round): (K1, make1, knit to last stitch before marker, make1, k1, slip marker) 4 times. Round 4: Purl all. Round 5 (increase round): (K1, make1, knit to last stitch before marker, make1, k1, slip marker) 4 times. Round 6 (increase round): (P1, make1, purl to last stitch before marker, make1, p1, slip marker) 4 times. Work rounds 5 and 6 one more time. There should now be 38+52+38+52 stitches between markers. Round 9: Knit all. Keep the markers. Now it is time to assemble the parts!

FromLamb toSweater The Relay
Assembling the parts
Turn the Yoke inside out, as if to start working from the wrong side of the fabric. Behind the needle holding the Yoke stitches, place the Back stitches on needle, right side of fabric towards right side of fabric. Bind off the stitches of both parts together loosely. Use all the 52 Yoke stitches to the first marker, and all the 52 Back stitches. Remove marker. Do the same with one of the Sleeves. Place the Sleeve stitches (on one double pointed needle at a time) behind the needle and stitches of the Yoke, and bind off 38 stitches (all stitches from the Sleeve and all stitches to marker for the Yoke). Remove marker. Now go on to bind off the Front and the other Sleeve. Seam the sides of Front and Back together. Weave in all ends. Soak the sweater and pin it onto a flat surface. Leave to dry. All done!!


