AppliedIBabyBlanket
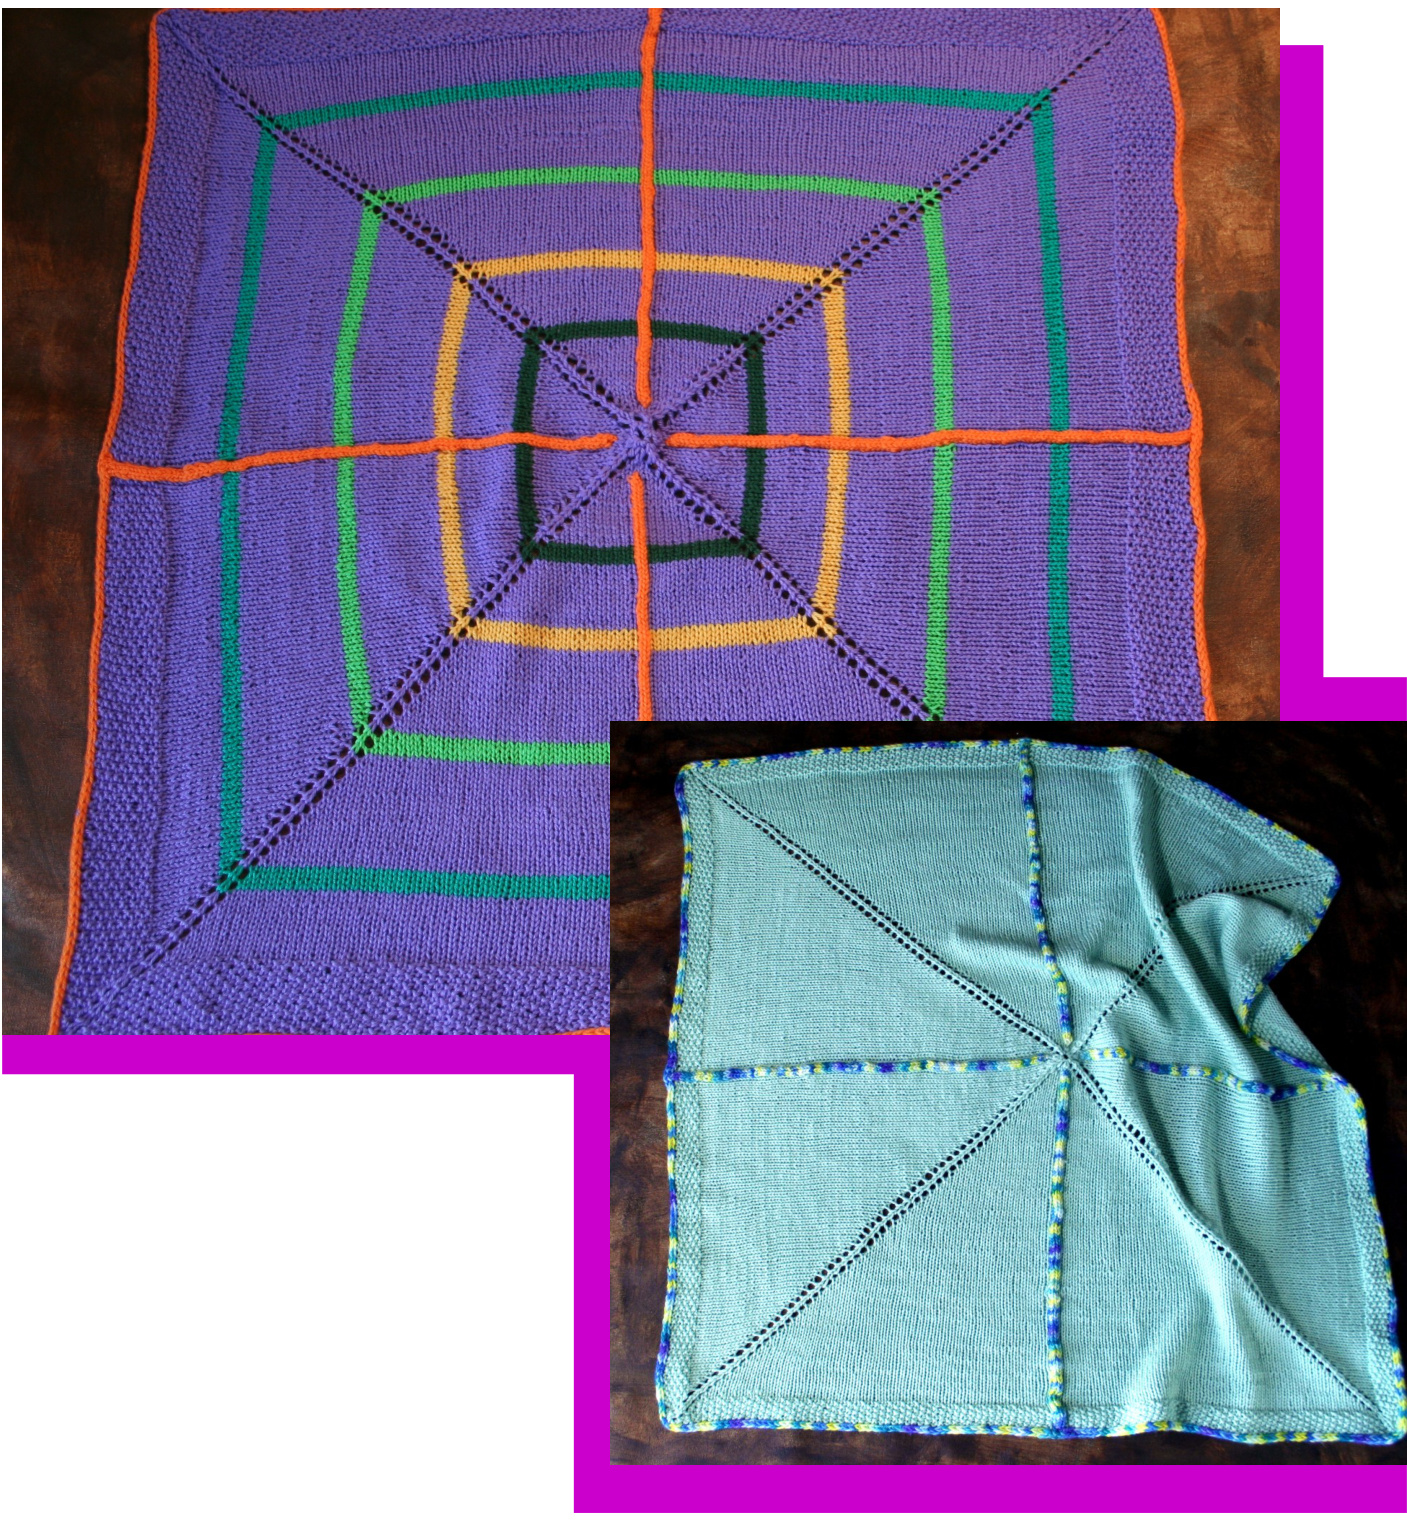
Knit this square baby blanket from the center out in the round. Mostly all knit, the blanket knits quickly and has a cool color applied I cord decoration and border. Once the center of the blanket is established, this is easy knitting. Directions include fingering, sport, dk, and worsted weight.
by: Linda Shelhamer
lindas5252@yahoo.com Ravelry linda-shelhamer Sandwich Creativity
Applied I Baby Blanket
CHOOSING YARN
| This pattern works up well in fingering to worsted weight yarn. It is best in a washable yarn. You need a [ main color or colors and an accent color. Green blanket is in DK weight superwash wool. Purple striped Iblanket is Superwash fingering Baby Ull. Accent yarn should be enough of a color variation to show I and doesn't need to be identical to the main yarn but should have the same washing properties.
| MATERIALS Yarn Weight | Sock/fingering | Sport/DKKnittingWorsted | |
| Needle Size | 9 | ||
| Double points*&29"Circular | 3 | 6 | |
| ApproxBlanketsize | 33" square | 33" square | 33" square |
| Yarn needed | |||
| Main Color (MC) | 920 yards | 850 yards | 770 yards |
| AccentColor(CC) | 120 yards | 100 yards | 80 yards |
| Optional stitch markers and yarn bobbins. If purchasing double points for this project, I'd suggest wooden needles because they are less slippery which is helpful at the beginning. | |||
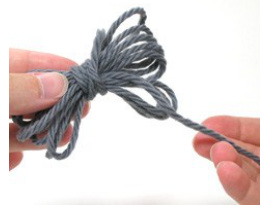
|1) Yarn Butterfly: To create a yarn butterfly you wrap a figure 8 around your thumb and pinky. Then I slide the butterfly loops off of your fingers and wind the remaining yarn around the [2) Abbreviations: k knit; p purl; yo yarn over, k2tog knit 2 together; m1 make 1 increase with right needle from back of work, pick up strand between last st knitted and next st. Place on left needle and knit through back psso |passed slipped stitches over; LH left hand; RH right hand; inc knit into I the front and back of the stitch; pm place marker; dpn double pointed neeI dle; MC Main Color; CC Accent Color
14) Blocking: The blanket needs blocking to show the pattern to advantage. Handwash gently with slight I agitation and roll in towel to absorb moisture. Let dry 12-24 hours. [5) Emily Ocher beginning-one way to start a circular beginning [1] Make a loop of yarn with the I working end in front, pass the crochet hook through it from front to back (under the tail), grab the work|ing end of the yarn, and pull it through the loop. [2] Grab the yarn once more, and pull it through the !loop on the hook. This makes one stitch of single crochet, and one stitch casted on. [3] Leaving the last
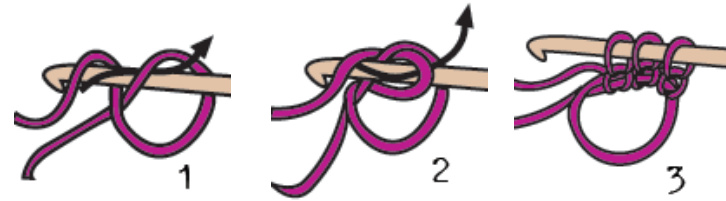
loop on the hook, repeat until the right number of stitches have been made, always passing the hook through the loop and under the tail. [4] Transfer the stitches on the crochet hook to dpns, knit a couple of rows, pull the tail of the loop to close it. Linda Shelhamer 446 Tabriz Drive, Billings, MT 59105 lindas5252@yahoo.com www.montanamadetradingpost.com/SandwichCreativity/ www.montanamadetradingpost.com/blog/ Copyright Linda Shelhamer. All rights reserved With accent yarn (CC) create 4 butterflies or 4 bobbins of yarn. Starting at the center of the blanket with double pointed needles, cast on 8 sts in Main Color. It is easiest to put 2 stitches on each of 4 dpn and then knit with a 5th dpn. Join in round being careful not to twist stitches. I prefer to put needles on a table when making that first join to help avoid twisting. I suggest using an Emily Ocher beginning (shown on p.2) or other circular beginning. Round 1 k (8sts) Round 2 \*k1,yo,\* repeat around (16sts) Round 3 k (16sts) Round 4 \*k1,yo,k3,yo\* repeat around (24sts) Round 5 Using 4 bobbins (or butterflies) of CC, \*k3MC,k1CC, k2MC\*repeat around (24 sts) Round 6 \*(With MC k1,yo,k2),using CC k into front and back of CC st, (with MC k2,yo)\* repeat around (36)sts Round 7 \*k4MC,using CC k1-m1-k1 in 2 CC sts,k3MC\*repeat around (40sts) Round 8 \*(With MC k1[put a marker into this corner stitch, not on the needle],yo,k3), work 3st I-cord with CC, (with MCk3,yo)\* repeat around (48sts) 3- stitch Icord is automatically created (no slipping stitches to the end of the needle) because CC automatically ends at the other end of the 3 stitches when working circularly. Also you need to make sure that the Icord attaches by picking up CC from below MC and making sure that first st after the I cord is fairly taught to avoid ladders next the Icord. Note if you miss attaching the I-cord in a round you can fix this when working in your ends. Round 9 K with MC, keeping 3 st I-cord in CC Round 10 (With MC k1,yo,k to I-cord), 3 st I-cord with CC, (with MC k to stitch before the corner stitch, yo) Continue Round 9 and 10 increasing 2 sts on each side of the corner stitch every other rnd and the I cord at the center of each quarter of the blanket. When you get too many stitches on your dpn move to your circular needle. Use the magic loop method for using a bigger circular needle to avoid having to buy a smaller circular needle (unless you have the smaller needle in your stash). It will eventually be big enough you have to move up to 29" needles. For striping as in the purple blanket, k 4 rounds of stripe colors when I cord on 1/4 of blanket is 2", 4.5", 7.5 " and 11". Continue on until the blanket is 4 inches smaller than you desire. The 33" blanket in superwash wool grew about 10 percent with blocking. Beginning on a Round 9 (no increases), work seed stitch k1, p1, k1 instead of all k except for I cord portion which will continue as before. On the next rounds continue to increase on the corners as before and keep the corner stitch a k. Then k the stitches that look like purl on your needle and p the stitches that look like knit. Since we keep increasing, you will have to adjust the purls and knits right at the corners( so that you consistently stay in seed stitch which means you may end up for 2 stitches with 2 knits together.) Do this for 2” ending with a row that does not have increases. Proceed to Applied I cord edging. Applied I cord edging. Break your blanket yarn leaving a 6" tail. Move stitches so the next stitch is the middle CC I cord stitch. With 2 dpn, cast on 3 sts with waste yarn preferably cotton string. Tie ends of CC yarn and string in bow knot. With separate ball of CC yarn, knit 1 row (only 3 sts). Place the 3 sts on the circular needle (used for blanket). \*With 1 dpn and CC working yarn coming behind work from the third stitch on needle, K2, slip 1 as if to knit, K1 (a stitch from blanket), pass the slipped stitch over. Replace the 3 sts to the circular needle. Repeat from \*. At each corner of the blanket, knit one row of I cord without attaching it to make the corners more square. When you have worked all the blanket stitches, remove the waste yarn and graft or sew 2 ends together.


