RUSTY
Design by Amy E. Anderson @
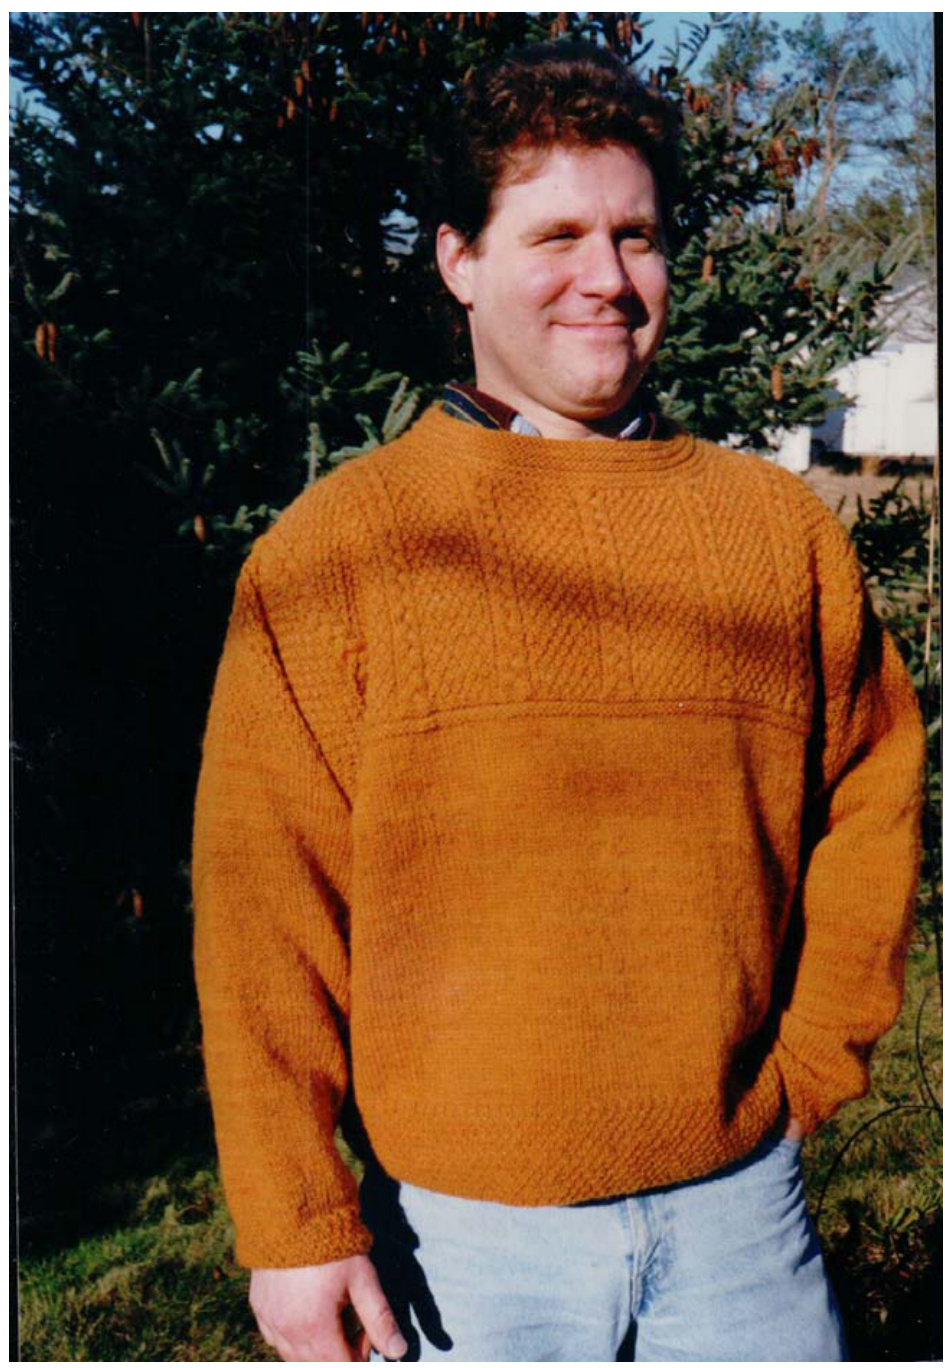
Unisex Sweater with Cabled Yoke Intermediate Skill Level 2 Sizes: Finished Chest Dimensions 44", 50" Worsted Weight Wool Yarn design by Amy E. Anderson If you decide to make this sweater in a color other than orange, you can call it "Russell". When you invest time and money into making a wool sweater, you want it to be worn for years...and men never seem to tire of the basics. Directions are given for two styles of collar: a standard crew neck and a mock turtleneck. This Blackberry Ridge yarn is a delight to work with and it's produced right here in Wisconsin. Directions are given for size Medium, with Large in parentheses. If only one number is given, it applies to both sizes. Read all charts from right to left. Materials: Blackberry Ridge, Wool & Mohair 5 (6) skeins Needles: Size 3 and Size 5, $16^{\circ}$ and $^{29^{\prime\prime}}$ circular, or size needed to obtain gauge. Gauge: 11 sts $=2^{n}$ on larger needles in stockinette stitch Finished Dimensions: Underarm: 44" (50") Length: $24^{\prime\prime}$ (25")
Double Moss Stitch - (over an even # of sts)
Rounds #1 and #2: \*K1, P1\*, repeat $\star_{-}\star$ to end of rd. Rounds #3 and #4: \*P1, K1\*, repeat \*\* to end of rd. Repeat Rounds 1-4. Note: Directions for Double Moss are the same whether you are working flat or in the round.
Body:
With smaller needles, cast on 212 (242) Join and work 23 rounds in Double Moss Stitch, starting with Round #2. Place side marker after 106 (121) sts. Next round: Switch to larger needles and work in stockinette stitch, increasing 1 st before and after side markers on every $8^{\mathrm{th}}$ round until you have a total of 244 (266) sts. Continue even until body measures 14%2" (15"). Next round: Begin armhole shaping as follows: BO 6 sts, work to 6 sts before side marker, BO 12 sts, work to end of round. Note: you will now be working back and forth, rather than in the round. (Slip front sts onto a piece of scrap yarn and continue working on back sts only)
Back Yoke:
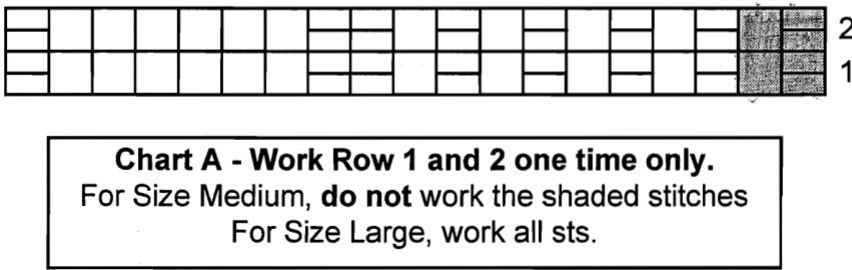
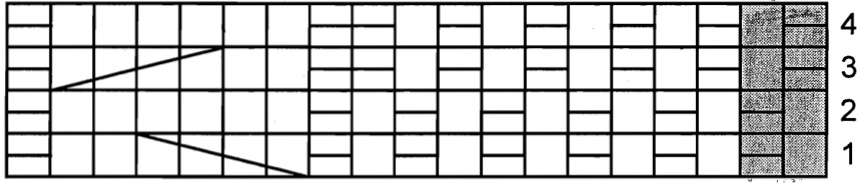
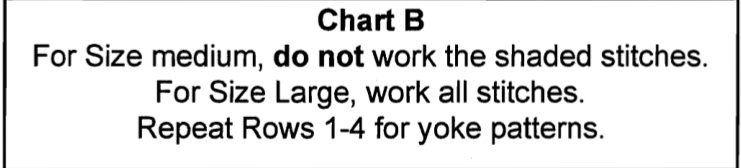
Turn and purl across back sts, binding off the first 6 sts. Work the divider pattern as follows: Row 1 (RS): Purl Row 2 (WS): Knit Row 3: Knit Row 4: Switch to smaller needles and Purl across, increasing 18 (23) sts evenly spaced. Q: Why is she making me do this? A: You need to increase at this point to adjust for the yoke pattern, but I don't want the divider pattern to bulge after you work the increases, so I'm having you switch to smaller needles for 3 rows. You will have a total of 128 (144) sts. Row 5: Purl Row 6: Knit Establish yoke patterns as follows: Next row (RS): Switch back to the larger needles and work the two rows of Chart A. Note: For Size Medium, DO NOT work the shaded stitches. On each row you will work 7 reps of Chart A and then work the first 9 (11) sts of Chart A one more time. Next row (RS): Work 7 repeats of Chart B, then work the first 9 (11) sts of Chart B one more time. Repeat the 4 rows of Chart B as established until body measures $24^{\circ}$ (25"), ending so that last row worked has WS facing. Slip 37 (43) sts onto holder for right shoulder, slip 54 (58) stsontoholde forback eck, slp 37 (43) sts onto holder for left shoulder. Front Yoke: Work same as for back yoke until body measures 21" (22"), ending so that last row worked has WS facing. Begin neck opening as follows: Next row (RS): Work (51) 57 sts in pattern then slip them onto a piece of scrap yarn for left side,work thenext2630)stsand sli them onto a holder for neck , work to end of row in pattern. Note: From here on you will be working with right side stitches only. Turn and, keping in pattern, work a W row across right front sts only. Work neck decreases on RS rows , as follows: BO 4 sts at the beginning of RS rows, twice. BO 2 sts at the beginning of RS rows, twice. BO 1 st at the beginning of RS rows, twice. You will have 37 (43) sts remaining. Continue even until front measures $24^{\circ}$ (25"), ending so that last row worked has WS facing. Slip all sts onto holder for shoulder. Work left front as follows: Slip left front sts back onto needle, so that you are ready to work a WS row. Work neck decreases on WS rows, as follows: BO 4 sts at the beginning of WS rows, twice. BO 2 sts at the beginning of WS rows, twice. BO 1 st at the beginning of WS rows, twice. You will have 37 (43) sts remaining. Continue even until front measures $24^{\prime\prime}$ $(25^{\circ})$ , ending so that last row worked has WS facing. Slip all sts onto holder for shoulder. Knit together and bind off shoulder seams on Ws: Slip one set of front shoulder sts onto one needle. Slip one set of the back shoulder sts onto another needle. Hold these two needles so that the RS are together and you're looking at the Ws. Using a $3^{r d}$ needle, knit together and bind off as follows: Insert needle through 1 st on the front needle and 1 st on the back needle, and knit these 2 sts together. Repeat for the next st on the front and back needle, then lift the first st on the right needle over the $2^{n d}$ st to bind off, as you would in ordinary knitting. Continue working in this manner to .the end of the round.
Sleeves:
Note: Directions are given for working sleeves flat - you may work them in the round if you prefer. With smaller needles, cast on 48 sts. Work 14 rows in Double Moss Stitch. Next row (RS): Switch to larger needles and knit across, increasing 12 (12) sts evenly spaced. You will have a total of 60 sts. Continue working in stockinette stitch, increasing 1 st at the beginning and end of every $4^{\mathfrak{t h}}$ row, until you have a total of 106 (112) sts. Work one more row with WS facing. Next row: Begin working in Double Moss Stitch, starting with Row #1. Continue even in Double Moss Stitch, until sleeve measures $18^{n}$ (19"), ending so that last row worked has WS facing. Next row: BO all sts in pattern. Note: Sleeve length is highly individual and is affected by the fit of the body. I strongly recommend that you complete the shoulder seams, so that the body can be tried on. With outstretched arm, measure the distance from wristbone to edge of shoulder seam.
Finishing:
Block pieces by laying them flat between 2 damp towels, overnight. Weave in loose ends. Sew sleeve seams. Sew sleeves onto body. Shoulder seams will have a tendency to stretch out over time, due to the weight of the sleeves. This also makes the sleeves longer. To prevent this, I recommend reinforcing the shoulder seams with bias tape - just hand stitch it in.
Collar:
For Size Medium: With size 3, $16"$ circular needle, work sts from back holder as follows: $\star\mathsf{K}4$ , K2tog\* repeat \*\*, then PU 18 sts from left side of neck opening, work sts from front holder as follows: $\star\mathsf{K}4$ K2tog\* repeat \*\*, ending with K2, then PU 18 sts from right side of neck opening. You will have 103 sts total. For Size Large: With size 3, $16"$ circular needle, work sts from back holder as follows: \*K4, K2tog\* repeat $\star_{-}\star$ ending with k4, then PU 18 sts from left side of neck opening, work sts from front holder as follows: $\star\mathsf{K}4$ K2tog\* repeat $^{\star}-^{\star}$ , then PU 18 sts from right side of neck opening. You will have 110 sts total.
Both Sizes:
Rounds 3 & 4: Knit For a standard crew neck: Repeat Rounds 1-4 one more time. Next Round: Purl Next Round: BO all sts purlwise. For a mock turtleneck: Repeat Rounds 1-4 three more times. Next Round: Purl. Next Round: BO all sts purlwise.
Abbreviations:
$\mathsf{K}=$ Knit $\mathsf{P=P}\mathsf{u r l}$ $\mathsf{P M}=$ place marker K2tog $=$ knit 2 together $\mathsf{R S}=$ Right side WS $=$ Wrong side BO $=$ Bind off ${\mathsf{c o}}=$ Cast on rep $=$ repeat $\tt S S K=$ slip slip knit (slip 2 sts knitwise, insert left needle back through both stitches and knit them together)
$=$ Knit on RS, Purl on WS $=$ Cable 4 Front. (Slip 2 sts to cable needle, hold at front, K2, K2 from cable needle.)


