TREES AND CABLES CUSHION
By Lauren Wood
One size: $43\;\mathrm{cm}$ (17 in) to fill a $46\;\mathrm{{cm}}$ (18 in) cushion insert.
Description
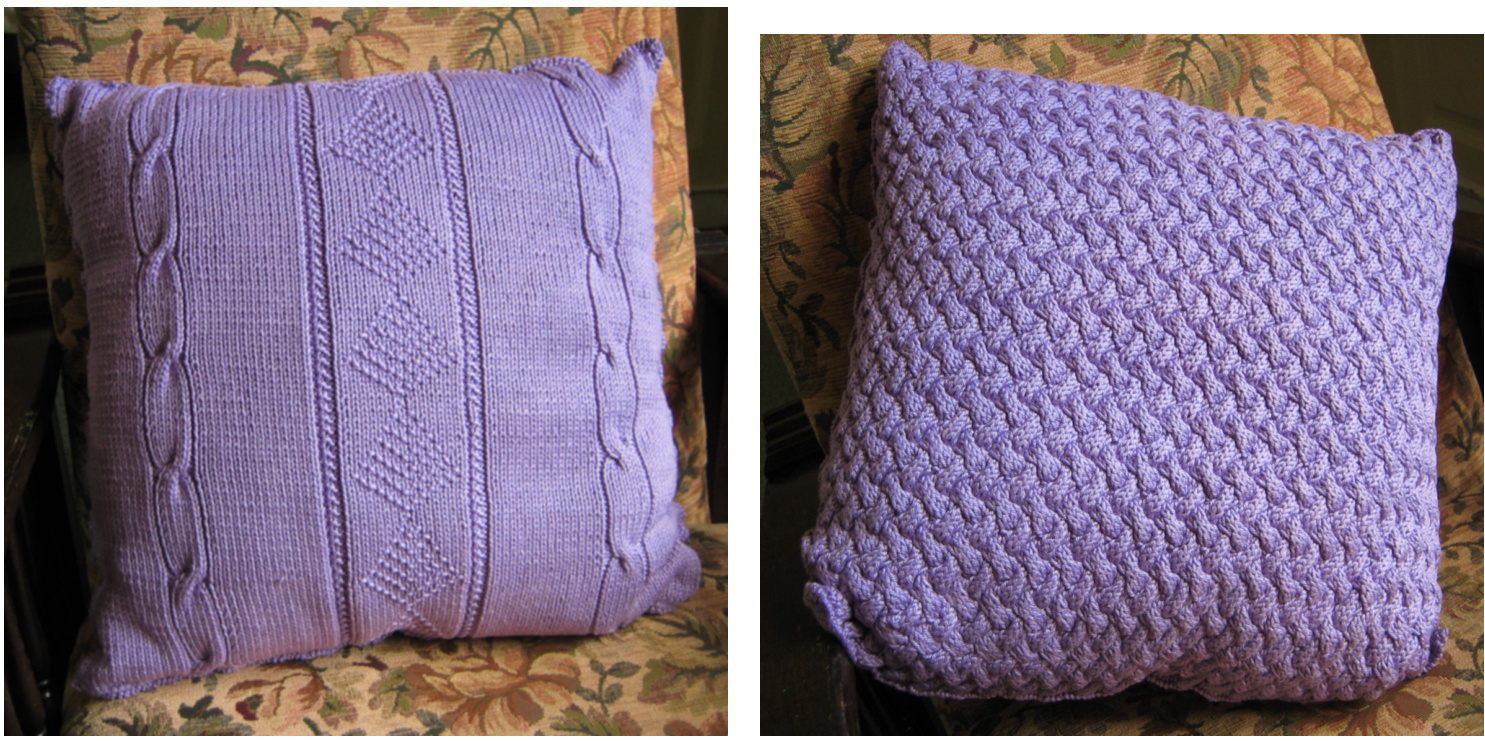
This cushion is a lovely gift for a wedding or house-warming. It is knitted in two pieces and then seamed. The cables on one side complement the tree of life pattern on the other side. Of course, you could knit both sides the same, or knit them in different colours.
Pattern Notes
The cushion is knitted at a firmer gauge than you would normally use with this type of yarn. You need to know how to work cables, and it will be quicker if you can cable without a cable needle. There are lots of tutorials on the web that show various methods to do this, and this cushion will give you lots of practice. The pattern is both charted and written out.
Yarn
Any mercerized cotton in double knitting weight (185 yds/169 m per $100\mathrm{g}$ skein_ with a recommended gauge of 21 stitches and 28 rows on 4 mm needles), 5 skeins. I used Sirdar Pure Cotton Double Knitting but any mercerized cotton yarn of equivalent weight should give good results. The 5 skeins included swatching and seaming.
Needles
$3.25~\mathrm{mm}$ (US ) for the knit-purl side, and $4.5~\mathrm{mm}$ (US ) for the cabled side, or whichever size you need to achieve the right gauge.
Gauge
Knit-purl side (washed and blocked): the same gauge as stocking stitch, 22 st to $10\,\mathrm{cm}$ (4 in). Row gauge is not important. Cabled side (washed and blocked): 36 st to 10.5 cm (4.1 in). Row gauge is not important. Checking your gauge first will help ensure the two sides are the same size. When I knitted this cushion, blocking did not change the gauge much.
Skills Required
● Basic cast-on, knit, purl, and bind-off · Cables (this is great project to practise ca bling without a cable needle) Seaming
Abbreviations
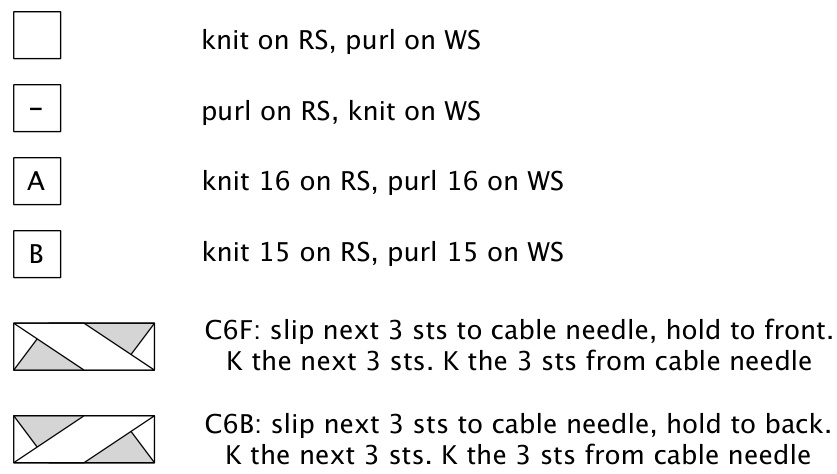
k knit p purl st stitch BO bind off cm centimeter(s) CO cast-on C6B slip 3 stitches to cable needle, hold to back of work. Knit 3 stitches, then knit the 3 stitches from the cable needle C6F slip 3 stitches to cable needle, hold to front of work. Knit 3 stitches, then knit the 3 stitches from the cable needle RS right side WS wrong side \* \* repeat instructions between asterisks as many times as indicated
Charted Instructions
Key
Cabled Side
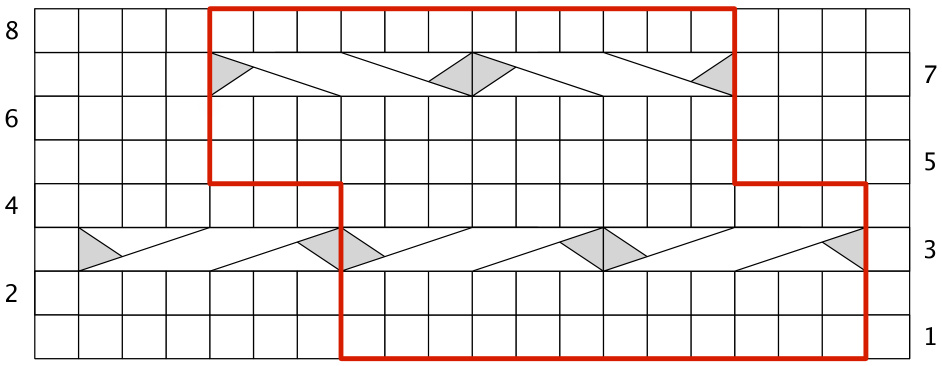
The red line indicates the repeated sections. Cast on 146 stitches. Follow the chart,repeating the section in red. Note the repeated section moves over by three stitches so that the cables do not line up. Thus row 3 has one edge stitch, and row 7has 4 edge stitches on each side, with all other stitches on these rows being cabled. Repeat the 8 rows in this chart for 132 rows total or until the cushion length matches the width, ending on row 1 or 5. Bind off.
Tree of Life Side
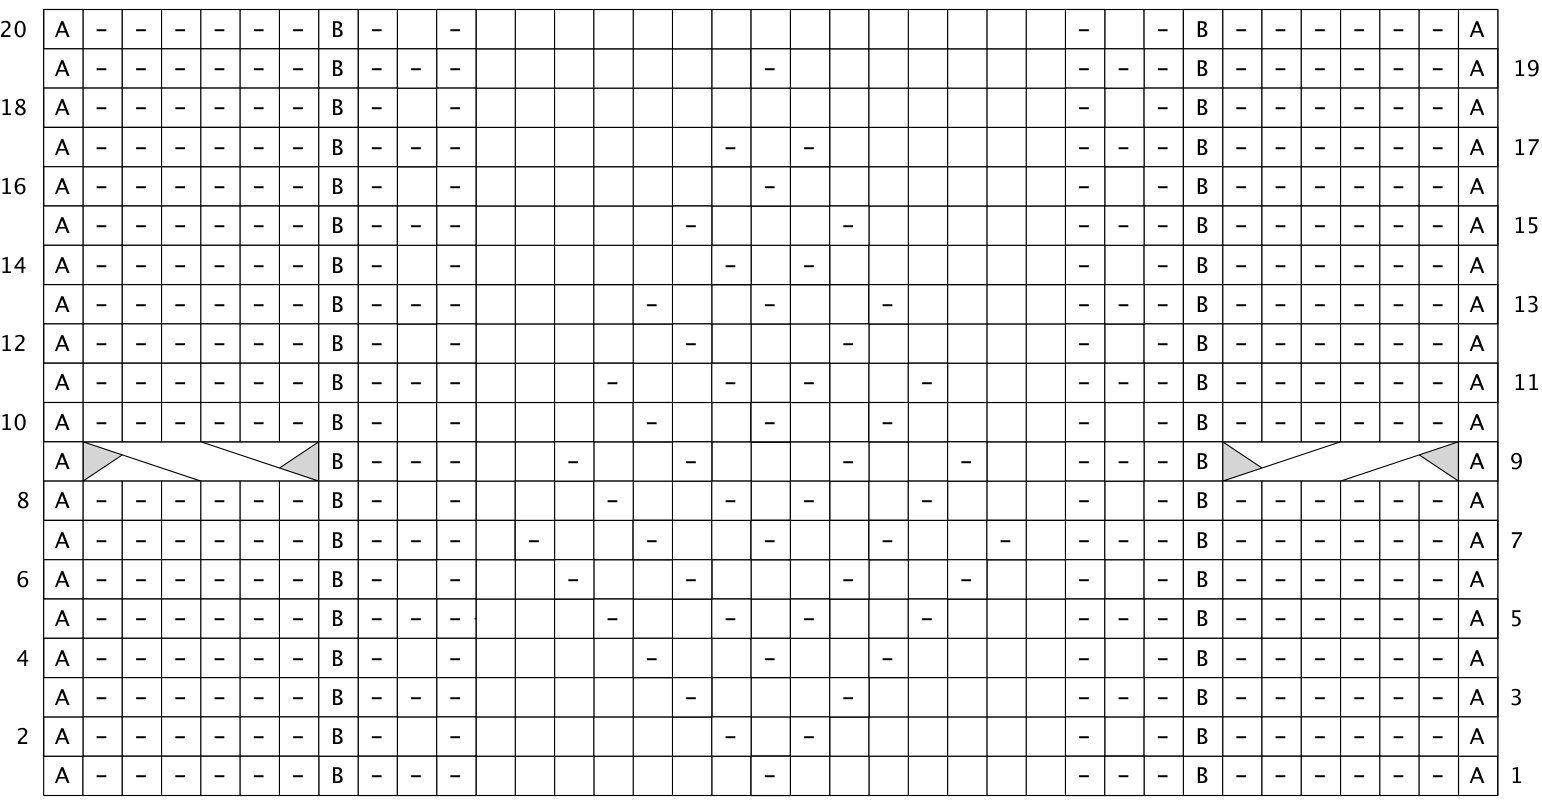
Cast on 99 stitches. Follow the chart. The letter A on this chart means to knit 16 stitches on the right side, or purl 16 on the wrong side. The letter B means to knit 15 stitches on the right side, or purl 15 on the wrong side. Repeat the 20 rows in the chart until the cushion length is the same as the cushion width, ending on any row other than row 9. Bind off.
Finishing
Wash and block both pieces to the same size square. Pin together right side out, and either crochet around the edges, or stitch them together. Don't forget to put the cushion pad in before you close the last side! I used Armenian stitch, which is a variation of buttonhole stitch. The Reader's Digest Knitter's Handbook, written by Montse Stanley, has instructions for Armenian stitch, and you can also find them on the web.
Written Instructions
Cabled side
Cast on 146 stitches. Row 1: Knit all stitches. Row 2: Purl all stitches. Row 3: K1, \*C6B, repeat from \* until 1 st left, k1. Row 4 and 6: As for row 2 (purl allstitches). Row 5: As for row 1 (knit all stitches). Row 7: K4, \*C6F, repeat from \* until 4 st left, k4. Row 8: Purl all stitches. Repeat these 8 rows for 132 rows total or until the cushion length matches the width, ending on row 1 or row 5. Bind off.
Knit-Purl Side
Cast on 99 stitches. Row 1: K16, pl, k6, pl, k15, p3, k7, pl, k7, p3, k15, pl, k6, pl, k16. Row 2: P16, k1, p6, kl, p15, kl, pl, kl, p6, kl, pl, kl, p6, kl, pl, kl, p15, kl, p6, kl, p16. Row 3: K16, pl, k6, pl, k15, p3, k5, pl, k3, pl, k5, p3, k15, p1, k6, pl, k16. Row 4: P16, kl, p6, kl, p15, kl, pl, kl, p4, k1, p2, k1, p2, kl, p4, kl, pl, kl, p15, kl, p6, kl, pl6. Row 5: K16, pl, k6, pl, k15, p3, k3, pl, k2, pl, kl, pl, k2, pl, k3, p3, k15, pl, k6, pl, k16. Row 6: P16, k1, p6, kl, p15, kl, pl, k1, p2, k1, p2. kl, p3, kl, p2, kl, p2, kl, pl, kl, p15, k1, p6, kl, pl6. Row 7: K16, pl, k6, pl, k15, p3, k1, pl, k2, pl, k2, pl, k2, pl, k2, pl, kl, p3, k15, pl, k6, p1, k16. Row 8: P16, kl, p6, kl, p15, kl, pl,kl, p3, kl, p2, kl, pl, k1, p2, kl, p3, kl, pl, kl, p15, kl, p6, kl, pl6. Row 9: K16, pl, C6F, pl, k15, p3, k2, pl, k2, pl, k3, pl, k2, pl, k2, p3, k15, pl, C6B, pl, k16. Row 10: P16, kl, p6, kl, p15,kl, pl, kl, p4, kl, p2, kl, p2, kl, p4, kl, pl, k1, p15, kl, p6, kl, p16. Row 11: K16, pl, k6, pl, k15, p3, k3, p1, k2, pl, kl, pl, k2, pl, k3, p3, k15, p1, k6, pl, k16. Row 12: P16, k1, p6, kl, p15, kl, pl, kl, p5, k1, p3, k1, p5, k1, pl, kl, p15, k1, p6, kl, pl6. Row 13: K16, pl, k6, pl, k15, p3, k4, pl, k2, pl, k2, pl, k4, p3, k15, pl, k6, pl, k16. Row 14: P16, kl, p6, k1, p15, kl, pl, k1, p6, kl, pl, k1, p6, kl, pl, k1, p15, kl, p6, kl, pl6. Row 15: K16, pl, k6, pl, k15, p3, k5, pl, k3, pl, k5, p3, k15, p1, k6, pl, k16. Row 16: P16, kl, p6, kl, p15, kl, pl, kl, p7, kl, p7, kl, pl, kl, p15, k1, p6, kl, pl6. Row 17: K16, pl, k6, pl, k15, p3, k6, pl, k1, pl, k6, p3, k15, p1, k6, pl, k16. Row 18: P16, kl, p6, k1, p15, kl, p1, kl, p15, kl, pl, kl, p15, k1, p6, k1, p16. Row 19: K16, pl, k6, pl, k15, p3, k7, p1, k7, p3, k15, p1, k6, p1, k16. Row 20: P16, kl, p6, k1, p15, kl, p1, kl, p15, kl, pl, k1, p15, kl, p6, kl, p16. Continue knitting, repeating these 20 rows, until the cushion is square, ending on a non-cable row. Bind Of.
Finishing
Wash and block both pieces to the same size square. Pin together right side out, and either crochet around the edges, or stitch them together. Don't forget to put the cushion pad in before you close the last side! I used Armenian stitch, which is a variation of buttonhole stitch. The Reader's Digest Knitter's Handbook, written by Montse Stanley, has instructions for Armenian stitch, and you can also find them on the web.
Designer
I design a lot of patterns, and eventually plan to write more of them up for other people to use. They're published on my crafting web site, RuneDesigns.com. This pattern is the first I've published. If you find any mistakes, please let me know. I'm on Ravelry as laurendw, or email me at lauren $@$ runedesigns.com.
Terms of Use
Feel free to use the pattern to make items, even for sale, but I do require atribution. Please don't repost the pattern on any website; link to it instead. Thanks!


