Quincy Mitts
Pattern by Merri Purdy merripurdy@verizon.net
Materials List:
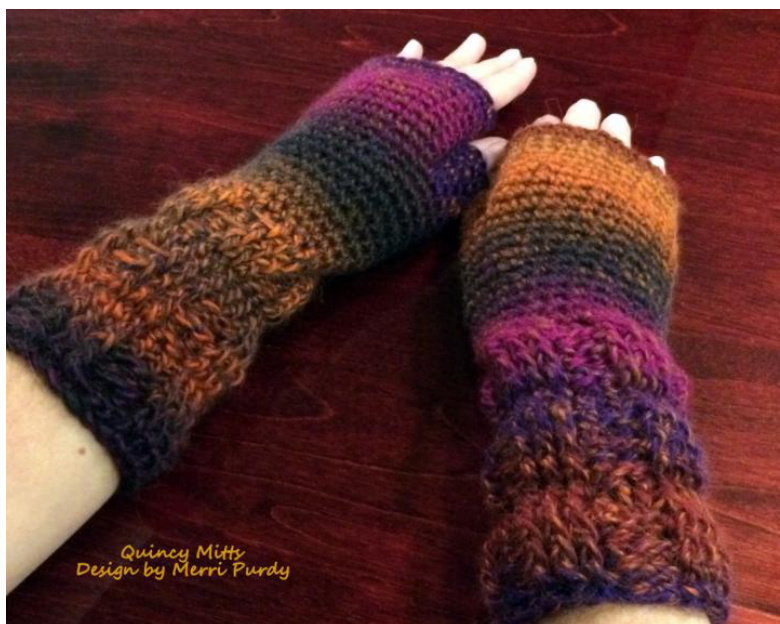
75-100 yards worsted weight yarn Stitch Studio by Nicole used in sample to the right (70% acrylic, 30% wool; color: Samba) Size I crochet hook Stitch marker (optional)
Stitches/Abbreviations Used:
(fpdc) front post double crochet (fpsc) front post single crochet (fsc) foundation single crochet (sl st) slip stitch Gauge: 10 stitches and 3 rows = 2 inches in dc (although this will vary depending on yarn weight, hook size and tension)
Pattern Notes:
Pattern directions are written using American crochet terminology ? These mitts are worked in the round from the cuff toward the finger tips Some rounds have been highlighted to make them easier to locate The foundation round is worked in multiples of 5 stitches and can easily be adjusted to increase or decrease the circumference of the mitt by adding or subtracting stitches in groups of 5 The ch(s) at the beginning of a round does NOT count as the first stitch
Directions - (Make 2)
Cuff section: Foundation Round 1: Fsc 25, being careful not to twist, join with a sl st to the top of the first fsc to form a loop. (Leave a 5 - 6" starting tail so you can whip ends of the foundation round closed when finishing your project.) Note: Crochet tension varies from one person to another. After joining the foundation round, slip this over your wrist to see if you like the fit. You will want a little bit of "wiggle room" to be able to slide your hand into the wristlet. If it is too small, add stitches to the foundation round in groups of 5 until it is large enough to easily slide over your hand without being too loose. If it is too large, reduce the foundation round in groups of 5 stitches until you have the right fit. Keep in mind that the next 3 rounds will cause your fabric to become a little "spring-like" and more condensed, so it is a good idea to try the mitts on a few times as you continue to work through the pattern. Round 2: Ch 2, fpdc in first 3 sts, bpdc next 2 sts, \*Ifpdc 3, bpdc 2] repeat from \* around to end. Join with a sl st to the top of the first fpdc of the round. (25sts total) Note: When completing the last bpdc of the round, crochet right around the starting ch2 of the round as well. This will help to conceal the starting ch of the round. Round 3 - 4: Repeat Round 2 Round 5: Ch 1, fpsc in each stitch around to end, join with a sl st to the first bpsc stitch of the round. See note below. Note: When beginning the first round of fpsc stitches, complete the stitch underneath the top loops of the dc stitches in the previous round and NOT the post of the dc stitches. This will help to make each fpsc round look the same. Round 6: Repeat Round 5 Round 7 - 9: Repeat round 2 (3 times) Round 10 - 11: Repeat round 5 (2 times) Round 12 - 14: Repeat round 2 (3 times)
Mitt Body:
Note: As you work the body of the mitt, you might want to try it on frequently to be sure that you like the fit.If you find that the upper part of the mitt seems a bit loose, consider going down a hook size for this section. Round 15: Ch 1, sc in same stitch as join and in each stitch around. Place a marker in the first stitch of the round. (25 sc total) Rounds 16 - 24: Without "joining," sc in the first marked st of the round and the remaining 24 sts of each round. Continue to move your marker up as you complete the first stitch of each round here and throughout the remainder of the pattern. Round 25: Sc 5, ch 5, skip 5 sts (thumbhole made), sc in next st and in remaining 14 sts of the round. Round 26: Sc in first 5 sts, sc in back loop only of the next 5 sts (thumbhole), sc in remaining sts to the end of the round. (25 sc sts) Rounds 27 - 34: Sc in each st of the round for 8 rounds. Ss in two or three stitches to even out top edge, fasten off. Thumbhole: Attach your yarn in the center st on the underside of the thumbhole. Ch 1, sc in same st as join. Place marker in this same stitch and then place 11 more sc sts evenly around thumb opening. Continue to sc in each st around for a total of 6 rounds. Ss to join, fasten off, weave in tail. Finishing: Return to your foundation round and stitch ends together with tail to completely close cuff edge. Weave in ends. Enjoy your new mitts!


