Somarken
Whether Somarken, Somarken or Somarken. The name was chosen to match the works of Danish designers under design.club.dk who like to use this pattern. needle-size: 5,5/ US 9 Verbrauch: blue meliert (600g - 900 m) 220 g SMC Micro grande (430 m) Wool choice as well as the gauge do not care. The jacket consists of individual sections which are easily adjusted depending on the size.
techniques used:
cast on by crocheting
-> A super explanation with pictures can be found in alpistrickbuch
Pattern set (PS) for 6 rows
1. row: knit 2. row: purl 3. row: knit 4. row: knit 5. row: purl 6. row: knit
Cast on from the V-Edge:
New stitches are taken from the Vedge. The right side of the knitted piece is at the top and with the crochet hook the back leg of the V is pulled under the front leg of the V and taken to the knitting needle. Edge stitches in stockinette: Slip the edge sts at the beginning of a row (yarn behind work), and purl the edge sts at the end of a row. So you get a V-Edge.
| 6 | sl ybw | k | K | k | k | D | |||
| 5 | 0 | D | D | P | D | sl ybw | |||
| 4 | sl ybw | k | K | k | k | D | |||
| 3 | 0 | k | k | k | k | sl ybw | |||
| 2 | sl ybw | D | |||||||
| 1 | k | K | K | K | sl ybw | ||||
| row | Edge-st | Pattern-Set | Edge-st | ||||||
I-Cord-Edge (explanation for both sides):
| 6 | slslslslkkkkkkkslslslsl | |||||||||||||||||
| 5 | kkkk | D | 口 | Kkkk | ||||||||||||||
| 4 | Ssss | KRKKKKK | slslsl sl | |||||||||||||||
| kkkk | kkkk | |||||||||||||||||
| slsl sl sl | Slssl sl | |||||||||||||||||
| 3 | kkkk | KKKKKK | kkkk | |||||||||||||||
| 2 | 5151551 | D | 0 | Slslsl sl | ||||||||||||||
| 1 | kkkk | KKKKKK | K | kkk | ||||||||||||||
| row | I-Cord | Pattern-Set | I-Cord | |||||||||||||||
The red marked sts from the patternset are the frist behind die i-cord. To make the i-cord round and tight, knit the I-cord connection thread with the red st together. Connection (explanation forboth sides): Knit the last stitch from the PS with one stitch ot the other part together. RS knit together / WS purl together like you see in the chart. Sometimes it could be k3to/p3to, for details, see description
| 6 | sl ybw | k | K | K | k | p2to | |||||
| 5 | k2to | D | D | 0 | D | sl yfw | |||||
| 4 | sl ybw | K | K | K | K | p2to | |||||
| 3 | k2to | K | K | K | sl yfw | ||||||
| 2 | sl ybw | D | D | D | p | p2to | |||||
| 1 | k2to | K | K | K | K | sl yfw | |||||
| roW | connection | Pattern-Set | connection | ||||||||
Bind off with yo (yarn over)
To avoid the bind off edge being too tight make a yo every time before you bind off. Bind off the yo+st together.
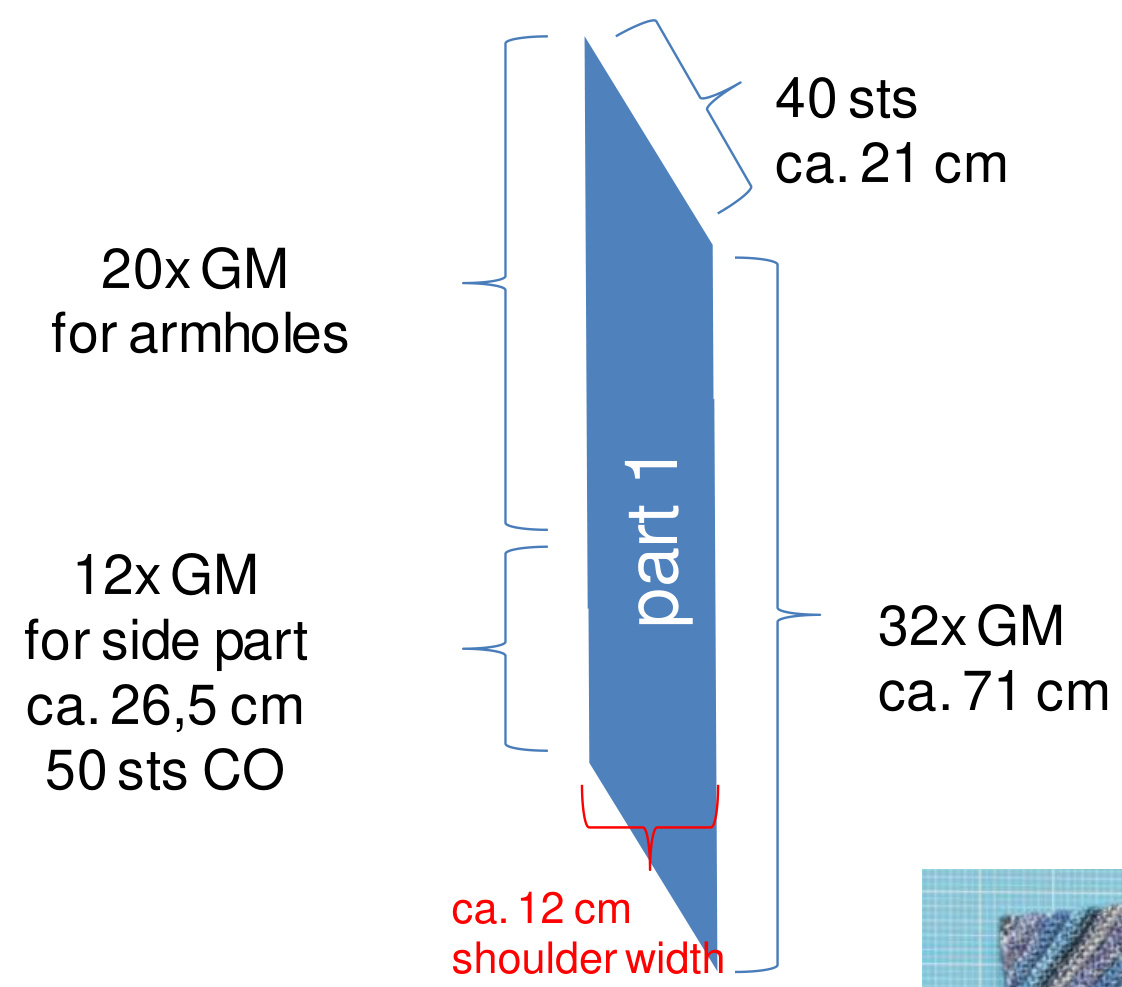
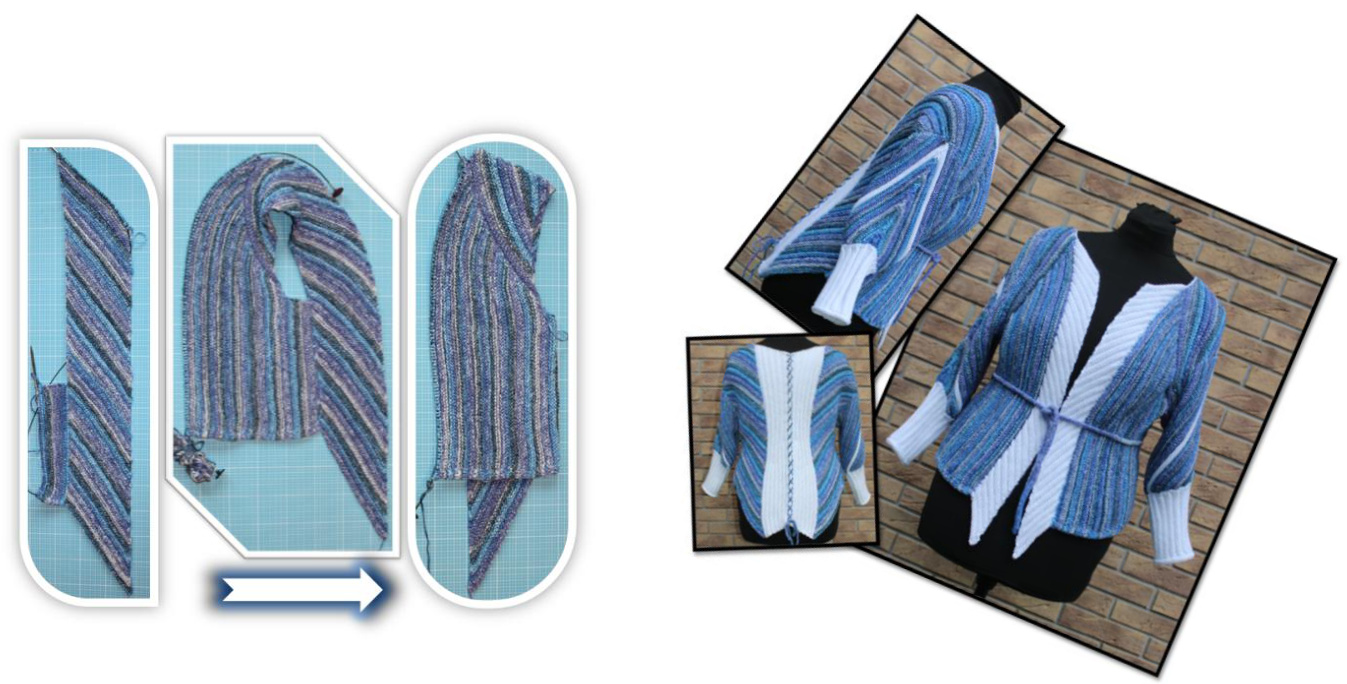
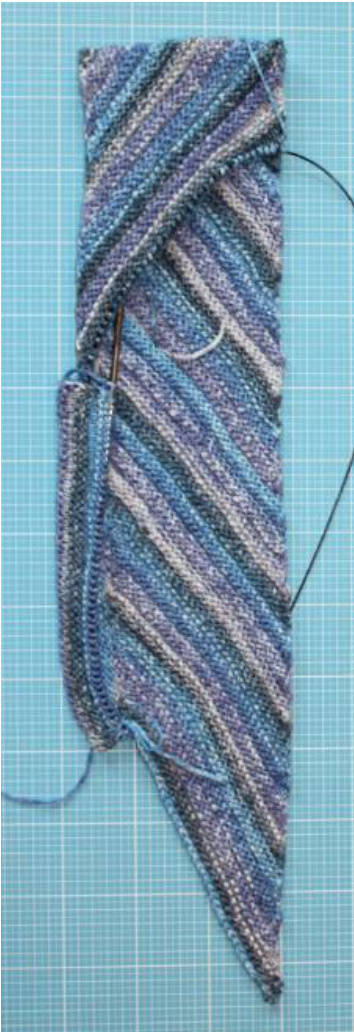
part 1 (back/ shoulder left):
CO 40 sts
| 6 | sl ybw | kk | k | k | K | k | k | ||||
| 5 | D | pfb | D | D | D | D | p2to | sl ybw | |||
| 4 | sl ybw | kk | k | k | K | k | k | P | |||
| 3 | kfb | k | k | K | k | k2to | sl ybw | ||||
| 2 | sl ybw | PP | D | p | P | P | |||||
| 1 | P | kfb | k | k | K | K | k2to | sl ybw | |||
| row | Edge-st | Pattern-Set | Edge-st | ||||||||
part 2 (armhole left):
CO 50sts from the edge of 12 GM (12xGM that mean ( 3x V-edge + 1) = 48 sts) The last two stitches are doubled because of the I-cord . 3x GM + 3 rows GM a 46 sts + 4 sts I-Cord.
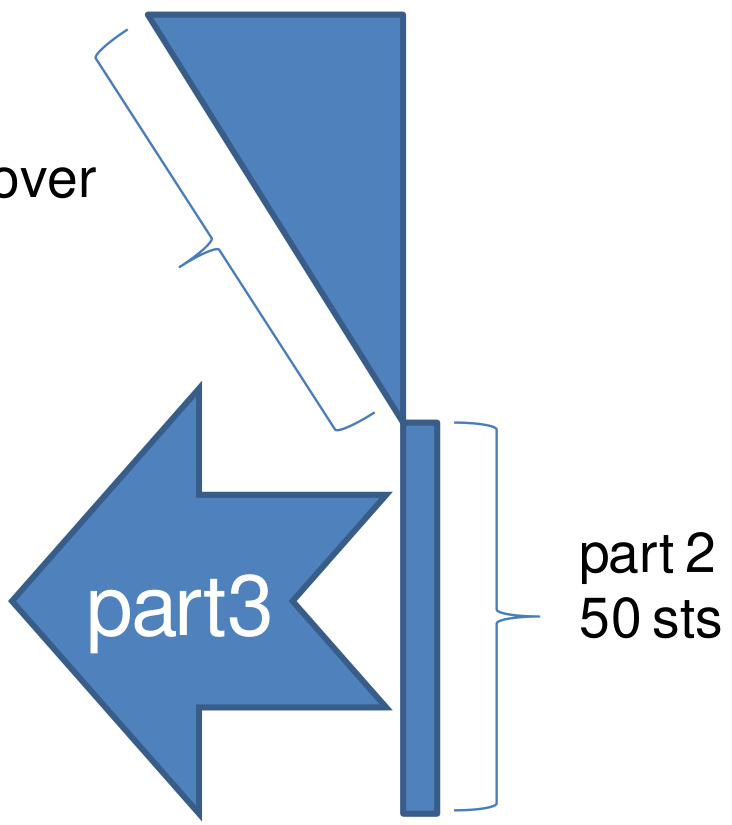
Go on knittig in GM. In the back rows connect with part 1.
part 3 (front left):
| k | k | ||||||||
| 6 | k | K | k | K | 5l | ||||
| 5 | p | p | p | P | k | P | |||
| 4 | k | k | K | K | k sl | ||||
| 3 | k | k | k | k | k | ||||
| 2 | P | P | P | P | p | p | |||
| 1 | k | k | k | K | k | ||||
| row | Pattern-Set | last st part3 | part1 | ||||||
At the end of Part 3, you have 50 + 40 = 90 stitches on the needle.
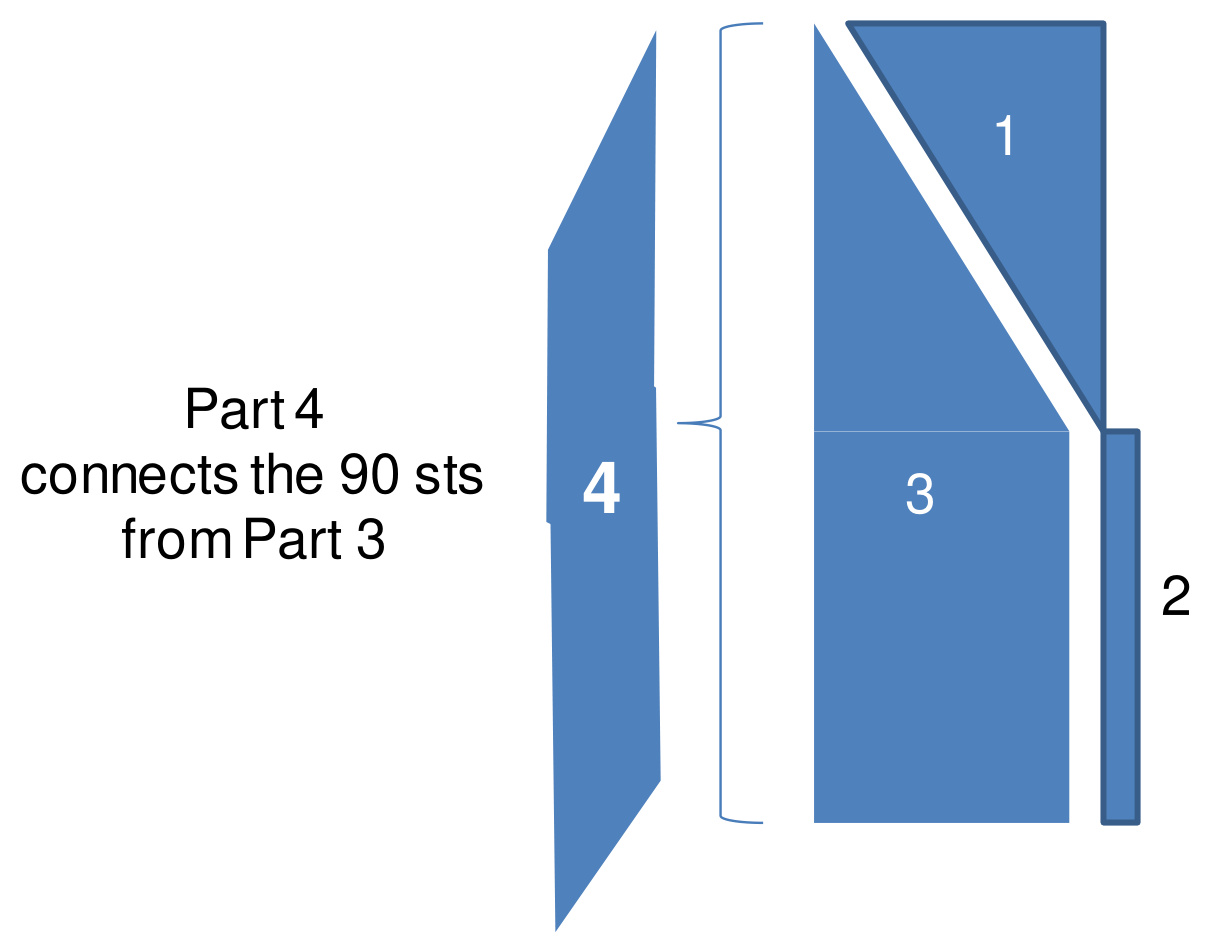
part 4 (front left):
CO so many sts, so you can close the jacket Here CO 20 sts. Started with the 4th row of GM.
| 6 | sl ybw | k | k | k | K k | kk D | |||
| 5 | D | p2to | D | 0 | D | pfb | sl ybw | ||
| 4 | sl ybw | k | k | K | K K | kk D | |||
| 3 | D | k2to | k | k | K k | kfb sl ybw | |||
| 2 | sl ybw | P | D | 0 | D | PP P | |||
| 1 | p | k2to | k | K | K | k | kfb | sl ybw | |
| rOW | Edge-st | decrease | Pattern-Set | increase | Edge-st |
Connection with Part 3 > Option 1: Make part 4 separately (22.5 xGM) and then 1x GM sew with sts of part. 3 > Option 2: 2x k2to (1st part 4+ 1 st part 3) and 1xk3to (1 st part 4 + 2sts part 3) (one GM of Part 4 is connected to 4 sts from Part 3)
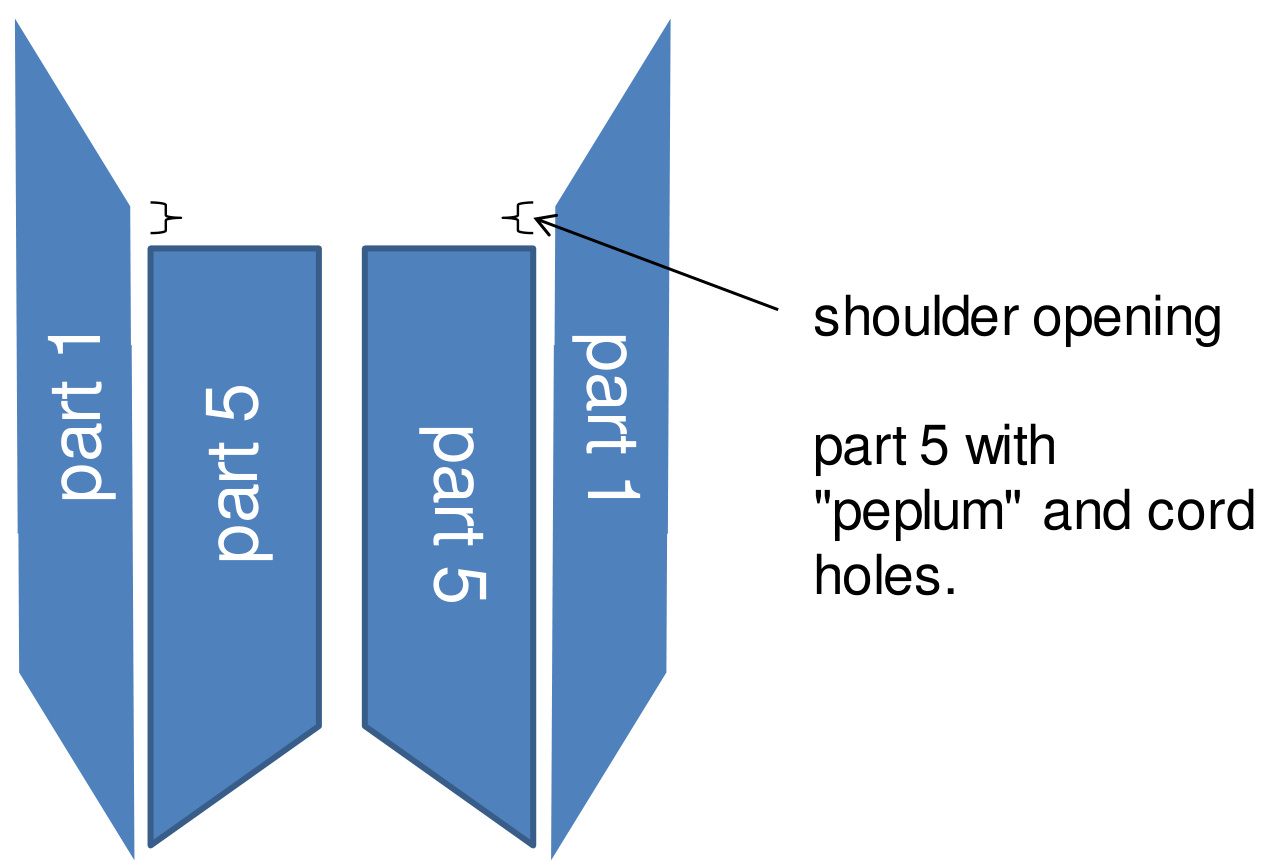
part 5 (back):
The shoulder opening consists of 4x GM from part 1. From the remaining edge stitches of part 1 CO 4sts each GM. (3 edge stitches from GM +1) here 112 mesh. For the slight bevel k2to every 6 rows. Backside incl. ,peplum": row 1-13 in GM row 14: purl, 40 sts, turn, make DM row 15: knit row 16: knit, 41 sts, turn, make DM row 17: purl row 18: knit, 40 sts, turn, make DM row 19: knit row20-31in GM row32:purl, 50 sts, turn, make DM row33:knit row 34: knit, 51 sts, turn, make DM row 35: purl row36: knit, 50 sts, turn, make DM row 37: knit row38-44 in GM row 45: 2x knit, \* k2to, y0, 4 knit \* row46:BO
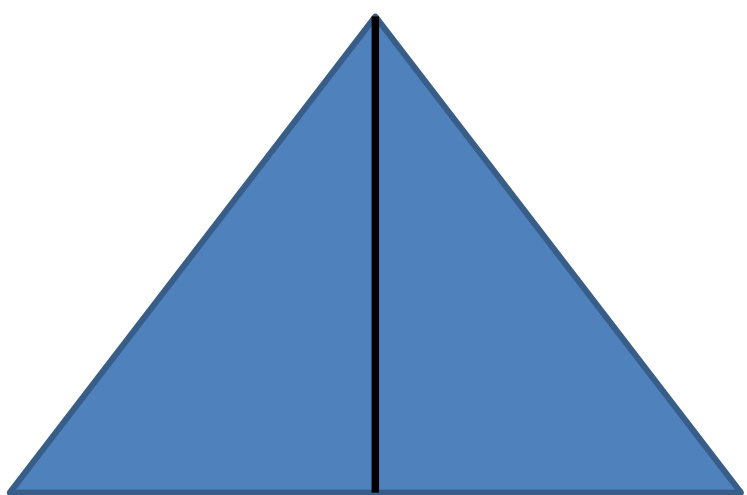
Triangle with middle st
sleeve - triangle under:
Starting from the middle of part 2 (starting pointunder the arm), CO stsof part 1 and 2. The center stitch is always in stocking knit. Increases always be done before the center stitch and before the end. The last stitch of triangle is always knitted together with a st from the edge of part 1/2. To avoid holes you take if necessary the previous stitch of part 1/2 stillback with it. Start here with 3 stitches and 3.row of GM.
sleeve - triangle above:
Building the triangle until only one or two stitches are left. These then form the new center stitch for the opposite triangle. The old center stitch is shut down. The first stitch is lifted over the second stitch. k2to before and after the center stitch in every row. As an accent turn at the beginning of this triangle to white for 3.-8.row of the GM. sleeve - big rif cuffs: CO the edge sts from the triangle + disused center stitch For the remaining length of the sleeve CO provisional 30 sts. Go on knitting in GM over the 29sts and k2to the last st with the triangle-edge-st. Turn around and at the end 3NBO with the provisional CO.
sleeve - i-Cord:
For a perfect ending, the sleeve also get an I-Cord. Thus, the I-cord is not too tight, 3xedge stitch from GM has been processed with 4x H cord here again.
Back-corset:
For lacing the back a crocheted chain was used. Length approx 230 cm.
belt - iCord
Knit 4 stitches, slide the sts to the other end of the needle, Knit again and pull the thread always firmly. Length per I-cord here about 50 cm. Sewing to the edge between Part 1 and Part second
Have fun and

| Kurzel | Describtion engl | Beschreibung deutsch |
| st / sts | Stitch / stitches | Masche / Maschen |
| CO | Cast on | Maschenaufnahme |
| BO | Bind off | Maschen abketten |
| K2to | Knit 2 sts together | 2 Maschen knit zusammenstricken |
| p2to | Purl 2 sts together | 2 Maschen purl zusammenstricken |
| DM | Double mesh for short rows | Doppelmasche bei verkurzten Reihen |
| yfw | Yarn forward | Mit dem Faden vor der Arbeit |
| Kfb | Knit forward /backward | Eine Maschen zunehmen, indem man eine Maschen von vorne und eine von hinten herausstrickt |
| RS | Right side | Hinrow |
| WS | Wrong side | Ruckrow |
| SI | Slip | Masche abheben |


