LAMATAKKI
Lamatakki is a timeless cardigan that is worked from top down in one piece without any seams. The basic model enables playing with left over yarns for stripes and/or stranded knitting. This pattern isfor personal use only and it is not to be shared orto be reproduced for commercial purposes. -If you haven't boughtthis pattern via Ravelry, Love Knitting or had it gifted by the designer, you're in the possession of an illegal copy. Cadelheid - Allrights reserved.
Hi there fellow knitter!
A few words about this pattern and my thoughts about and around it, with some suggestions on how to modify it to suit you and your stash :) Lama is the Finnish word for depression... So Lamatakki in English would be Depression Jacket. Not a very cheery name. And not a very cheery topic either. The truth is though that times are tough for many people and I wanted to do my bit, not just from an economical aspect as a free pattern but also from an ethical and environmental aspect. Say what?! Well, this basic pattern can of course be done in brand new sport weight yarns.. but why not take a look at your current stash?! Dig around your leftovers for suitable yarns. Or take a look in your closet if there are some sweaters and cardigans that you don't use anymore. Why not unravel some old garments that are out of style and use the yarn for something new.
This cardigan doesn't necessary require spending any money, just some imagination on how to get the best use of what you already got! Leave all the wonderful yarns to your LYS shelves and to the shopping basket on a web shop. - You will not only save some money but also do both an ecologic as well as an ethic favor: you'll use already existing materials and you will definitely know who made your new cardigan :) The pattern is written for a "solid" yarn, so you'll need to use your own imagination on how you want to stripe the cardigan. Need a little help with striping? Use Random Stripe Generator. Or maybe you want to make it in stranded knitting? Again, you'll have to use your own imagination, but there are few simple stranded knitting motifs to use on the corner of last page. Mix them with stripes or use only stranded knitting, use stripes/stranded knitting only on sleeves or only on hem, one sleeve striped and the other in stranded knitting in same colours... The possibilities are endless! thshsitsl Maybe you don't have enough yarn just yet? Since the cardigan is worked top down, you can knit for as long as the yarn is sufficient and continue again when you have more suitable leftovers. So now it would be time to raid your stash and closet and do some discoveries ;) Happy knitting! V:Htidli P.S. Remember also to raid your button stash! SIZES: XS - S - M - L- XL - XXL - 3XL FINISHEDMEASUREMENTS: Bust 75-85-95-105-115-125-135 cm(30-34-38-42-46-50-54") Bicep 28.5-33-36.5-40- 44.5-48- 52 cm (11.4 -13.2-14.6 -16 -17.8 - 19.2 - 20.8") - More details in schematics below.
YARN WEIGHT: sport (12 wpi)
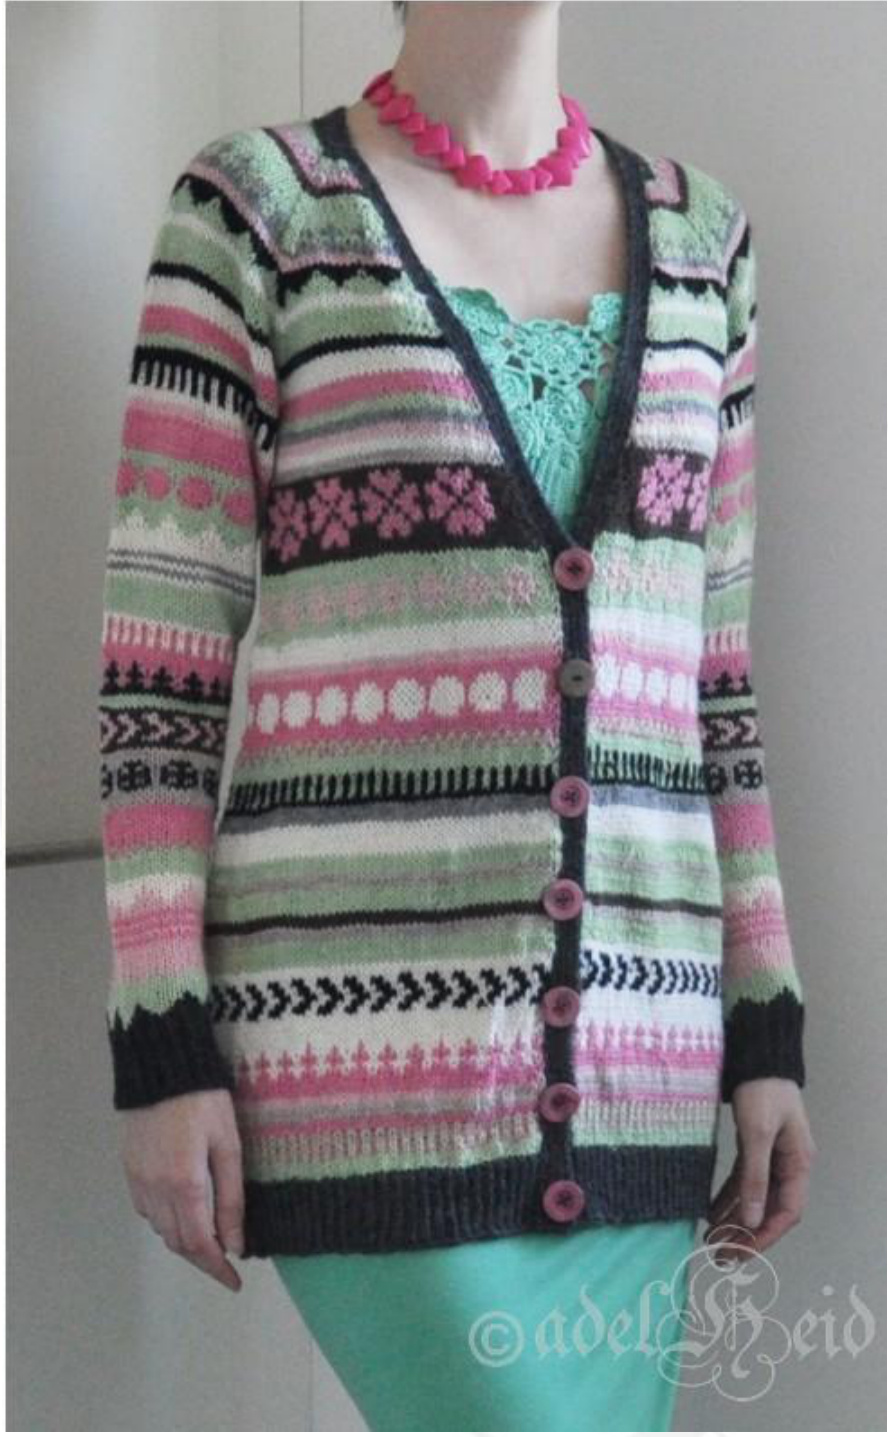
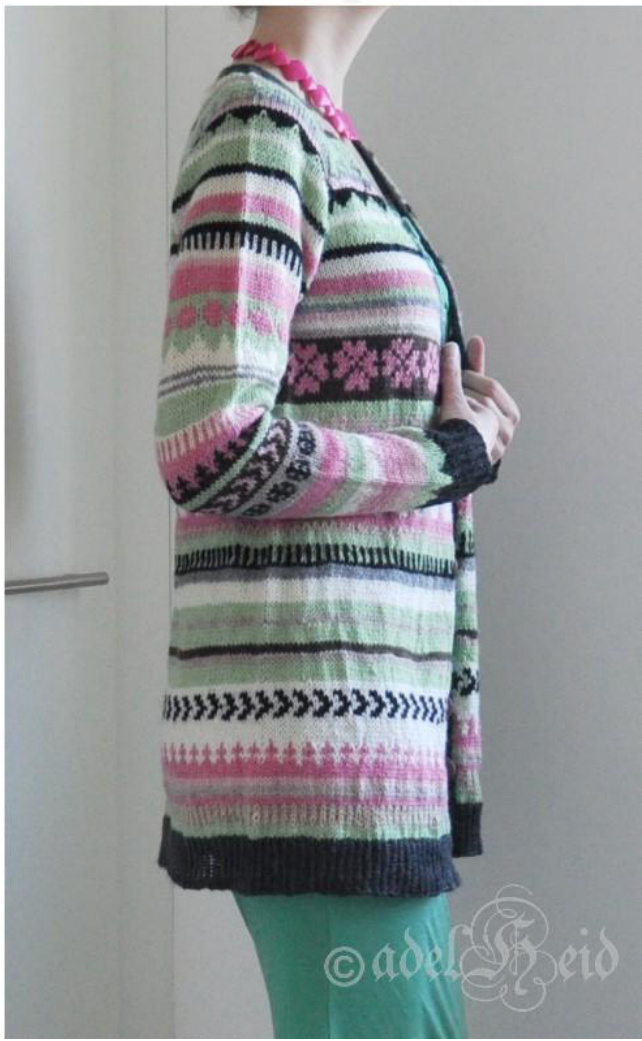
MATERIALS:885-995-1125-1270- 1435-1620-1835 m (968- 1089 -1230 -1390 - 1570 - 1772 - 2010 yd) whereof MC for neckline and hem 120 - 130 - 150 -170 -190- 215 -245 m (132- 142 - 164 -186- 208-235 - 268 yd) NEEDLES: 3.5 and 4 mm (US 4 and 6) circular needles - or a size to obtain the gauge NOTIONS: 6 stitch markers, waste yarn, about 3.5 mm (US E) crochet hook, tapestry needle and 7 buttons with diameter of 2-2.5 cm (0.8-1") GAUGE: 10 x 10 cm (4") is 23 sts and 32 rows in stockinette with 3.5 mm (US 4) needles ABBREVIATIONS: " = inch(es) \*\* = repeat within asterisks bet = between BO = bind off cm = centimeter cO = cast on cont = continue dec = decrease EOR = end of row inc = increase K =knit K1tbl = knit 1 st through the back loop K2tog = knit 2 sts together LH = left hand m = meter MC = main colour M1R = make 1 right (st loop leaning to right) M1L = make 1 left (st loop leaning to left) P = purl pm = place marker prev = previous PUW = pick up wrap and K/P it tog with wrapped st P1tbl = purl 1 st through the back loop rep = repeat(s) RH = right hand rm = remove marker RS = right side sl = slip SM = stitch marker SM1 = stitch marker No. 1 sm = slip marker ssk = slip, slip, knit these 2 sts together st(s) = stitch(es) tbl = through back loop tog = together WS = wrong side W&T = wrap and turn yd(s) = yard(s) Used yarns are various sport weight yarns that have been given a new life after unraveling old garments as well as a bunch of leftovers. Made in size S and photographed on a 170 cm (5'7") tall model with strategic measurements of 80 -70 - 95 cm (31.5 -27.5 - 37.5"). Basic principles for adelheid patterns can be found at http://adelheiddesign.blogspot.fi/p/basic-pattern-principles.html
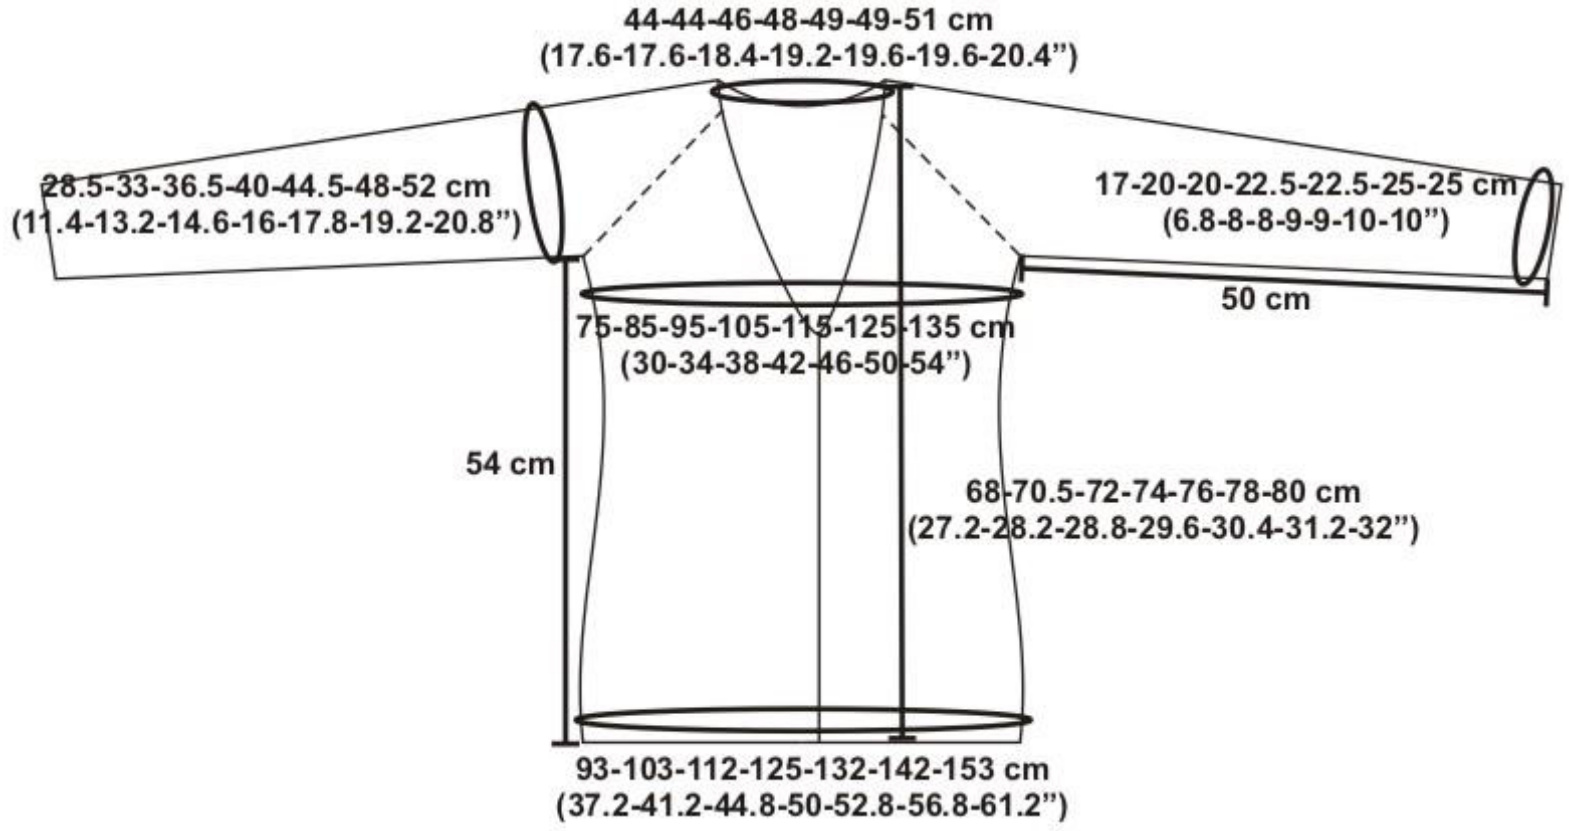
SCHEMATICS:
NOTES:
The collar and button band is worked in intarsia to make sure the edge between collar/button band and stripes/stranded knitting stays neat. Work intarsia so that all the yarn(s) from stripes/stranded part are twisted with the yarn from collar/button band part. The stranded part is worked with 0.5 mm bigger needles than the rest of the cardigan. Bigger needles are used to help prevent tightening the yarns too much while working with the stranded knitting. - A pretty good trick is also to stretch the sts on RH needle after every 8-10 sts to make sure the strands on WS aren't pulling the work too tight.
COLLAR
CO with waste yarn using a provisional cast on (like Provisional Crochet 1 CO) 9 sts with 3.5 mm (US 4) needles and work flat in MC: Row 1 (WS): P to EOR. Row 2 (RS): sl1, K1tbl, P1, K1tbl, P1, K1tbl, P1, K1tbl, K1, turn. Row 3 (RS): P1, P1tbl, K1, P1tbl, K1, P1tbl, K1, P1tbl, P1, turn. Rep rows 2-3 until you have worked 74 - 74 - 76 - 78 - 80 - 80 - 82 rows altogether. Don't turn at the EOR on RS, but cont by picking up with yarn 72 - 72 - 74 - 76 - 78 - 78 - 80 sts from the left edge. Unravel the provisional cast on, pick up 8 sts to the LH needle and K to EOR. - You have now 89 - 89 - 91-93-95-95-97sts. On next row (ws) place stitch markers as follows: sl1, P1tbl, K1, P1tbl, K1, P1tbl, K1, P1tbl, pm SM6, P2, pm SM5, P18, pm SM4, P33 -33 -35-37-39 - 39 -41, pm SM3, P18, pm SM2, P2, pm SM1, P1tbl, K1, P1tbl, K1, P1tbl, K1, P1tbl and P1. Cont to work flat. 8 sts on both of the edges are worked in rib, as described above, throughout the whole cardigan and sts bet SM1-SM6 are worked in stockinette.
NECKLINE
The neckline is formed with short rows as follows: On RS work rib to SM1, sm, K1, M1R, K1, sm SM2, K1, M1L and K until 1 st to SM3, M1R, K1, sm, (change colour and work from now on stripes or stranded pattern with colour changes always after W&T on WS) K1, M1L and K until 1 st to SM4, M1R, K1, sm, K1, M1L and W&T. P to SM3, sm, P2 and W&T. Rep \*K until 1 st to SM3, M1R, K1, sm, K1, M1L and K until 1 st to SM4, M1R, K1, sm, K1, M1L and K to prev turn; PUw, K3 and W&T. P to prev turn; PUw, P3 and W&T.\* twice. K until 1 st to SM3, M1R, K1, sm, K1, M1L and K until 1 st to SM4, M1R, K1, sm, K1, M1L and K to prev turn; PUW, K until 1 st to SM5, M1R, K1, sm, K1, M1L, K1, sm SM6 (change colour in intarsia) and work rib to EOR, turn. Work rib to SM6, sm (change colour in intarsia) and P to prev turn; PUW and cont to P to SM1, sm (change colour in intarsia) and work rib to EOR. You have now 109 - 109 - 111 - 113 - 115 - 115 117 sts: 8 sts on both edges, 3 sts on both front pieces (bet SM1-SM2 and SM5-SM6), 23 sts on both sleeves (bet SM2-SM3 and SM4-SM5) and 41 - 41 - 43 - 45 - 47 - 47 - 49 sts in back (bet SM3- SM4).
RAGLAN YOKE
Cont to work rib on both edges in MC and in stockinette bet SM1-SM6 in stripes or stranded pattern. Inc on both sides of SM2, SM3, SM4 and SM5 on every 2nd row, always on RS, as described in NECKLINE part. At the same time inc sts to the neckline on RS after every 4th row: rep \*sm SM1, K1, M1L and 1 st to SM6, M1R, K1, sm etc.\* 17- 18 - 19 - 20 -21- 21 -22 times. When the sleeves (bet SM2-SM3 and SM4-SM5) have 51- 61 - 67 - 73 - 81 - 87 - 97 sts and the back (bet SM3-SM4) 69 - 79 - 87 - 95 - 105 - 111 - 123 sts, cont to inc on both sides of SM2, SM3, SM4 and SM5 on every row 4 times. You have now 8 sts on both edges, 59 - 69 - 75 - 81 - 89 - 95 - 105 sts on both sleeves and 77 - 87 - 95 - 103 - 113 - 119 - 131 sts in back. Separate sleeves and body as follows: work rib to SM1, sm, Kto SM2 and rm. Pick up sleeve sts (bet SM2-SM3) on a waste yarn and rm SM3. CO 6- 8- 10 - 14 - 14 - 20 - 20 sts on LH needle with a waste yarn using a provisional cast on (for example Provisional Crochet 1 Cast On, that is easy to unravel later), work Provisional stitches; K3 - 4 - 5 -7-7-10 -10, pm SM2, K3 - 4-5-7-7- 10 - 10 and cont to K to SM4, rm. Pick up sleeve sts on a waste yarn and C0 6 - 8 - 10 - 14 - 14 - 20 - 20 sts on LH needle with a waste yarn using a provisional cast on, work Provisional stitches; K3 - 4 -5-7-7-10-10, pm SM5,K3- 4-5-7-7- 10 - 10 and cont to K to SM6, sm and work rib to EOR. Turn. Work rib to SM6, sm, P to SM1, sm and work rib to EOR.
BODY
Cont to work rib with 8 sts on both edges and bet SM1-SM6 in stockinette. - Remember inc to neckline! After the last neckline inc make a buttonhole to left front piece: on RS, 7 sts to EOR; BO 4 sts and cont rib to EOR. On next row sl1, K1tbl, P1 and CO 4 sts to replace the BO sts from prev row, K1tbl, sm SM1 etc. Make altogether 7 buttonholes as described after every 6 cm (2.4"). - After last neckline inc the body should have 181 - 207 - 227 - 251 - 271 - 295 - 319 sts: 8 sts on both edges, 41 - 48 - 53 - 59 - 64 - 70 - 76 sts on both front pieces (bet SM1- SM2 and SM5-SM6) and 83 - 95 - 105 - 117 - 127 -139 - 151 sts in the back (bet SM2-SM5). When body measures 3 cm (1.2") from the armpit start to inc after every 4 cm (1.6") on both sides of SM2 and SM5: rep \*4 sts to SM; M1R, K4, sm, K4 and M1L\* 10 times. Cont even with 221- 247- 267 - 291-311- 335 - 359 sts and when the body measures 49 cm (19.6") from the armpit, or when the length is 5 cm (2") shorter than the wanted length, change to MC and work K1tbl, P1 -rib on RS and P1tbl, K1 -rib on WS through the whole row. Work rib for 5 cm (2") and make a really stretchy BO (like Jeny's surprisingly stretchy BO or Tubular BO).
SLEEVES
Pick up 59- 69 -75- 81- 89- 95-105 sts from waste yarn back to 3.5 mm (US 4) needles. Unravel the temporary CO in the armpit and pick up 3 - 4- 5 -7-7- 10-10 sts, pm and pick up 4-5- 6-8 - 8 - 11 - 11 sts. Work in stockinette in the round, SM marks change of row. Dec on both sides of SM after every 3 - 2.5 - 2 - 1.5 - 1.5 - 1.5 - 1.2 cm (1.2 - 1 - 0.8 - 0.6 - 0.6 - 0.6 - 0.5") as follows: rep \*2 sts before SM, K2tog, sm and ssk\* 13- 16 - 20- 22 -26 - 29 -34 times, until you have 40-46- 46- 52 - 52-58-58 sts left. Cont even and when the sleeve measures 45 cm (18") from the armpit, change to work K1tbl, P1 -rib in MC for 5 cm (2"). Make a really stretchy BO.
FINISHING
Wet the piece, block to measurements and let dry. Weave in ends. Finish buttonholes and sew the buttons.
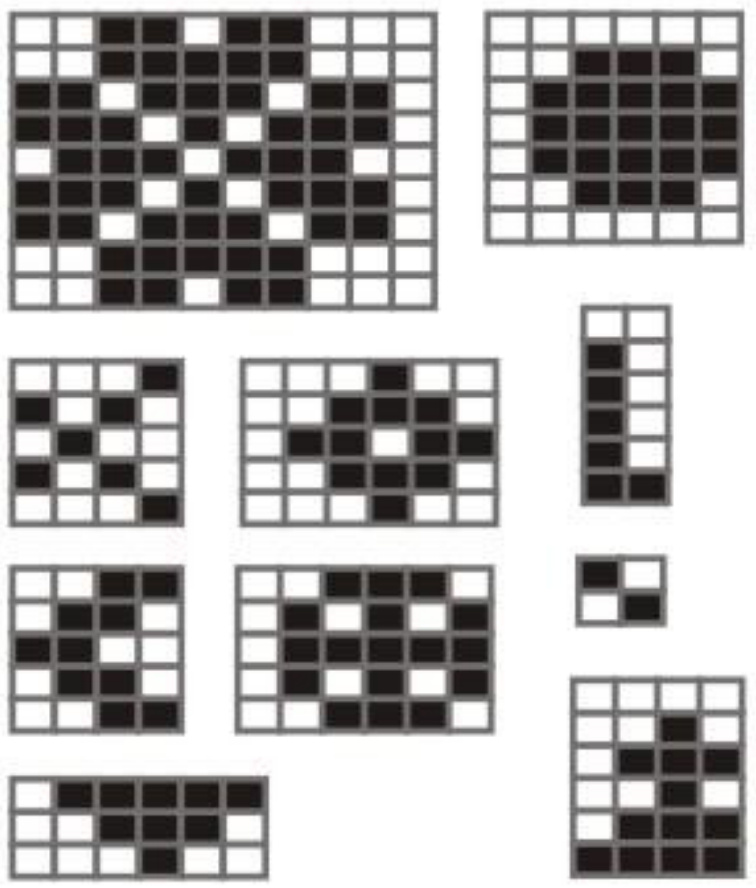
CHARTS FOR STRANDED KNITTING


