Double-Helix Reversible Hat CC
This hat has a simple pattern of alternating colors. Normally when you alternate colors there are jogs where you switch from one color to another and the inside of the hat has unsightly vertical bars where each color is carried up from two rows down. This hat uses a special technique that alternates colors without jogs or carries. This allows the hat to be reversible, which is handy because alternating colors looks quite striking in reverse stockinette.
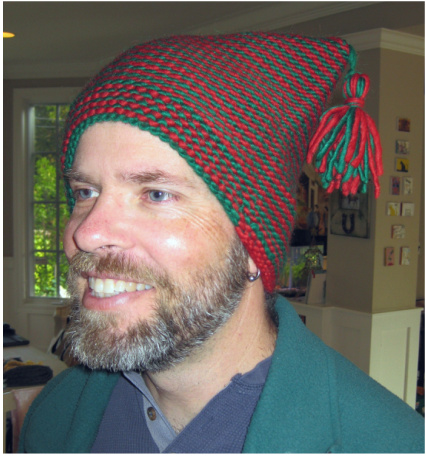
Once you master this double-helix technique you can move on to triplehelix or quadruple-helix patterns if you so desire. Or you can apply the technique to stitch patterns that, when worked in the round, always leave a jog at the end of the round; for example, garter stitch. Simply give each row of the stitch pattern its own working yarn and knit them all continuously in the round. Materials: Lamb's Pride Bulky in two colors (C1 and C2) Needles: Two circular needles, size 10 Notions: tapestry needle, pom-pom marker or tassel maker (optional) Gauge: 13 stitches $=4^{\circ}$ in stockinette Finished Size: $22^{\bullet}$ circumference, $8\%^{\circ}$ tall, fits (large) adult head
Begin brim:
Cast-on 36 stitches in C1 yarn on one circular needle. Cast-on 36 stitches of C2 yarn on the other circular needle. Take the C1 circular needle and move the end with the slip knot onto a needle tip, use this end as the left needle and the other end of the C1 circular needle as the right needle. Holding the C2 working and tail together knit 5 stitches onto the C1 circular needle, then drop the tail yarn and knit the remaining 31 stitches with the C2 working yarn. You are knitting with the C2 yarn but the C2 circular needle is “asleep'. Now the C1 needle goes to sleep and the C2 needle wakes up. Take the C2 circular needle and move the end with the slip knot onto a needle tip, use this end as the left needle and the other end of the C2 circular needle as the right needle. Holding the C1 working and tail together knit 5 stitches onto the C2 circular needle, then drop the tail yarn and knit the remaining 31 stitches with the C1 working yarn. This step joins the two sets of stitches in-the-round, so make sure that the cast-ons are untwisted and "sunny-side up” before knitting those first 5 stitches. Now turn the work, as one does with the two circular needles method, and knit 36 stitches on the C1 circular needle with the C1 working yarn. At this point both working yarns are stopped at the same end of one needle with two rows of stitches difference between the two circular needles. Normally there is only one row of stitches between the two needles but because of the special construction of the hat we have two. This extra row of stitches is the reason that the hat should be worked using DPNs or the two circular needles method. If you knit the hat using one circular needle then the extra row of stitches will get squished down when you knit past this point. You will end up with a vertical crease in your knitting, which may be fixable by wet blocking. But using DPNs or two circular needles means that the extra row of stitches only occurs between needles, so it never gets squeezed. These instructions are for a rolled brim hat, since the stitches are all stockinette. If you prefer a ribbed brim then simply knit and purl in your favorite rib stitch. You also have the option of knitting in a jogless garter stitch. Simply always knit in C1 and purl in C2.
Grow Brim:
Pick-up the lower of the two working yarns and knit a round in whatever stitch pattern you are using for the brim. When you get to the end of the round your yarn will now be the upper working yarn and other yarn will be lower working yarn. Drop your yarn and knit the next round using the new lower working yarn. Continue in this manner until the brim is as tall as you want it to be and then switch to stockinette for the body.
Body:
Knit in stockinette, alternately rounds of each color until the hat is $8\,^{1}\!/\!_{2}\,^{\bullet\bullet}$ tall. Then take the lower working yarn and seal the top of the hat. If you truly want the hat to be reversible then you need to grit your teeth and Kitchener stitch the two needles of 36 stitches. If this is more than you can bear then use a three needle bind-off. Either way, you will end up with a tail at each end of the top of the hat.
Finishing:
Weave in the ends of the cast-ons and use the ends of the working yarn to attach tassels or pom-poms to each end of the top of the hat. If you intend to use the hat reversibly then attach tassels or pom-poms to both sides of the hat. There should be enough room on the inside to stow the tassels or pom-poms that you are not using, if you don't make them too large.
Notes:
Another way to avoid the dreaded Kitchener stitch is to work this hat from the top down starting from a provisional cast-on. Use the standard provisional cast-on but with the cable of the second circular needle instead of waste yarn. Or you can try Judy Becker's Magic Cast-on using C1 on one needle and C2 on the other. Either way, just remember to never knit into C1 stitches with C1 yarn or C2 stitches with C2 yarn and you should be able to establish a double-helix of knitting. If you prefer a hat with shaped crown rather than a rectangular hat then by all means use your favorite crown shaping pattern.
Triple-Helix and Beyond:
To work with three working yarns one could use the above method with three circular needles are DPNs. But an easier method (that also works with two working yarns) is to cast-on all of the stitches onto one circular needle and then distribute them onto two circulars and join in the round. Cast-on one third of the stitches in C1 yarn and slide these stitches so that the slip knot is on the other needle tip. Cast-on another one third of the stitches in C2 yarn. Holding the C2 working yarn and tail together knit 5 stitches on the C1 yarn, then knit the remaining C1 stitches with just the C2 working yarn. Slide all of these stitches over so that the C2 yarn slip-knot is on the other needle tip. Cast-on the remaining stitches in the C3 yarn and knit onto the C2 stitches in the same manner. Now divide the stitches onto two circular needles. Join in the round using the C1 working yarn and knit a round (first 5 stitches with the tail and working yarn held together). Continue knitting rounds, always using the lowest working yarn.


