Yarn & Notion Requirements
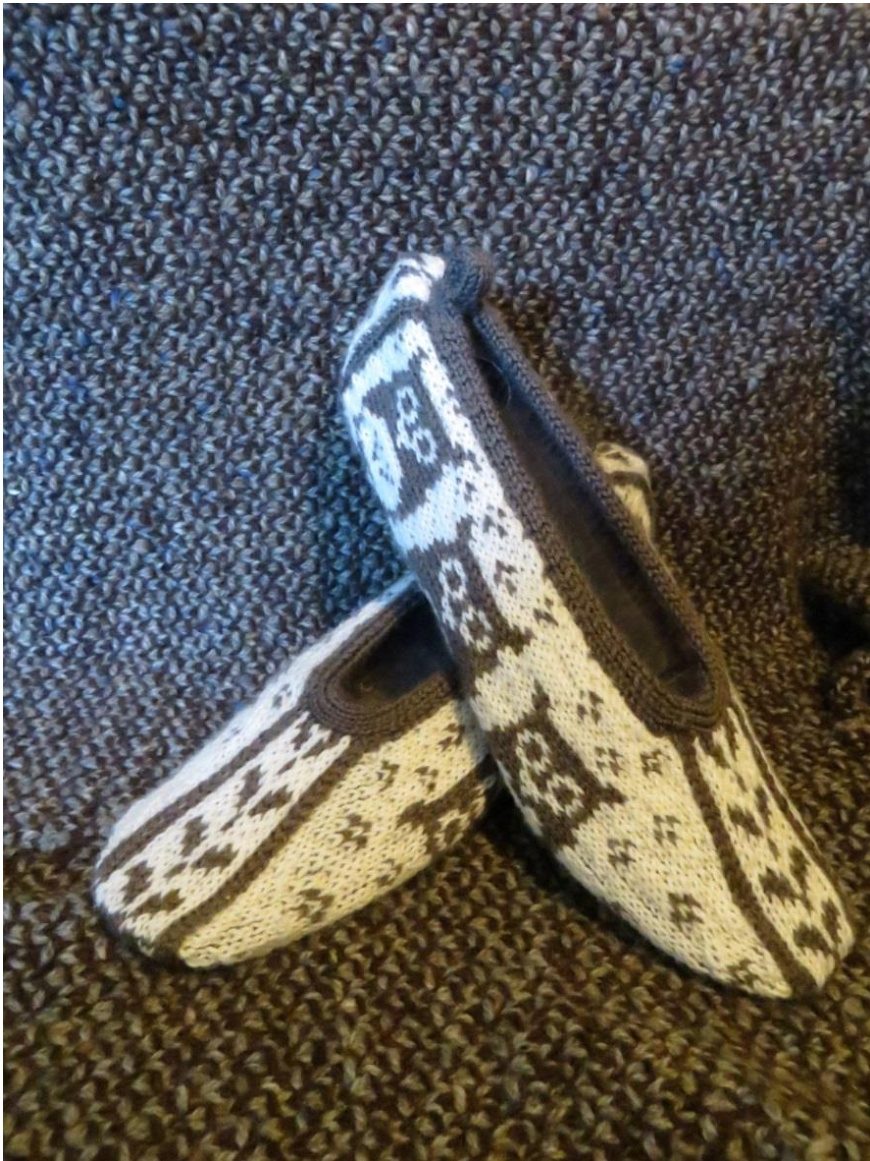
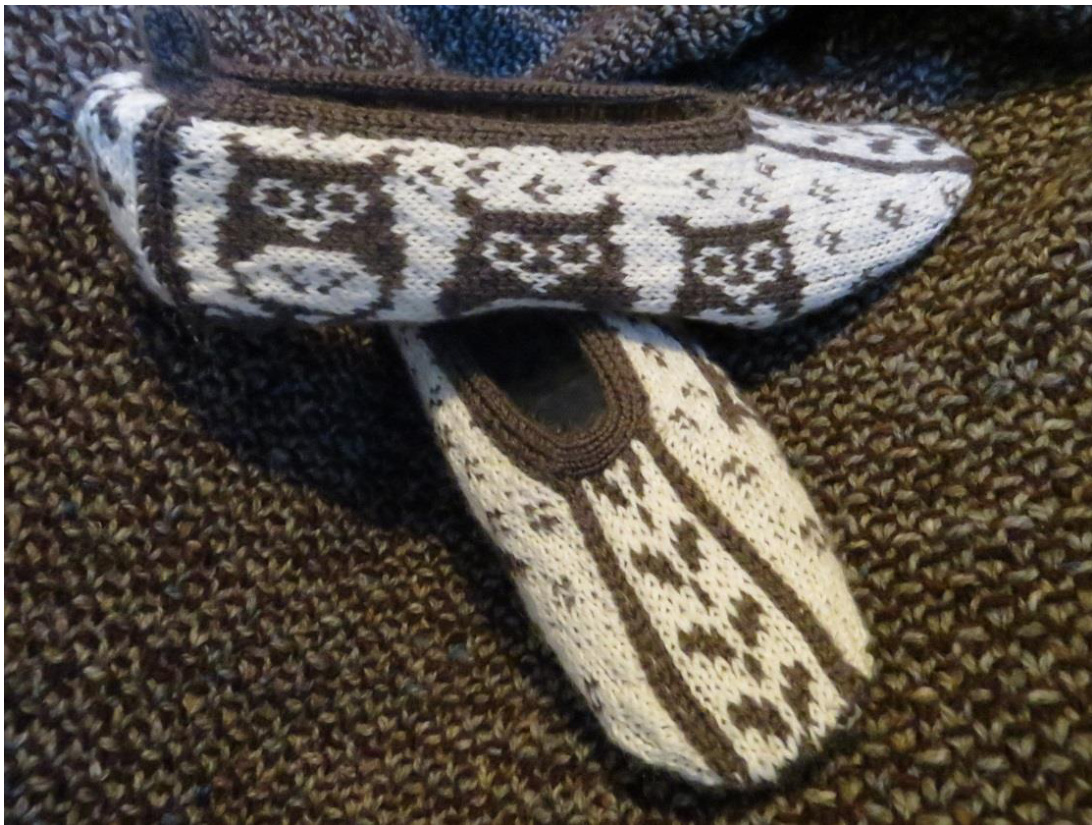
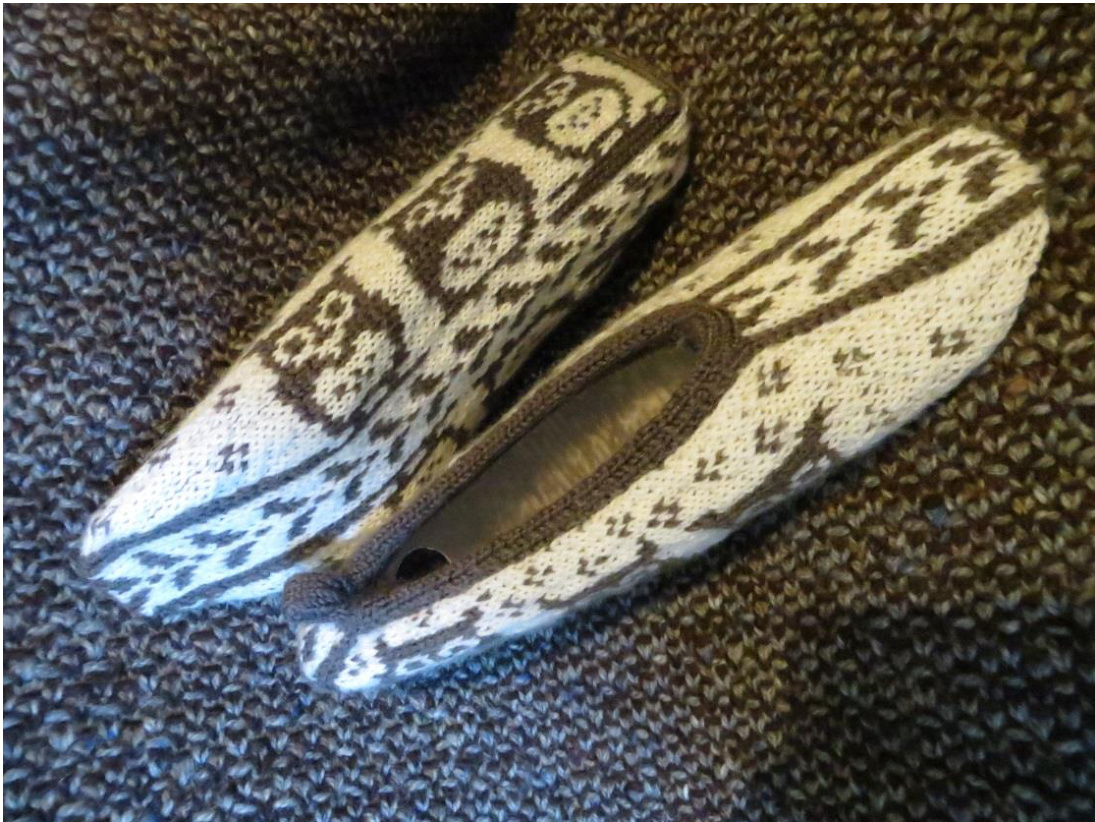
SLEEPY OWL SLIPPERS
By Louise Lamarche Dainty slippers knitted flat and in the round. The i-cord trim is knitted as you go along and becomes an elastic casing - no finishing required. With this technique, these slippers stay on the foot. The fairisle pattern makes them interesting to knit and adds warmth, cushiness and comfort. Includes: Video links for the various techniques Detailed instructions for grafting Sizes: 5/6 (7/8, 9/10) Individually charted for each size Sport yarn - 35 g of each color - shown in size 9/10. Elann A-Series S01 Superwash wool with ny (50 g - 150m, 163 yds) 30g of Cream(02) MC and 34 g of Brazil Nut (06) CC 2.75mm DPNs and 2.75 circular needle Markers Round-end needle for grafting and safety pin for inserting elastic Sewing needle and thread for securing both ends of elastic 60 cm elastic - 4mm wide Gauge: 36 sts, 35 rows = 10 cm
Applied techniques:
Judy's Magic Cast-on - video link https: / /www.youtube.com/watch?v=19jVjlay5Lk I-cord flat and along border - step by step instructions Intarsia and fairisle knitting - tips on crossing threads on last page video link intarsia:http: / /www.youtube.com/watch?v=MAi8og9sA_W video link fairisle: http:/ /www.youtube.com/watch?v=dtDGR2NM9-Q Kitchener grafting - step by step instructions
HEEL TAB
If you are not familiar with Judy's Magic Cast on please look at the following video but use two DPNs: https:/ /www.youtube.com/watch?v=19jVjlay5 Lk Using the Judy's Magic Cast-on method and two 2.75mm DPNs and the trim color, do a double needle provisional cast-on of 6 stitches on each needle. With a third DPN, knit the 6 stitches of the top needle once. Put the 6 stitches of the bottom needle on a stitch holder or plastic safety pin.
I-cord tab border:
1) Slip the stitches to the opposite end of the needle, the yarn will be attached to the last stitch. 2) Knit the 6 stitches, pulling tight on the first two stitches Repeat steps 1 and 2 for a total of 13 rows.
Picking up stitches and knitting the heel tab
If you flatten the i-cord, it will be easy to see the straight columns of stitches. With another DPN you will pick up the single back loops from the edge making sure to pick up the same column of stitches. Once you have knitted a row, put the 6 stitches from the i-cord on a stitch holder or safety pin.

With the yarn on the live row, turn the work and pick up and knit 13 sts from the top-down as follows: As this becomes intarsia knitting, to avoid gaps make sure you follow the tips on crossing your yarns explained on last page. Row 1: K2 CC - knit 9 as per HEEL TAB CHART (both colors are used) - K2 CC Row 2: Purl F/B and P1 in CC - Purl 9 in pattern - slip next 2 stitches to right hand needle. Turn work to start the heel tab i-cord: Pulling tightly, Knit F/B, K1 in CC. Slip these 3 stitches back to left needle. Turn work. You now have 15 sts. Row 3: Cross colors, pull tight and K3 (icord) - knit 9 in pattern - slip last 3 sts to right needle. Turn work to start the other i-cord. Cross colors, pull tight and Purl 3 sts. Slip these 3 stitches back to left needle. Turn work. Row 4: Cross colors, pull tight and P3 (icord) - purl 9 in pattern - slip last 3 sts to right needle. Turn work. Cross colors, pull tight and Knit 3 sts. Slip these 3 stitches back to left needle. Turn work. As you can see, you will be knitting the i-cord twice, once for the end of the row and once for the beginning of the other row. Knit in pattern a total of 24 rows following method explained for rows 3 and 4 above. You will have created an i-cord on each side of the heel tab from which you will be picking up stitches to make the sides of the slipper. Leave stitches on DPN and cut both yarns leaving a 5 inch tail.
SLIPPER FOOT
For this section, use either DPN's or a circular needle with the magic loop method.
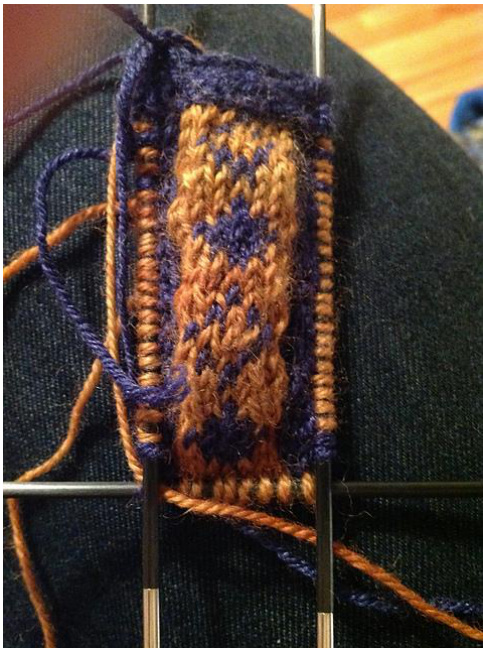
This is an example of the finished set-up. Not in the OwL pattern but same idea. With right side facing, slip the 6 i-cord stitches from holder to a DPN. Do not knit the first 5 stitches - you will knit the 6th stitch with the first stitch you will pick up along the heel tab. Read chart from Right to Left for the Knit side and from Left to Right for the Purl side. Attaching yarn and keeping in pattern with both colors according to the FOOT CHART starting at ROw1, pick up and knit 22 stitches along the i-cord's middle stitch keeping a nice even row-KNIT THE FIRST STITCH WITH THE LAST STITCH OF THE I-CORD. Knit the first stitch from the bottom of the heel. Total count on the first DPN: 5 i-cord and 23 sts in pattern. With another DPN, and continuing Row 1 of the FOOT CHART, knit the stitches from the bottom of the heel tab - proceed as follows for this row only: K2 tog, K9, K2 tog - Keep last stich for the third DPN. Total count on the second DPN: 11 sts in pattern. With another DPN and continuing Row 1 of the FOOT CHART, knit last stitch of the bottom of heel tab, pick up and knit 22 stitches along heel tab i-cord. Knit the last picked up stitch together with the first stitch of the 6-st icord. Slip the remaining 5 icords on the DPN - DO NOT KNiT. Turn work. Total count on the third DPN: 5 i-cord and 23 sts in pattern. TOTALNUMBEROF67STS. Row 2: Cross colors as per intarsia tips, pull tight and P5 (i-cord) - purl in pattern to last 5 sts. Slip to right needle. Turn work. Cross colors, pull tight and K5 (i-cord) - end of row. Slip sts back to other needle. Row 3: Cross colors, pull tight and K5 (icord) - knit in pattern to last 5 sts. Slip to right needle. Turn work. Cross colors, pull tight and P5 (icord) - end of row. Slip sts back to other needle.
TOPOF THEFOOTI-CORDBORDER&CASING
On the right side of work, slip the 5 i-cord stitches on a DPN and knit the i-cord in the same manner as the i-cord heel tab border. Increase the i-cord from 5 to 6 sts as such: K4 - K1 front and back. Knit 11 i-cord rows. Cut yarn and leave a 20 cm tail for grafting. Leave sts on DPN. Cut elastic 26 (28, 30) cm. Attach one end of the elastic to a safety pin and insert in casing. Sew both ends of elastic together. Slide the other 5 sts i-cord to a DPN. Bring both DPNs facing one another with the yarn tail coming from the back right side. Insert thread in grafting needle. Continue FOOT CHART for your corresponding size 5/6 (7/8, 9/10) repeating the i-cord process as for rows 2 and 3. Change to 2.75mm circular needle as soon as you can and knit back and forth creating a loop in the cable separating stitches evenly on each tip for ease of knitting; after about 24 rows you won't need the loop. At the end of the chart, you work should measure approximate 15.5 (16.5, 17.5) cm ending on a wrong side. Do not cut yarns.
Grafting:
1. Insert grafting needle purlwise in first stitch of front needle. Leave on needle. 2. Insert grafting needle knitwise in first and second stitch together of back needle. Leave on needle. 3. Insert grafting needle knitwise in first stitch of front needle. Slide off. Insert grafting needle purlwise in next stitch of front needle. 4. Insert grafting needle purlwise in first two stitches together of back needle. Slide off. Insert grafting needle knitwise in next stitch of back needle. Stitch count is now the same on both DPNs. Repeat steps 3 and 4 one stitch at a time. After removing the last stitch, you will have closed off the casing. Cross your work and stretch the elastic so that the elastic join does not make a bump at the point of grafting.
TOEPORTIONOF THEFOOT
From hereon in YOU WILL NOW KNIT IN THE ROUND. The chart will read from Right to Left on each row. With right needle tip, pick up (without knitting) 13 stitches along the top of foot icord. Slip the last stitch to your left needle tip. Insert marker. This is beginning of the round. Re-attach border yarn and start knitting the FOOT DECREASE CHART. Knit 24 sts in pattern, pm, knit 11 sts, pm, knit 24 sts, pm, knit 11 sts from TOP OF FOOT CHART. Total of 70 sts. Distribute your stitches evenly on both tips of the circular needle to avoid gaps and knit row 2 of both charts. Decreases start on the 3rd row after joining in the round. Decrease as follows: \*slip first marker, SSK in CC, knit to two stitches before next marker, K2tog in CC, sm, knit to next marker, sm, SSK in CC, knit to two stitches before next marker, K2tog in CC, sm, knit to end. \* Repeat \* \* every 2 rows. At some point, you may need to re-arrange stitches on the needle tips to facilitate the decreases. Keep decreasing until you have 12 sts on bottom and 12 sts on top. Cut both threads leaving about 30 cm of the CC thread for grafting the toe portion.
Grafting:
1. Insert grafting needle purlwise in first stitch of front needle. Leave on needle. 2. Insert grafting needle knitwise in first stitch of back needle. Leave on needle. 3. Insert grafting needle knitwise in first stitch of front needle. Slide off. Insert grafting needle purlwise in next stitch of front needle. 4. Insert grafting needle purlwise in first stitch of back needle. Slide off. Insert grafting needle knitwise in next stitch of back needle. Stitch count is now the same on both DPNs. Repeat steps 3 and 4 one stitch at a time. Hide threads.
LOOP ON TOP OFHEEL TAB
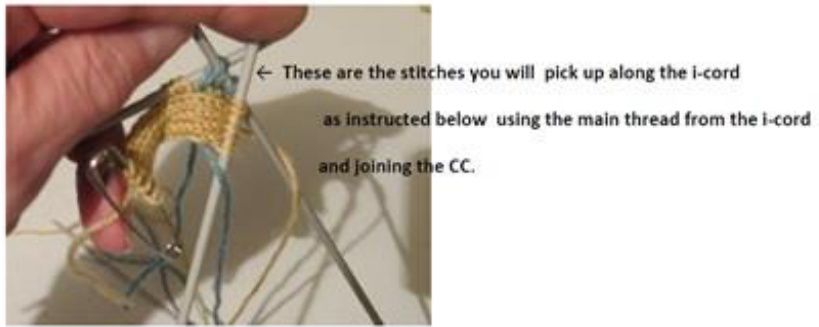
With DPN, pick up and knit 8 stitches in CC along the top i-cord of the heel tab. Knit an 8 st i-cord for 15 rows. K2 Tog all around. Cut 20 cm thread. Fold in half and sew each stitch to the pickuprow. Do not make a full wrap around the yarn as it will be hard to pull and close gap. On the purl side bring the background thread from under away from you and pass it over the border thread. Continue knitting the icord with the border thread. When you repeat the operation on the second round, both threads will be Crossed and there won't be a gap as you continue knitting the rest of work if you pull tightly on the background thread. On the knit side bring the background thread towards you and pass it over the border thread. Continue knitting the icord with main thread. When you repeat the operation on the second round, both threads will be Crossed and there won't be a gap as you continue knitting the rest of work if you pull tightly on the background thread. Videos are rare on intarsia border. I have found this one that is very good. Keep in mind that you are not doing the same type of border but the method of crossing is good. http://www.youtube.com/watch?v=MAi8og9sA_w
TIPS ON CROSSING YARNS FOR FAIRISLE
Fairisle is preferably done with a color held in each hand. The contrast yarn (motif) should come from below to stand out more - yarn held in left hand. If you are not familiar with carrying floats, please look at this video to the end. It is excellent; very clear explanation from Lori1551. http:/ /www.youtube.com/watch?v=dtDGR2NM9-Q.
Abbreviations
Purl F/B Purl in front and back of stitch to increase Knit F/B Knit in front and back of stitch to increase K2 tog Knit 2 sts together to decrease SSK Slip 1st st knitwise, slip 2"d st knitwise, bring back to left needle and knit Together through the back loop - to decrease
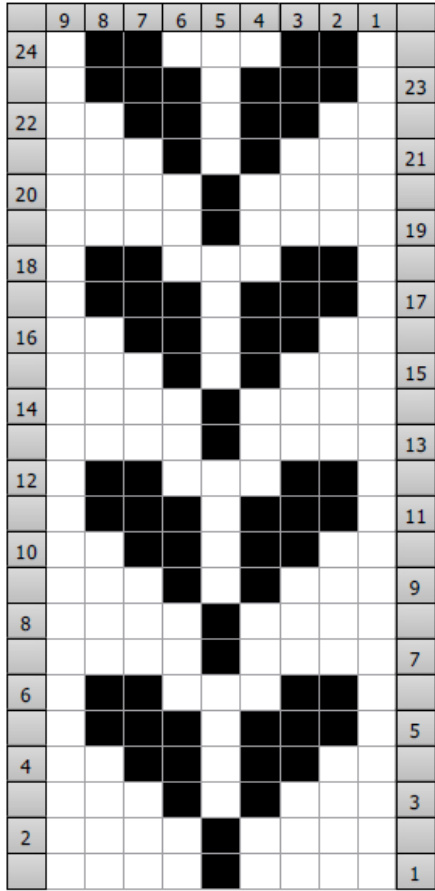
HEEL TAB CHART (all sizes) (knitted back and forth)
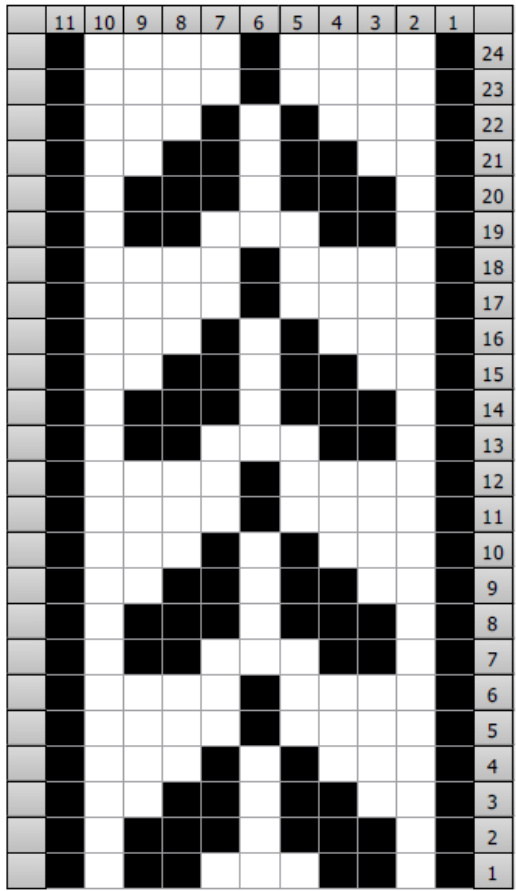
TOP OF FOOT CHART (all sizes) (knitted in the round)
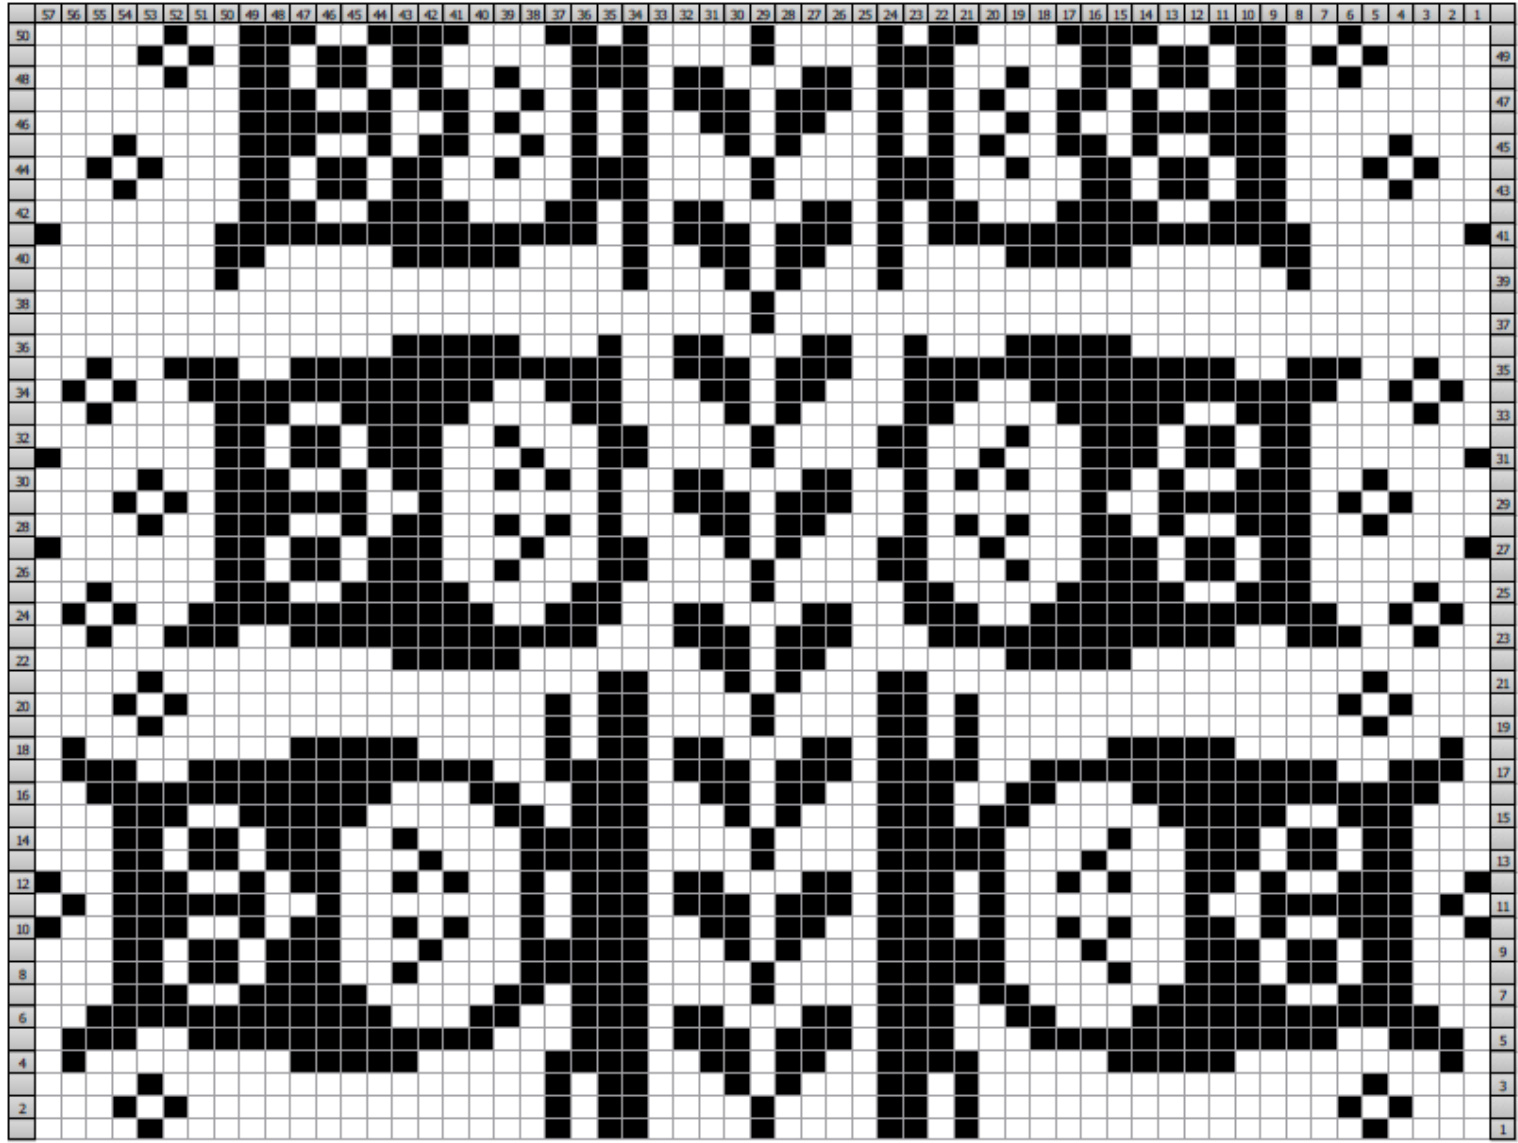
FOOT CHART - SIZE 5-6 (knitted back and forth)

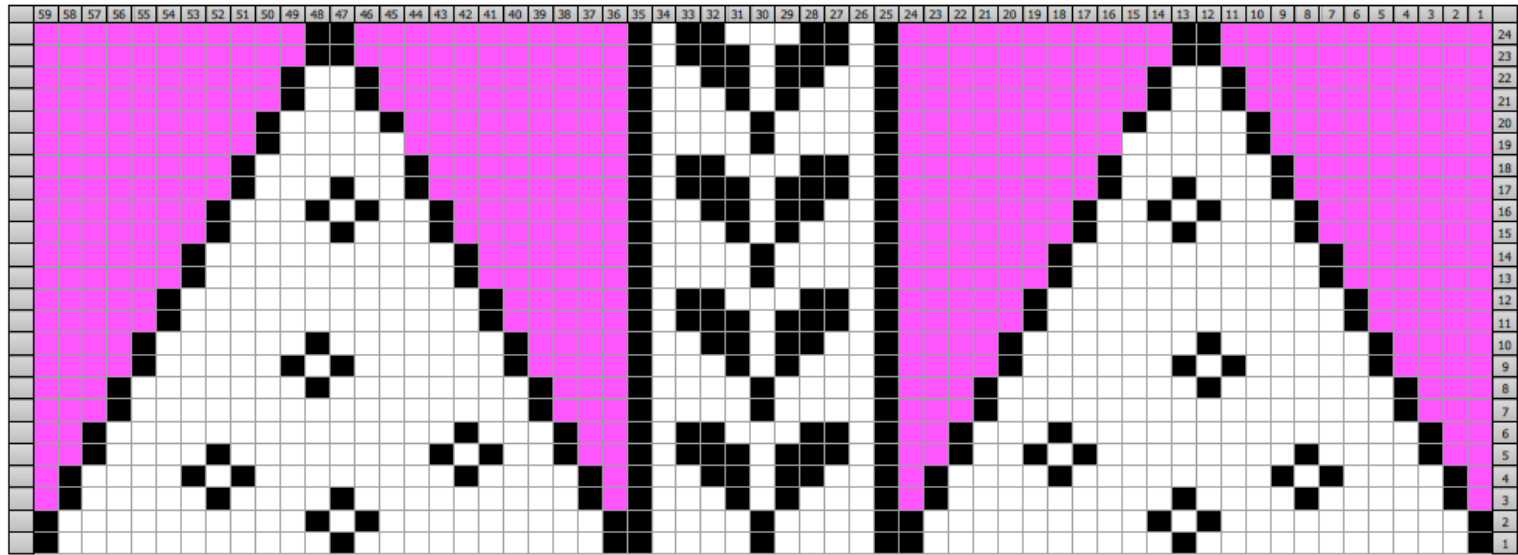
FOOT DECREASECHART-SIZE5-6 (knitted in the round)
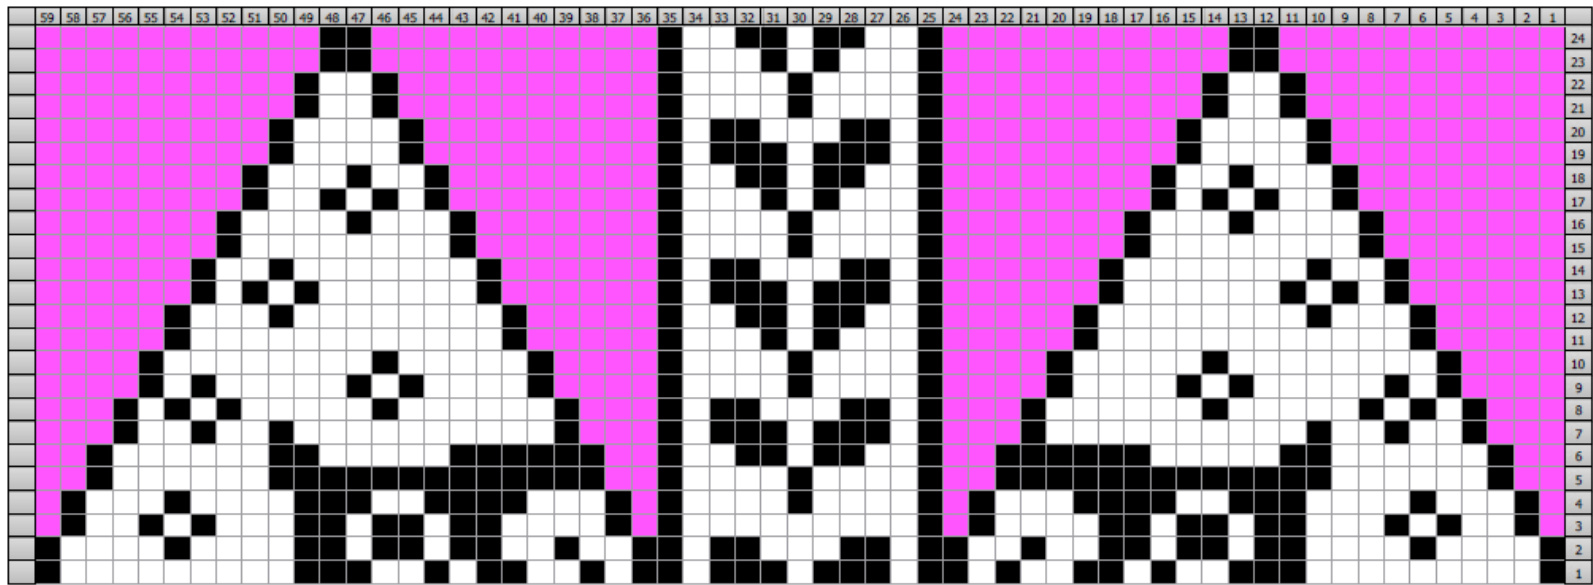
Pink background indicates no stitch.
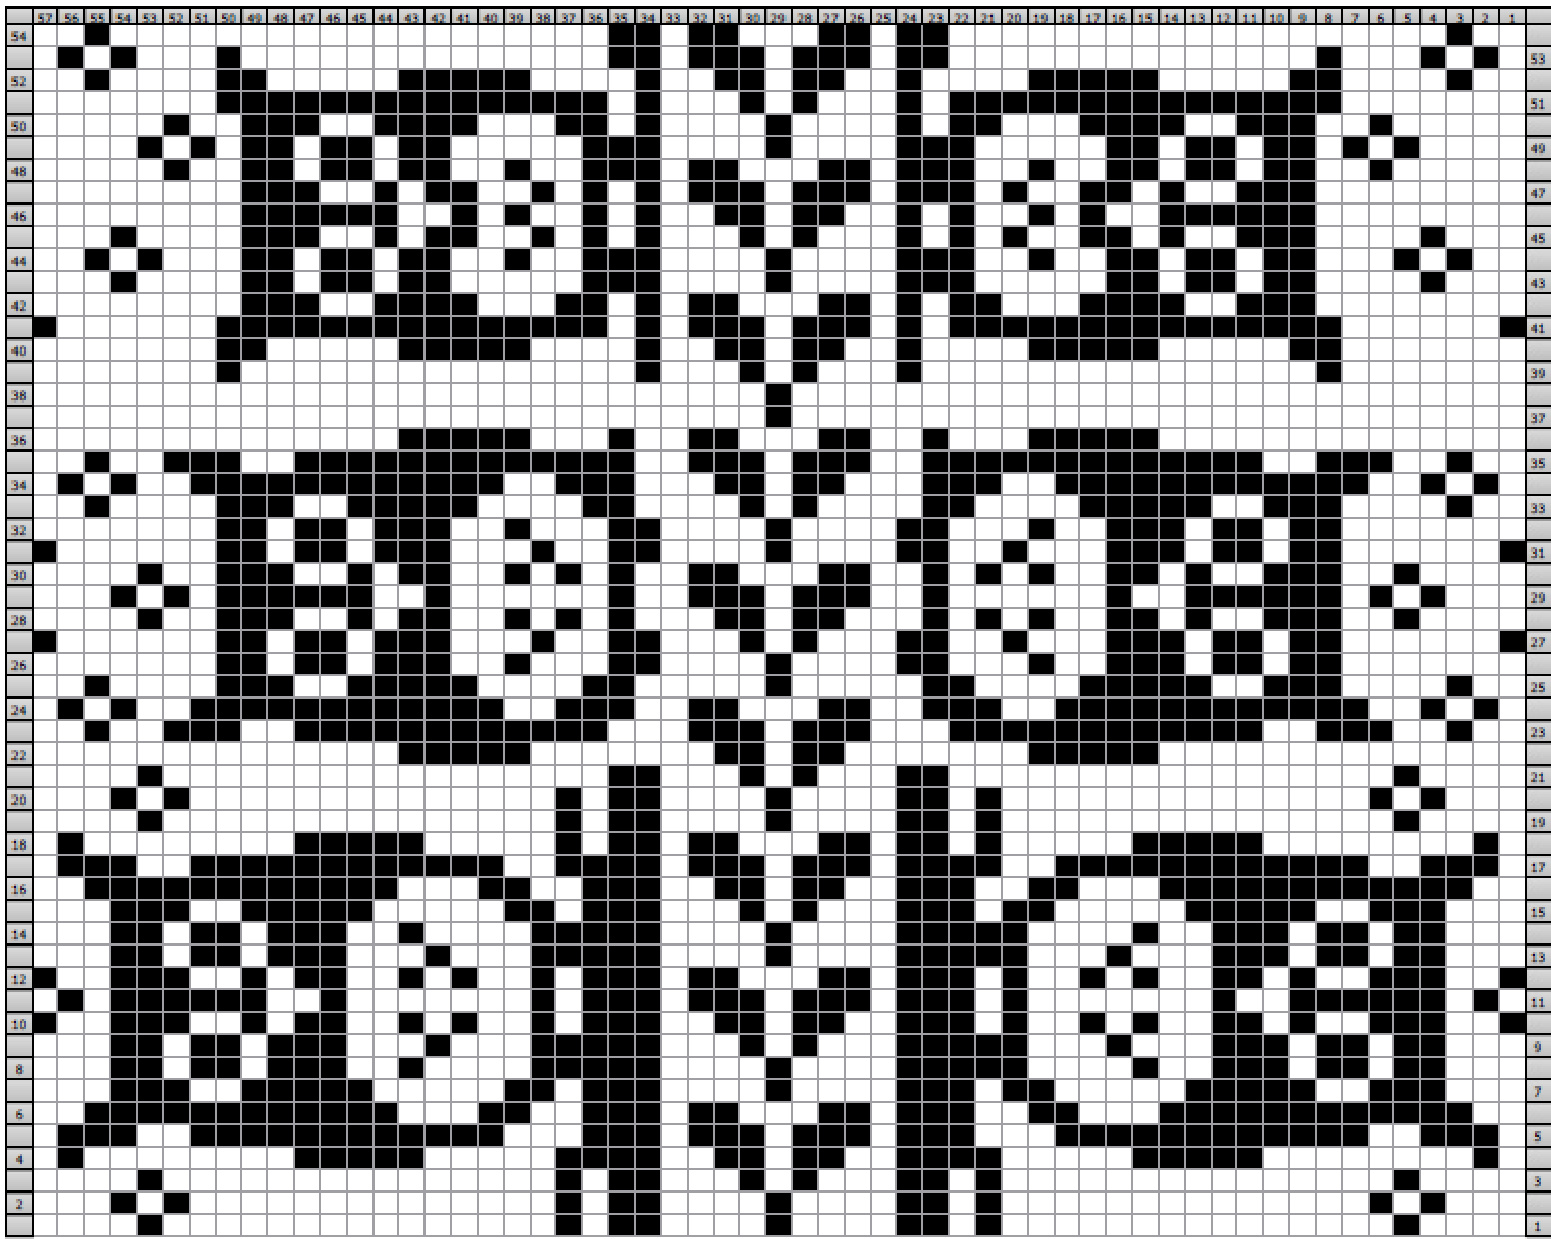
FOOT CHART - SIZE 7-8 (knitted back and forth)
FOOT DECREASECHART-SIZE 7-8 (knitted in the round)

Pink background indicates no stitch
FOOT CHART - SIZE 9-10 (knitted back and forth)
FOOTDECREASECHART-SIZE9-10 (knitted in the round)
Pink background indicates no stitch


