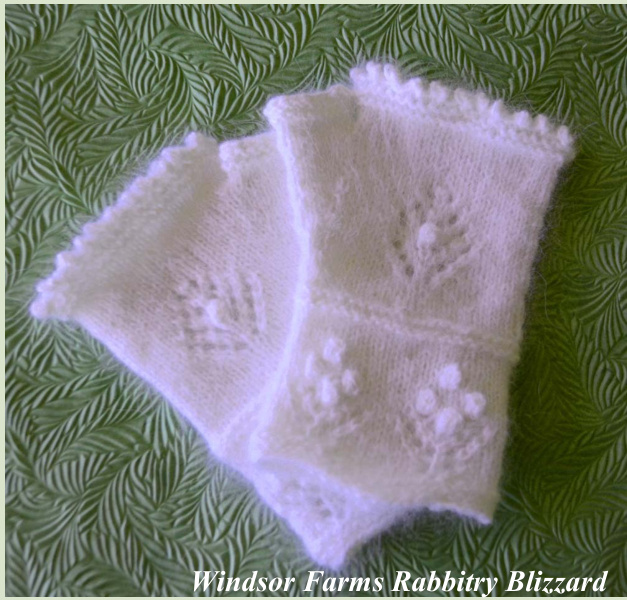
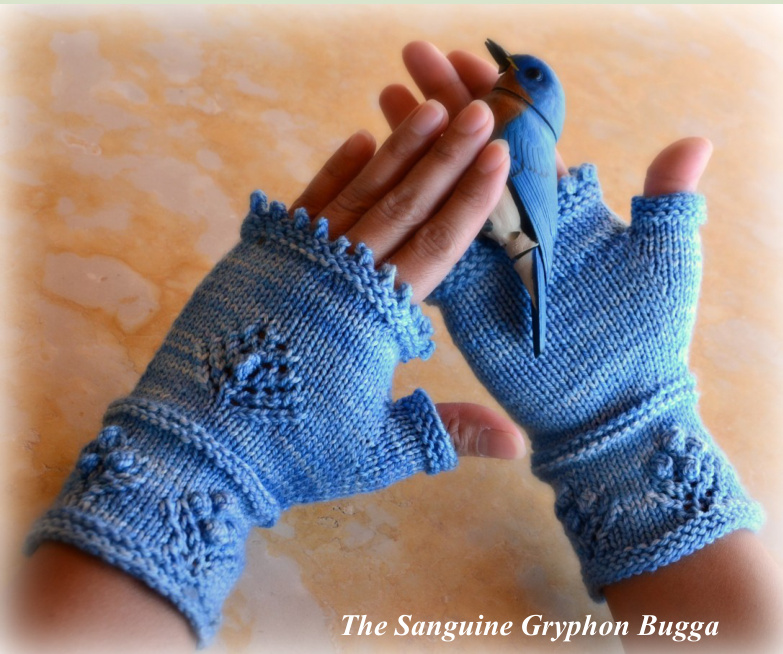
Lovely feminine fingerless mitts knitted in the round using Magic Loop, two circulars or dpns with DK or sportweight yarn. These little mitts will keep your hands warm and toasty and provide flexibility with the separate open thumb. Pattern has instructions for a one-turn bobble that creates a compact little knot and the textural effect is repeated in the picot bind off. Pattern is written and has charts for the lace motifs. Sizes Finished mitt circumferences: 7 /7.5/ 8 inches with 6 sts.=1 inch gauge. With 6.5-7 sts.= 1 inch size is approx. 6.5/7/7.5 inches. All will stretch though to accommodate a hand about one inch larger than finished size. Hand circumference is measured across the palm. Instructions are written for Magic Loop or two circulars, however, pattern does include needle distribution for dpns. Yarn Uses approx. 140/165/185 yards of DK or sportweight yarn. Notions 2 stitch markers, waste yarn and yarn needle Gauge Stitch gauge is 6 stitches to the inch in the round. If you like a snugger fit, you can knit the mitt at a 6.5-7 stitches per inch gauge. You will, however, most likely need to add more rounds and possibly another increase round for the thumb gusset. Knit a swatch in the round as gauge can vary greatly between flat knitting and in the round knitting.
Needles I knit loosely and used a size 3.25mm (US 3) circular needle, 32 inches long and did Magic Loop. Adjust needle size as necessary to get correct gauge. I went down two needle sizes to a size 2.25 mm ( US 1 ) for the picot bind off in order to make the bind off bumps tight and compact. This is optional. Everyone's knitting is different.
Models
White mitts are Windsor Farms Rabbitry Angora Blizzard, says laceweight but it is more like DK or sport Used 130 yards for medium. Dark pink mitts are Knitpicks Swish DK, Lotus. Used 123 yards for medium. Light pink mitts are Jade Sapphire Keja Cashmere DK, pink. Used 120 yards for small. Blue mitts are The Sanguine Gryphon Bugga, Peacock Parachute Spider. Used 165 yards for medium. 2012KarenStrauss You are free to sellitems made with your wnhands using this pattern, however, please do not sellor distribute the pattern. Ravelry name: like2makethings

Instructions
Right Hand
Use a long tail cast on. Sizes small and medium: Cast on 44 stitches; Magic Loop stitch distribution-22 stitches on each needle; DPN needle distribution- Small and medium: 22, 11, 11 (44stitches total) Size large: Cast on 46 stitches; Magic Loop stitch distribution- 23 stitches on each needle; DPN needle distribution- 23, 12, 11 (46 stitches total) Variations in sizes are indicated by / in instructions. After cast on, join and \*knit one round, followed by a purl round\*. Repeat \* one time. This will give you two garter ridges. Work rows 1-15 of Chart 1. NOTE: The Right Hand charts are on the right hand side of Page 5. The even numbered rows are knit rounds. Knit four rounds. Purl one round, knit 1 round, purl one round, and knit one round.
Setup Round
This round will get the stitch count ready to have the central motif on the back of the hand centered between the motifs on the cuff and to have the count on the back of the mitt accommodate the thumb gusset. Size Small: Needle 1: k11, k2tog, k9 (21 stitches) Needle 2: Knit across (22 stitches) Size Medium: Needle 1: k11, k2tog, k9 (21 stitches) Needle 2: K3, M1L, knit to last three stitches, M1L, k3 . The first M1L becomes the center stitch of the thumb gusset. (24 stitches) Size Large: Needle 1: knit across (23 stitches) Needle 2: K4, M1L, knit to end of round. The M1L becomes the center stitch of the thumb gusset(24 stitches) Knit 1 round even.
Start Thumb Gusset, all sizes
Knit across Needle 1 to end. On Needle 2, k 3/3/4, pm , M1L, k1, M1R, pm, knit to end. NOTE At the same time you are working the thumb gusset you will start the Central Motif, Chart 2 when you have 8/10/12 stockinette rounds after the last garter ridge. The even numbered rows are knit rounds and the gusset stitches are not shown on the charts. See Custom Fit on Page 4. Thumb Gusset Increase, all sizes. Right Hand 2 \*Needle 1: Work across. Needle 2: K 3/3/4, sm, M1L, knit to next marker, M1R, sm, knit to end.\*
Size Small:
[Work two rounds and then do the \* thumb gusset increase in the third round.] Repeat [] three times. Knit three rounds and do the \* increase in the fourth round. Gusset will end with a total of 13 stitches between markers.
Size Medium
[Work two rounds and do the \* thumb gusset increase in the third round]. Repeat [] five times. Gusset will end with a total of 15 stitches between markers.
Size Large
[Work two rounds and then do the \* thumb gusset increase in the third round]. Repeat [] five times. (15 stitches between markers) Knit three rounds and do the \* increase in the fourth round.Gusset will end with a total of 17 stitches between markers. If thumb gusset length does not match your hand or the photo on page 4, do extra rounds and/or add another increase round.
Gusset Stitches Reserved
When you have completed the last round with the increases for the thumb gusset, and you are pleased with the height of the gusset, work across Needle 1, knit 3/3/4 stitches on Needle 2. Slide those 3/3/4 stitches to the end of Needle 1. Remove the stitch markers and put all the gusset stitches on a waste yarn. Bring the front and back of the mitt together and cast on two stitches using a backward loop cast on at end of Needle 2. Don't pull tightly or you will not be able to knit into them on the next round. When you come to the cast on stitches on the next round, knit through the back of them to tighten them up.
| Size | Needle 1 | Needle 2 | Total |
| Small | 24 | 20 | 44 |
| Medium | 24 | 22 | 46 |
| Large | 27 | 21 | 48 |
Knit in stockinette until the distance between the last garter ridge and the current round is 3/3.5/4 inches. On Needle 1: k4, k2tog, k 5/5/6, k2tog, k5/5/7, k2tog, k4. Needle 2: Knit across. You will have a total of 41/ 43/ 45 stitches. Purl one round, knit one round. Purl one round.
Picot Bind Off
The picot bind off is an elastic bind off. You can go down up to two needle sizes to keep the picot bumps compact. Smaller needle can be any length since it is just used for binding off. I used a dpn, US 1. 0 sell items made with your own hands using this pattern, however, please do not sell or distribute tl ethings \*Cast on two stitches using the cable cast on. Bind off four stitches. Place remaining stitch back on left needle \* . Repeat from \* across all stitches on mitt top. Try to knit stitches tightly to make bumps compact.
Thumb
You will now pick up stitches around the thumb opening and transfer the reserved thumb stitches to your needle. Here is a good video of the proces using Magic Loop.
http://www.youtube.com/watch? V=p9ghFRvbOIw&feature=related
I found it only necessary to pick up the two cast on stitches plus one stitch on each side of the opening, instead of two on each side shown in the video. On the first round after attaching my yarn, I also like to k2tog through the back loops of the first two and last two stitches. This further tightens up any gaps. If you do have any holes when the thumb is finished, use yarn tail to weave them closed by picking up stitches in a circle around the hole and cinching up the yarn. Stuff yarn tail down inside thumb. Knit 3/3/4 rounds for the thumb. Purl one round, knit one round and purl round. Cast off using a stretchy cast off. I like this one: knit 2 stitches, slip 2 stitches back on the left needle and knit together through the back loops. \*Knit 1, slip 2 stitches back on the left needle and knit together through the back loops, repeat \*until all stitches are bound off. A shortcut for this bind off is instead of moving the stitches back to the left needle, you insert the tip of the left needle into the fronts of the two stitches on the right needle and, voila, you are in position to knit them together through the back loops.
Left Hand
Follow instructions for Right Mitt but use the Charts on the left hand side of Page 5, until you get to Set Up Round.
Setup Round
Size Small: Needle 1: K9, k2tog, k11 Needle 2: Knit across to end. Size Medium: Needle 1: K9, k2tog, k11 Needle 2: K3, M1L, knit to last three stitches, M1L, k3.
Size Large: Needle 1: Knit across. Needle 2: Knit to last four stitches, M1L, k4. Knit 1 round even. Start Thumb Gusset , all sizes Needle 1: Knit across. Needle 2: Knit to last 4/4/5 stitches, pm, M1L, k1, M1R, pm, k 3/3/4 Note At the same time you are working the thumb gusset you will start the Central Motif, Chart 2 when you have 8/10/12 stockinette rounds after the last garter ridge. The even numbered rows are knit rounds. See Custom Fit on Page 4. Thumb Gusset Increase, all sizes. Left Hand \*Needle 1: Work across. Needle 2: Work to marker, sm, M1L, knit to next marker, M1R, sm, k3/3/4 \*
Size Small:
[Work two rounds and then do the \* increase in the third round.] Repeat [] three times. Work three rounds and do the increase in the fourth round. Gusset will end with a total of 13 stitches.
Size Medium
[Work two rounds and do the \* increase in the third round]. Repeat [] five times. Gusset will end with a total of 15 stitches.
Size Large
[Work two rounds and then do the \* increase in the third round.] Repeat [] five times. Work three rounds and do the \* increase in the fourth round. Gusset will end with a total of 17 stitches.

Favourite Knitting Tools One of my faves is a HiyaHiya, 40 inch, 0oo0, circular. I use it to rescue live stitches from a multi-row frogging without disturbing the knitting. I also like it for picking up the stitches around a mitt thumb.
Gusset Stitches Reserved
When you have completed the rounds with the increases for the thumb gusset and you are pleased with the height of the gusset, you will work across all the stitches on Needle 1 and Needle 2 up to the first marker . Remove the stitch markers and put all the thumb gusset stitches on a waste length of yarn. Slide the remaining 3/3/4 stitches to the beginning of Needle 1. Bring the front and back of the mitt together and cast on two stitches using a backward loop cast on at end of Needle 2. Don't pull tightly or you will not be able to knit into them on the next round. When you come to the cast on stitches on the next round, knit through the back of them to tighten them up See Chart on Page 2 for stitch counts. Knit in stockinette until the distance between the last garter ridge and the current round is 3/3.5/4 inches. On Needle 1: k4, k2tog, k 5/5/6, k2tog, k5/5/7, k2tog, k4. Needle 2: Knit across. You will have a total of 41/ 43/ 45 stitches. Purl one round, knit one round, and purl one round. Follow instructions for Right Hand Mitt starting at Picot Bind Off until end.
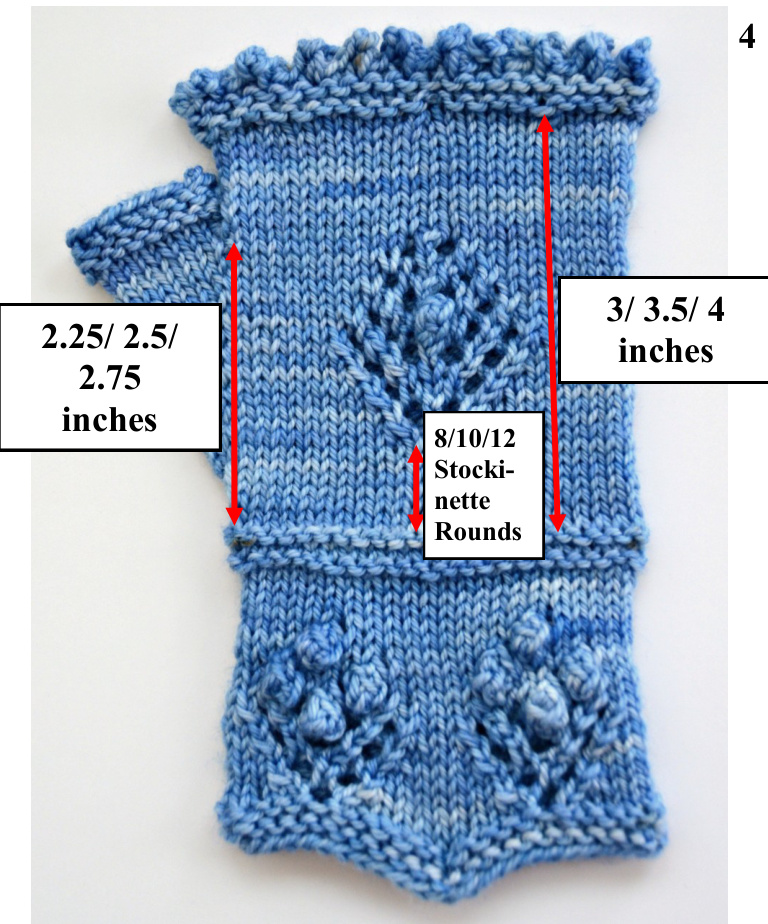
Custom Fit
Measure your own hands and alter pattern by adding additional gusset increases and/or rounds for the gusset without increases. For more mitt length, add 1 additional stockinette round before the Central Motif for every quarter inch of length you add to the mitt length shown in photo. Photo Note: More rounds of stockinette were added before the Central Motif after the models were made.
Increases

I found this video helpful for the M1R and M1L increases: http://www.youtube.com/watch? v=gGbOiIvWLjc&feature=related Hint: When doing the M1L, I find it quicker to pick up the running stitch with the tip of my right needle from back to front and then slide theleft needle tip into the front of the right needle. I am then in position to knit through the back of the stitch. ⊙ 2012 Karen Strauss. You are free to sellitems made with your own hands using this pattern, however, please do not sell or distribute the pattern. Ravelry name: like2makethings
LEFT HAND
| 6 | o/ | 7 | 13 | ||||||||||||||||||
| 8 | \ | 0 | 0 | 6 | 11 | ||||||||||||||||
| 7 | \ | 0 | 0 | / | 0 | 5 | 9 | ||||||||||||||
| 6 | 0 | / | 0 | 0 | \ | 0 | \ | 4 | 7 | ||||||||||||
| 7 | / | o | / | 0 | \ | o | \ | 5 | 5 | ||||||||||||
| 8 | 0 | o/ | 6 | 3 | |||||||||||||||||
| 6 | / | 0 | 0 | \ | 7 | 1 |
| 7 | /o | o/ | 6 | 13 | |||||||||||||||||
| 6 | \ | 0 | 0 | 8 | 11 | ||||||||||||||||
| 5 | \ | 0 | 0 | / | 0 | 7 | 9 | ||||||||||||||
| 4 | 0 | 0 | 6 | 7 | |||||||||||||||||
| 5 | / | 0 | / | 0 | 0 | \ | 0 | 7 | 5 | ||||||||||||
| 6 | 0 | 0 | 8 | 3 | |||||||||||||||||
| 7 | / | 0 | 0 | \ | 9 | 1 |
| 6 | 10 | 4 15 | ||||||||||||||||||||
| 4 | 6 | 13 | ||||||||||||||||||||
| 3 | / | 0 | 0 | \ | 4 | / | 0 | \ | 11 | |||||||||||||
| 0 | / | 0 | 0 | \ | / | 0 | / | 6 | ||||||||||||||
| 3 | / | / | 0 | 0 | \ | 4 | / | 0 | 7 | |||||||||||||
| 4 | / | 0 | 0 | \ | 6 | / | 0 | 5 | ||||||||||||||
| 4 | / | 0 | 0 | \ | 6 | / | 0 | o/ | 3 | |||||||||||||
| 5 | / | 6 | / | 4 | 1 |
Chart 1 Left Hand, sizes small and medium, repeat for second half of round.
| 4 | 10 | 6 15 | ||||||||||||||||||||
| 6 | 4 | 13 | ||||||||||||||||||||
| 0 | 0 | \ | 4 | / | 0 | \ | 3 | 11 | ||||||||||||||
| 0 | 0 | 0 | -0 | / | 0 | / | 0 | 0 | /lo | 9 | ||||||||||||
| / | 0 | 0 | 4 | / | 0 | 0 | \ | 0 | 3 | 7 | ||||||||||||
| / | 0 | 0 | \ | 6 | 0 | 0 | \ | 4 | 5 | |||||||||||||
| / | 0 | 0 | \ | 6 | 0 | 0 | \ | 4 | 3 | |||||||||||||
| 4 | o | 9 | 5 | 1 |
Chart 1 Right Hand, sizes small and medium, repeat fon second half of round.
<html><body><table><tr><td></td><td></td><td></td><td></td><td></td><td></td><td></td><td></td><td></td><td>10</td><td></td><td></td><td></td><td></td><td>o/</td><td></td><td></td><td></td><td></td><td></td><td></td><td></td><td></td><td>8</td><td>13</td></tr><tr><td></td><td></td><td></td><td></td><td></td><td></td><td></td><td></td><td></td><td>9</td><td></td><td>0</td><td></td><td></td><td></td><td>/</td><td></td><td></td><td></td><td></td><td></td><td></td><td></td><td>7</td><td>11</td></tr><tr><td></td><td></td><td></td><td></td><td></td><td></td><td></td><td></td><td>8</td><td>\</td><td>o \</td><td>0</td><td></td><td></td><td>/</td><td>0</td><td></td><td></td><td></td><td></td><td></td><td></td><td></td><td>6</td><td>6</td></tr><tr><td></td><td></td><td></td><td></td><td></td><td></td><td>7</td><td>/</td><td>0</td><td></td><td>0</td><td></td><td></td><td></td><td>0</td><td></td><td></td><td>\</td><td></td><td></td><td></td><td></td><td></td><td>5</td><td>7</td></tr><tr><td></td><td></td><td></td><td></td><td></td><td></td><td></td><td>8</td><td></td><td></td><td>/</td><td>0</td><td></td><td></td><td>o></td><td></td><td>o/</td><td></td><td></td><td></td><td></td><td></td><td></td><td>6</td><td>5</td></tr><tr><td></td><td></td><td></td><td></td><td></td><td></td><td></td><td></td><td>6</td><td>/</td><td>0</td><td></td><td></td><td></td><td>0</td><td></td><td></td><td></td><td></td><td></td><td></td><td></td><td></td><td>7</td><td>3</td></tr><tr><td></td><td></td><td></td><td></td><td></td><td></td><td></td><td></td><td></td><td>10</td><td></td><td>0</td><td></td><td></td><td>\</td><td></td><td></td><td></td><td></td><td></td><td></td><td></td><td></td><td>8</td><td>1</td></tr></table></body></html>
| 6 | 11 | 4 | 15 | |||||||||||||||||||||
| 4 | 7 | 13 | ||||||||||||||||||||||
| 3 | / | 0 | 0 | \ | / | 0 | 0 | \ | 11 | |||||||||||||||
| / | 0 | / | 0 | o/ | 3 | / | 0 | / | 0 | o | 6 | |||||||||||||
| 3 | / | 0 | / | 0 | \ | 5 | 0 | / | 0 | 0 | \ | 7 | ||||||||||||
| 4 | / | 0 | 0 | 7 | 0 | 0 | \ | 5 | ||||||||||||||||
| 4 | / | 0 | 0 | 7 | / | o | 0 | \ | ||||||||||||||||
| 3 | ||||||||||||||||||||||||
| 5 | / | 0 | 10 | / | 4 | 1 |
| 8 | 0 | / | 10 | 13 | ||||||||||||||||||||
| 7 | \ | 0 | 0 | 6 | 11 | |||||||||||||||||||
| 6 | 0 | 8 | 9 | |||||||||||||||||||||
| 5 | / | o | / | 0 | 4 | o | \ | 7 | 7 | |||||||||||||||
| 6 | 0 | 0 | 0 | \ | \ | 8 | 5 | |||||||||||||||||
| 7 | / | 0 | o/ | 6 | 3 | |||||||||||||||||||
| 8 | 0 | \ | 10 | 1 |
Chart 1 for Left Hand, size large, repeat for second half of round.
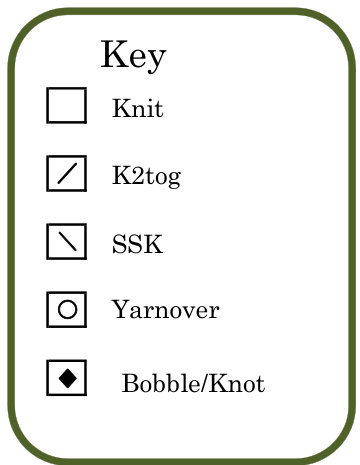
Chart 2 Right Hand, sizes small and medium
Chart 2 for Right Hand, size large
| 4 | 11 | 6 | 15 | |||||||||||||||||||||
| 7 | 4 | 13 | ||||||||||||||||||||||
| / | 0 | 0 | \ | 5 | 0 | 4 | 0 | \ | 3 | 11 | ||||||||||||||
| 0 | / | 0 | > | 3 | / | 0 | 0 | 9 | ||||||||||||||||
| / | 0 | 5 | / | 0 | 0 | 0 | > | 3 | 7 | |||||||||||||||
| / | 0 | 0 | \ | 7 | 0 | 0 | \ | 4 | 5 | |||||||||||||||
| 0 | 0 | \ | 7 | / | 0 | 0 | \ | 4 | 3 | |||||||||||||||
| 4 | 0 | 10 | \ | 5 | 1 |
Chart 1 for Right Hand, size large, repeat for second half of round.
Bobble (Knot)
Keep all stitches tight to make a well shaped bobble. Into one stitch: Kfb, kfb, turn Slip stitch as if to purl, p3, turn, K2tog, slip1 as if to knit, k1, psso, slip k2tog stitch over last stitch. Transfer stitch to left needle and ktbl or for a short cut, leave the stitch on the right needle and insert the tip of the left needle through the front of the stitch and knit. Numbers shown in RED on the charts give you the knit stitch count before and after the motifs. Saves time when you don't have to count the squares for long runs of knit stitches. Square with the red number is in the count. Charts in pattern created in Microsoft Excel using www.stitcherymastery.com fonts. @ 2012 Karen Strauss. You are free to sellitems made with your own hands using this pattern, however, please do not sell or distribute the pattern. Ravelry name like2makethings


