THE SMURFS
The Smurfs are characters invented by Peyo (Pierre Culliford) and copyright to them belongs to IMPs (http://www.smurf.com/smurf.php/www/home/nl). I used the character without permission. This is a free pattern and was not made to earn money from it, but purely for the fun of it. Therefore, I ask you to please not redistribute or sell this pattern anywhere, nor to sell the dolls made from this pattern.
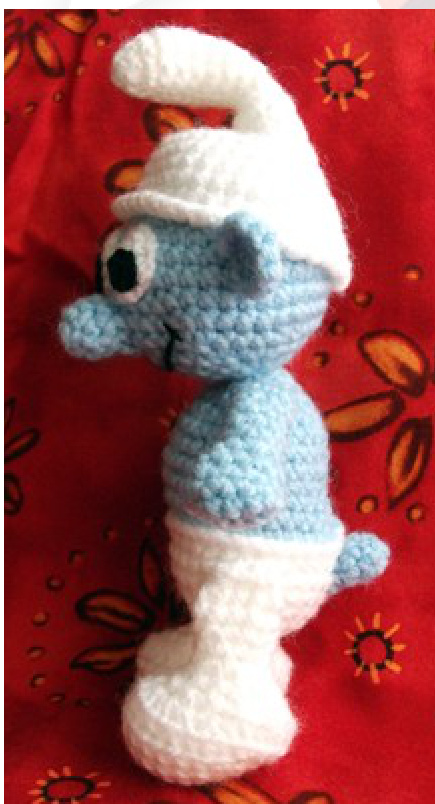
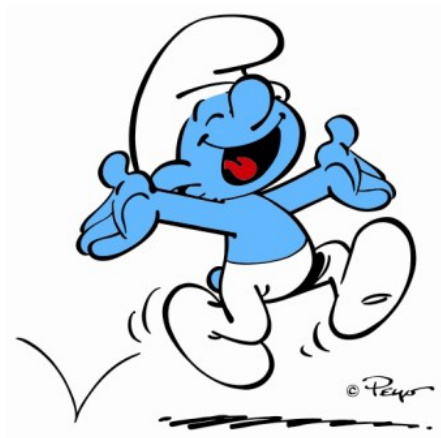
Smurf
This is a pattern for the base Smurf.

MATERIALS
White and blue yarn. A little bit of black for the pupils and the mouth. 一A fitting crochet hook for the yarn you have chosen, that enables you to crochet tight 一Polyfill一Needle for sewing
SIZE
The size of your Smurf depends on the yarn you chose and the crochet hook you used. My Smurf was made with a 3,5 mm hook (US E; UK 9; JPN 5) and measures approximately 18 cm (7 inches) from foot to tip of the hat.
ABBREVIATIONS EXPLANATIONS
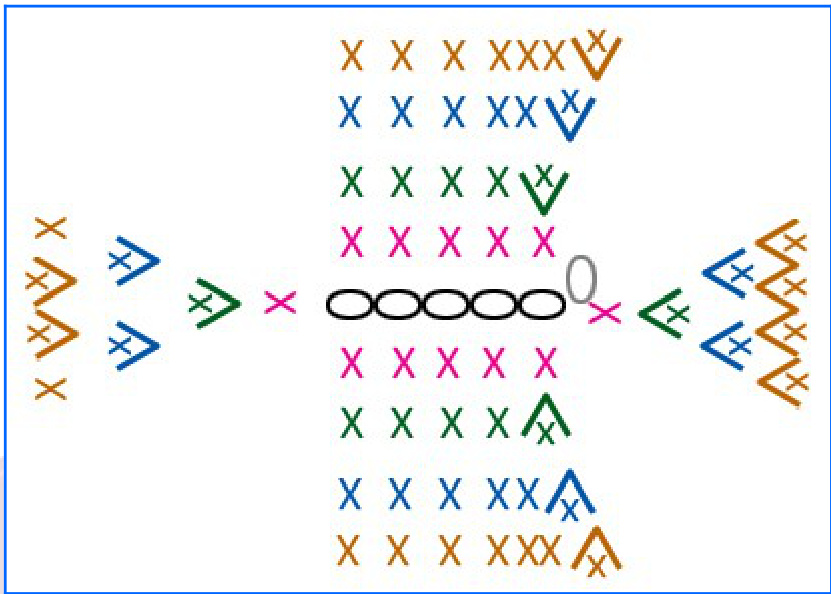
SC Single Crochet SC x 4 Crochet a SC in each of the next 4 stitches INC =Increase; crochet two single crochets in one stitch INC x 2 二Crochet two single crochets in the next 2 stitches DEC =Invisible decrease; crochet two stitches together DECx 2 二Crochet two stitches together twice SIS 二Slip Stitch Ch Chain stitch extsc Extended Single Crochet: Insert hook in next st, yarn over, pull up a loop, yarn over, draw through one loop, yarn over, and draw through all loops on hook INC extSC Make two extSC in the next stitch Crab Stitch Crocheting SC in the reverse direction, from left to right. YouTube: http://www.youtube.com/watch?v=-C1lVz60ylg Bubble Stitch = [Yarn over, insert hook in stitch, yarn over and pull loop through ] x4; yarn over and pull loop through all loops on hook.
FeEt AND LeGs (X2)
We start with the feet, by crocheting in an oval around a chain.
Start: Ch 6 (5 + 1 to turn) Row 1: SC in the next 4 chains; 3 SC in the last chain. Continue at the back of the chain. SC in the next 3 chains; 2 sc in the last chain. You should have 12 sc now. [12 stitches] Row 2: INC, SCx4; INC; SCx4; INCx2 [16 stitches] Row 3: INC; SC x 5; INC x 2 + SC x 5; INC x3 [22 stitches] Row 4: INC; SC x 7; INC x 2; SC x 7; INC x 5 [30 stitches] Row 5: Crochet in BACK LOOPS only: SC around [30 stitches] Row 6: Crochet in BACK LOOPS only: DEC around [15 stitches] Row 7: [ SC + DEC ] x 5 [10 stitches] Start stuffing the foot firmly. Only the foot needs to be stuffed. The leg remains unstuffed. Row 8: [SCx3 + DEC]x 2 [8 stitches] Row 9 - Row 12: SC around [8 stitches] Row 13: You should now have reached the back of the leg. If that isn't the case, just crochet a couple of sc until you are. Pinch the leg closed, and crochet through both layers 4 single crochets. Row 14: Turn; skip first sc; crochet 3 sc; tie off
BoDY
The body is crocheted in closed rounds. This means that each round finishes with a slip stitch in the first single crochet; followed by a chain stitch. The first stitch of the next round is made in the same stitch in which you made the slip stitch. Do not crochet in the chain stitch! Just skip it. Here you can find a very good video tutorial for crocheting in closed rounds: http://www.youtube.com/watch?v=CJgoju_T53E The body is crocheted in two colours: white and blue, starting with white. Don't forget to stuff the body as you progress. Row 1: IN WHITE: Start with a magic circle in which you crochet 6 SC. After you tightened your magic loop, finish off by crocheting a slip stitch in the first SC, followed by a chain stitch. [6 stitches] Row 2: INC around; SIS in first + Ch [12 stitches] Row 4: [SCx2 + INC ] x6; SIS in first + Ch [24 stitches] Row 5: [SCx3 + INC ] x6; SIS in first + Ch [30 stitches] Row 6 - Row 8: SC around [30 stitches] Row 9: In FRONT LOOPS only: SIS around [30 stitches] Row 10: IN BLUE: Crochet in the skipped back loops of the previous round: SC around [30 stitches] Row 11: DEC x 2; SC x9; INC; SC x 2; INC; SC x 9; DEC x 2 [28 stitches] Row 12: DEC, SC x 11; INC x 2; SC x 11; DEC [28 stitches] Row 13: SC around [28 stitches] Row 14: INC x 2; SC x 9; DEC x 3; SC x 9; INC x 2 [29 stitches] Row 15: decrease 5 stitches evenly over this row [24 stitches] Row 16: [SCx2 + DEC] x6 [18 stitches] Row 17: [SC + DEC ]x6 [12 stitches] Row 18: DEC around [6 stitches] Bind off and use the end to close the remaining stitches. Then hide the end inside.
TAIL
Crocheted in spirals [6 stitches] Row 1: Make a magic loop with 6 SC Row 2 - Row 3: SC around [6 stitches] Tie off. The tail does not need filling.
HEAD
Crocheted in spirals. Do not forget to fill as you go! Row 1: Make a magic loop with 6 SC[6 stitches] Row 2: INC around [12 stitches] Row 3: [SC + INC ] x6 [18 stitches] Row 4: [SCx2 + INC ] x6 [24 stitches] Row 5: [SCx5 + INC ] x4 [28 stitches] Row 6: [SCx3 + INC + SCx3 ] x4 [32 stitches] Row 7: [SCx7 + INC ] x4 [36 stitches] Row 8: [ SCx4 + INC + SCx4 ] x4 [40 stitches]
Row 9 - Row 11: SC around [40 stitches]
Row 12: [SCx4 + DEC] x6; SC x 4 [34 stitches] Row 13: SC x 4; [SC + DEC + SCx2 ] x6 [28 stitches] Row 14: [ DEC + SCx2 ] x6; SCx4 [22 stitches] Row 15: SCx4; [SC + DEC] x6 [16 stitches] Row 16: [ DECx2 + SC] x3; SC [10 stitches] Row 17 until end: [ SC + DEC ] around until you have 6 stitches left. Tie off en use the end to close the remaining stitches. The remaining end can then be used to sew the head to the body.
NosE
Crocheted in spirals. Row 1: Magic loop with 6 SC [6 stitches] Row 2: [ INC + SCx2 ] x2 [8 stitches] Row 3 - Row 4: SC around [8 stitches] Tie off. The nose does not need filling.

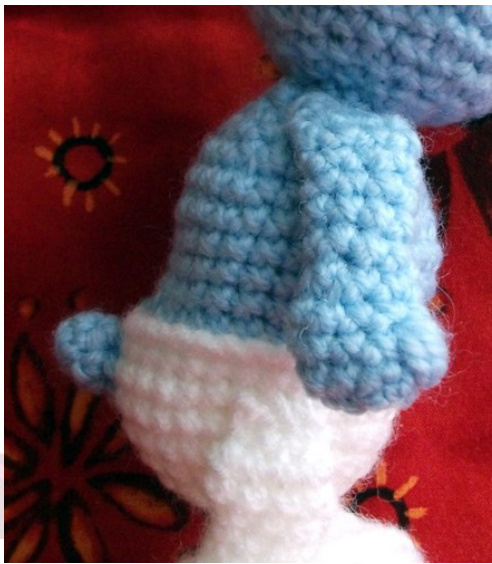
HAT
Crocheted in spirals. Row 1: Magic loop with 4 SC [4 stitches] Row 2: [ INC + SC ] x2 [6 stitches] Row 3: INC around [12 stitches] Row 4: SC around [12 stitches] Row 5: INC; SCx11 [13 stitches] Row 6: SC around [13 stitches] Row 7: INC; SCx12 [14 stitches] Row 8:SC around [14 stitches] Row 9: SCx6; INCx2; SCx6 [16 stitches] Row 10 - Row 11: DECx2; SCx2; INCx4; SCx2; DECx2 [16 stitches] Row 12: extSC x 4; SCx8; extSC x 4 [16 stitches] Row 13: extSC x 4; SCx3; INC x 2; SCx3; extSC x4 [18 stitches] Row 14: SCx6; INCx6; SCx6 [24 stitches] Row 15: extSC x3; INC extSC; [ SCx3 + INC ] x4; extSC x 3; INC extSC [30 stitches] Row 16: extSC x5; INC; SCx18; INC; extSC x5 [32 stitches] Row 17: extSC x3; SCx5; INC; SCx14; INC; SCx5; extSC x3 [34 stitches] Row 18: extSC x4; INC; SCx24; INC; extSC x4[36 stitches] Row 19: [ SCx9 + INC] x4 [40 stitches] Row 20: extSC x10; SCx20; extSC x10 [40 stitches] Row 21: FRONT LOOP only: Crab stitch around
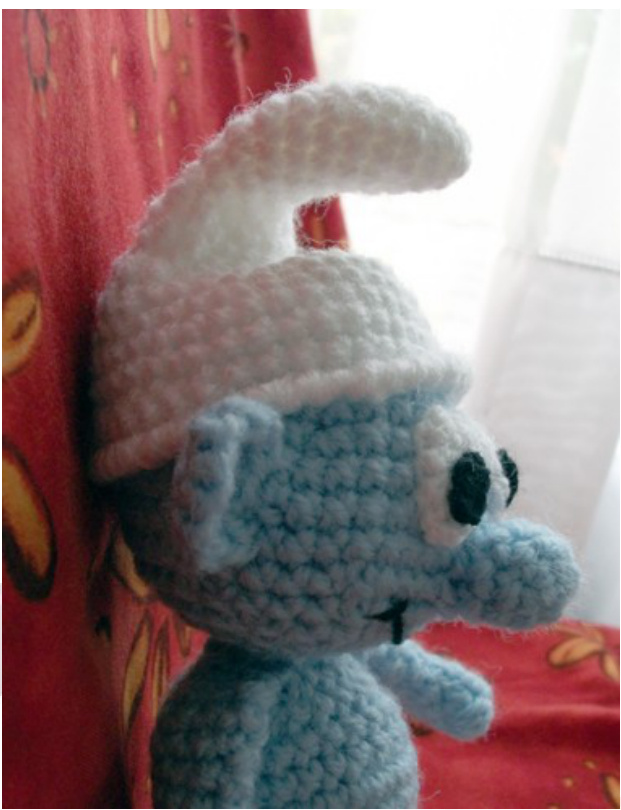
EAR (x2)
Crocheted in spirals Row 1: Magic loop with 8 SC [8 stitches] Row 2: [INC + SCx3 ] x2 [10 stitches]
ARm (x2)
Crocheted in spirals, in an oval around a chain. Start: Ch 5 (4 + 1 to turn) [5 stitches] Row 1: SC in the next 4 chains. Continue at the back of the chain. SC in the next 4 chains. You should have 8 SC now. [8 stitches] Row 2: SC around [8 stitches] Row 3: Bubble stitch; SCx7 [8 stitches] Row 4: [SCx2 + DEC ] x2 [6 stitches] Row 5 - Row 11: SC around [6 stitches]
EYE (x2)
The eyes consist of two parts, the eyewhite and the pupil.
White (x2)
Crocheted in spirals, in an oval around a chain. Start: In WHITE: Ch 4 (3 + 1 for turning) [4 stitches] Row 1: SC in the next 2 chains, 3 SC in the last chain. Continue at the back of the chain. SC in the next chain; 2SC in the last chain. [8 stitches] Row 2: [INC + SC] x4; SLS in first SC [12 stitches]
Pupil (x2)
Row 1: In BLACK: Magic loop with 5 SC. SIS in first SC.
FINISHING
rts together. I advice you to first use pins to pin everything into the right position Attach the legs to the sides of the body, by sewing the flat part of the legs just below the border of the trousers. Sew on the tail, just below the border of the trousers. I sew on the tail underneath the spot where I changed colour. This usually is just below the S-shape of the back. Sew the nose in the middle of the face. Sew the pupils onto the white of the eyes. Then sew the eyes on both sides of the nose, 2 stitches apart. Embroider the mouth beneath the nose. Sew on the hat, with its point on the same side as the nose. To sew on the hat I use the back loops left from the last round, that way the stitches are less visible. Sew on the ears, so they are just above the border of the hat. 一Sew the head onto the body. -Sew the arms to the body. And that's it, your Smurf is finished!
I hope you enjoyed this pattern and I hope the instructions were clear enough! When you finished your Smurf, do drop by my blog to show him off! I'm really curious about the Smurfs made with my pattern.