Top Down Basic Ribbed Beanie
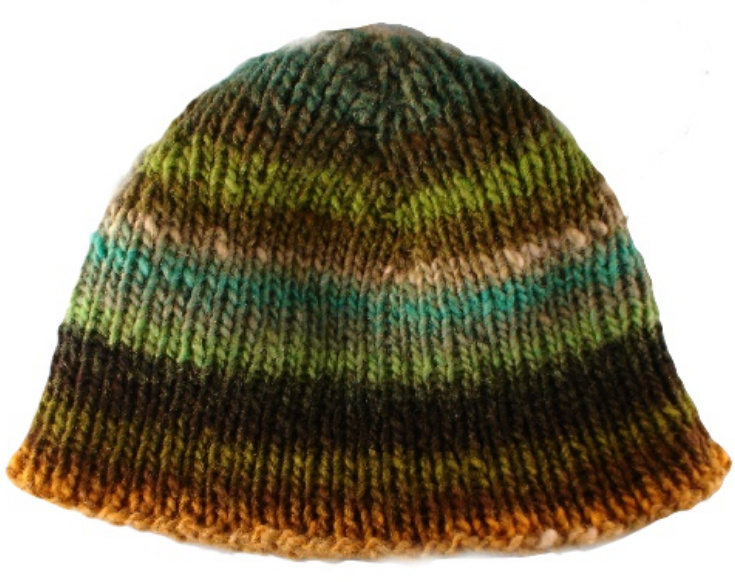
a knitting recipe by M.K. Carroll This is a knitting recipe which you can use with whatever size needles and any yarn you'd like to use to make a custom-fit basic beanie/toque in sizes from preemie baby to thick dreadlocks. The 1x1 ribbing keeps it stretchy, and the increases are planned to form an $\mathbf{\Delta}^{\prime}\mathbf{X}^{\prime}$ at the top of the hat. This recipe assumes that you know the basics of knitting and how to knit in the round. Individuals and small groups may use this pattern to make and sell finished hats. M.K. MATERIALS Knitting needles in an appropriate size for the yarn and effect you desire, 1 set of dpns ${^{*}}_{0\mathrm{{r}^{*}}}$ 2 circular needles ${^{*}}0\mathbf{r}^{*}$ one circular needle, based on your knitting preference. You may also want needle(s) in a size smaller for the sides of the hat for a closer fit. Yardage guidelines: 100 - 200 yds for child sizes, 150 - 300 yds for adult sizes is given as a basic idea, but this can vary wildly with gauge and hat style. I've knit up bulky handspun on size 13 needles and used only 70 yds to make a medium sized adult hat. Yarn of your choice (sample in photo used US $8/5.0$ mm needles and 1 skein/109 yards of Noro Kureyon, colorway 164 for an adult medium). Notions: stitch markers (if using circs), scrap yarn to use as a stitch holder, a tape measure, and a calculator (optional). ABBREVIATIONSANDTERMINOLOGY GLOSSARY ${\bf k}=\mathrm{knit}$ $\mathbf{p}=\mathbf{p}\mathbf{u}\mathbf{r}]$ dpn(s) $=$ double pointed knitting needle(s) $\mathbf{circ}(\mathbf{s})=$ circular knitting needle(s) double increase $=$ increase twice into one stitch. In this recipe, I use (m1, k1, m1) but you may use a different double increase if you prefer. $\mathbf{m}\mathbf{1}=$ make one; increase done by lifting bar between stitches with left needle from back to front and knitting into the front of the lifted bar. You may use a different increase (such as kfb/ knit into front and back of stitch) if you prefer. $\mathbf{st}(\mathbf{s})=$ stitch(es) $\mathbf{pm}=$ place marker $\mathbf{CO=}$ cast on $\mathbf{BO}=$ bind off
$\mathbf{rnd}=$ round
$**=$ repeat instructions given between asterisks until end of round or instructions say otherwise, for example $^{*}\mathbf{k}\mathbf{1},\mathbf{p}\mathbf{1}^{*}$ to end of round $=$ knit one stitch, purl one stitch until the round is completed.
BEFORE YOU GET STARTED
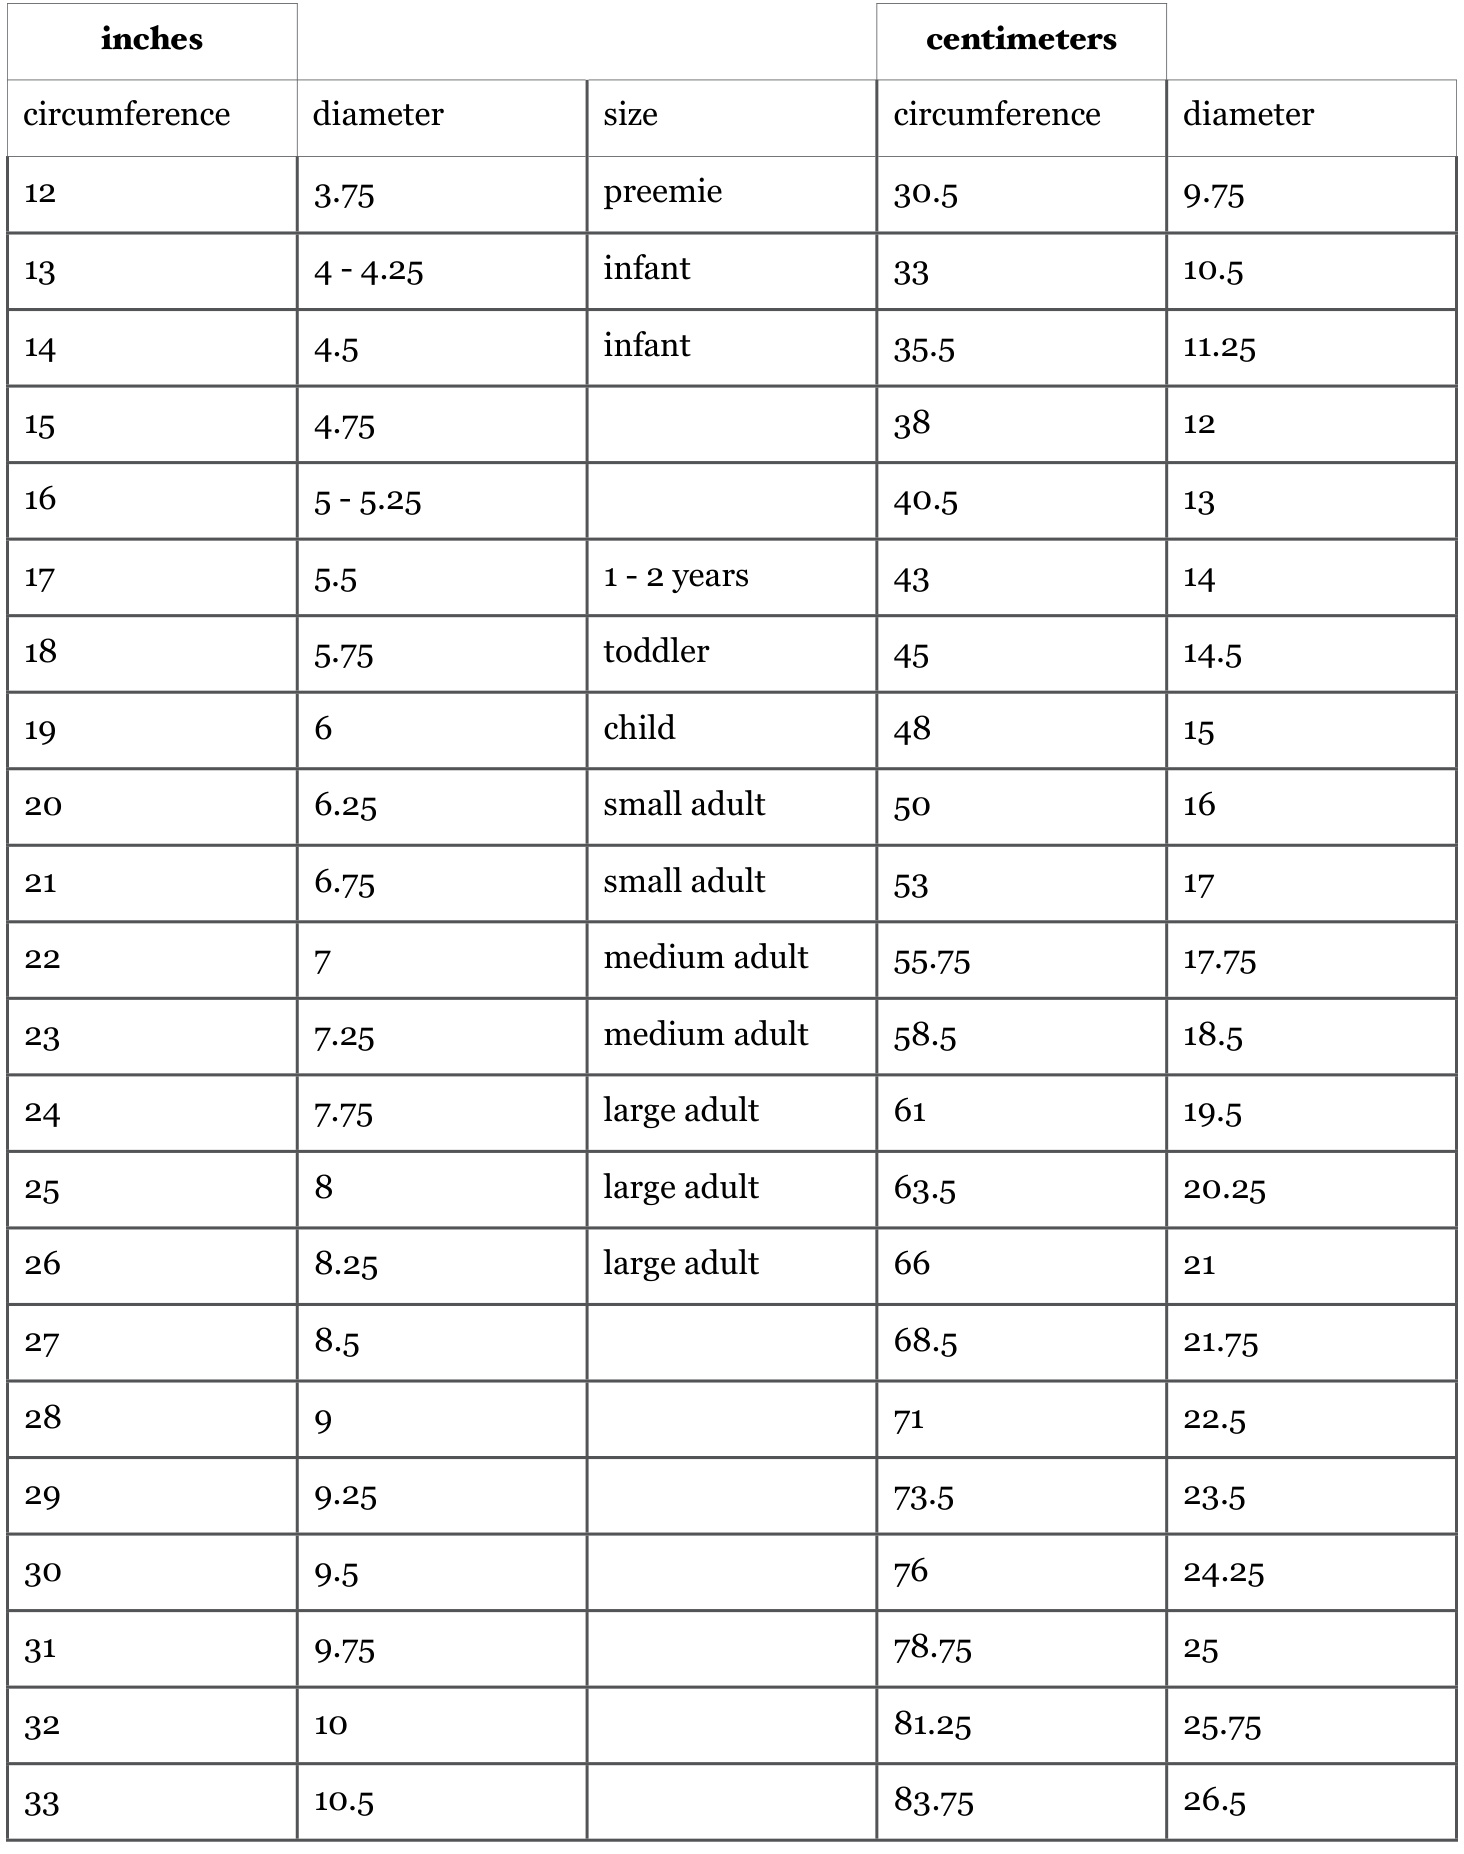
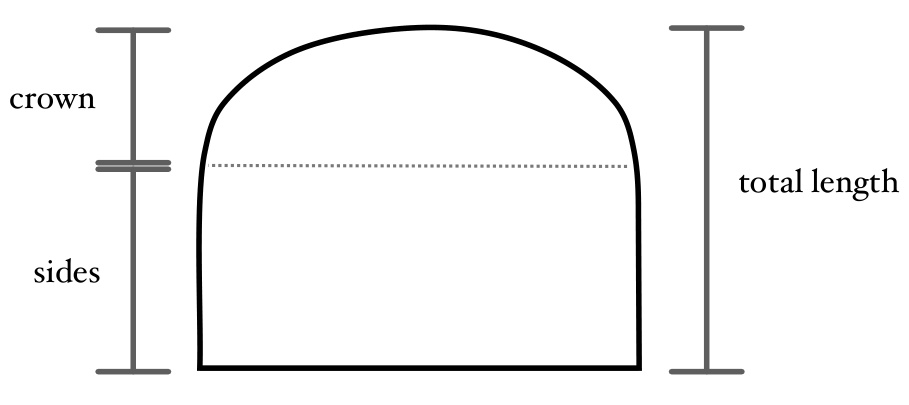
The idea here is to knit a square by using double increases, placed to form straight lines. When the square is big enough, you just knit around and wind up with a circular hat! Use any yarn you like with appropriate sized needles (ex. US 8/5.omm needles with worsted weight/4/medium yarn - or play around with gauge and experiment, like using fine yarn and big needles for a light, lacy effect). You can use a set of 5 dpns, or use stitch markers with one or two circs. The amount of yarn needed will vary based on the yarn, the size of the beanie, and your personal knit gauge and yarn mileage. Estimates for yarn amounts are included but not to be taken as rules you must follow. If you'd like more guidance on what size needles to use with your yarn, yarnstandards.com has a free list of standard yarn weights and recommended knitting needle sizes. You may want to have some flexibility your desired end results - a single round of knitting in a bulky weight on large needles, for example, could expand the diameter by over 1"/4cm which could be the difference between a child-sized hat and an adult-sized hat. If you are willing to have a hat a bit snugger or looser, you'll be fine. Charts with size estimates for circumference and length are included. For a custom fit, try the hat on as you go, threading the live stitches onto scrap yarn. Although you could get started without making a swatch, I recommend knitting one before starting a hat - you could also just stop after knitting a few inches of the beginning of the hat and washing it . Knitting and washing a swatch will give you a feel for the yarn, stitch, and finished product, and is a way to cut down on surprises later on - best to know if you are working with a yarn that will stretch, shrink, relax, change color, etc. before knitting an entire hat. The chart below gives estimated length measurements for a hat brim that will come down to mid-ear. The personal size and preferences of the intended wearer may be significantly different from the suggested length given in the chart.
TOTAL LENGTH ESTIMATES

VARIATIONS
This recipe can be used to knit a hat in a combination of stockinette and ribbing or entirely in stockinette, with a turned-up and sewn hem or a simple bind-off. For stockinette, simply knit all stitches - don't purl. If you'd like a ribbed hem, switch to a 1 x 1, 2 x 2, or $3\,\mathbf{X}\,\mathbf{1}$ ribbing when desired.
CROWN
Every other round is an increase round. CO 8 sts (2 sts on each dpn, 4 sts on each of two circs, or 8 sts on one circ). round 1) [dpns]: knit into the back of each st. [1 circular needle] $^{*}\mathbf{k}2$ (into back of each st), $\mathsf{p m}^{*}$ [2 circular needles] k2, pm, k4, pm, k2. round 2) ${\bf\nabla\ast}{\bf k}{\bf1}$ , dbl inc, $\mathbf{k}$ to end of needle/k to marker\* [8 sts added] round 3) ${\bf\nabla\ast}{\bf k}{\bf1}$ p1\* $^{*}\mathbf{k}\mathbf{1}$ round 4) to last st on needle/k to marker, dbl inc\* [8 sts added] round5) ${\bf\nabla\ast}{\bf k}{\bf1}$ ,D1\* Repeat rounds 2 - 5 until the top will fit the size you want. A rough way to figure this out on circs is to measure across the center (from side to side) and multiply that number by 3 to get the circumference. On dpns, measure 1 side and multiply by 4. For a more exact calcuation, refer to your swatch - measure the number of stitches per inch/cm and determine the number of total stitches needed from that (stitches per inch multiplied by total desired measurement in inches). The chart of circumference and size estimates can be used as a guide - please note that the chart is for actual head measurements. For a snug fit, try at least 1"'/4cm less than the actual measurement of the intended wearers head ('snug' will vary based on the yarn you use and your personal preference). If you want a more exact fit, slip all stitches to a long piece of scrap yarn, placing markers to separate the stitches from each needle, and try it on. To be really sure, wash and dry it before trying it on.
SIDES
Once the crown is the size you want it to b, work $^{*}\mathbf{k}\mathbf{1}$ ?$\mathbf{p1}^{*}$ around until the sides are the length you want (for a fisherman-style toque, for example, knit it long enough so that you can fold the brim up), and bind off. I try to bind off a little loosely or use a single-crochet bind-off; you could use a bind-off specifically for ribbings, like tubular bind-off. You could also knit additional rounds on needles one size smaller for a hem to fold up and whip-stitch into place. NOTE: you may wish to use smaller needles for the last few rounds of the sides to bring the ribbing in for a snugger fit.
personalized fit measurements will vary CIRCUMFERENCE MEASUREMENTS AND SIZE ESTIMATES