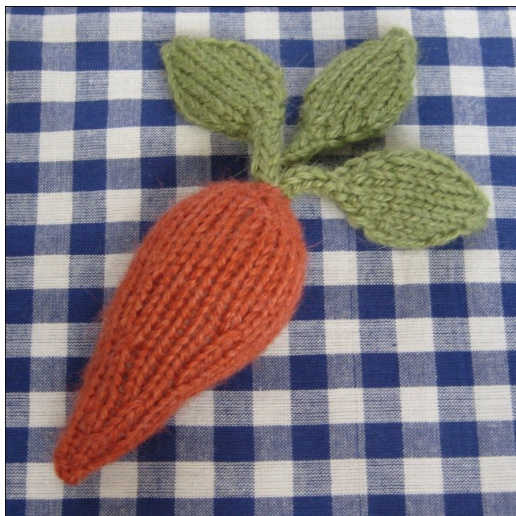
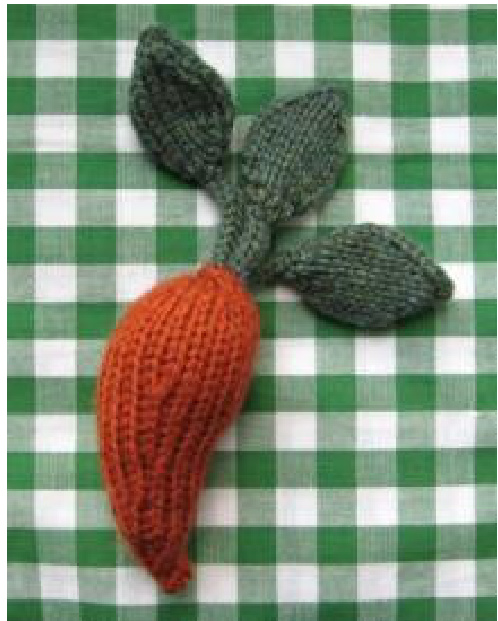
Carrots
fluff and fuzz knitting pattern Design by Amanda Berry
Finished size .
Approximately 14 cm long The finished size will depend on the choice of yarn and needle size.
Wool ...
25g double knit wool (orange) 25g double knit wool (green) This is an approximate amount, but should be sufficient to knit all the pieces and sew your tree together.
Needle size ...
3.25 mm straight needles. Two 3.25mm double pointed needles (DPNs)
Other materials ..
Toy filling/stuffing (approximately 20g). Tapestry needle (to sew the pieces together)
Copyright information ..
Copyright @ 2010 to 2013 Amanda Berry All patterns offered by fluff and fuzz (designed by Amanda Berry) are protected by international copyright laws. Any unauthorised copying will constitute an infringement of copyright. All rights reserved. I have no objection if you wish to sell the finished toys made from this knitting pattern, however, please do credit fluff and fuzz as the pattern designer in your product details/listing information. These patterns are intended for personal use, so you are not authorised to sell the pattern itself. 1 encourage items knitted from my patterns to be sold for charity fundraising purposes Knitting Abbreviations ..
| CO | Cast on |
| K | Knit |
| P | Purl |
| KFB | (lncrease)-Knit twice into the stitch. Knit into the front of the next stitch on the left hand needle, but do not slip off the needle.Then take the right hand needle and knit into the back of the stitch, then remove the loop from the left hand needle. |
| SSK | (Decrease) - Slip the next stitch on the left needle knitwise, then slip the next stitch on the left needle purlwise.Take theleft needle and knit through the front of the two slipped stitches on the right needle. |
| K2TOG | (Decrease) -Knit two stitches together through the front of the loops. |
| K2TOG TBL | (Decrease) -Knit two stitches together through the back of the loops. |
| [..] | Repeat the stitches in square brackets by the number indicated. |
| (...) | Thenumberinroundbracketsindicates the number of stitchesperrow. |
Knitting Needle Size Chart ...
| Metric | n | US |
| 2.75 mm | 12 | 2 |
| 3.0 mm | 11 | |
| 3.25 mm | 10 | 3 |
| 3.5 mm | 4 | |
| 3.75 mm | 9 | 5 |
| 4.0 mm | 8 | 9 |
Tension ...
Tension (or gauge) is not important. However, stitches should be close together so that when the finished toy is stuffed, the stuffing does not come out through gaps in the stitches.
About the patterns ..
If you are making your toys to give to a baby or child, please ensure you have no loose parts (loose threads, etc) which can be potential choking hazards. Please also be cautious about the type of yarn, as fluffy brushed mohair yarns can have small fibres that can be swallowed by children. Please make a note of the washing instructions provided with the chosen wools, fabrics and stuffing.
Making up ...
Use the same yarn used to knit the toys to sew all seams. Use mattress stitch to sew the seams together. Tie any knots on the inside (as these will not be seen when the toy is completed), and bury any loose ends from sewing in the stuffing.
fluff&fuzz
About the author .. My name is Amanda Berry and I love knitting, sewing and anything crafty! I started designing my own toys as fluff and fuzz in 2010, and my knitting and sewing patterns have been featured in Handmade Living, Craftseller, and Let's Get Crafting Magazines. For my free patterns and crafting tutorials, please pop over to my blog at http://fluffandfuzzknitting.wordpress.com/ Knitting patterns ..
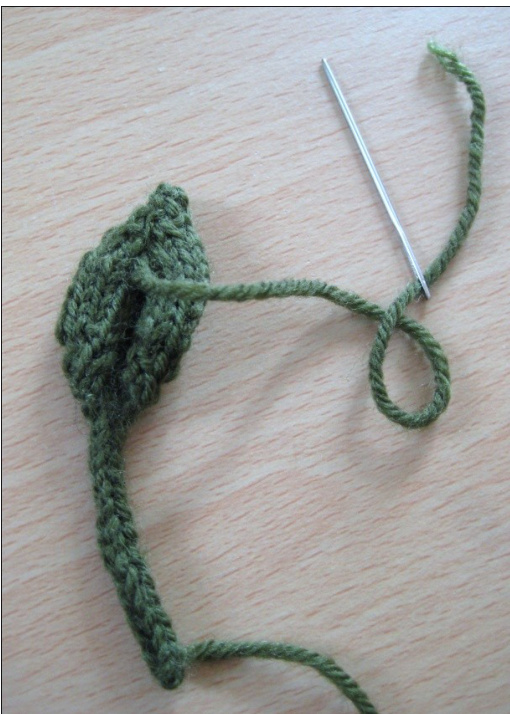
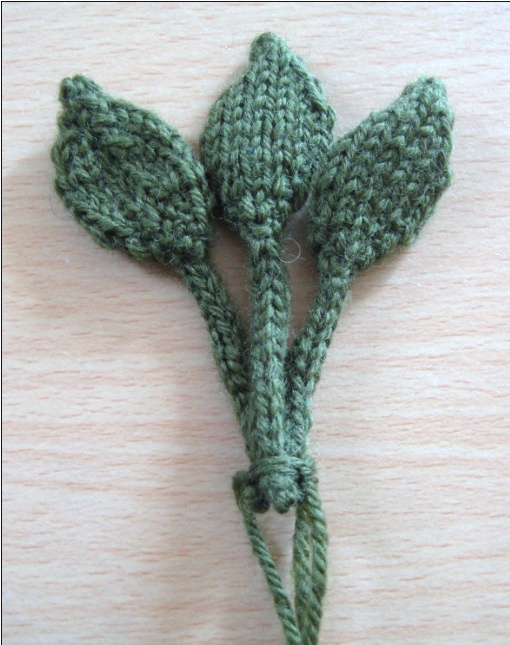
Leaves
Make3 Using double pointed needles, cast on 3 stitches (green). Knit i-cord for the stems for 3cm, but do not cast off. Switch to straight needles, with the right side facing you. You can make the i-cord stalks longer or shorter if you wish. 1. K1, KFB, K1 (4) 2. P 3. [KFB] X 4 (8) 4. P 5. K1, KFB, KFB, K2, KFB, KFB, K1 (12) 6. P 7. K1, KFB, K1, KFB, K4, KFB, K1, KFB, K1 (16) 8. P 9. K 10.P 11. K 12.P 13. K1, K2TOG, K1, SSK, K4, K2TOG, K1, SSK, K1 (12) 14. P 15. K1, K2TOG, SSK, K2, K2TOG, SSK, K1 (8) 16. P 17. [K2TOG] X 3, K2TOG TBL (4) Break the yarn leaving a tail. Thread the yarn through the remaining stitches and pull tight to gather. Secure the thread leaving a tail to sew tho l5fo2m
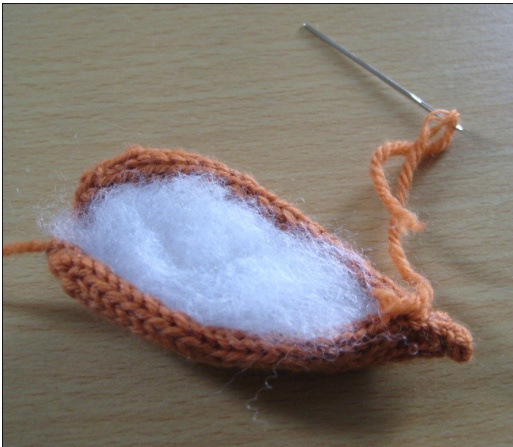
Carrot
Make1 Start at the top of the carrot. CO 10 (orange) 1. P 2. K1, [KFB] X8, K1 (18) 3. P 4. K1, [K2, KFB] X 5, K2 (23) 5. P 6. K 7. P 8. K 9. P 10. K 11. P 12. K 13. P 14. [K3, K2TOG] X4, K3 (19) 15. P 16. K 17. P 18. K 19. P 20. K1, [K2, K2TOG] X4, K2 (15) 21. P 22. K 23.P 24. K1,[K2, K2TOG] X3, K2 (12) 25. P 26. K 27. P 28. K1, [K2TOG] X 5, K1 (7) 29. P 30. K 31. P 32. K1, [K2TOG] X 2, K2TOG TBL (4 33. P Break the yarn leaving a long tail. Thread the yarn through the remaining stitches and pull tight to gather. Secure the thread, leaving a tail to sew the carrot seam.
Making up ...
Leaves
With the cast off tail from each leaf, sew the back of the leaf seam. Start from the tip of the leaf and end at the i-cord stem.
Bundle all the finished leaves together and tie around the base of the stems to hold together. The tied ends will be hiddeninside the finished carrot.
Carrot
With the cast off tail at the pointed end of the carrot, sew the carrot seam. Add stuffing as the seam is sewn (otherwise it will be fiddly to stuff the carrot tip after the seam is finished).
Before finishing the seam, insert the bundle of leaves in the top of the carrot. Finish sewing the carrot seam to the cast on edge.
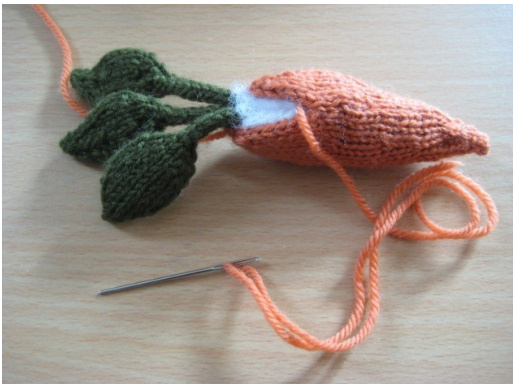
Gather the cast on stitches at the top of the carrot and pull tight, securing the ends of the stems inside the carrot. Secure the thread. Sew back and forth a few times through the main carrot piece and the stems to secure the leaves in place.