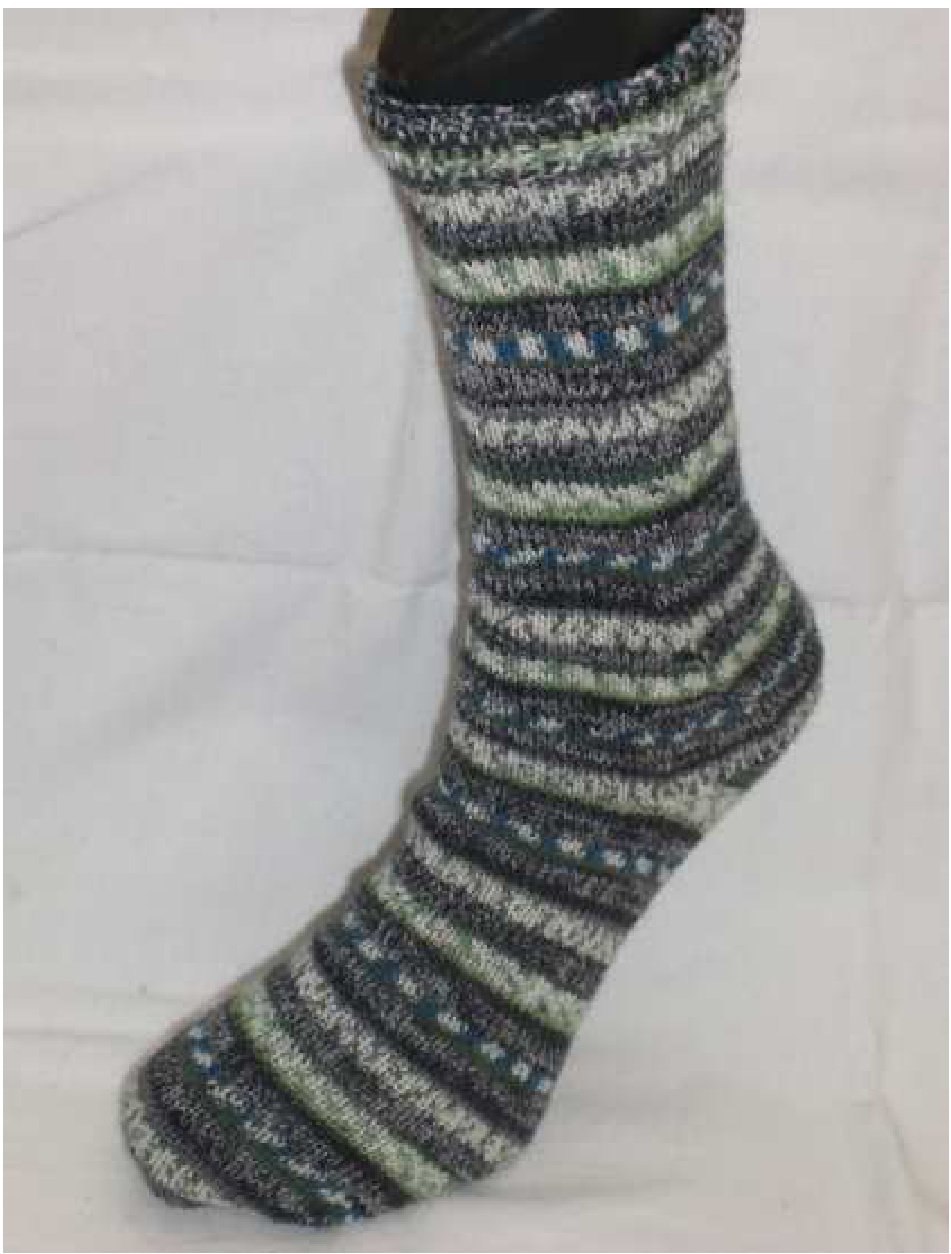
Jane Doe Basic Socks
basis sock instructions with chart two heel variations without picking up stitches
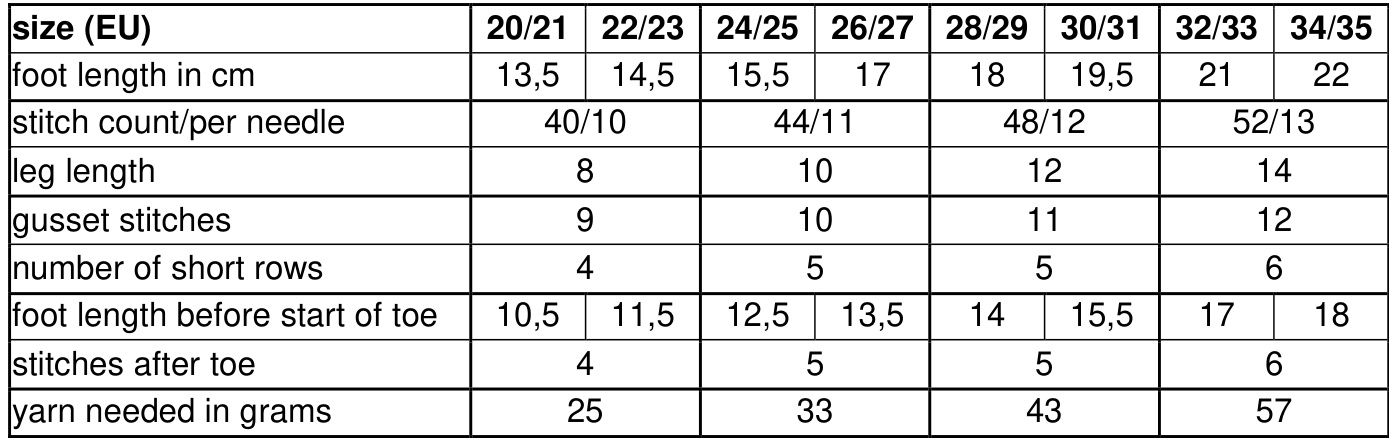
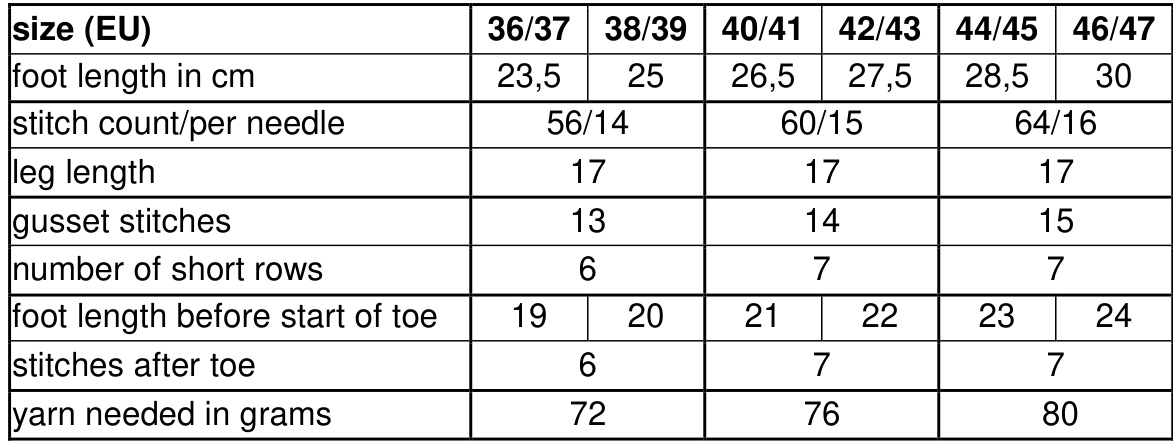
The chart contains foot length, size, different length measurements and stitch counts. Furthermore, it gives you the amount of yarn needed. The heel is worked without picked up stitches. Therefore, the gusset is knitted first, followed by the heel turn and flap. The flap is given in two variations. Variation 1 uses a triangular heel flap, and variation 2 a classic straight one.
material 4ply sock yarn dpns 2.5mm or size suitable to obtain gauge sewing needle (blunt tip)
gauge 32 stitches and 42 rounds $=$ 10cm (round gauge is not crucial)
choosing size
To determine your foot length, put your foot on a sheet of paper and trace around. Measure from heel to toe. Use the chart to choose the size closest to your foot length.
numbering of the needles
For easier instructions, the needles are given numbers from 1 -4. Needle 1 is the needle after the start of a round (which is also center back) - identified by the yarn tail $\circledcirc$ The numbers do not move with the needles, but always stay the same.
abbreviation: "ssk"
This creates a left leaning decrease. Work as follows: slip the next stitch as if to knit,slip another stitch as if to knit. Both stitches get twisted individually and are on the right needle. Now slip the left needle into those two stitches, and pull the working yarn through with the right needle.
casting on
You can use any kind of technique for the cast on. I prefer the “alternating long tail cast on" which is explained in the youtube video “alternating 2 color long tail cast on". Of course you only use one color. The first stitch can be a slip knot, or just lay the yarn over the needle. Then do one cast on stitch like normal, then alternate. Cast on as many stitches as the chart states for your size. For the cast on, only one needle is used (you can hold 2 needles together if your cast on is rather tight). You distribute the stitches onto 4 needles in the first round of the ribbing. Note: If you use self striping yarn and want matching socks, start the first sock where the colors on the yarn change. This way, you can easily identify where to start the second sock!
ribbing
Turn you eede and stat kniting (thelast Cstitchgetsknitted first)uring the first oud, add more needles so that the stitches are evenly distributed onto 4 needles. Youcan knit ap2k2ora1kp1 ribbing lf youused the alternating cast on,doa p1k1 ribbing (starting with a purl stitch). Knit the ribing as long as you like. I prefer to do 10 rounds. lea Knit in stockinete stitch untilthe “leg length" for your size is reached. Note: this measurement includes the ribbing! Of course you can also do a different leg length. Remember that the given yarn amount is only correct if you knit the leg as long as stated in the chart.
gusset
The increases are done at the start of needle 2 and at the end of needle 3. Those gusset stitches are then transferred to needle 1 and 4 before the heel turn. This way you do not need any stitch markers $\circledast$ I like to do the increase as yarn overs, so I can easily see if lam on an increasing round or on a plain round. Note: If you cannot "read" your kniting, place a piece of scrap yarn or a detachable stitch marker at the first increase. You are going to measure the foot length from this point! Increase round needle 1: knit needle 2: yarn over, knit to end needle 3: knit to end, yarn over needle 4: knit plain round knit allstitches; knit the yarn overs through the back loop. Repeat those two rounds until all gusset stitches have been increased. See chart for how many stitches you need for your size.
Variation 1 - triangular heel
heel turn Transfer the gusset stitches from needle 2 to needle 1, and those from needle 3 to needle 4. Work the heel turn in short rows as follows: Row1 Needle1: knit1, ssk, knit1, turn, slip1, purl to end Needle4: purl1, purl2together, puril1, turn, slip1, knit to end Row2 Needle1: knit2, ssk, knit1, turn, slip1, purl to end Needle2: purl2, purl2together, purl1, turn, slip1, knit to end Continue in this manner, always kniting 1 stitch more before the decreases. You do not need to count! Due to the turn, there will be a gap. The stitch before and after that gap will be knitted or purled together. Resume knitting in the round. On the first round, the final gusset stitch is decreased. This way you do not get any holes! final decrease round needle1: knit until 2 stitches remain, ssk needle2 and 3: knit needle4: knit2together, knit to end Continue with the “foot" section.

Variation 2 - classic heel
Transfer the gusset stitches from needle 2 to needle 1, and those from needle 3 to needle 4.
turning the heel
This part is knitted in short rows. You can use any technique for the turning stitches like "wrap and turn". short row 1: needle1: knit to 1 stitch before end of needle, work a turning stitch, turn, purl to end needle4: purl to 1 stitch before end, work a turning stitch, turn, knit to end For each following short row knit or purl 1 stitch less before turning. Although your are actually knitting two rows, I callthem “one row" since this is easier to count for me. Work as many "short rows" as stated in the chart. Then knit one round over all stitches, working the turning stitches due to your used technique.
heel flap
Yes this heel flap sits at the bottom of your foot instead of at the back of the heel. This heel variation is nothing else as a classic heel worked backwards! needle1: knit as many stitches as you have gusset stitches (see chart), ssk, turn, slip1, purl to end needle4: purl as many stitches as you have gusset stitches (see chart), purl2together, turn, slip1, knit to end Repeat until there is only 1 gusset stitch left. Return to knitting in the round. In the first round you are going to decrease the final gusset stitch. Knitted this way, there will be no holes! Ill st IuuIu. needle1: knit until 2 stitches before end, ssk needle 2 and 3: knit needle4: knit2together, knit to end Continue at the “foot" section.
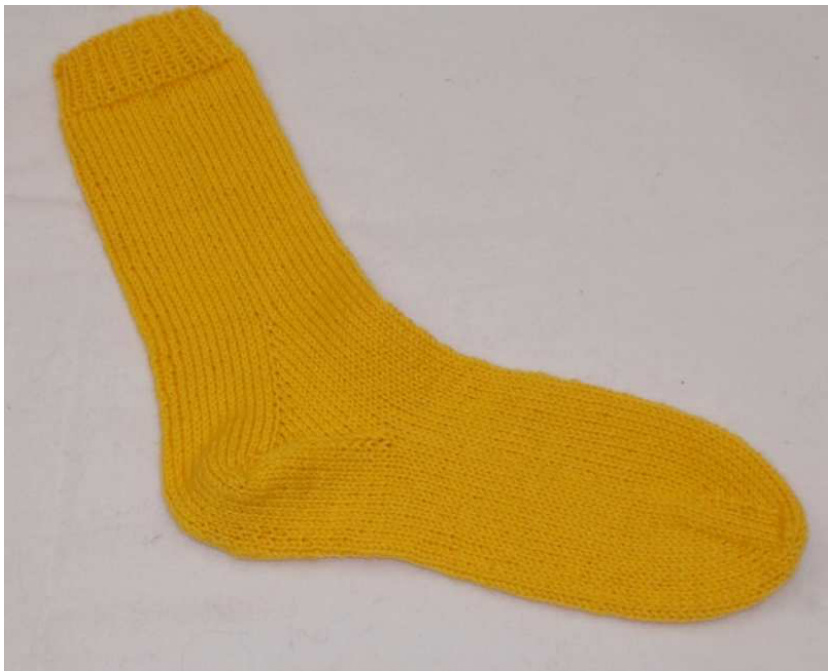
foot Knit in the round until foot length before toe" is reached (see chart). Note: Measure from the first gusset increase! toe Now some stitches are decreased along the side of the sock. My toe variation is for rather "squared" toes. If you have pointier toes, you might want to change this part. You could decrease more stitches while keeping the row count the same. Or you can knit a longer toe part (remember to knit the foot part shorter to keep the total foot length the same). round1 needle1: knit until 3 stitches before end, knit2together, knit1 needle2: knit1, ssk, knit to end needle3: see needle1 needle4: see needle2 round2 knit repeat those two rounds until there are as many stitches left as the chart states at "stitches after toe". finishing the toe Knit the stitches on needle1. Then put althe stitches from needle $\mathsf{I}+4$ onto one needle, and those fromneedle $_{2+3}$ onto another needle. These stitches are now grafted together as follows: Cut the yarn leaving a long tail (about 2 feet) and thread it into a blunt needle. The open toe points upwards and the tail yarn emerges from the right of the sock. Pulltheyarn from theright side through the first stitch of the front needle. Do not slip this stitch of the needle! \*Now work on the back needle. Pull the yarn from the right trough the first stitch and slip it of the needle. Then pulthe yarn from the left through the next stitch. Do not slip of. Now work on the front needle. Pull the yarn from the left through the first stitch and slip it of. Then pull the yarn from the right through the next stitch. Do not slip of. Repeat from \* until there is only one stitch left on each needle. To finish, pull the yarn through the stitch on the back needle and slip of allstitches. Weave in all the yarn ends and knit a second sock.


