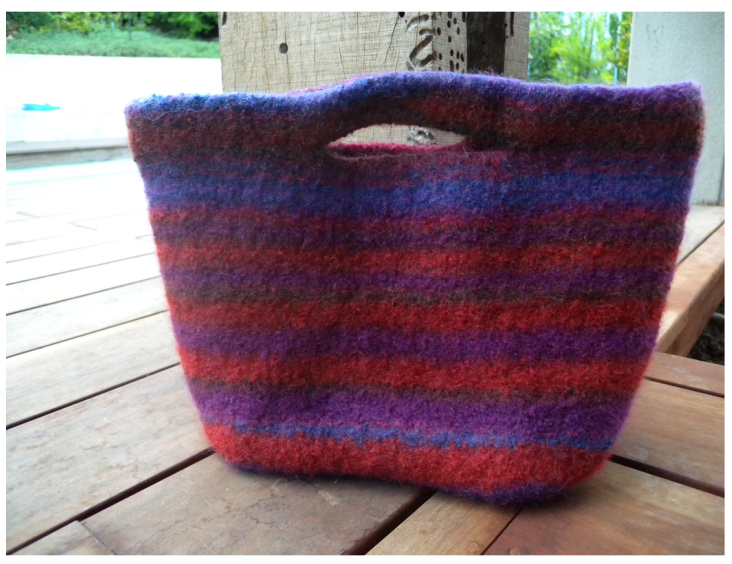
70's Inspired Striped Tote
by Anet Ahern I had been looking for something to do with my bulky stash and when I put the colours together I was reminded of 7o's swirls and stripes...brown and orange curtains...and skinny sweaters with stripes graduating from thin to thick
You need
In Bulky pure wool (12 ply, 7wpi) that is suitable for felting: 4 skeins variegated and 2 skeins each in an accent colour that works with the variegated yarn I used Merino Wool Brights and Merino Wool Solids (Kei, Cherry Red and Purple), unfortunately discontinued Approx. 7om (77yds) per 50g, so you will need about 500- 600m 5 stitch markers 10mm 20" circular needle (size 15) - you could get away with a smaller needle, down to 8mm Third needle for casting off Washing machine for felting Darning Needle for neatening up Gauge Not terribly important, but about 12 sts and 14 rows for a 4" square Abbreviations C/O- cast on sts.- stitches k-knit pm- place marker k2tog-. knit 2 stitches together ssk-slip two stitches as if to knit, slip then back onto the left needle, and knit them tog. through back loops.
Instructions
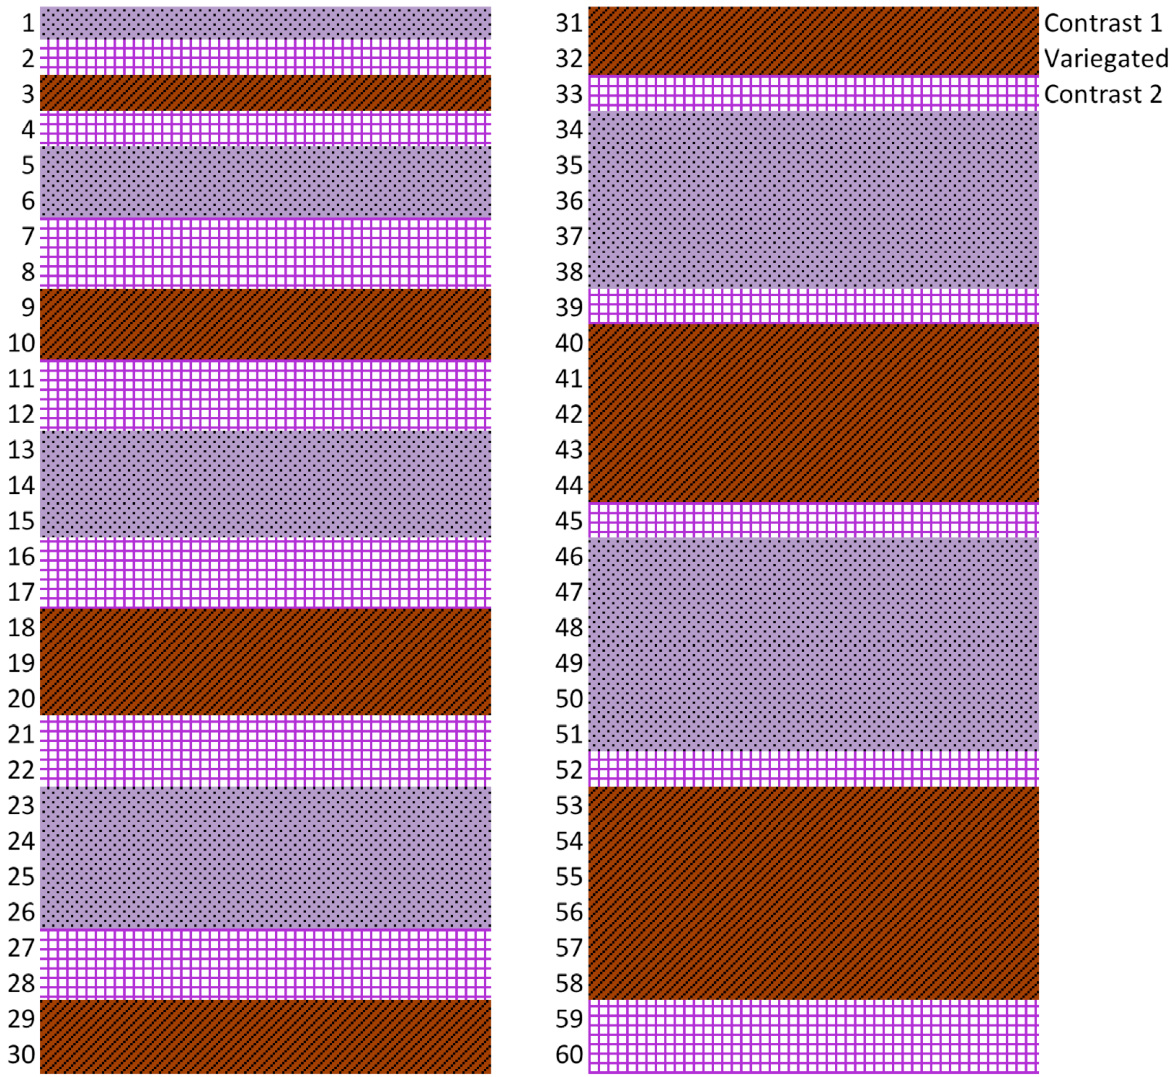
C/O 120 sts. with Variegated Yarn. Place marker, join and knit in stockinette stitch for 2.5". Place stitch markers on last round: k 12, pm, k 36, pm, k 24, pm, k 36, pm, 12. These markers define the corners of the bag. If they bother you, you can just leave the end-of-round marker and add these once you have the length of the bag done.
Shaping the handles
On the next row, k 17, cast off 26, k 34, C/O 26, k 17. Next row, knit around, casting 26 sts. back on where you cast them off in the previous row. Knit 5 rows. Start following the colour chart. Work to a total of about 24" from top of bag, then begin decreasing for bottom.
Shaping the bottom
Use whatever wool you have left, making the bottom one colour or randomly striped. You'll be decreasing before and after each of the 4 corner markers ignoring beginning of row marker) to create a flat bottom on the bag. So place those markers if you have not done so yet. Next row: knit to 2 stitches before marker, k2tog, slip marker, sk, continuing to decrease around in this method. Continue decreasing every row until the short sides of bag have 2 stitches each. Next row: Knit the stitch before and after the markers together, removing marker, ending at beginning of row marker. Position stitches on two needles with equal amount on each needle, with the tips of your needles where the beginning of the row was. Turn bag inside-out, do three needle bind off and weave in all ends. http://www.youtube.com/watch?v=ZpGz8Q-LAKs NB do not bind off too tightly, as you will have puckering on the base of the bag.
Felting
Be sure to sew in loose ends before you felt. Throw your finished bag and an old towel or two in a washing machine on 4o degrees C (check the label of your wool to be sure). Use short cycles to make sure you have the option of stopping! Use a little soap. Keep an eye on things and felt the bag until it's the size you want. Mine took two cycles. The bag above is about 13" wide by 1o" high when laid flat. You could achieve a larger size by washing it once only, and you can stretch it a little while wet. Air-dry it, blocking it slightly to define the corners. An adaptation with many alterations...from Fulled Lopi Tote, by Adrian Bizilia which I found too small NB this only starts once you have done 5 rows after the handles. Measure as you go along and try to stop at the end of a stripe to get the best effect. It is easy to make it longer or shorter to suit. Enjoy, and add a lining or a fastener if you want!