Viking Boat Knit-and-Felt Bag by Sue Parker of Sheepfold
This bag is knitted loosely, in two pieces, then felted in your washing machine. During the felting process the bag will shrink considerably and become much sturdier. Any embellishments must be added affer this felting stage. The bag is fastened with two magnetic clasps attached to the inside. The exact size of your finished bag will depend on wool and felting temperatures used, but an indication is given below. The photographed example is made using Manx Loaghtan wool, available from Sheepfold's online shop: http://www.sheepfold.co.uk/online-shop/natural-wools-type/rapidcart-32/index.html
You will need:
Approx 200-250g aran weight pure wool (not machine washable or superwash varieties) 10 buttons, for decoration 2 magnetic clasps 10-12 cm of 25 mm (1 inch) wide crossgrain ribbon small piece of iron-on tape or interfacing 1 pair of 5.5 mm straight needles 5.5 mm circular needle (or 4 double ended needles) 1 pair of 4.5 mm double ended needles 4 stitch markers 4 safety pins or stitch holders Wool needle to graft handles to bag
Approx finished size:
Beforefelting: width 40 cm, height at centre 32 cm, depth 14 cm Affer felting: width 27 cm, height at centre 19 cm, depth 9 cm
Instructions:
Body of bag:
Using the 5.5 mm straight needles and the aran wool, cast on 50 st. Knit 36 rows (garter stitch) to form the base of the bag. Change to the circular needle, knit 1 row, pick up and knit 26 st from the side edge, 50 st along the cast on edge and 26 st along the second side edge, placing markers at each of the corners. There will be 152 st on your circular needle. Working in the round, knit until the work measures 30 cm from the base (approx 60 rounds) ending at the start of a long side, slipping the stitch markers across to the working needle each time they are reached.
Upper edge:
\*From the start of a long side knit 14 st. Turn your work and purl 27 st. Turn and knit 26 st. Turn, slip 1 st purlwise then purl 25 st. Turn and knit 24 st. Turn, slip 1 st purlwise then purl 23 st. Continue shaping in this way until you have just 4 st remaining in the shortened row. Knit across the next 59 st, to the start of the opposite short side. Knit 13 st and turn. Turn and purl 27 st. Turn, slip 1 st and knit 26 st. Turn, and purl 25 st. Turn, slip 1 st and knit 24 st. Turn and purl 23 st. Continue shaping in this way until you have completed the row: slip 1 st, knit 4 st. Turn and knit 3 rows across the whole curved edge. Knit 5 st and place these stitches on a stitch holder or safety pin. Cast off 66 st and knit to end (5 st on needle). Place these 5 st on a second stitch holder or safety pin. Break off yarn.\*\* With right side facing, rejoin yarn to the opposite side and knit to the marker at the start of the second long side. Work \* to \*\* to shape top edge.
Handles:
Transfer the 5 st from one safety pin to a double ended needle and work in l-cord on these for 50 cm (knit, do not turn work and slide stitches to opposite end of needle. Repeat until you reach the desired length). Graft these stitches to the remaining 5 st on the same long side of the bag. Repeat for the handle on the other side of the bag. Finishing: Finish off all ends of yarn by weaving into the work, along the cords where possible, before felting.
Felting:
Felt your bag in the washing machine by placing it in a zippered mesh bag or pilowcase in your machine, with a couple of towels or pairs of jeans to give the necessary agitation. Add a small amount of washing powder, but no fabric conditioner. I used 2 washes on a 60° cycle with the time saving option and 500 spin cycle. A low level spin, if available, reduces the risk of crumpling your bag. When felted to the desired level, remove from your washing machine and place a plastic bag inside your felt bag. Stuff the plastic bag with crumpled newspaper to give a good shape and leave somewhere warm to dry out completely. This may take several days!
Attaching clasps:
Cut two pieces of crossgrain ribbon, approx 5-6 cm (2 inches) long. Cut two pieces of iron-on tape or interfacing slightly smaller than the crossrain ribbon. Place one piece of iron-on tape or interfacing centrally over one piece of crossgrain ribbon, with the coated side in contact with the ribbon. Press with a moderately hot iron. Placing the circular backing of the clasp centrally over the tape, mark the position of the two slits and cut the ribbon to produce slits. With the ribbon side facing, feed the two prongs on the magnetic clasp through the slits, cover with the circular backing and fold the prongs towards the centre of the backing plate. Repeat with the other pieces of ribbon and iron-on tape or interfacing, and the 3 other sections of the magnetic clasps. For each clasp the two sections should be facing out from the ribbon and the prongs and circular backing on the side with the iron-on tape. Sew one piece of the reinforced ribbon, with the magnetic clasp attached, inside at the top left hand side of one side of the bag, turning in the ends of the ribbon, for neatness. Sew the second piece, aligning the two sections of the magnetic clasp, to the opposite side. Repeat with the second clasp at the other side.
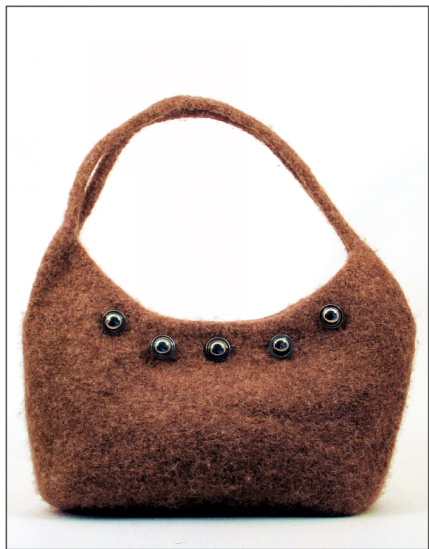
Decoration:
Arrange the buttons on the front and back of your bag and sew in place.


