Frankie's Knitted Stuff

This is the first of five linked patterns for a Springtime Wreath. Covering the wreath and knitting the leaves are explained in this pattern; the other four patterns are for flowers and creatures to nestle amongst the leaves.
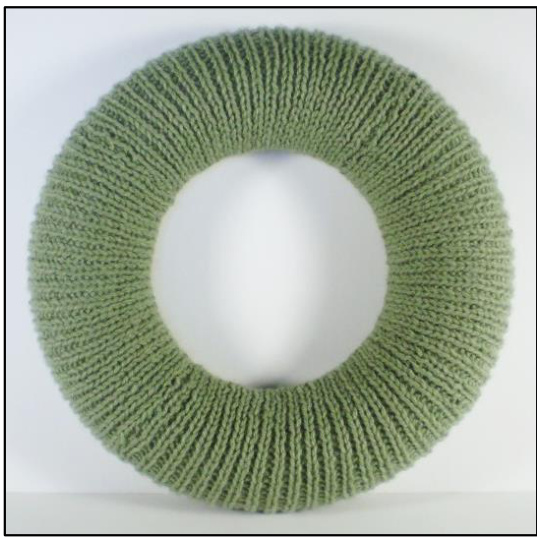
Covering the Wreath
The wreath I chose is made of polystyrene, with a flat back. It measures 25 cm / 93%" across and the inside is 14 cm / 51/2" wide. The circumference is 16 cm / 614". The instructions below are for covering this size of wreath but could easily be adapted for different wreaths. The cover is knitted flat in sections and then sewn together on the wreath. This is less boring than knitting one huge cover and it makes sure that it will fit. I used Sirdar Snuggly DK (165 m / 50g) in Olive (shade 442) and 4mm / US 6 size needles. You will need about 50g of yarn; the cover could also be knitted with leftover yarn in different shades of green as most of it will be hidden by the leaves and other things. I knitted to a tension of about 16 stitches and 16 rows to 5cm / 2"2, working in K1, P1 rib but the tension is not crucial as long as you knit something that will fit your wreath. Working in rib allows the knitting to stretch over the wider parts. Using the long tail method cast on 40 stitches. Work 45 rows in K1, P1 rib. Cast off in rib, leaving a long tail. Wrap the knitted strip round the wreath and sew the cast on and cast off edges together. You can hide this join on the back of the Wreath. Work three more strips in the same way, sewing each on to the wreath as you go. Use mattress stitch to join the strips, matching up the seams on the back of the wreath. It might not look as though four strips will be enough but the knitting will stretch quite a lot. If you don't want to knit the cover in strips, knit 45 rows of K1, P1, rib on 160 stitches. If your wreath is a different size to mine, measure the circumference and knit the first section to fit. It can be tried on the wreath as you go. Then just keep adding strips until you have covered the wreath.
The next thing to do is to knit enough leaves to cover the wreath. This is the most time consuming part of the whole project but the leaves give a good backdrop for the other decorations so you need lots of them. The leaves are knitted with double knitting weight yarn; you can use one yarn or oddments of lots of shades of green as each leaf is knitted separately. I used Sirdar Snuggly DK (165 m / 50g) in two shades of green, Olive (442) and Summer Lime (260). Using 50g of each shade I made two garlands, each with 40 leaves.
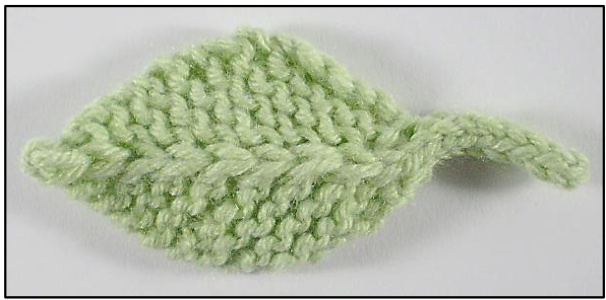
The leaves are knitted on 3.75mm / US size 5 double pointed needles, or you can use whatever size needles suits your yarn. The stems of the leaves are worked in I cord while the actual leaves are knitted back and forth. Each leaf is about 5 cm / 2" tall, excluding the stem. Using the long tail method cast on three stitches. Work eight rows in I cord. Now slide the stitches to the end of the needles, as if you were going to carry on in I cord, and, using the cable method, cast on six more stitches. All slipped stitches should be slipped purlwise with the yarn in front. Row 1: Knit (9 sts). Row 2: Cast on 6 sts, K6, P1, sl 1, P1, K6 (15 sts). Row 3: Kf&b, K5, S2KP2, K6 (14 sts). Row 4: Kf&b, K5, sl 1, K7 (15 sts). Row 5: K6, S2KP2, K6 (13 sts). Row 6: K6, sl 1, K6. Row 7: Kf&b, K4, S2KP2, K5 (12 sts). Row 8: Kf&b, K4, sl 1, K6 (13 sts). And now it gets simpler. Row 9: K5, S2KP2, K5 (11 sts). Row 10: K5, sl 1, K5. Row 11: K4, S2KP2, K4 (9 sts). Row 12: K4, sl 1, K4. Row 13: K3, S2KP2, K3 (7 sts). Row 14: K3, sl 1, K3. Row 15: K2, S2KP2, K2 (5 sts). Row 16: K2, sl 1, K2. Row 17: K1, S2KP2, K1 (3 sts). Row 18: Kl, sl 1, K1. It looks complicated but the pattern is obvious when you knit it and doesn't take long to learn by heart. When you have three stitches left, work one more S2KP2 and fasten off. Darn the end in down the vein on the underneath of the leaf but leave the cast on tail for joining the leaves.
Joining the Leaves.
The leaves will be joined together into one long garland. I recommend adding each leaf to the garland as soon as you've finished knitting it; a pile of 80 leaves waiting to be sewn together is not a happy sight.
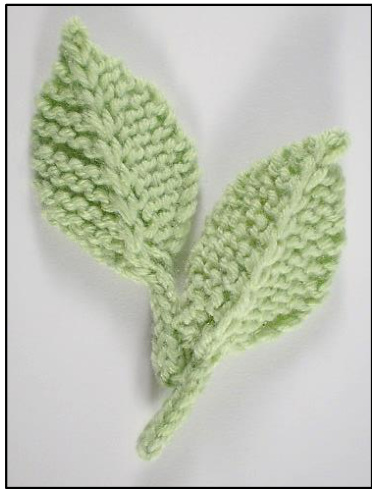
Use the cast on tail to sew the stem of the new leaf to the side of the previous leaf. Sew it to the top of the first leaf's stem and finish before you get to the top of the stem on the new leaf (you may need to read this sentence a few times).
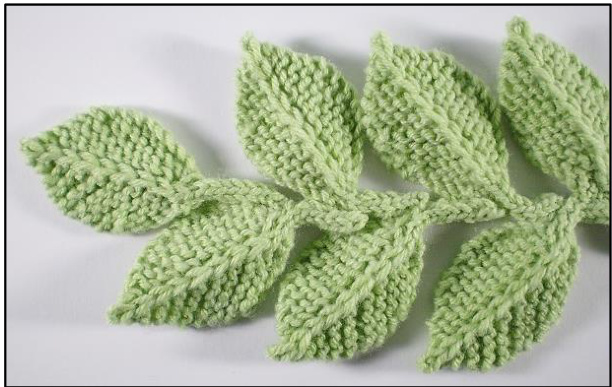
Add the leaves to the garland as you make them, sewing them alternately to the left and right sides of the previous leaf.
Sewing the Leaves on to the Wreath
Lay the wreath on a flat surface and arrange the two garlands round it. Work in zigzags, leaving the back of the wreath bare. Adjust the garlands to get an even coverage and then pin them in place. If you use pins with coloured heads to attach all the decorations before sewing, they won't be so easy to lose. Now sew the garlands to the wreath. Work along the stems in running stitch, taking the pins out as you go.
Abbreviations
st /sts stitch / stitches K knit P purl sl1 slip one stitch (in this pattern slip stitches purlwise with the yarn in front) kf&b knit into the front and back of the stitch S2KP2 slip two stitches as if to knit them together, knit one stitch and pass slipped stitches over (two stitches decreased) I cord: Knit every row but don't turn the work at the end of rows, just pull the yarn round from behind the stitches and carry on. Frankie Brown, 2014. My patterns are for personal use only and should not be used to knit items for sale. Please do not use them for teaching purposes without my permission.


