YIADOLINLDWITUL "AROUND WITH AURI"
A Felted Bag Designed By Priscilla WhiteTocker
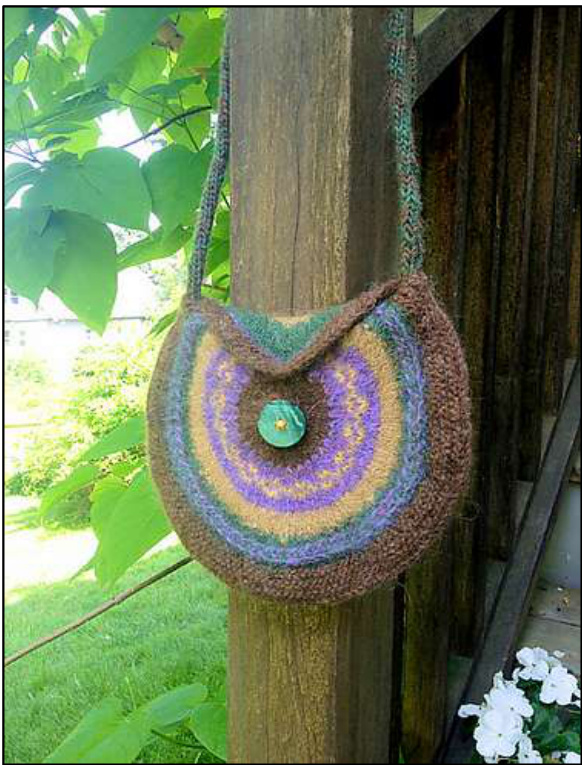
My great niece Auri (the daughter of my niece Sarah who inspired my Sarah Bishop shawl, and the granddaughter of my sister Pamela of my Pamela's Cottage shawl) was born just as the first hints of Spring began to brighten and warm our chilly New England winter. With her light blonde hair and fair complexion, Auri reminds me of the sun and Springtime, full of growth and energy! When I saw Auri recently during a family celebration, she was running around and around in circles chasing gleefully after her siblings and cousins. Thus she is the inspiration for this little round bag pattern, knit in the colors of early Spring and just the right size for carrying a little girl's most treasured objects. It's also the perfect bag to use for tossing in your wallet, keys and phone as you head out for an errand or casual outing. The entire bag uses only 3 simple stitches, but incorporates some interesting techniques, including felting and the creation of the Baltic braid with two colors. It is finished with a three needle bind-off that joins the two sides of the bag, and the handle is a knitted i-cord using two different colored strands held together. I describe these techniques in the instructions that follow, and there are videos demonstrating the three needle bind-off and the i-cord on www.knittinghelp.com. The bag in the photo was knit to have a 9 1/2" diameter before felting and an 8 %" diameter after felting. It is made with 5 different colorways of Istex Lett-Lopi that I purchased on a trip to Iceland, and I felted it to produce a thickened fabric with a considerable "halo" and a bit of stitch definition. This bag can be a great stash basher since you are using less than 50 yards of most of the colors, but it is important to use a type of yarn that felts well and to use the same type of yarn for all of your colors. Some other yarns recommended for felting are Cascade 220, Knit Picks Wool of the Andes, Paton's Classic Merino, and Brown Sheep Lamb's Pride. You may want to do some experimenting with some different swatches and compare the felting results. You can also vary the size of your bag according to how much you felt and the yarn weight and needle size you choose.
INSTRUCTIONS FOR KNITTING
Suggested Materials:
Yarn: Istex Lett-Lopi (Aran 10 ply 100%wool, 109 yds. /50 grams per skein). One skein each of Colorways 53 Acorn Heather (COLOR A), 1413 Lys Lilla (COLOR B), 1411 Yellow (COLOR C), 1400 Camel (COLOR D), and 9422 Sage Green Heather (COLOR E) Needles: One set of Size 6 double-pointed needles (DPN'S) , and two Size 6 circular needles which can be between 16" and 24": Two size 3 DPN"s (to create the I - cord handle) or size needed to obtain desired gauge. Gauge of the bag shown in the photo is 5 stitches per inch prior to felting Tapestry needle for weaving in ends Stitch marker to mark the beginning of the round Sewing needle and thread to match your Color A Set of Snaps for closing the bag - size and color your choice Decorative Button (s) - Size, color and type your choice Pillow case with zipper to use for felting
Abbreviations:
K=Knit P =Purl Kfb = Knit front and back (an increase stitch) - knit a stitch but leave it on the left needle, and then knit into the back loop of this same stitch so that you now have two stitches to slide onto your right needle.
Back of Bag:
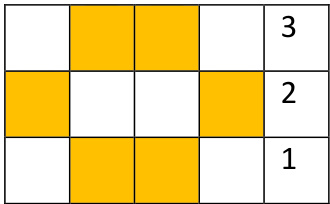
- With Color A, cast 8 stitches onto one of your Size 6 DPN's and knit one row. - For the next row, Kfb in each stitch (16 stitches). At this point, divide these stitches onto 3 DPN's and join in the round, being careful not to twist, and place a stitch marker at the beginning of the round (You will have a small opening in the center of the round, which you can sew together later.) - K the next 3 rounds. - Kfb in each stitch of the round (32 stitches). - K the next 4 rounds. - Switch to Color B and Kfb in each stitch of the round (64 stitches). - Knit 2 rounds. Join Color C and use the following chart for the next 3 rounds (marked as 1-3 on the chart). Color C is indicated by the yellow squares and Color B by the white squares. Read each row of the chart from right to left and start in the lower right hand corner. Repeat the chart design for each round 16 times to complete the round.
- After completing the 3 rounds of the chart, break off Color C and K 2 more rounds in Color B only. - \*K 1, Kfb\* for the next round (96 stitches). - Switch to Color D and K 5 rounds. - Switch to Color E and \*K2, Kfb\* for the next round (128 stitches). Once you have this many stitches, you will likely want to change to one of your circular needles. - K the next 5 rows - Switch to Color B and \*K3, Kfb\* around the row (160 stitches) - Switch back to Color A and do 4 rounds of garter stitch edging as follows: Rounds 1 and 3 -K Rounds 2 and 4 - P - For the next round you will loosely bind off the first 40 stitches. K to the end of the round (120 stitches). - K 2 more rows (you will now be knitting back and forth). Leave your work on the circular needle while you work on the front of the bag.
Front of Bag
- The front of the bag is knit following the identical steps as the back of the bag until you come to the round where you switch to Color E. You will then work as follows - Switch to Color E and \*K2, Kfb\* for the next round (128 stitches) Switch over to your second circular needle. -K 1 round. You will now work the next 3 rounds to create a Baltic Braid as follow - Join Color B. \*K1 Color B, K1 Color E\* to the end of the Round. - For the next round, bring both colors around to the front to prepare to P. You will \*P1 Color B, P1 Color E\* to the end of the round, making sure that each time you purl with the new color you carry it UNDERNEATH the previous color to create the bottom half of the braid. This will cause your 2 strands of yarn to become twisted, but don't worry because they will magically untwist when you work the next round! - Now you will \*P1 Color B, P1 Color E\* to the end of the round, making sure that each time you purl with the new color you carry it ABOVE the previous color to create the top half of the braid. By the time you complete the round, your yarn should be untwisted. - K 2 rows in Color B. NOTE: You likely notice a visible “jog" in your Baltic Braid pattern at the point where you start the new round; however this jog will be concealed when the bag is assembled and finished. - Switch to Color A and \*K3, Kfb\* around the row (160 stitches) - From here on you follow the same instructions to complete the front of the bag that you used for the back. You will end up with each side on a circular needle with 120 live stitches on each. Weave in all of your loose ends onto the wrong sides.
Joining the Front and Back of the Bag
Place the wrong sides of the two halves together so that the bound off edges are lined up and the circular needles with your live stitches are beside each other. Hold the two circular needles together in your left hand, and use one of your DPN's to do a 3 needle bind-off as follows: 1. Insert your DPN into the first stitches on the circular needles as if to knit. Knit these two stitches together and slide them off the circular needles so that you now have one stitch on your DPN. 2. Knit the next two stitches on the circular needles together in the same way so that you will have two stitches on your DPN. Now use the end of one of the circular needles to slide the first stitch on the DPN up and over the stitch you just knit, and off the DPN. 3. Repeat Step 2 until you have bound off all of the stitches. The front and back halves should now be attached with an opening at the top. Break off your yarn, bring it through the last stitch on your DPN and weave in the end on the wrong side. You may want to steam block the bag with a hovering iron that does not directly touch the fabric, to flatten it a bit before you felt.
Felting
- Place the bag into a zippered pillow case and put it into your washing machine to wash with a pair of jeans or some other heavier items. If you have a top loading washer, check the bag every few minutes to see if it is felting and remove it when it is felted enough into a thicker, firmer fabric. (1 have a front load washer, and so I first put it into the machine and used the Quick cycle. When that really didn't seem to do much, I put it through again using the NORMAL cycle and ended up doing this twice. Your ownresultsmayvary). - Once you have completed your felting, lay the bag flat and place a flat heavy object on top of it for several hours to smooth out any rippling or puckering that you still have after felting.
Finishing
- Once the bag is dry, lay it flat with the front of the bag facing you. Fold the top edge of the front of the bag to the inside, to form a straight edge between the two joined sides. (Notice that when you fold this way, the jog of the Baltic Braid is no longer visible from the outside.) Using your sewing needle and thread, sew one half of a snap onto the front of the bag (see photo below). Draw your thread allthe way through the two layers of fabric in order to secure the folded edge on the inside as you sew on the snap. You may also decide to sew the entire folded edge to the inside of the bag, although it isn't necessary, and since the fabric is thick you can do so without the thread showing on the right side of the bag
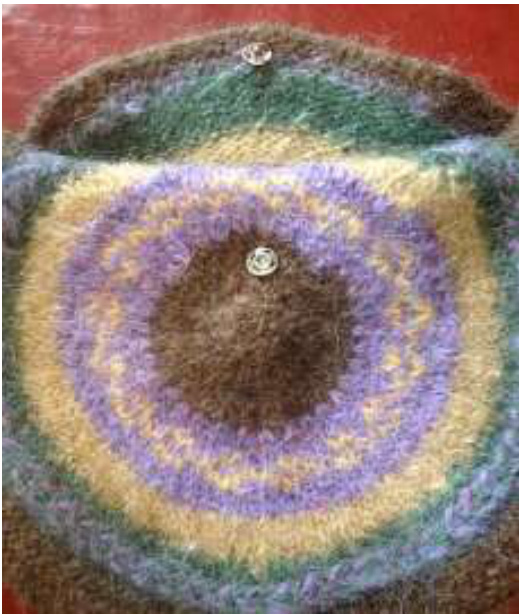
- Sew the other half of the snap on the inside of what will become the top flap of the bag (see photo). Close the flap and snap in place. - Choose a button to sew onto the center circle of the bag front, using thread or choosing one of your yarn colors. If you like, you can also sew a button on the back of the bag in the same place.
Strap for the Bag:
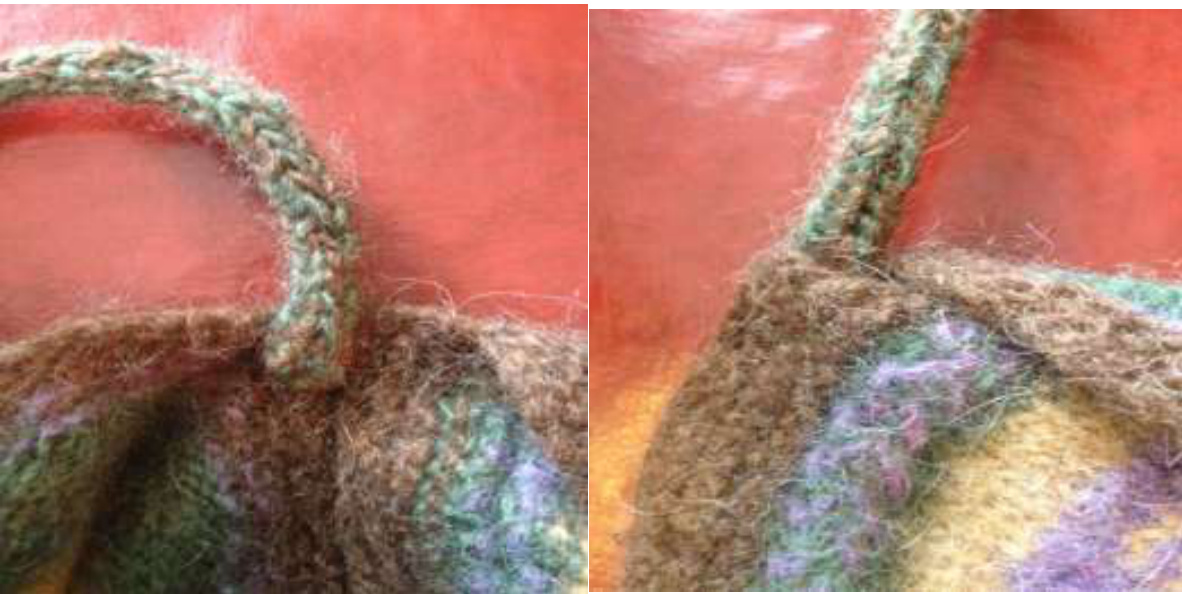
You will knit an i-cord strap to whatever length you choose. The strap I knit for the bag in the photo is 23 inches (22 inches after being sewn onto the bag). - To knit the i-cord, you will use two different colored strands of yarn and hold them together as one strand. I used Color A and Color E. Cast 4 double-stranded stitches onto one of your Size 3 DPNs, and knit with the other DPN. Do not turn your work when you finish the row, but simply slide it to the end of the DPN , bring the yarn around the back of the needle and knit the next row. - Repeat this process, and you will find that you are creating a rounded cord. Once you have reached your desired length, you will break off the strands of yarn, bring them around the back and use a tapestry needle to thread the yard through the stitches. Remove the DPN and weave the ends down through the center of thei- cord so that they are invisible. - Attach the i-cord by using your needle and thread to firmly secure approx % " of each end of the cord to the inside of the bag at the corners where the sides are joined. The photo below shows how the join will look on the inside of the bag, and then how it will look from the outside:
Your little bag is now complete. Use and enjoy! If you have any questions about this pattern, please message me directly on Ravelry to my username pwhitocker.


