Description
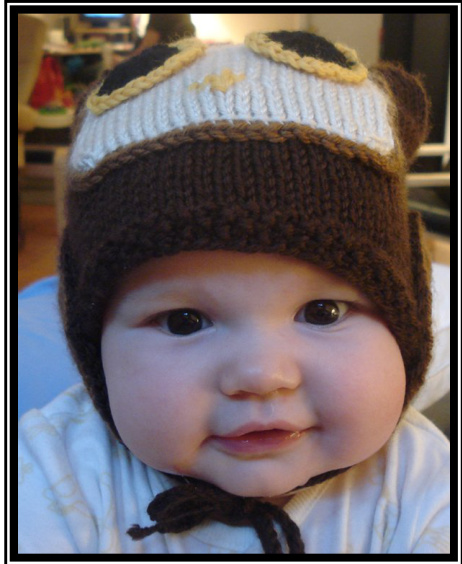
This is a cute litle hat that would suit any baby, boy or girl. It's a hoot to knit to! When I made this hat, it was the first time I'd ever crocheted, so if there are mistakes in my terminology regarding the crochet instructions, please forgive me and let me know at banks.lora@gmail.com. Enjoy!
Materials
口 1 16" Us 7 (4.5mm) circular needle 口 1 set of US 3 (3.25mm) straight needles 口 1 size D crochet hook 口 1 tapestry needle 口 5 colors of worsted weight yarn
Stitches and Abbreviations
$\begin{array}{r}{\mathsf{K}=\mathsf{K}\mathsf{n i t}}\\ {\mathsf{P}=\mathsf{P}\mathsf{u r l}}\end{array}$ $\mathbf{k2tog}=\mathsf{K n i t}\,2$ together kfb $=$ Knit front and back of stitch ch $=$ Chain
Colors
To make the hat shown, I used the following colors. The patten wil refer to them as color 1, color2,etc.

The Hat
In color 1, on 16" circular needles cast on 73 stitches Join the round, and knit four rounds in seed stitch (because there is an odd number of stitches, you can just K1, P1 for 4 rows straight) 口 Round 1: K1, P1 口 Round 2: K1, P1 口 Round 3: K1, P1 口 Round 4: K1, P1 Begin knitting in stockinette and continue until work measures about 6" 口 Form the ears K1, k2tog twice, K26, k2tog twice, K1, k2tog twice, K13, k2tog, K12, k2tog twice, K1 Knit one round Cast off, and sew along seam. Sew first and last stitch together, second and second last together, third and third last, etc.
The Face
口 In color 2, cast on 22 stitches
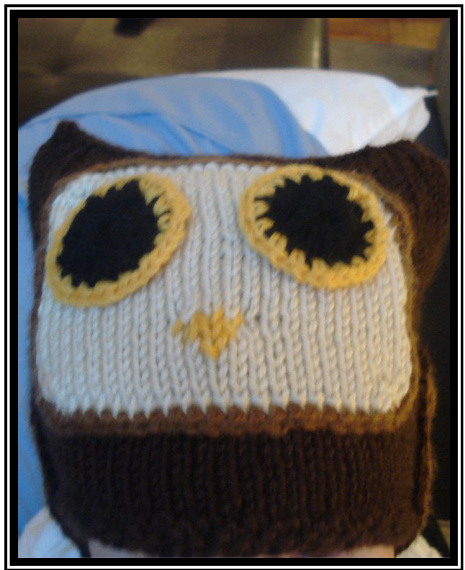
口 Row 1: K1, kfb, K to last two stitches, kfb, K1 口 Row 2: P 口 Row 3: K1, kfb, K to last two stitches, kfb, K1 口 Row 4: P 口 Knit in stockinette until work measures about 2.5 inches 口 Place the nose, starting with ws facing: Row 1: P9, switch to color 3 and P4, P9 in color 2 Row 2: K10, switch to color 3 and K2, K10 in color 2 口 Row 3: Purl row all in color 2 口 K1, k2tog, K to last three stitches, k2tog, K1 口 P 口 K1, k2tog, K to last three stitches, k2tog, K1 口 Cast off In color 3, go back and using a tapestry needle, embroider one stitch below the bottom two stitches of the nose. 口 In color 4, using a size D crochet hook, work a single crochet edging around the piece Once you have completed and attached the eyes, secure the face to front of the hat using color 4 (the “front" will have a k2tog at the top row in the middle of the hat - use it for centering)
The Eyes (make 2)
In color 5, using a size D crochet hook, ch 4 口 Complete the centre ring, by pulling the yarn through the first stitch and the loop on your hook 口 Triple crochet 16 times (or until the circle looks fairly solid) 口 In color 3, work a single crochet edging around the piece Secure the eyes to the face using color 3
The Wings/Earflaps (make 2)
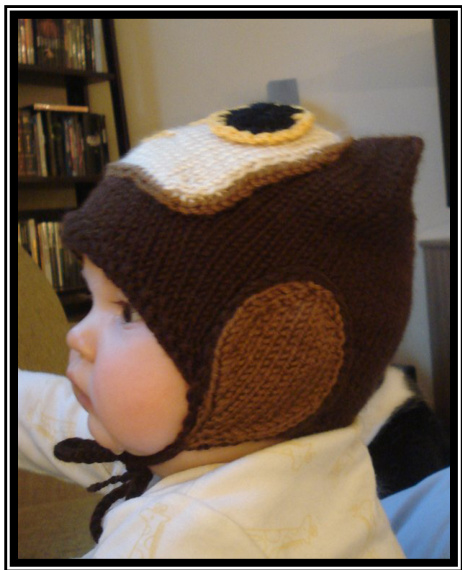
口 In color 4, cast on 4 stitches 口 Row 1: K1, kfb, kfb, K1 (6 stitches) 口 Row 2 (and every even row): P 口 Row 3: K1, kfb, K2, kfb, K1 (8 stitches) 口 Row 5: K1, kfb, K4, kfb, K1 (10 stitches) 口 Row 7: K1, kfb, K6, kfb, K1 (12 stitches) 口 Rows 8 - 14: Continue in stockinette 口 Row 15: K1, k2tog, K6, k2tog, K1 (10 stitches) 口 Row 16 (and every even row): P 口 Row 17: K1, k2tog, K4, k2tog, K1 (8 stitches) 口 Row 19: K1, k2tog, K2, k2tog, K1 (6 stitches) 口 Row 21: K1, k2tog, k2tog, K1 (4 stitches) 口 Row 23: k2tog,k2tog (2 stitches) 口 Row 24: Slip $2^{\mathsf{n d}}$ stitch over first stitch and place this single stitch on a holder Complete earflap edging and ties: In color 1, using a size D crochet hook, ch1 Work a single crochet edging around the piece Once the chain is completed around the entire edge, leave the last stitch on the crochet hook, then slip crochet hook through the stitch on the holder, and the first chain made before beginning the edging Pull the working yarn, and the tail from the cast on, through all three stitches (this will leave you with 2 stitches on the crochet hook) Switch to size 3 kniting needles and make a 2 stitch i-chord to your desired length 口 Attach earflaps to either side of hat. They can be placed directly below the owl's ears. There does not need to be more than one inch of earflap extending past the bottom of the hat, because this hat willcover the baby's ears already. The earlaps are more for decoration (and to prevent the baby from pulling their hat off and throwing it after you've worked so hard to make it. Weave in your ends and you're all done! Can I get a hoot hoot?


