Flaming Lamborghini
Knitted Bag by Sharon Maher laughing purple goldfish designs
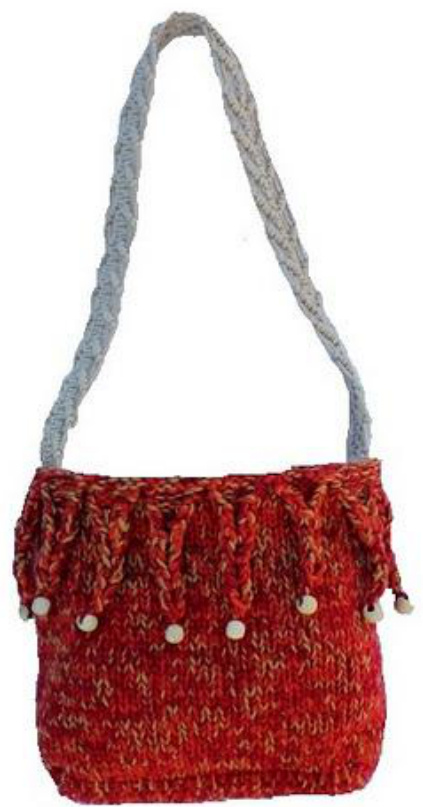
While I was working on this bag, my Dad sent me a series of photos from his recent Malaysian holiday. Taken in a local bar, the photos feature Dad enjoying a Flaming Lamborghini.. while his Lady Friend nervously watches from a few steps behind. Flames were dancing the length of the bar in a way that I have NEVER seen before - and to be honest, I'm surprised that the man still has his eyebrows. And so the Flaming Lamborghini bag was born. Knitted in a trio of vibrant colours with flames dancing around the top...

Yarn Used
8ply (DK) 100% Wool Red - 175m/191yds Orange - 175m/191yds Yellow - 175m/191yds
Notions
6 mm circular needle (US 10) Wool needle 14 wooden beads Macramé belt, used for strap
Finished Size
Height - 20 cm (8 in) Width - 20 cm (8 in) Depth - 7 cm (3 in)
Gauge (tension)
For the sample, 14 sts and 22 rows measure 10 x 10 cm / 4 x 4 in, worked in St st using 6 mm needles and all three yarns worked together. Exact gauge is not important, but the knitted piece should be quite dense.
Abbreviations
Standard US abbreviations are used. Flaming Lamborghini Bag - by Sharon Maher of laughing purple goldfish designs' @2012
Pattern Notes
· Bag is knit in one piece with three strands of yarn worked as one. Alternately you could use a single strand of super bulky yarn. Or even t-shirt yarn. I've also seen this bag worked using plarn (strips of plasticused as yarn). · Pattern begins with the base which is knitted flat, then the body is worked in the round, finishing with the flame edging which is again worked flat. · The top edge of the bag is rolled out - so it is the reverse side of your work which is visible for the top edge and the flames. · Bag can be easily customized: O For a deeper bag, cast on more sts. OFor a wider bag, work more rows for the garter st base. OFor a taller bag, work more rounds of stocking stitch for the body. OIf modifying the pattern, it is important when you pick up stitches for the body of the bag that your stitch count remains a multiple of 5 (for the flames). · Try using a different colour for the flame edging. Just be sure to start this new colour approx. 4 rows before you begin the flame shaping, so that the entire rolled edge is in the new colour.

Flaming Lamborghini Bag - by Sharon Maher of 'laughing purple goldfish designs' @2012
PATTERN BEGINS
| Start base | Using 6 mm circular needles, cast on 8 sts. |
| Garter stitch | Working flat, K every row until work measures 20 cm (8 in). |
| Pick up stitches | Pick up sts around all 4 edges of the base. |
| There are 8sts already on needle. | |
| Pick up 27 sts evenly along 1st edge. Then pick up 8 sts evenly along cast on edge. | |
| Finally pick up 27 sts evenly along last edge - 70 sts in total. | |
| Reminder: If modifying the size of the bag, please ensure that the total stitch | |
| Knit in rounds | count at this point is still a multiple of 5. K in rounds until work measures 23 cm (9 in) from the edge of the base (where |
| the stitches were picked up). | |
| Begin flame edging | There is no need to mark the beginning of your rounds. |
| Flames are worked flat. Turn work at the end of each row. | |
| Each flame is worked using 5 sts. There are 14 flames around the bag. | |
| Rows 1 - 6 | This is the best place to start the first flame. |
| Row 7 | Using the next 5 sts, work 6 rows St st beginning with a knit row. K2tog, k1, k2tog - 3 sts. |
| Rows 8 - 13 | Work 6 rows St st beginning with a purl row. |
| Row 14 | P3tog and fasten off your yarn. |
| Join Yarn | Leave a 20 cm (4 in) tail, which will later be used to attach the wooden bead to the tip of the flame. |
| With right side of your work facing, rejoin your yarn. Leave a 20 cm (4 in) tail, which will later be used to secure the rolled brim of | |
| Repeat Roll edge | the bag in place. Repeat flame edging rows 1 - 14 until all live sts are worked. |
| Allow the top edge to roll over by approx. 2.5 cm (1 in) and secure in place with the 20 cm (4 in) tails left for this purpose. Once secure, leave loose ends on the inside of the bag - as they will be | |
| Add beads | covered by the lining. Stitch one bead to the tip of each flame, using the 20 cm (4 in) tails left for this purpose. |
| Attach handle | Sew macramé belt in place, or if preferred, knit a matching strap. The sample uses a 76 cm (30 in) length of macramé, which is 4 cm (1 1/2 in) |
| wide. At each end, 2.5 cm (1 in) of the belt is stitched inside the bag to secure firmly. | |
| Sew and Attach Lining | This step is not essential, but the bag will be much more useful and durable if you create a fabric lining for it. |
Flaming Lamborghini Bag - by Sharon Maher of laughing purple goldfish designs' @2012


