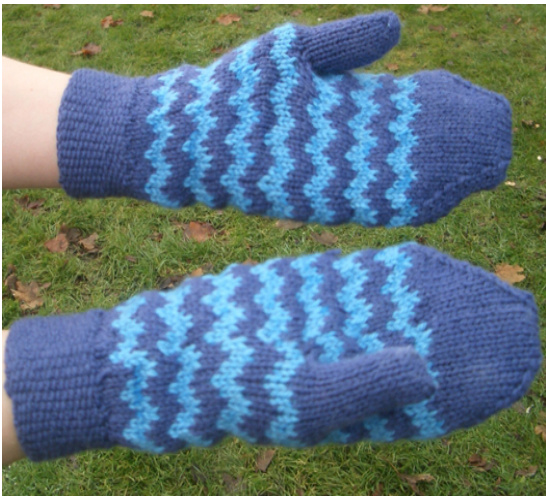
Zig Zag Mittens

These mittens are made using the stranded knitting technique and DK-weight yarn. The cuff is knitted in linen stitch to keep the fabric firm around your wrists. I have knitted some blue variegated laceweight yarn together with the blue DK yarn in the mittens shown, this produces a slightly mottled effect and has the bonus of using up odds and ends of lace yarn, but it is entirely optional. Happy knitting!
Size
Medium (Large), to fit a hand 20cm/8" (23cm/9") circumference (measured around the palm, excluding the thumb).
Gauge
22 stitches per 10cm/4", in stockinette stitch 24 stitches per 10cm/4", in linen stitch
Materials
Main Colour (MC): 1 ball of Rowan Pure Wool DK (124m), colourway 030 (Damson) Contrast Colour (CC): 1 ball of Panda Woolbale DK (91m), colourway 124 (optional) 100m Knitting Goddess blue variegated laceweight yarn ● 1 set3.5mm DPNs ● 3 stitch markers 1 large safety pin (to act as a stitch holder)
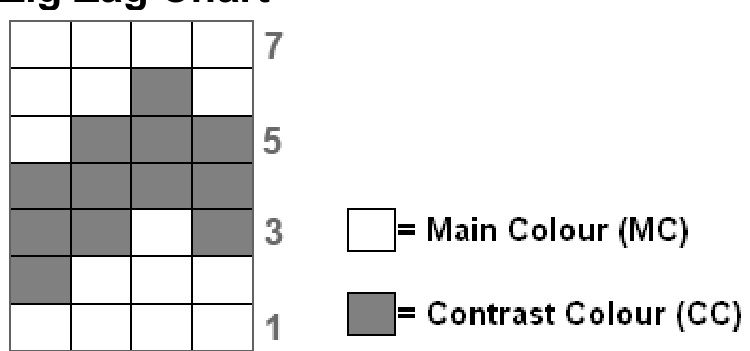
Zig Zag Chart
Directions (for both mittens)
With the main colour, cast on 39 (45) stitches and place a marker. Arrange the stitches across the DPNs to start knitting in the round.
Cuff
Row 1: \*k1, yarn forward, slip next stitch purlwise, yarn back. Repeat from \* until one stitch remains, knit this stitch. Slip marker. Copyright @ Alana Blewitt 2011. All rights reserved. Row 2: \*yarn forward, slip next stitch purlwise, yarn back, k1. Repeat from \* until one stitch remains, then bring the yarn forward, slip the last stitch purlwise and move the yarn back. Slip marker. These two rows form linen stitch. Repeat rows 1 and 2 until your cuff is 5cm/2" long.
Mitten Body
Medium size: (knit 7, m1) 5 times, knit to end of round. You should now have 44 stitches. Large size: (knit 6, m1) 7 times, knit to end of round. You should now have 52 stitches. Both sizes: Knit 2 rounds. Using both the main colour (MC) and the contrast colour (CC), work 11 (13) repeats of the Zig Zag chart. Work the chart 4 times, then follow the directions for the left or right mitten listedbelow.
Right Mitten Top
Using the MC, knit to 9 (11) stitches before the marker. Slip the next 7 (9) stitches onto a safety pin, cast on 7 (9) stitches using a cable cast on, knit 2. Slip marker. (Please note this counts as the first row of the next Zig Zag chart repeat). Work the Zig Zag chart across all stitches 3 (4) times more. Break off the CC, leaving enough of a tail to weave the ends in (10cm/4" or so). Large size only: using the MC, knit 4 rounds. Both sizes: To shape the top, knit 1 round with the MC. On the second round, knit 9 (11) stitches, k2tog, place a marker, k2, ssk, knit to the end of the round (42 (50) stitches total). Slip the round marker. Knit 1 round, slipping markers as you go. Knit to 2 stitches before the decrease marker, k2tog, k2, ssk, knit to the end of the round (40 (48) stitches total). Slip marker. Knit 1 round. Knit to 2 stitches before first marker, k2 tog, k2, ssk, k14 (16) stitches, k2tog, place another marker, k2, ssk, knit to the end of the round (36 (44) stitches total). Knit 1 round. \*Knit to 2 stitches before first marker, k2tog, k2, ssk, knit to 2 stitches before second marker, k2tog, k2, ssk, knit to the end of the round. Knit 1 round. Repeat from \* until 16 stitches remain. Arrange the stitches onto two DPNs (8 stitches each), with the decreases at either side (the marker for the beginning of the round will be in the middle of the stitches on one needle; please remove it). Cut your yarn leaving a 25cm (10") tail, and graft these 16 stitches together using Kitchener stitch.
Mitten Thumb
Rounds 1 - 19: Slip the 7 (9) stitches from the safety pin onto a DPN. Using the MC and working clockwise around the thumb hole, pick up 9 (11) more stitches (1 stitch in each cast on stitch, plus 1 stitch either side). Place a marker. Arrange the stitches comfortably onto DPNs and knit 19 rounds, or until the thumb is the desired length. Round 20: (slip 1 purlwise, k2tog, pass the slipped stitch over. Knit 6) twice. You should now have 12 stitches. Slip the first 6 stitches onto one DPN, and the second 6 stitches onto a second DPN. Cut the yarn leaving a 20cm (8") tail, and graft the stitches together using Kitchener stitch.
Left Mitten Top
the increase row and 4 repeats of the Zig Zag chart, as per the right mitten Using the MC, k2 stitches, place the next 7 (9) stitches onto the safety pin, cast on 7 (9) stitches using a cable cast on, and knit to the end of the row. (Please note this counts as the first row of the next Zig Zag chart repeat). Work the Zig Zag chart 3 (4) times more. Break off the CC, leaving enough of a tail to weave the ends in (10cm/4" or so). Large size only: using the MC, knit 4 rounds. Both sizes: To shape the top, knit 1 round with the MC. On the second round, knit 27 (33) stitches, pm, k2tog, k2, ssk, knit to the end of the round (42 (50) stitches total). Slip the round marker. Knit 1 round. Knit to 2 stitches before first marker, k2tog, k2, ssk, knit to the end of the round (40 (48) stitches total). Slip marker. Knit 1 round. Knit 7 (9), k2tog, place a second marker, k2, ssk, Knit to 2 stitches before next marker, k2 tog, k2, ssk, knit to the end of the round (36 (44) stitches total). Knit 1 round. \*Knit to 2 stitches before first marker, k2tog, k2, ssk, knit to 2 stitches before second marker, k2tog, k2, ssk, knit to the end of the round. Knit 1 round. Repeat from \* until 16 stitches remain. Arrange the stitches onto two DPNs (8 stitches each), with the decreases at either side (the marker for the beginning of the round will be in the middle of the stitches on one needle; please remove it). Cut your yarn leaving a 25cm (10") tail, and graft these 16 stitches together using Kitchener stitch. < the left mitten thumb according to the Mitten Thumb directions given abov
Finishing
Turn your mittens and thumbs inside out, and weave in all ends. Turn the right way out, wash, block and enjoy :).
I can be contacted at alanablewitt@gmail.com. Please let me know if you have any questions or comments, find any errors in this pattern or just want to show off your work! This pattern is covered by copyright law and all rights remain with the designer. This pattern, including text and images, is an original design.


