This is a relatively straightforward pattern that is easy to modify for different yarn and needle sizes. I used a double strand of laceweight yarn on size 6 double pointed needles for a headband about 2 inches wide. Fingering weight could be used equivalently, but I prefer the look of two strands in the resulting pattern. A larger yarn or needle size will result in a wider band. Yarn: Classic Elite Yarns, Silky Alpaca Lace Color: Deep Blue Smoke Needles: US size 6 Key: Kor Knit Por Purl M or [M Make one stitch - any method SSK or Slip one stitch, knit one stitch, pass slipped stitch over K2 tog or Knit two stitches together S2tog, K1, PSSO or Slip two stitches together, knit one, pass both slipped stitches over Read all charts from right to left
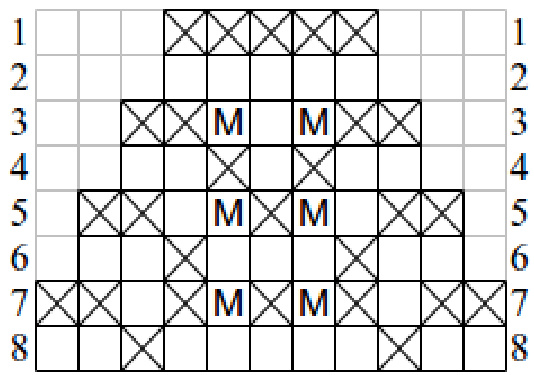
Setup:
CO 5 Row 1: K across Row 2: P across Row 3: K2, M1, P1, M1, K2 (7 stitches) Row 4: P2, K1, P1, K1, P2 Row 5: K2, P1, M1, K1, M1, P1, K2 (9 stitches) Row 6: P2, K1, P3, K1, P2 Row 7: K2, P1, K1, M1, K1, M1, K1, P1, K2 (11 stitches) Row 8: P2, K1, P5, K1, P2
Body:
Row 9: K2, P1, YO, SSK, K1, K2tog, YO, P1, K2Row 10: P2, K1, P5, K1, P2Row 11: K2, P1, K1, YO, S2tog, K1, PSSO, YO, K1, P1, K2Row 12: P2, K1, P5, K1, P2
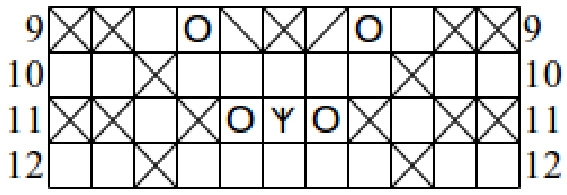
Repeat as necesary to reach desired length. Note: finishing will increase total length by 1/2".
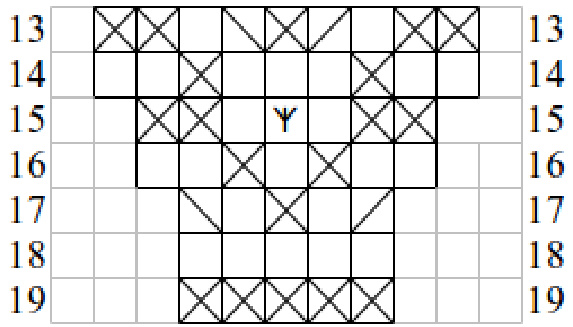
Finishing:
Row 13: K2, P1, SSK, K1, K2tog, P1, K2 (9 stitches) Row 14: P2, K1, P3, K1, P2 Row 15: K2, P1, S2tog, K1, PSSO, P1, K2 (7 stitches) Row 16: P2, K1, P1, K1, P2 Row 17: SSK, P1, K1, P1, K2tog (5 stitches) Row 18: P across Row 19: K across Row 20: Bind off
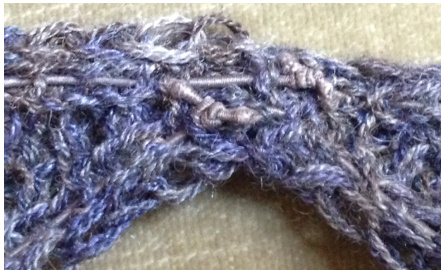
There are a few options for finishing the headband after you've bound off the yarn. You can simply stitch the two ends together, which will give some amount of stretch based on the elasticity of the yarn.
Alternatively, you can sew a narrow band of elastic between the two ends to add additional springiness. All methods will stretch over time, though using elastic will give additional life to the headband. My preferred method is to stitch the ends together and then weave two of elastic cord through the headband, continuously moving under and over the purled stitches. This will give the most stretch to your headband. By using a complementary color of elastic cord, the contrast between the yarn and the elastic is minimized. Additionally, the purl stitches help to bury the elastic in the lower part of the knitting, close to your scalp. I secure my elastic with square knots, but the elastic cord could also be sewn in.