Ring-Coss' Stash-Busting ScRap Socks By Anne Carrolt Gitmour
For sock knitters who like color work, this fun & fanciful sock was designed for the Salt Lake Knitting Guild Spring Workshop, inspired by Kaffe Fassett's Persian Poppy technique. Worked from cuff to toe with a ribbed top, heels & toes in the background shades & charted designs using the accent shades in classic 2-handed, 2-color stranding (see special helps supplement, begins on pg 6). Materials: Approx. 265yds/240m med. weight (dk to light worsted) yarn scraps of varying (60- 120"/150-300cm-or so) lengths, tied together with over-hand knots to make 2 contrasting balls in shades of your choice, 1 for background, 1 for accent. (It's ok to mix these similar weights, with the frequent yarn changes you are in effect making custom shaded longchange slightly thick & thin yarn)- Mixing texture is great but use good judgement about mixing the fiber content. (The sample shown in close-up above is a play on 'warm-toned' accent colors for the ring shapes on a 'cool-toned' background, just one very simple idea but the color possibilities are endless..) ot: 1 card of reinforcement yarn to match background shades for heels & toes One large blunt-end yarn darner 2 small st holders (Opt- you can substitute waste yarn or 2 empty needles) Double-point needles in sizes 2.75mm(US2) & 3.25mm(US3) for smaller socks or in sizes 3.25mm(US3) & 3.50mm(US4) for larger socks -keep in mind that the over-all fabric will be more or less dense depending on which gauge you use. The 3 sizes offered in this pattern will produce socks in adult sizes small (19cm/7.5" cuff), medium (23cm/9"cuff) )& large (27cm/10.5"cuff ). - Foot length is up to the knitter One stitch marker Gauge: 5 sts and 7 rows= 2.5cm/1" on 3.50mm (US#4) needles (ndls) 5.5 sts and 8 rows= 2,5cm/1" on 3.25mm (US #3) ndls. Gauge is measured over stocking stitch(stst) Pattern is written in smaller size with larger sizes following in parenthesis if only 1 number appears, it applies to all 3 sizes. Begin at the top of the cuff, using smaller sized needles, long-tail co & background ball, c/o 40(48,56)sts, divide evenly on 3 needles and being careful not to twist, join in a circle. This join will mark the center back of your sock and the beginning of each new rnd. Wk cuff in 1x1 rib for a total of 9 rnds. Now switch to larger sized needles and stst. Work 1 rnd even in stst, then attach accent ball & follow the chart on page 2 for 3 full repeats- 42 rnds. Keep in mind that this is a straight tube, no calf shaping. You can make it shorter if you like (stop on a round 7 or 14) but if you make the leg section too long, it won't fit over the calf. On completing 3 repeats (or desired length if you want it shorter) of the 14-round chart, proceed to 'divide for heel flap' directions top of page 3..
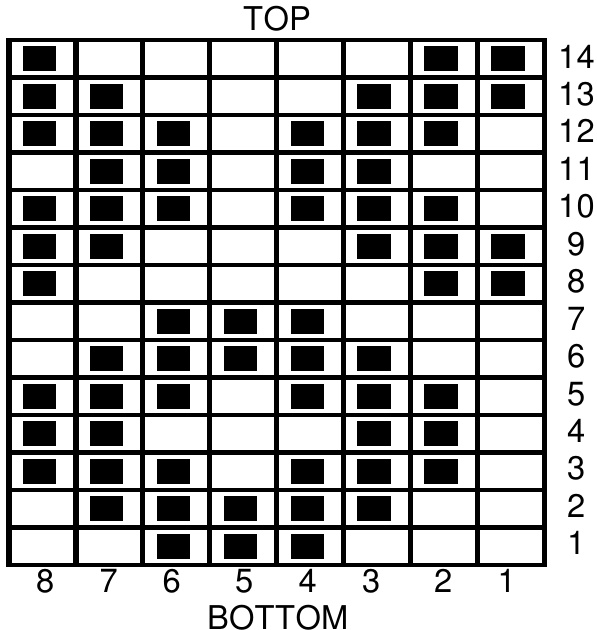
"Mini Ring" Chart:
Worked over 14 rounds and 8-stitch repeats Follow Chart from Bottom to top, right to left for 3 full 14-round repeats. Remember to carry yarns not in use very relaxed behind the active stitches, & lock back any long floats every 3 sts. Also remember to lock back any tie tails as needed. = background ball = accent ball

Sample shown in large photo above features a 2-tone heel & toe option but this pattern is written using the background ball only for heel & toe, as shown in red & gold sample above right. (note the fun ground reversal used on the red & gold pair- sweet!)
Divide for heel flap
Temporarily break off accent ball & with background only & needle #3, k the 1st 10(12,14)sts from ndi#1. Stop knitting. Shuttle the next 20(24,28) center front instep sts to a piece of waste yarn, divided on 2 holders or 2 empty ndls until needed to work the instep. The other 20(24,28) should now all be waiting on what was ndl #3, ready to work the heel flap. The heel flap will be worked back and forth on 2 needles over these center back 20(24,28)sts. (Switch to smaller sized needles here for the rest of the project if a denser fabric is desired) Work the heel flap in purl-side heel stitch as follows: te- sl all p's as to p and all k's as to k for heel flap edge 'chain' to form properl Heel flap Row 1 (Wrong side facing you) \*sl1, p1. Cont from \* across row. Row 2 (Right side facing you) sl1, K all remaining sts across row. Repeat these 2 rows10(12,14) times for a total of as many rows as there are heel flap sts. You should have 10(12,14) links' in your heel flap edge chain. Place a marker on ndl at center and end having completed a row 2. You are now ready to turn the heel with short row shaping. To turn heel- (note, this is a 'purl-side heel st heel turn')
| Row 1: sl1, p1 to center, p 2 more, p2tog, p1. Turn Work. (Do not work to end of row). |
| Row 2: sl1, k5, ssk, k1, Turn work. Row 3: sl1, p1 to 1 st before 'gap' from last turn, p2tog, p1, turn. |
| Row 4: sl1, k all sts until you are 1 st before 'gap') ssk, k1, turn. |
| Row 5: As for row 3... Row 6: As for row 4... |
Continue on in this manner until all sts have been worked, end having completed a right side row. 12(12,14) sts remain on heel needle. Pick up into the heel flap edge chain: You should be ready to go up the right side edge. (Look at the sock as worn on a foot). Re-attach accent ball here & alternating the 2 balls, (using an empty ndl), p/u and K into the 10(12,14) links in the edge chain (see diagram pg 7). Then with a 2nd emty ndl, k across all 20(24,28) instep stitches resuming charted pattern as established. With a 3rd ndl, pick up and k down the remaining “links' on the left side edge again alternating the 2 balls to match needle #1. With these 10(12,14)sts, k 6(6,7) of the remaining heel sts, the other 6(6,7) will begin ndl #1. There should now be 16(18,21) sts in both shades alternating going up the right side of the sock (ndl #1), 20(24,28)sts in pattern across the instep (ndl #2) and 16(18,21)sts in both shades alternating going down the left side (ndl # 3). You are again working in rounds, with center bottom of foot marking beginning of each new rnd. Now Begin instep gusset shaping..
| InstepC Gussets- |
| Row 1:Maintaining g 1x1 striping, k to last 3 sts of ndl #1, k2tog, k1. K all sts in pattern as established across ndl #2. At the beginning of ndl #3 resume 1x1 striping & k1, |
| ssk, k to end of round. |
| Row 2: k even in 1x1 stripes as established across ndl #1, in pattern as established across ndl #2 & resuming 1x1 striping on ndl #3 to end of rnd. |
Repeat these 2 rows alternately until there are again 10(12,14) sts on needles #1 and #3, to return to the total of 40(48,56) sts. Work even as established to desired length to toe shaping, ending on a chart round 7 or 14. (About 1.5-2" from tip of toe). Toe Shaping- The toe will be shaped with a series of alternating mirror image decreases on alternating rows (similar to instep gussets) as follows: NOTE: Toe shaping is written using background shade only but you may continue in 1x1 striping as shown in sample photo if desired... Row 1: Work to last 3 sts of needle #1, make a dec to the right (k2tog)k1. K 1st st on ndl # 2, ssk. K to last 3 sts on ndl #2, k2tog, k1. K 1st st on 3rd ndl, ssk. K to end of rnd. Row 2: Work even all sts. Repeat these 2 rounds alternately, until there are a total of 4 sts remaining on both the 1st and the 3'd ndls, and 8 sts remaining on 2nd needle- 16 in all. With ndl #3, k across all 4 sts from ndl #1 so there are 8 sts on both needles facing each other, half on top and half for sole. Break off yarn, leaving about 18" to graft toe (see "on grafting those toe sts" bottom of page 8). Wash, block and enjoy your new socks! Optional Toe reinforcement technique: (\*lmportant note This is not necessary or even possible if you are doing the 2-tone option, use this technique only on 1-color heels..) For more advanced knitters (that this will hopefully make sense to), I like to use a technique I call 'heel stitch in the round' on all needles during toe shaping to add durability, by slipping every other stitch on every other round as you do (although flat) for the heel. Keep in mind that this will add a density like that on the heel that will affect the finished shape and feel. You will need the ability & skill to 'read' your knitted fabric, as it can be difficult to tell which sts and rounds to slip on. To make this easier, I like to begin slipping on ndl #3 (so that all the sole sts are worked in succession) and sl as to k, knowing that on the next rnd they will be twisted. This not only tells me which round I slipped on but also which ones I slipped. I simply kb into twisted sts on alternate rnds. Always finish on a k-even round so you are not trying to graft into any slipped stitches.\*lmportant note: On toe shaping decrease rounds, k even into the 3 sts on ends of ndls involved in the shaping, they should not be slipped. Extra Bonus Charts: 'Oblio's Ring Toss' (8 sts x 36 rounds) (kind of a pain, too many long stacking floats)
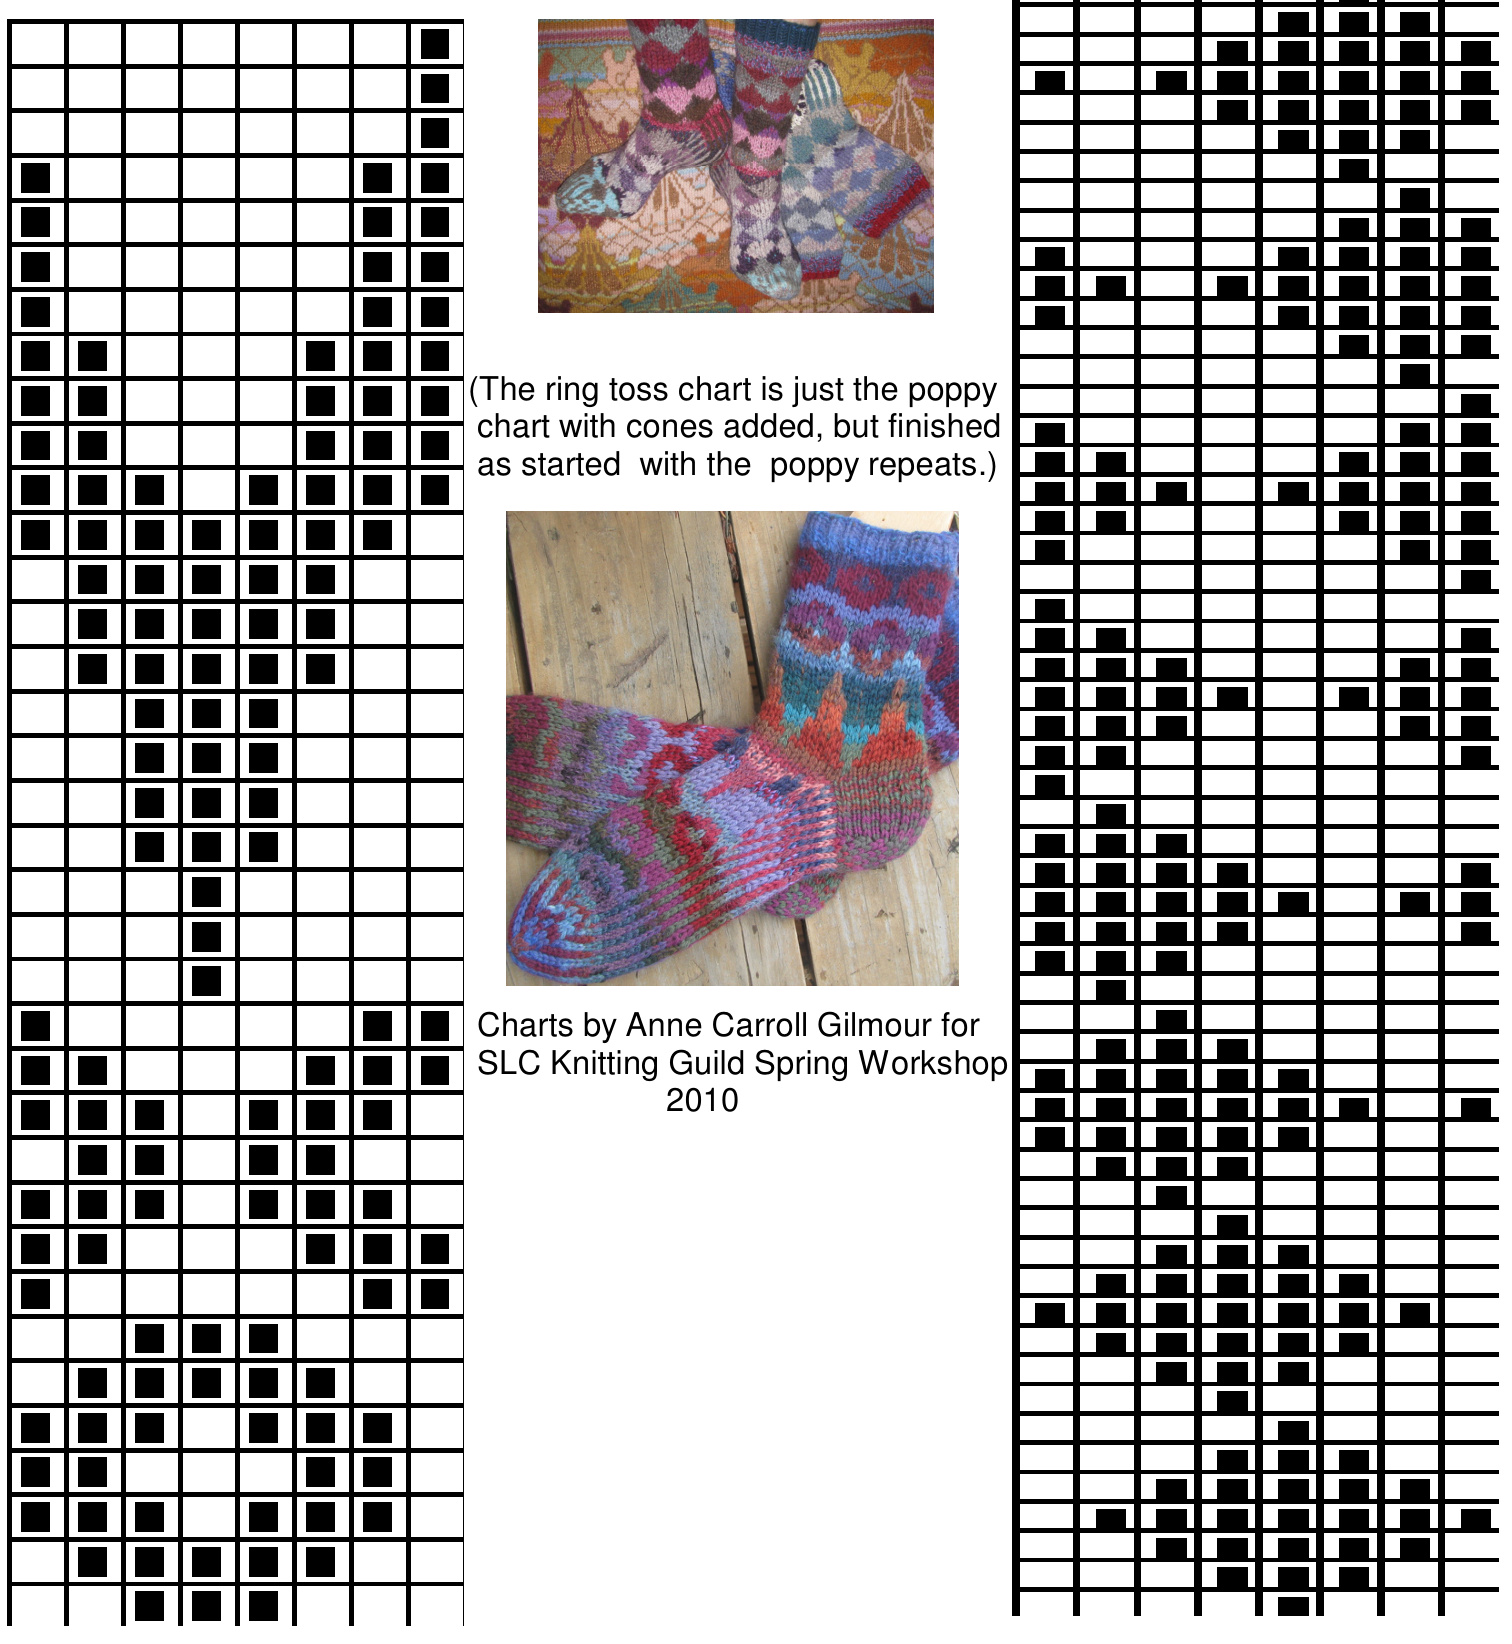
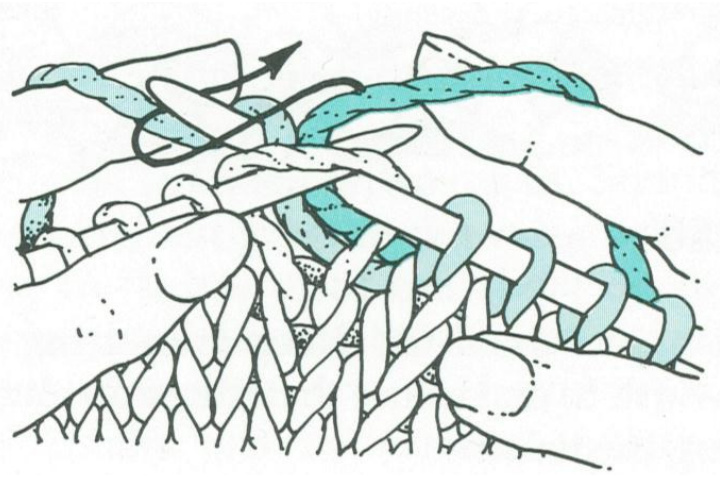
Follow charts from bottom to top, right to left. They both seem really long but are easy to memorize. STASH BUSTING SCRAP SOCKS TEXT & CHARTS COPYRIGHT 2O1O BY ANNE CARROLL GILMOURFOR THE SALT LAKE KINITING GUILD SPRING WORKSHOP Special Helps supplement , Weaving in long floats & tails: (you won't need the Purl side info for this project, but I included it anyway...) Knitting, with float in left hand (light green): Purling, with float in left hand (light green):
This is a 2-stitch process, step 1 is to insert the needle into the stitch as usual, postition the floating yarn (or yarn tail) up over the right hand ndl tip as shown above, then K or P stitch as usual, under float. This first step catches the float, so that when you K or P the next stitch it is locked in. Knitting, with float in Right hand (dark green):
Purling, with float in Right hand (dark green):
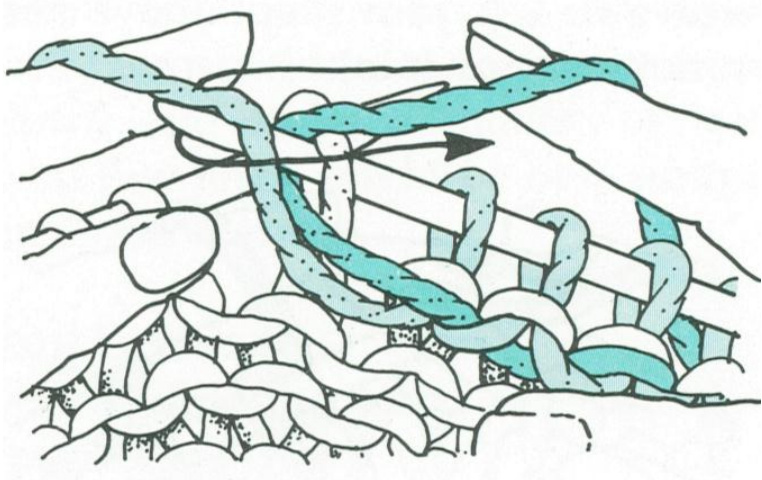
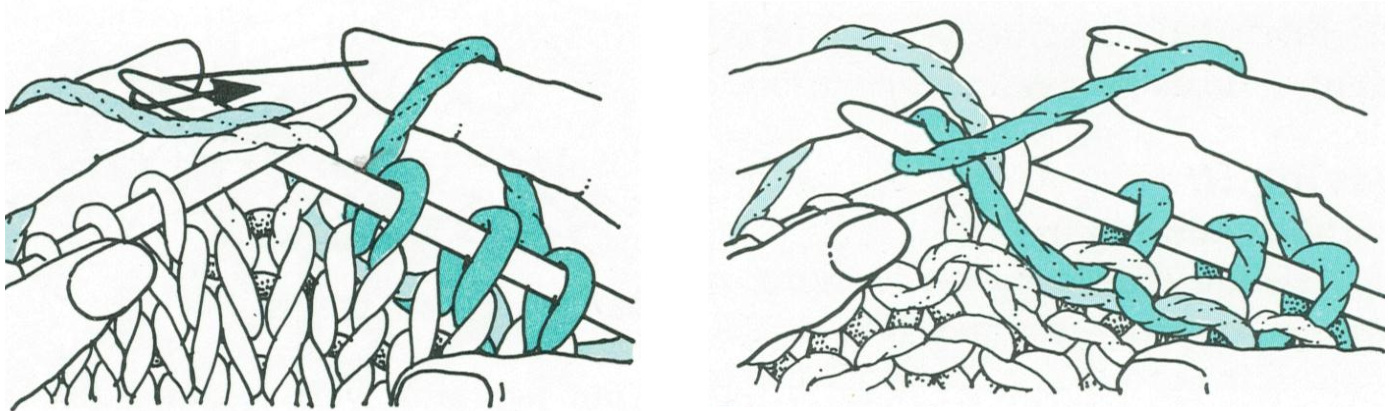
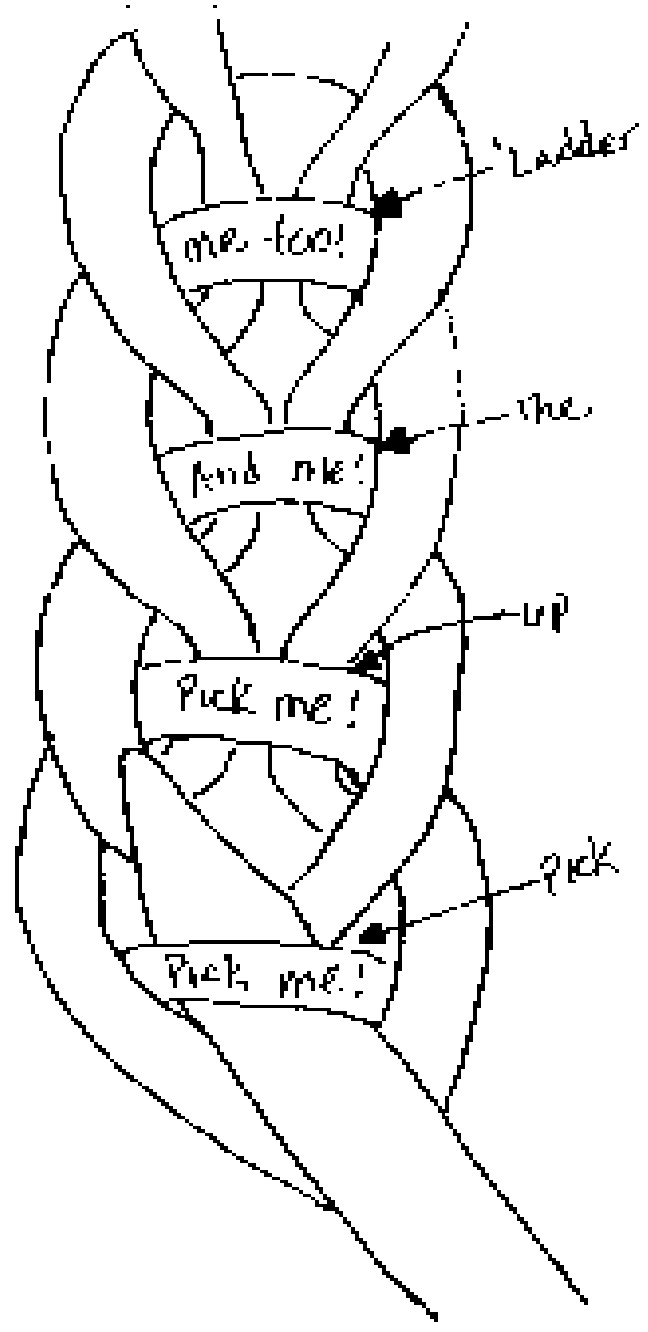
Weaving in floats held in the right hand has a fun little trick to it, insert the right hand ndl into the st in the usual way, 'pretend' knit (or purl) by winding the floating yarn around the right ndl tip in the usual way as shown above (but do not draw through), wind working yarn around right needle and as usual, then 'un-pretend' with the floating yarn by un-winding it from the right ndl tip, then draw the working yarn through & presto! The float's locked in! Weaving-in helps by Anne Carroll Gilmour for SLC Knitting Guild (use for teaching purposes only please) Springworkshop 2002 PICKING UP HEEL EDGE STITCHES: This diagram attempts to illustrate 'picking up the ladder', as on a chain edge of the type used on heel edges in sock knitting or in techniques like entrelac squares...
Fine Tuning your sock knitting
The following hints, tips and tricks are taken from my book, Happy Trails Socks. Picked up along the way in almost 40 years of sock knitting, I hope you find some of them useful...
Speaking about sock knitting
One of the most frequently asked questions in my sock knitting classes is “How long do I make the tail?" (For long-tail cast-on.) A General rule of thumb that has worked well for me is to take a RELAXED measurement around the thigh, calf or shin (in other words, the circumference of the cuff or hem) of whoever you're knitting for and multiply it by 3 for length of tail. Another thing that seems to frustrate a lot of sock knitters is picking up heel edge sts. There are a lot of ways to do this, the way I like to pick up into a chain edge is sometimes referred to as 'picking up the ladder', which means to pick up into the horizontal thread which lies at the narrow base of the 'V' that is formed by each link in the chain. You insert your empty ndl tip between the 2 branches of the \*V', pull the horizontal loop onto the ndl tip and k it with your heel edge ndl just like a regular st. I like this pick up because it makes a nice clean heel edge that doesn't leave gaps or distort the fabric in any way. Some knitters like this method because you can pick up all the heel edge sts at once and k into them like a row, therefore keeping track of how many you've picked up. I like to k them 1 at a time because I find it a little tight picking them all up at once. Another way I like to do a heel edge is with seed st, as in the Horseshoe lace sock. The pick up is simple because you just insert the ndl under all the purl bumps. The important thing to remember when using this method is that all heel flap edge sts must be worked in seed st (no slipping 1st st). No matter what method you use, building the heel flap edge correctly in the first place will make it easier. Another problem that seems to plague many sock knitters is a gap between heel flap & instep. There are a number of ways to deal with this. One is to pick up an extra stitch at the top of the heel flap and transfer it to the instep needle, knitting it together with the 1st 2 sts of the instep (don't forget to mirror this on the other side). Another method is to pick up the left edge of the 'V' on the last heel stitch and knit it together with the first instep stitch, mirroring this on the other side as well. You may find that one method works better on one side than the other, or that only one side has a gap (this is true for many knitters). Either way, experiment & see which method works best for you, & don't fret if you have an extra stitch on one edge, this may happen because of the extra 1/4 of a row that is needed to line up the heel stitches, just work an extra instep decrease on the side that has more. On Grafting those toe stitches: The 1st 2 steps prepare for the 4 steps that follow. Hold sock so that the 2 needles are facing each other & lined up st for st. You should be looking at the instep (or top) side of the sock with the sewing-up tail on your right. Thread tail through the yarn ndl, then bring the yarn ndl through the 1st st on the front ndl as if to P: bring tail through but leave st on ndl. Now duck under front ndl & bring yarn ndl through 1st st on back ndl as if to K. Bring tail through but leave st on ndl. Preparation steps now complete. (abbreviated: front ndl P/stay, back ndl K/stay). Now for the actual grafting, in a similar manner pull yarn ndl through 1st st on front ndl as to K and sl st off ndl. Now pull yarn ndl through next st on front ndl as to P & leave st on ndl. Duck under front ndl and pull yarn ndl through 1st st on back ndl as to P and sl st off ndl, then pull yarn ndl through next st on back ndl as to K & leave st on ndl. Abbreviated: (\*Front ndl: K/off, P/stay. Back ndl: P/off, K/stay). Repeat this 4-step sequence from '\*' until you have pulled the yarn ndl through the last st, then dive yarn ndl inside sock & secure & trim any remaining tail.This little chant is easy to remember, but don't forget the prep steps.


