PINTERESTING SWEATERRECIPE

My inspiratio n
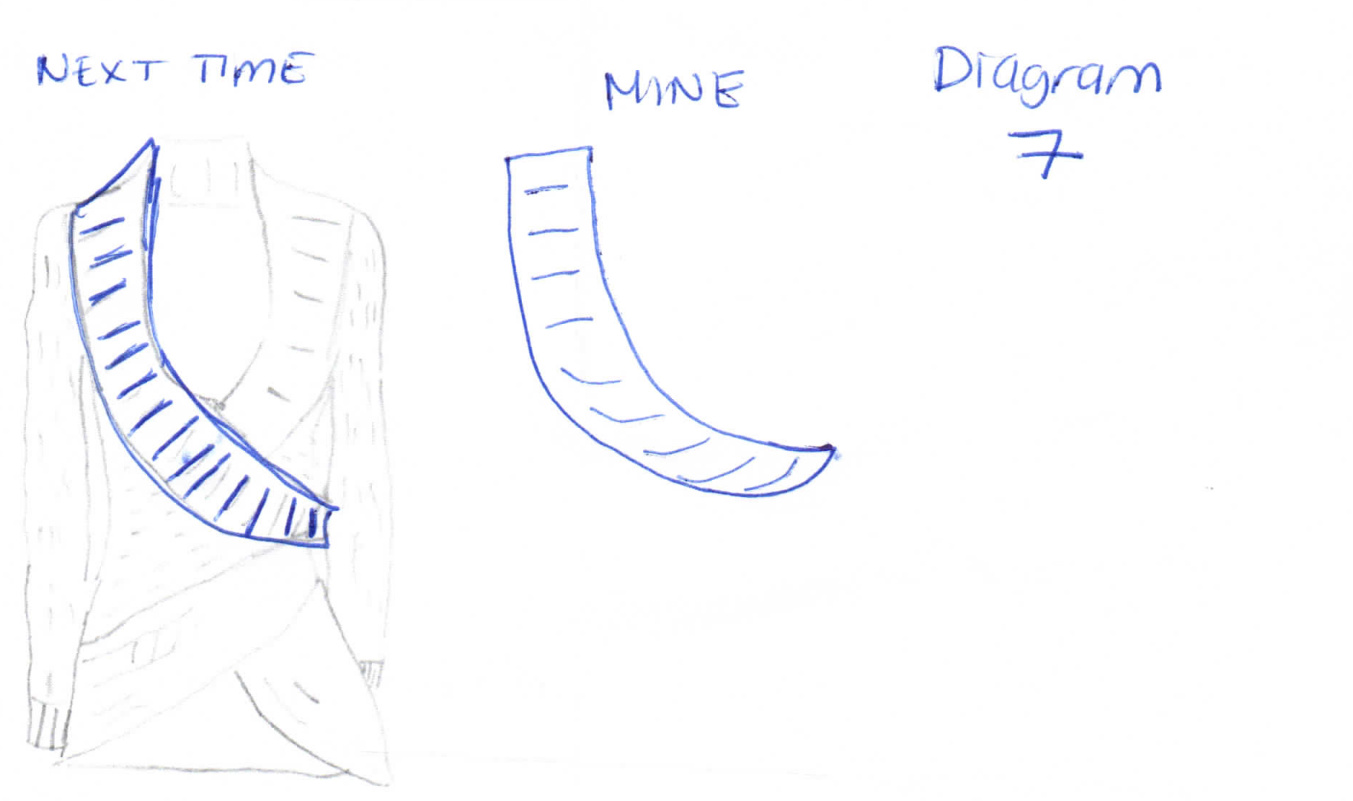
This is a RECIPE. I wrote up what I did for this to fit me. It's a form fitting sweater so Ireco mmend you usethis as a guide but usethe instructions I included in the “How to make it fit you" sectio n to make it yo ur own form- fitting sw eater. I also included “WhatI would do differently next time". I don't generally makethe same thing morethan once so it's unlikely I will bu this one I might and if I do, here's w hat I'd change based on what I learned and would w ant to improve. MATERIALS (Note:I lovedthis yarn. The skeins never end. Ibought 6 in case of experimentingbutI used welllessthan5.I put 1100 to be safe) Size: This recipe is written up to fit me. 33" bust, 30" waist and 40" around your butt. There are directions to customize this to fit you.
CABLE BAND
The cable band is a nice small, easy projectso start in ona spare needle ifyou have one so you can carryit around and work on it astime permits throughout the project especially when your sweater gets too bulkyto be a travel project. Alarge part of my cable was done ridingthe NYC Subway. Caston35stitches RoWS 1, 3, 5, 7: K6, P3, K3, P3, K4, P3, K4, P3, K3, P3 RoWs 2, 4, 6,8, 10: K3, P3, K3, P4, K3, P4, K3, P3, K3, P6 Row 9: K6, P3, K3, P3, Put 2 stiches on holderin front, Knit 2, Knit 2 from needle, P3, Knit 2, Knit 2 from needle, P3, K3, P3 If you prefera chart ofthis see Diagram below for the Cable Chart
| Purl | ||||||||||||||||||||||||||||||||
| Cable | Cable | 6 | Knit | |||||||||||||||||||||||||||||
| Cable | Hold2tofront,K2,thenKnit2fromcable | |||||||||||||||||||||||||||||||
| 7 | ||||||||||||||||||||||||||||||||
| 5 | ||||||||||||||||||||||||||||||||
| 3 | ||||||||||||||||||||||||||||||||
| 1 | ||||||||||||||||||||||||||||||||
Knit for 53.5 inches Don't cast off but put on waste yarn so you can wrap it around you as part of the finishingto ensure it's long enough and add more rows if needed.. lalso realized when Itried it on vs. whatIhad measured, Iseemed to have "grown" and neededto lay off the ice cream fora bit. The cable band when blocked will be about 7" wide. BACK I did this top down Provisional Cast on 60 stitches St stitch. Work even for 6 1/2 inches, ending on a WS row Shape armholes: On that final WS row at end, CO 2 stitches Knit 1 row, atend C02 stitches Purl 1 row, at end cO 2 stitches (using backward cast on) (using backward cast on) (using backward cast on) (using backward cast on) Total 68 stitches Purl 1 row WaistShaping: You are now shaping from your underarm to your waist. I needed to reduce 3 inches overall(front and back) to get to my waist size. On theseam edges Decrease 1 stich on both sides every 15 rows, total of3 times Hip/Booty Shaping: Increase 1 stich on both sides every 5 rows, total of9 times Work even until work measure 23 inches. Cast off (The back will be a total of 30 inches. It is the back + the 7 inches of cable band)
FRONT
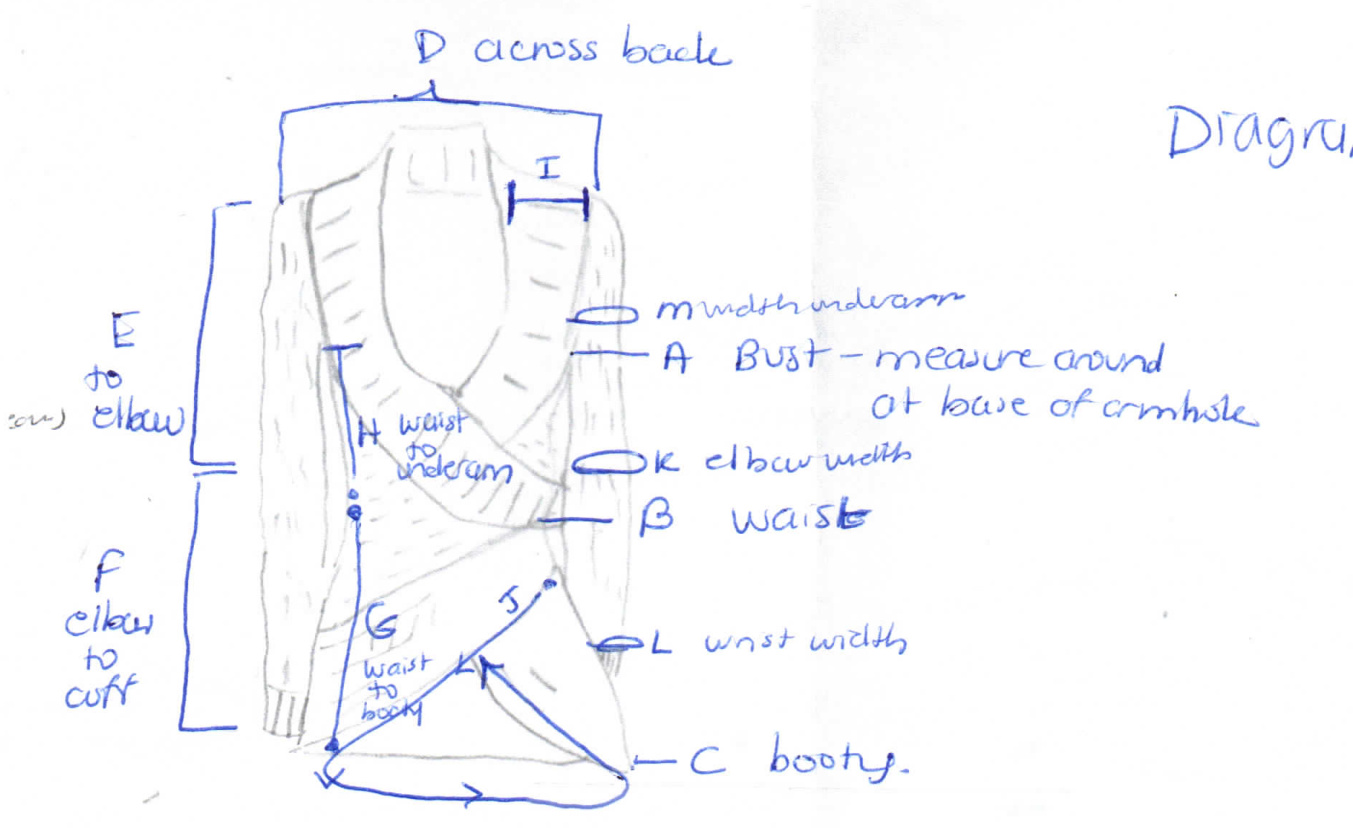
Carefully unravel provisional cast on edge for back Put 16 stitches from each side on needles Leave middle 28onwasteyarn St. stitch. Work even for 6 1/2 inches, ending on a WS row When you reach this point, you will be shaping the armholes and the neck at the same time . armholes and neck (Diagram 4) Shape armholes: On each arm edge, on the final WS row, CO 2 stitches. Next row, at end C0 2 stitches Nextrow,atend CO 2stitches Next row, at end C0 2 stitches Next row, Purl 1 row Neck shaping: Increase 1 stitch at neckedge every row for 14 rows. After these are done you can now join the 2 front pieces and worktogether St until work measure 17inches
Waist Shapin g:
You are now shaping from your underarm to your waist. Ineeded to reduce 3 inches overall (front and back)to get to my waist size. On theseam edges Decrease 1 stich on both sides every 15 rows, total of 3 times Hip/Booty Shaping: Increase 1 stitch on both sides every 5 rows, total of9 times. At this point your front left side is as longas it will be. You will now be creating the diagonal Diagram 5 Continue st stitch but on each RS row, cast off the first 2 stitches. This will make a very step looking angle but don't worry as it will get covered up when you sew on your cable. Continue until you are out of stitches Remember, if you still have hip/booty shaping increases to do, continue doing those on the right hand side. (1 stitch increase every 5 rows). You still need that side to flare out.
SLEEVES
Sleeves
Armhole
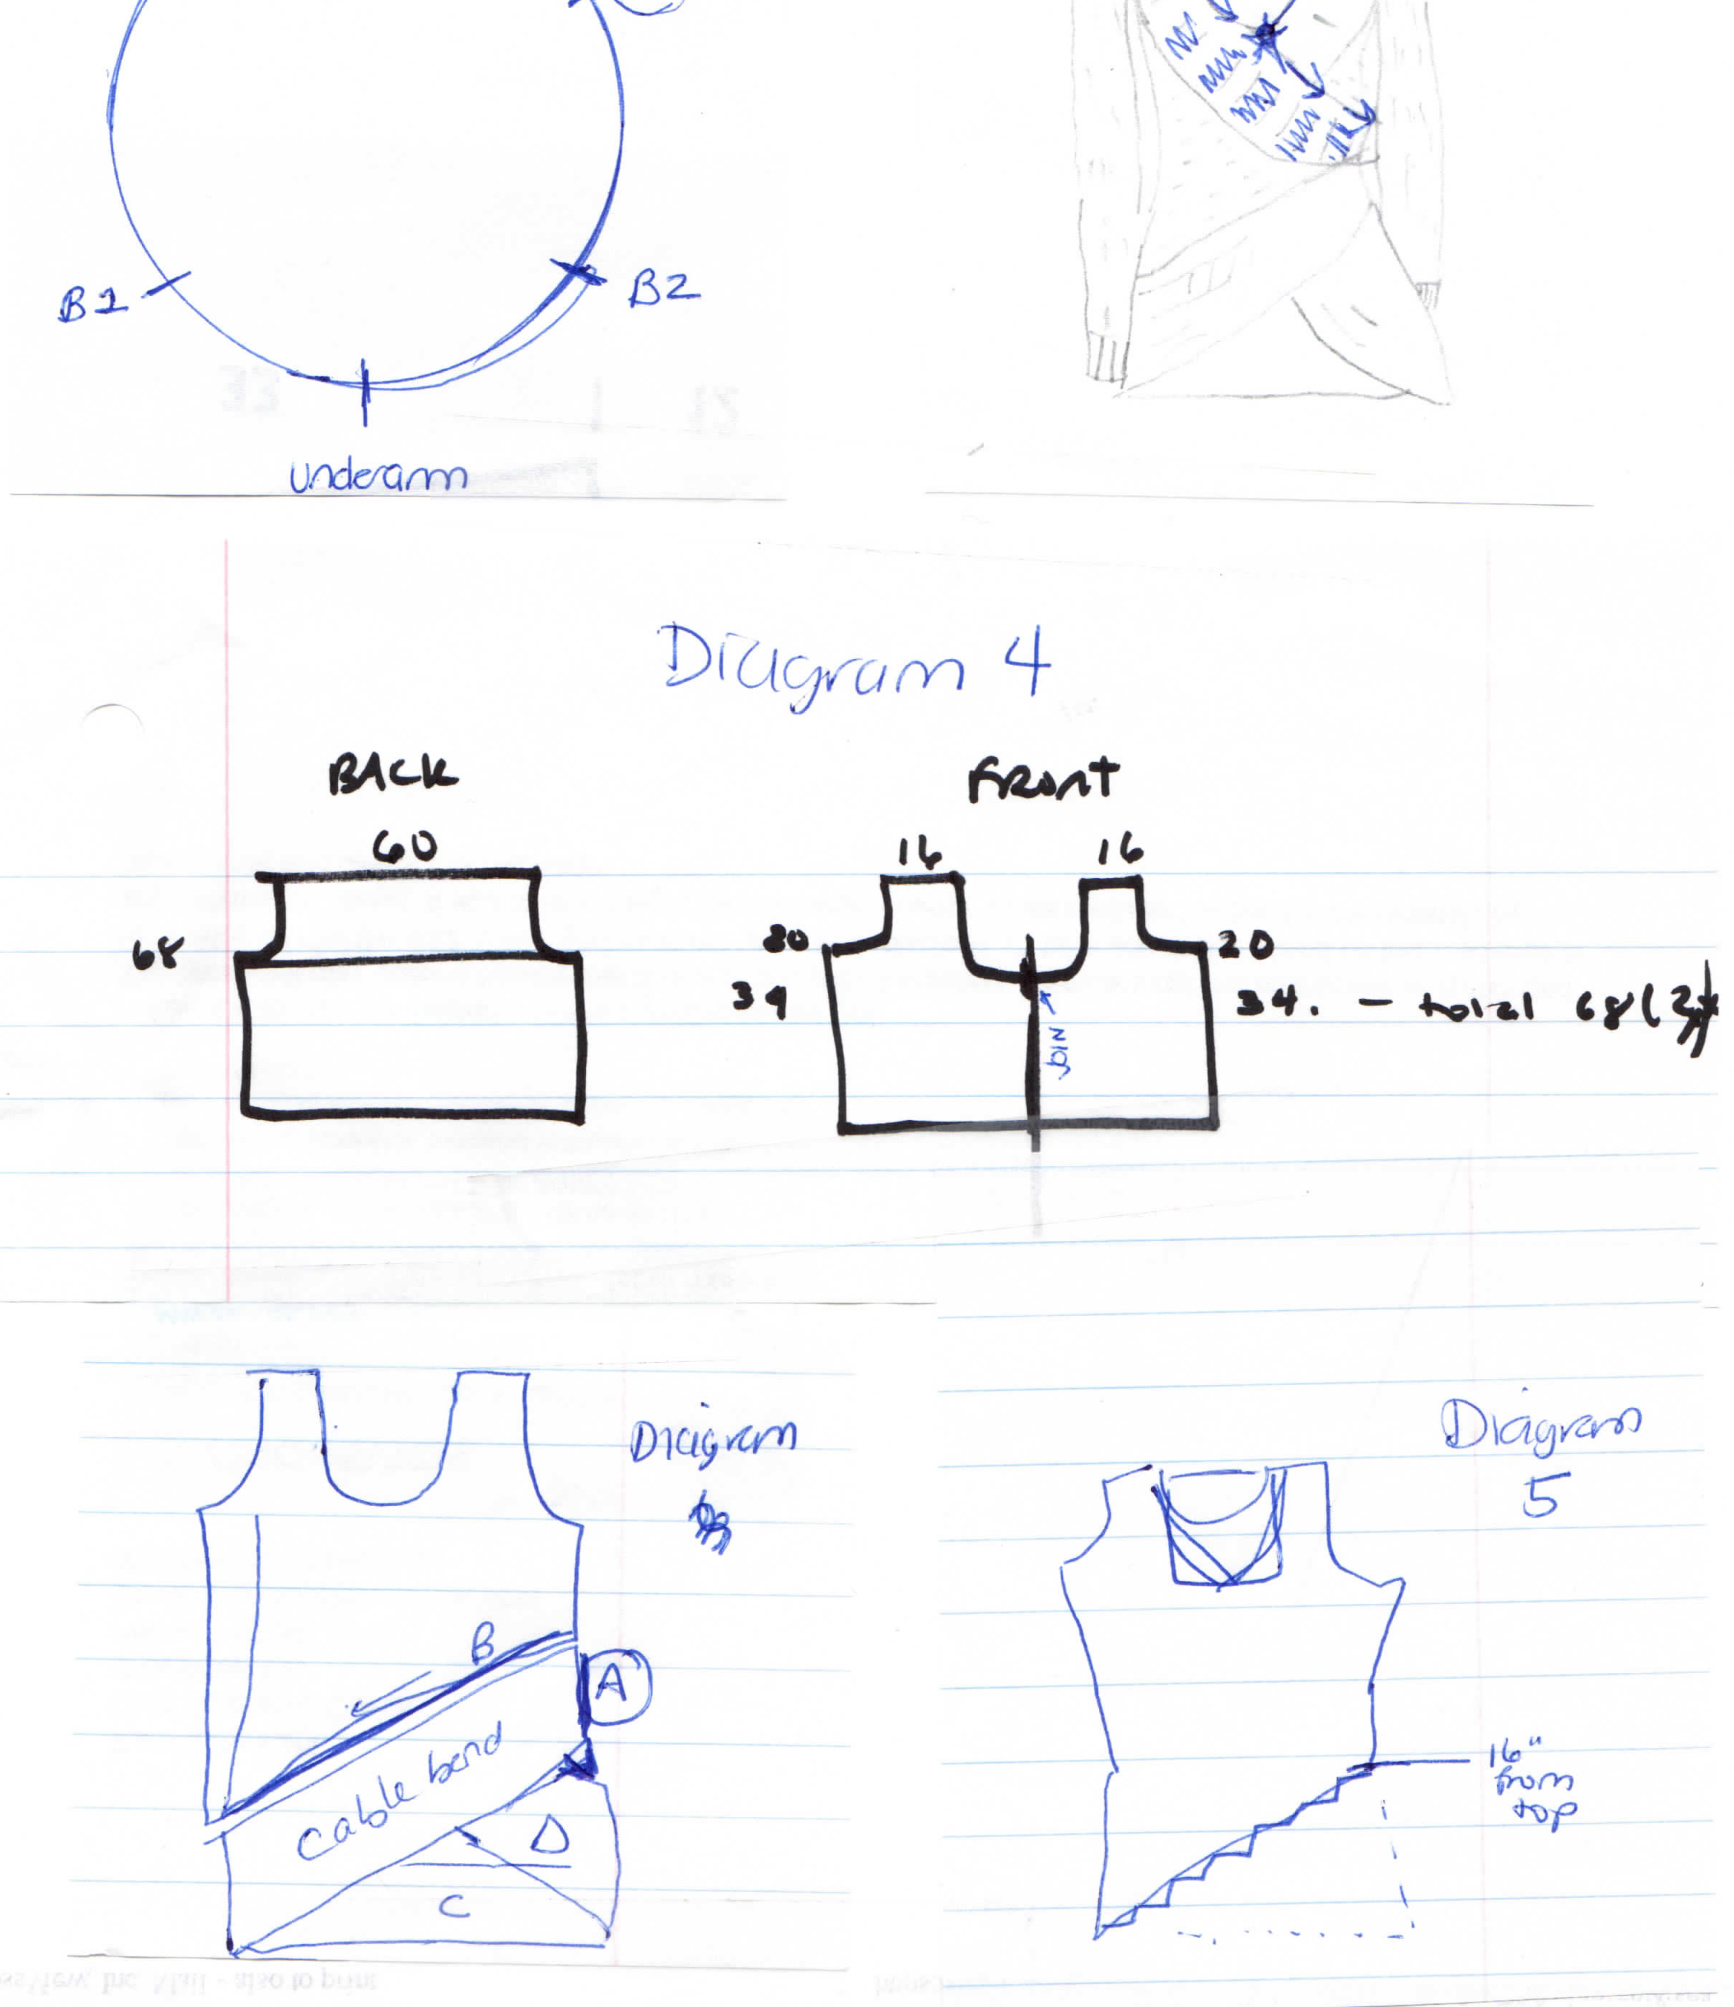
I did set-in sleeves from the top down. I hate seaming especially on sleeves and these always look neat. Pickup 2 stitches forevery row around the armhole starting at the underarm seam. (66 stitches) Put a marker 11 stitches to the right and left of the top shoulder seam (call thisA1 andA2) Put a marker 11 stitches to the right and left of the underarm seam (call this B1 and B2) See Diagram 1 You will then knit to A2 Then wrap and turn and Purl to A1 Wrap and turn Knit to 1 stitch past A2 Don't forget to hide your wraps as you go You will be going 1 stitch past your A markers each round, wrapping and turning as you go until you reach your B markers Voila you have sleeve caps. Now for the TV knitting portion of the sleeves
| underarm | When you hit the B markers, knit 13 rows all ofthe way around the arm anddecreaseatotalof10stitchesnexttotheunderamseamoverthese rows. |
| Underarm to | |
| elbow | Decrease 2 stitches every6 rows (7times) |
| Elbowtocuff | Decrease 2 stitches every6 rows (5 times) Try on the sweater. |
| Determine how much is left before you wantto finish the sleeve. In my case Ihad 14cmleft.So Iknit4 more cm (nodecreases) | |
| Cuff | Youwill need acuffthatisamultipleof3soinmycaseIdecreased3more stitches and then K2, P1 around for last 10 cm |
| Bind Off | |
| Lather, Rinse, | |
| Repeat for the | To avoid second sleeve syndrome, you might want to knit both sleeves |
| 2nd sleeve. | |
| together-easierto dowhenyou gettothe"underamtoelbow"directions | |
| time soIfound a good book and a nice day and the 2nd sleeve was done along with the book | My 2nd sleeve was not done for a LoNG time. Lucky for me, I can read and knit at the same |
NECK
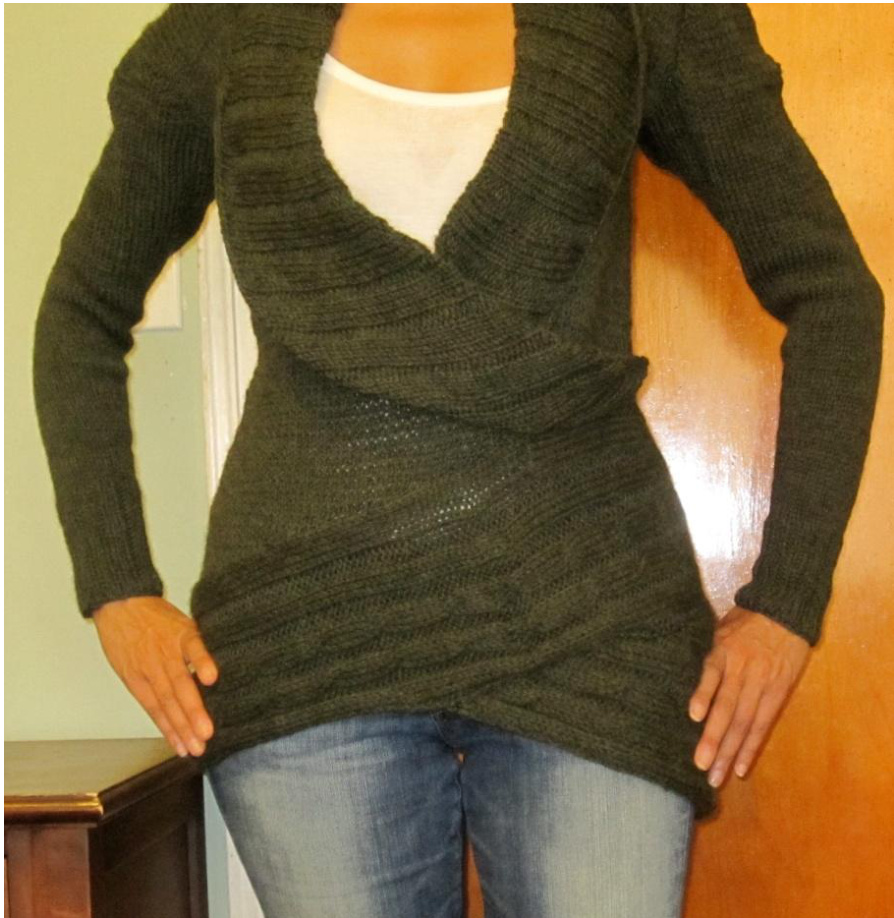
Pick up stitches around the neck starting the bottom of the neck going around it counterclockwise. Pick up 3 stitches for every 4 rows. Alongthe back of the neck, pick up 1 stitch for 1 stich. When you get back to where you started, keep picking up stitches diagonally across the sweater to the waist. See Diagram 2 (start at the star and follow the arrows) ThenswitchtoaUs8needles P4, K2 rib the first row. This will turn into the back of the neck collar since it folds over. The front will be K4, P2 Ithought I'd only have to do this collar for about 4.5 inches. However when I tried it on, Iended up doing a total of 7.5 inches (see "what I would do differently next time) Then try on the sweater. Fold the part that is not attached to the neckline to get a nice slope. Pin it and the neck edges where you want them to lie. Itacked mine on to the bodyin front in a few placestoo. Cast off loosely. Try the sweater on. Diagram 3 Attach the cable band with pins first. Attach it to A (along the side ofthe back of the sweater) Attach alongedgeB Then around the back C Thenbackupand around D ifit's not long enough, add some more rows ofcable) Then seam alongthe edges. Attach a button to where the neck meets the collar if you want. Weave in your ends (hopefully you did this as you went or have a nice long movie to watch) Block and wait patiently for it to dry. Diagram 6 has a drawing with things to measure. Ifyou are too lazy to do it,find a nice fitting, set-in sleeve s weater you w ear and measure most of those on there. Record them inthe sheet and your row and stitch gauge. This will give you the variatio ns to do for your sweater. The spreadsheet is here to use to make it your own fittingsw eater m/spr eadsheet/ccc?key=0Ap4ss Y9 4TiRTdC 1kb2dZX1ZvNjExT 0xUZllm LVAwaX I have created as preadsheet to help with this. It's not per fect as it may tell you to decrease so mething every 4.5 rows 10 times. You have to fi gure out that instead you do so mething close (5 stitches, 9 times). 4.5 x 10 = 45, 5 x 9 = 45. Lighter color. I don't think the cables aretoo lost in this but the dark green does hide them a bit and wo uld have made them more obvious. The shawl collar. I am 75 % happy with the version I have but the reality is if I did this again, I would spend time figuring out how to make it right. I think it would take a comb ination of short rows and making it longer so there's less diagonal pulling it atthe bottom. See Diagram 7 to see w hat I mean. eater but alighter y arn and this might have been one I could w ear in the fall too. A little better job on the cap part ofthe sleeves.
VARIATIONS
If you look at the photo car efully you will notice so me variations I made. Most were by choice. The body of the sweater. I did mine in Stockinette stitch. I liked how that looked. I did swatch up something to match the pattern in the picture. But in real life it was too busy looking w ith the cables. It also would have meant the longknitting parts (sleeves, back and most ofthe front) would havetaken longer and would not have been so easy to do in front on the television. There was one other reason too. Ifyou do the pattern - it would require you to do the front differently to accommo datethe angle ofthe patt ern. I did not have to do that with mine. Ifyou do use that patterning, wo uld love to s ee what it looks like all knit (or knatted up as my beau s ays) up. Cable band. I matched it but I attached mine upside down to the way it was inthe pattern. That was initially a mistake w hen I pinn ed it on. Wh en I flipped it aroun d to correct it, I realiz ed I liked it better this w ay. The attached under shirt . The original pattern has the shirt attac hed as part ofthe sweater. I did not. I will wear a longor short sleev e o ne un der it as my mood suits.