IRULAN IN DUNE

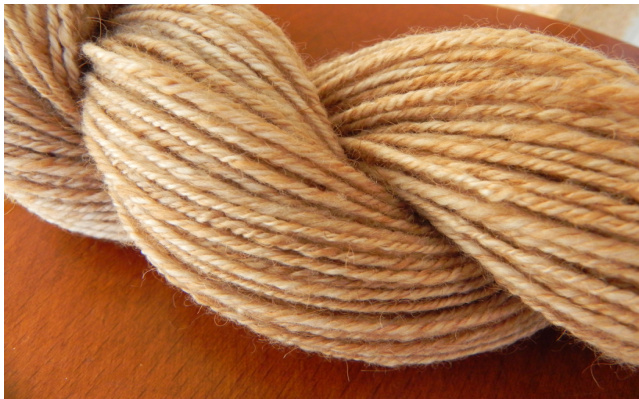
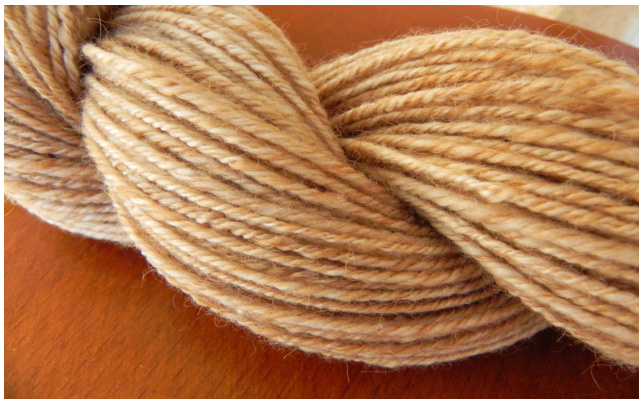
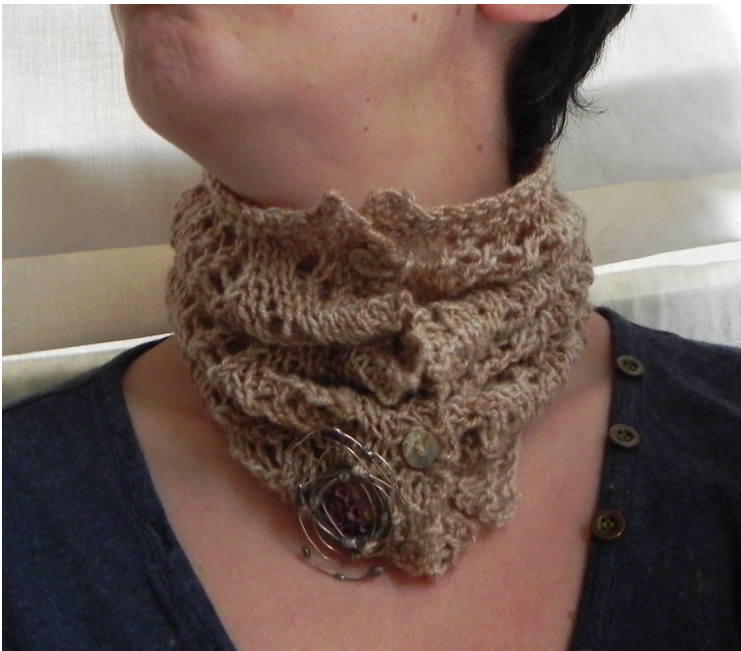
I've always been a huge Scy-Fy fan, and since the first time that I read FrankHerbert's Dune I've been fascinated with Princess Irulan Corrino. The Imperial Princess who married Paul Atreides, betrayed everything she had been raised for and lived the rest of her life in Arrakis, a dedicated step mother of the Imperial Twins, and respected historian. I've you haven't read Dune... go for it! This cowl was designed for a hand-spun yarn (one of my personal hand-spuns), so gauge is estimated, it works well with a navajo plyed sport yarn, and any sport yarn will do.
MATERIALS.
Arrakis, Dune by KIbyMM Yarn (Sport, 135 y.) US 8 - 5.0 Needles. 2 Stich markers 5 buttons (small) Tapestry Needle (for sewing ends and buttons) Rustproof blocking pins.
DIRECTIONS.
K- Knit. P- Purl Yo- Yarn over. SSK- slip stitch, slip stitch, Knit. (slip purlwise, splip knitwise, knit) K2tog- Knit next to stitches together. PM: Place Marker. SM: Slip Marker.
PATTERN.
Read the whole pattern before you start knitting! ast on 54 stitches with your usual casting method (I use the long-tail cast-on) Knit 3 rows in garter stitch. Be loose when knitting, it's not a tight fabric. R01 and all WS Rows: K3, PM, Purl until you have only 3 sts left, PM, K3. (Next WS Rows, SM). R02: K3, SM, K4, [Yo, SSK, K1, K2tog, Yo, K2tog, Yo, K3], SM, K3 R04: K3, SM, [K3, (Yo, SSK) x2, K1, K2tog, Yo], K4, SM, K3 R06: K3, SM, K2, [(Yo, SSK) x3, K4], Yo, SSK, SM, K3 R08: K3, SM, K1, [(Yo, SSK)x4, K2], Yo, SSK, K1, SM, K3. R10: Repeat Row 06 R12: Repeat Row 04 R14: Repeat Row 02 R16: K3, SM, K2tog, Yo, [K4, (K2tog, Yo)x3], K2, SM, K3. R18: K3, SM, K1, K2tog, Yo, [K2, (K2tog, Yo)x4], K1, SM, K3. R20: Repeat Row 16. Repeat the stitches between the [] as many times as necessary. Repeat rows R01-R20 3 times. R21, 22, and 23: Garter Stitch. Bind off with your usual binding method (I use slip 1 st, k1, psso). Put the resulting piece of knitted fabric on your usual blocking surface and pin it until you have a rectangle and the pattern shows up (no need to be agressive). Sprinkle it with water, wait till it's dry. When dried, sew the buttons in one of the ends and use the holes in the fabric to fasten them. (No need of button holes! But the buttons need to be small!)

Published Under CreativeCommons,Atributtion-NonCommercial-Share.a.likeLicence.
IRULAN IN DUNE

Siempre he sido muy fan de la Ciencia Ficcion, y desde la primera vez que lei Dune, de Frank Herbert, me ha fascinado la Princesa Irulan Corrino. La Princesa Imperial que se caso con Paul Atreides, traiciono todo aquello que le habia sido inculcado y vivio el resto de su vida en Arrakis, como una madrastra dedicada a los Mellizos Imperiales, y respetada historiadora Si no has leido Dune, hazlo! Este cuello fue disenado para una lana hilada a mano (una de mis lanas personales), asi que el tamano es estimado, el patron funciona bien con una lana sport con plegado navajo, o cualquier otra lana sport.
MATERIALES.
Arrakis, Dune de KIbyMM (Sport, 125 m.) Agujas del 5.0 (US 8) 2 marcadores 5 botones (pequenios) Aguja lanera (para coser esquinas y botones) Alfileres para bloquear.
DIRECCIONES.
D- Punto del derecho. R- Punto del reves H- Hebra (lanzar hebra para hacer 1 punto) PPD- pasar punto, pasar punto, hacer del derecho. D2J- Hacer los siguientes dos puntos juntos del derecho. PM: Poner Marker. MM: Mover Marker.
PATRON.
jLee todo el patron antes de empezar a tejer! Monta 54 puntos de la forma habitual. Haz 3 lineas en punto de jarrete (del derecho todo el rato). Hazlo flojo, el tejido debe quedar suelto. L01 y lineas impares: D3, PM, hacer del reves hasta que queden 3 puntos, PM, D3. (Siguientes lineas impares, MM). L02: D3, MM, D4, [H, PPD, D1, D2J, H, D2J, H, D3], MM, D3 L04: D3, MM, [D3, (H, PPD) x2, D1, D2J, H], D4, MM, D3 L06: D3, MM, D2, [(H, PPD) x3, D4], H, PPD, MM, D3 L08: D3, MM, D1, [(H, PPD)x4, D2], H, PPD, D1, MM, D3. L10: Repetir Linea 06 L12: Repetir Linea 04 L14: Repetir Linea 02 L16: D3, MM, D2J, H, [D4, (D2J, H)x3], D2, MM, D3. L18: D3, MM, D1, D2J, H, [D2, (D2J, H)x4], D1, MM, D3. L20: Repetir Linea 16. Repite los puntos entre [] tantas veces como necesites. Repite las lineas 01 a 20 tres veces. L21, 22, y 23: Punto de jarrete (todo el rato del derecho) étodo habitual (yo utilizo pasar 1 punto, D1, pasar el punto pasado por encima Coje la pieza resultante y colocala sobre la superficie de bloqueo y forma un rectangulo que muestre el dibujo. Salpica con agua, espera a que se seque. Cuando se haya secado cose las hebras sueltas y los botones y utiliza los agujeros del tejido para atarlos (no hacen falta ojales! Pero los botones tienen que ser pequenos!)
Publicado bajo licencia Creative Commons, Atribucion-No Comercial-Compartir igual.


