Frankie's Knitted Stuff
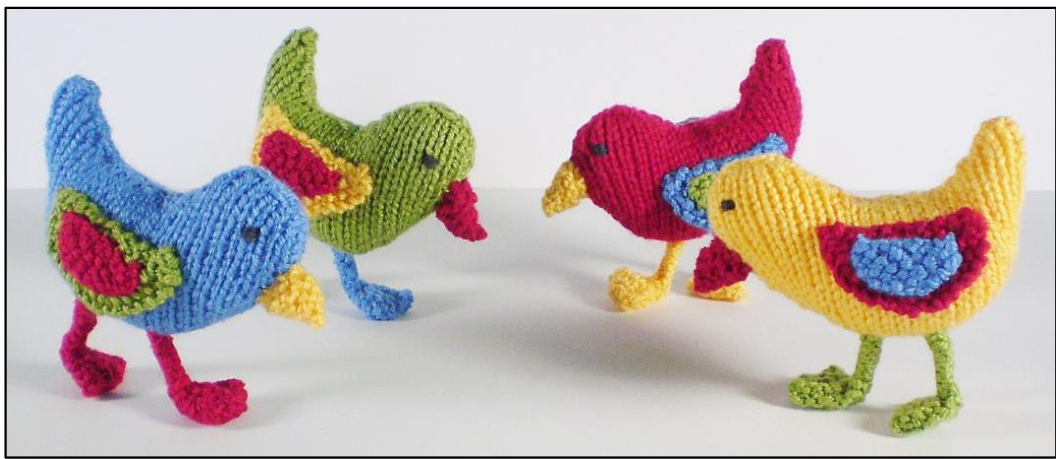
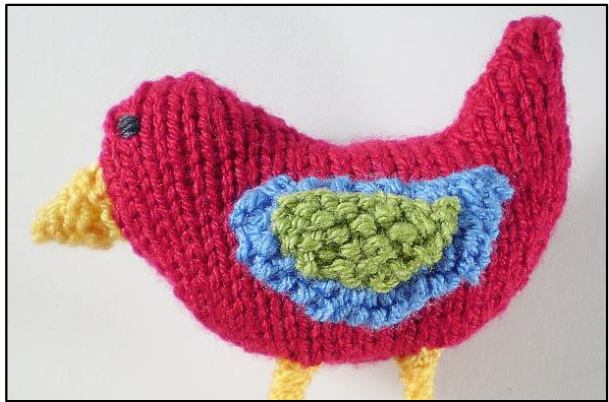
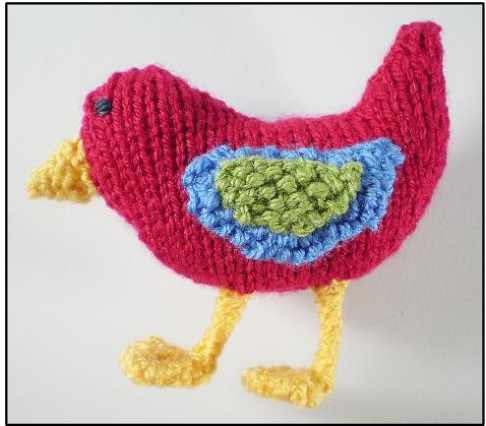
These bright little birds stand on their own two knitted feet and don't take long to make. They are about 9 cm / 312" tall and are knitted with DK weight yarn. The feet hide wire legs and feet made from paper clips; these add strength but mean that the birds are unsuitable for very young children.
Yarn and Needles
I knitted my Busy Birds with Stylecraft Special DK (295 m / 100g) in four colours: Lipstick (red), Aster (blue), Saffron (yellow) and Meadow (green). I used 3 mm / US size 2/2 needles and worked to a tension of 14 stitches and 18 rows to 5 cm / 2"2 in stocking stitch. The knitted fabric needs to be quite firm to stop the stuffing and wire poking through. And now for the knitting .
The Body
This is knitted in two pieces and then sewn together. First Side Using the long tail method cast on 12 stitches. Row 1: Purl. Row 2: K1, ml, K to last st, ml, K1. Repeat these two rows twice more, you should now have 18 stitches. Row 7: Purl. Row 8: K to last st, m1, K1 (19 sts). Row 9: Purl. Row 10: K1, m1, K to last st, m1, K1 (21 sts). Row 11: Purl. Row 12: K to last st, m1, K1 (22 sts). Row 13: Purl. Row 14: K1, m1, K to end (23 sts). Row 15: Purl. Row 16: Knit. Row 17: Purl. and head are worked one at a time, beginning with the tai Row 1: K5, K2tog, turn, leaving 16 sts unworked (6 sts). Row 2: Purl. Row 3: K4, K2tog (5 sts). Row 4: Purl. Row 5: K3, K2tog (4 sts). Row 6: Purl. Row 7: K2, K2tog (3 sts). Row 8: Purl. Cast off by working S2KP2 and fastening off. Now re-join the yarn to the remaining 16 stitches for the head. Row 1: Cast off 5 (slip first stitch knitwise), K to end (11 sts). Row 2: Purl. Row 3: SSK, K9 (10 sts). Row 4: Purl. Row 5: SSK, K8 (9 sts). Row 6: Purl. Row 7: SSK, K5, K2tog (7 sts). Row 8: Purl. Cast off, working SSK at the start of the row and K2tog at the end. That's half a bird's body knitted. Second Side To begin with, the instructions are the same as for the first side but the shaping is reversed. Using the long tail method cast on 12 stitches. Row 1: Purl. Row 2: K1, ml, K to last st, ml, K1. Repeat these two rows twice more, you should now have 18 stitches. Row 7: Purl. Row 8: K1, m1, K to end (19 sts). Row 9: Purl. Row 10: K1, m1, K to last st, m1, K1 (21 sts). Row 11: Purl. Row 12: K1, m1, K to end (22 sts). Row 13: Purl. Row 14: K to last st, m1, K1 (23 sts). Row 15: Purl. Row 16: Knit. Row 17: Purl. This time it is the head that is worked first. Row 1: K11, turn, leaving 12 sts unworked. Row 2: Purl. Row 3: K9, K2tog (10 sts). Row 4: Purl. Row 5: K8, K2tog (9 sts). Row 6: Purl. Row 7: SSK, K5, K2tog (7 sts). Row 8: Purl. Cast off, working SSK at the start of the row and K2tog at the end. Re-join the yarn to the remaining 12 stitches for the tail. Row 1: Cast off 6 sts (slip first stitch knitwise), K to end (6 sts). Row 2: Purl. Row 3: SSK, K4 (5 sts). Row 4: Purl. Row 5: SSK, K3 (4 sts). Row 6: Purl. Row 7: SSK, K2 (3 sts). Row 8: Purl. Cast off by working S2KP2 and fastening off. Pin the two body pieces together with the right sides together. Oversew round the edge, leaving the bottom edge open. Take special care where stitches have been cast off; make sure that you are taking the whole of the cast off edge into your seam. Turn the bird right side out, stuff it lightly and then close the bottom seam.
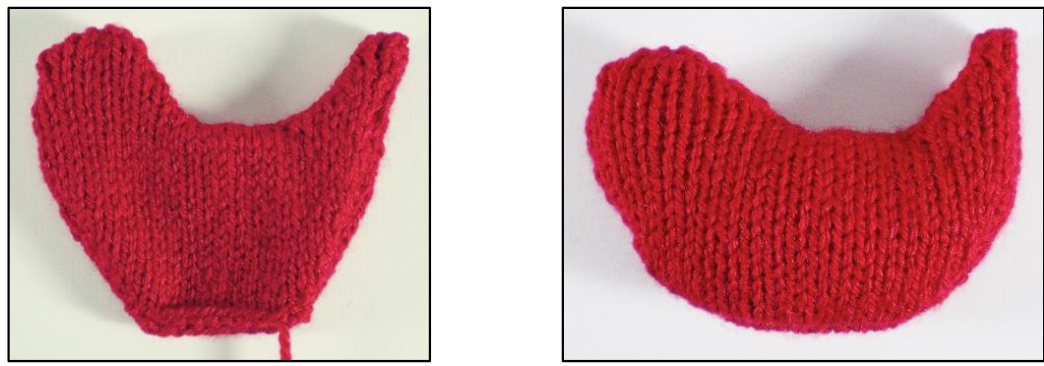
It doesn't look very exciting yet, time for some more knitting.
The Beak
This is really easy. Cast on one stitch and knit into the front and back of it (2 sts).
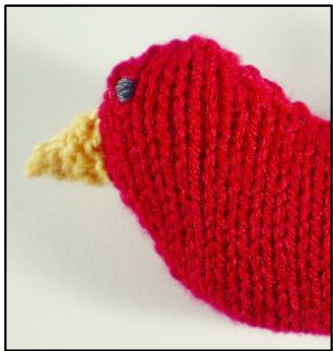
Next row: Kf&b, K to end. Repeat this row until you have nine stitches on your needle and then cast off. Fold the beak in half and use the cast on tail to close the side seam. Sew the cast off edge to the bird's head. sing dark yarn, embroider a few small stitches for each eyy
The Wings
Each wing is made up of two parts, the main wing and the upper wing. These are knitted in moss stitch and are reversible so the wings for both sides of the bird can be worked exactly the same. Shaping is achieved by working short rows / ridges. Work the specified number of stitches then wrap the following stitch, turn the work and work back. This wrapping and turning will be abbreviated as w&t in the pattern and is worked like this: Bring the yarn forward, slip the next stitch purlwise, take the yarn back again, replace the slipped stitch on the left hand needle, bring the yarn forward again and turn the work. The instructions look complicated but the knitting is really quite straightforward to do. Main Wing t on one stitch and knit into the front and back of it (2 sts). Row 1: Knit. Row 2: Kf&b, K1 (3 sts). Row 3: K1, P1, K1. Row 4: Kf&b, P1, K1 (4 sts). Row 5: K1, P1, K2. Row 6: Kf&b, K1, P1, K1 (5 sts). Row 7: K1, (P1, K1) twice. Now work in short ridges (a ridge = two rows): 1) K1, P1, K1, w&t, K1, P1, K1. 2) K1, w&t, K1. 3) K1, P1, K1, w&t, K1, P1, K1. Row 8: Kf&b, (P1, K1) twice (6 sts). Row 9: (K1, P1) twice, K2. Row 10: Kf&b, K1, (P1, K1) twice (7 sts). Row 11: K1, (P1, K1) three times. And some more short ridges: 1) K1, (P1, K1) twice, w&t, K1, (P1, K1) twice. 2) K1, P1, K1, w&t, K1, P1, K1. 3) Kl, w&t, K1. 4) K1, P1, K1, w&t, K1, P1, K1. 5) K1, (P1, K1) twice, w&t, K1, (P1, K1) twice. Row 12: K1, (P1, K1) twice, K2tog (6 sts). Row 13: K2, (P1, K1) twice. Row 14: (K1, P1) twice, K2tog (5 sts). Row 15: K1, (P1, K1) twice. Row 16: K1, P1, K1, K2tog (4 sts). Row 17: K2, K2tog (3 sts). Cast off, leaving a long tail. This end of the wing will be nearest the head of the bird.
Upper Wing
This is a lot simpler than the main wing. Using the long tail method cast on five stitches. Row 1: K1, (P1, K1) twice. Row 2: Kf&b, (P1, K1) twice (6 sts). Row 3: Kf&b, (P1, K1) twice, K1 (7 sts). Row 4: Kf&b, (K1, P1) twice, K2 (8 sts). Row 5: Kf&b, (K1, P1) three times, K1 (9 sts). Cast off in pattern. Sew to the main wing with the cast off edge at the top. Sew the main wing to the body by the short, cast off front edge and the top only.
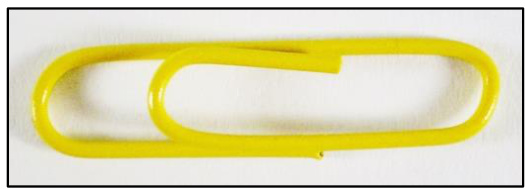
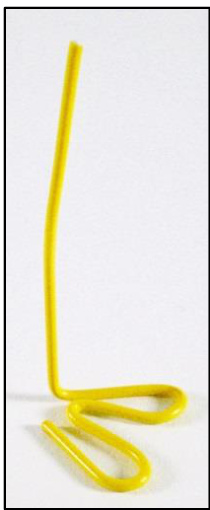
And now for the all-important legs. Each leg is made from a standard 1" paper clip. If you are using coloured ones, it is a good idea to match the colour to the yarn you are going to use for the legs. The wire is quite hard to bend, if you have some small pliers they would make it easier to do.
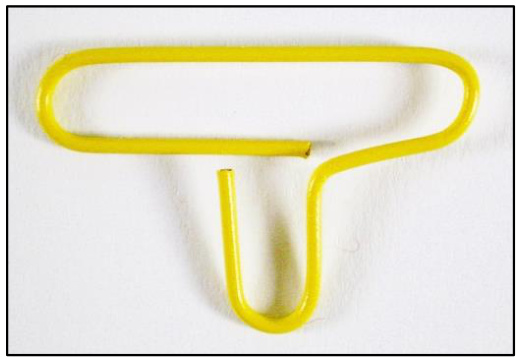
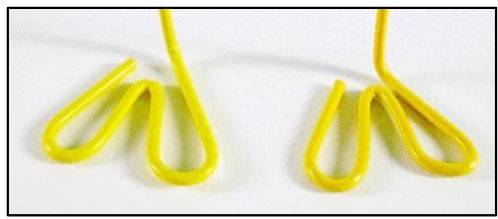
So, bend the short end of the paper clip out at a right angle. Bend it round further and squash the two loops to make the bird's foot.
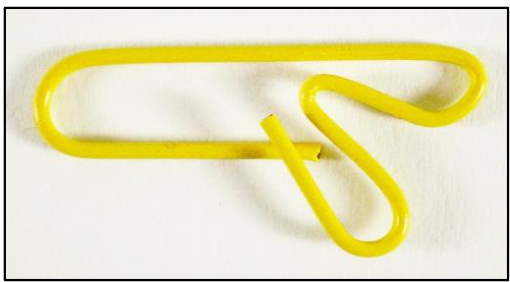
Open out the rest of the paper clip and fold it up to make the bird's leg. Make another one to match and you're ready to knit the covers for the legs.
The Knitted Legs
Using the long tail method cast on 12 stitches. The foot is shaped with short ridges: Ridge 1: K5, w&t, K5. Ridge 2: K3, w&t, K3. Ridge 3: Kl, w&t, K1. Ridge 4: K3, w&t, K3. Ridge 5: K5, w&t, K5. Ridge 6: K3, w&t, K3. Ridge 7: Kl, w&t, K1. Ridge 8: K3, w&t, K3. The leg is just one row: K5, P7. Cast off knitwise. The leg will want to roll with the purl side facing out but you will get a thinner leg if you force it the other way so that the knit side is the right side. Fold the foot in half and oversew the end together. Then put the wire foot inside the knitting and sew the side of the foot and leg around it. Keep your stitches small and close together to stop the wire poking through. The wire leg will be longer than the knitted one. This uncovered part will go inside the bird. Push the legs into the bottom of the bird, about 2.5 cm / 1" apart and sew them down firmly. Sew through the leg, first one way and then the other, in a cross shape.
You will need to adjust the legs to make the bird stand up; this is tricky and takes a while to get right. If all else fails, I suggest leaning the bird against something or perhaps blu-tack on his feet. Now you might want to make your little bird some friends.
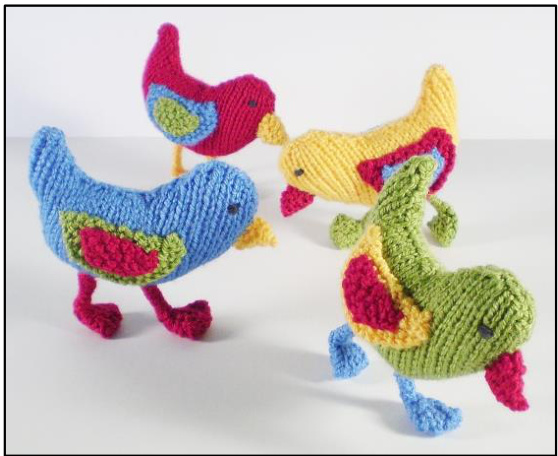
They really do look busy, don't they? Heads down, off they bustle in search of food.
Abbreviations
st / sts stitch / stitches K knit P purl m1 make 1 by lifting the thread before the next stitch and knitting into the back of it K2tog knit two stitches together S2KP2 slip two stitches as if to knit them together, knit one stitch and pass slipped stitches over SSK Slip 2 stitches knitwise (or knitwise followed by purlwise) one at a time, insert tip of left needle into stitches from above, put yarn round right needle and knit both stitches together Kf&b knit into the front and back of the stitch w&t wrap and turn (explained in pattern) Frankie Brown, 2014. My patterns are for personal use only and should not be used to knit items for sale. Please do not use them for teaching purposes without my permission.


