Dopey Shawl with Autumn Beech Brooch
www.beakerbutton.co.uk @Jen Best 2014

Tension: 10cm x 10cm square = 22 sts x 28 rows in stocking stitch, size 4mm needles or appropriate size to achieve the correct tension, yarn needle for sewing up, 4ply 100g, 400m approx, DK 200g 400m approx (will come out bigger). I've used a Rosie's Moments 4ply Roly Poly in the sample. Materials for the brooch 1 brass ring 4.5cm, 3m of peach thread (l used Stef Francis MP 11), 3m of mid brown thread (l used Stef Francis MP 07), 1m of mixed green/yellow/orange (I used Stef Francis MP 51), blunt ended needle, small broochback. Dopey shawl Cast on 3 Row 1: K1, yo, K1, yo, K1 Row 2: K2, P1, K2 Row 3: K2, yo, K1, yo, K2 Row 4: K2, P3, K2 Row 5: K2, yo, K1, yo, K1, yo, K1, yo, K2 Row 6: K2, purl to last 2 sts, K2 Row 7: K2, yo, K3, yo, pm, K1, pm, knit to last 2 sts, yo, K2 Row 8: K2, purl to last 2 sts, K2 - (all wrong side rows from now on) Row 9: K2, yo, knit to marker, yo, slip marker, K1, slip marker, yo, knit to last 2 sts, yo, K2. Rows 8 and 9 form the pattern. Continue in pattern until work measures the required length from bottom to needles ending on a wrong side row. K2, yo, \*K2tog, yo\* repeat \* to \* until last 2 sts, K2. Wrong side row Knit 2 rows. Cast off using knit two together cast off: K2, (insert the left needle from left to right through both stitches on the right needle and knit them together as if kniing together through the back loops, K1) repeat the brackets This gives a nice wavy cast off edge.
Autumn Beech Brooch
There are four stages to making a Dorset Button on a ring. Casting, Slicking, Laying and Rounding. Hints and tips: If you find you are running out of thread simply thread the tail of yarn neatly through the back of the button and leave a long tail. Add new yarn by threading it back the opposite way to the first thread, leaving a long tail, and continue rounding, stitching over the tails as well. The tails can be woven into the back of the button at the end. When laying the spokes make sure the spoke you are laying is perfectly in the centre of the ring at the front. Don't worry about the back. This will help to make your spokes central. The holding stitches you put in wil pull the back spokes into place.
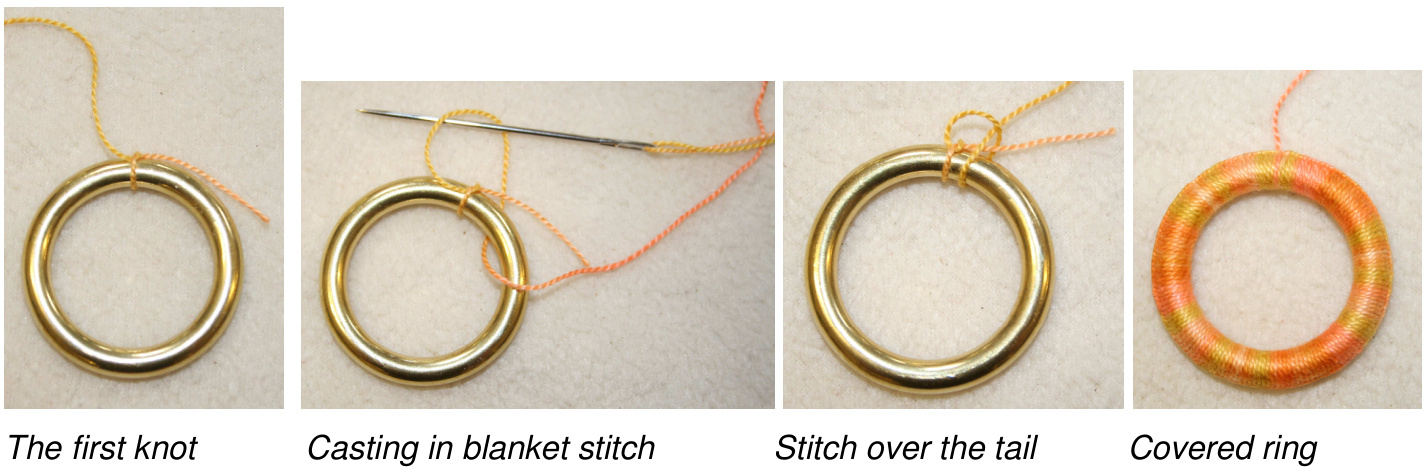
Casting
Tie the yarn around the ring in a single knot, leaving a tail of about 2cm. Stitch round the entire ring in blanket stitch, covering the tail as you go. Bring the needle towards you through the ring and pass it away from you through the loop created. Make sure to cover the whole ring, moving the stitches along the ring so there are no gaps. Photos on the next page.
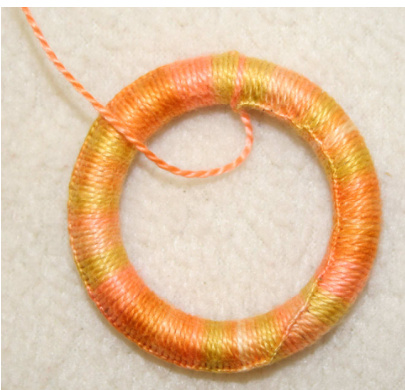
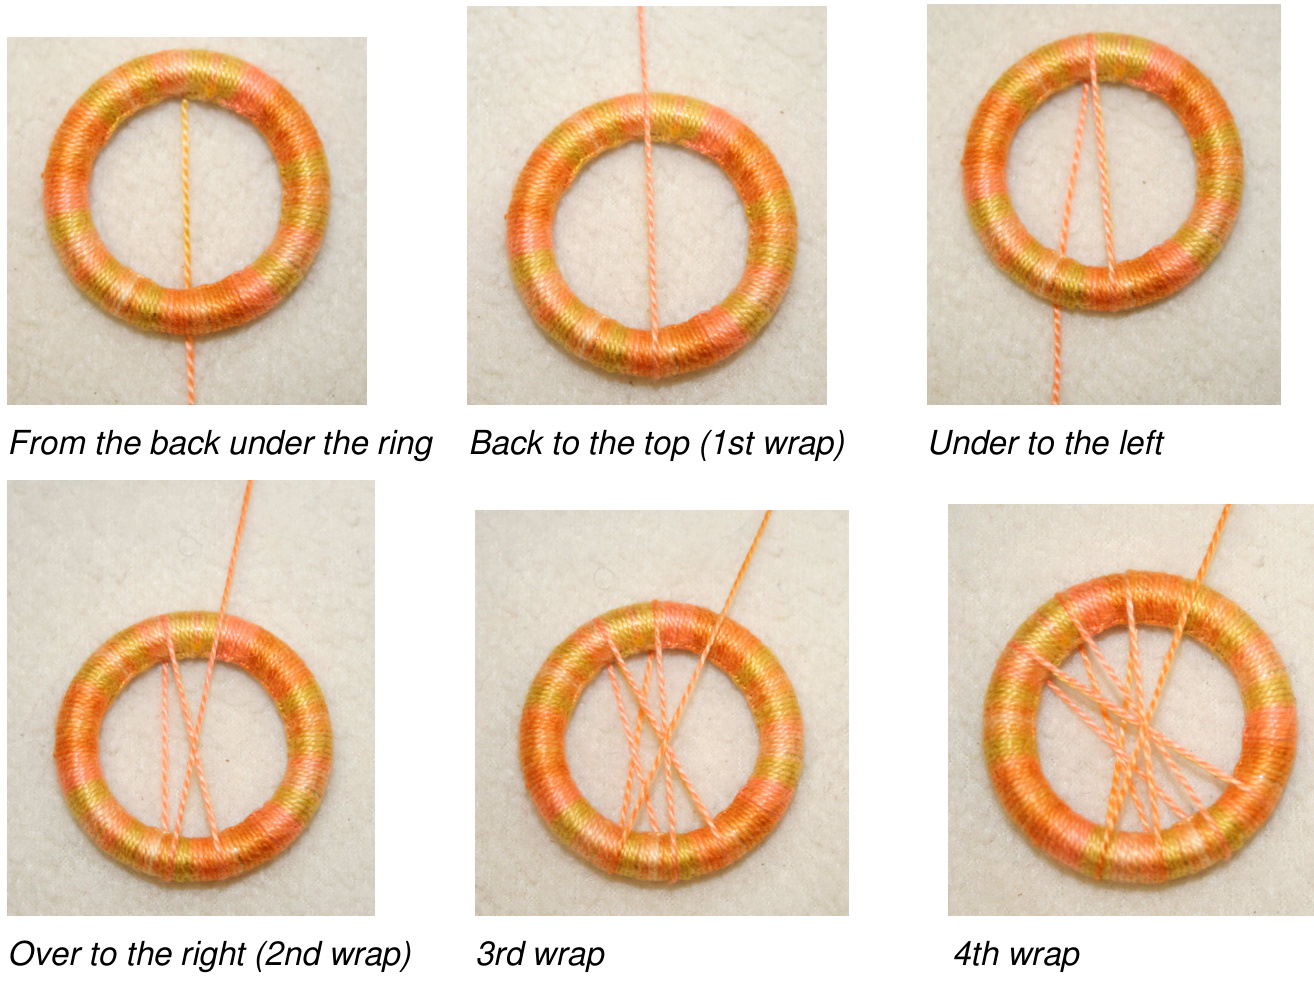
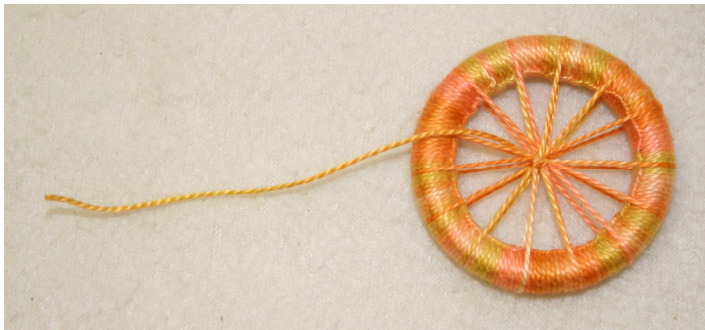
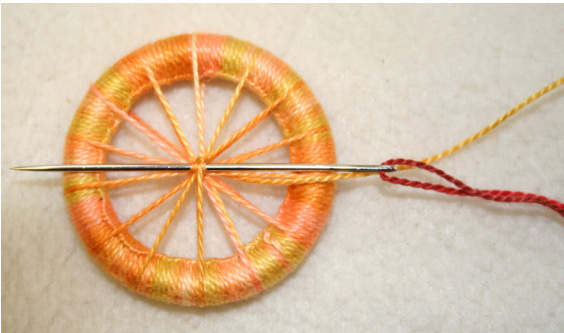
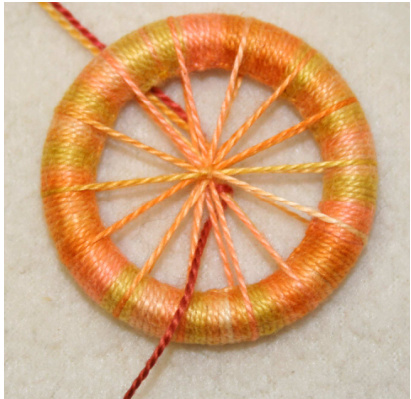
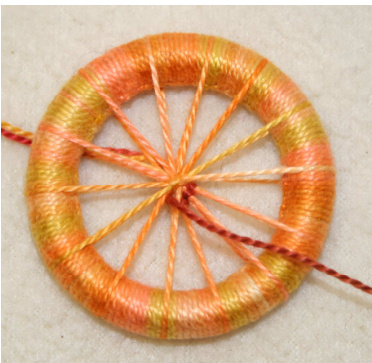
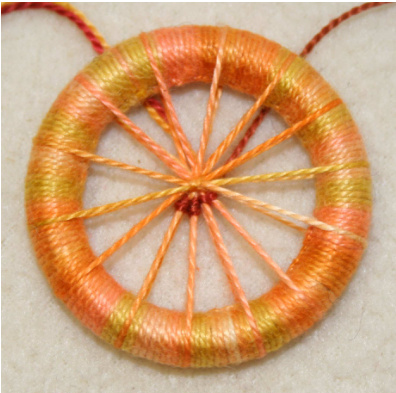
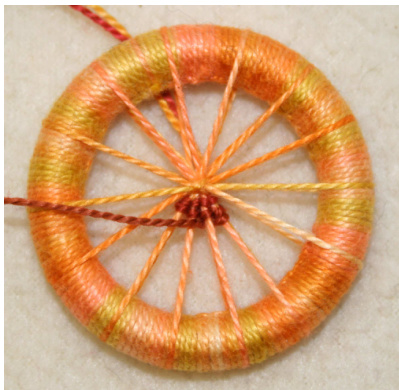
Slicking Turn all the stitches so that they face inwards, leaving a smooth edge to the button. Laying Following the angles of the thread in the photos, wrap the yarn from the back under the ring then back up to form your spokes. The spacing of the spokes should be even all the way round. You need 14 spokes so you'll wrap round the ring 7 times. Make 2 or 3 stitches in the centre to pull the back spokes in to the centre, and thread the needle through these stitches.
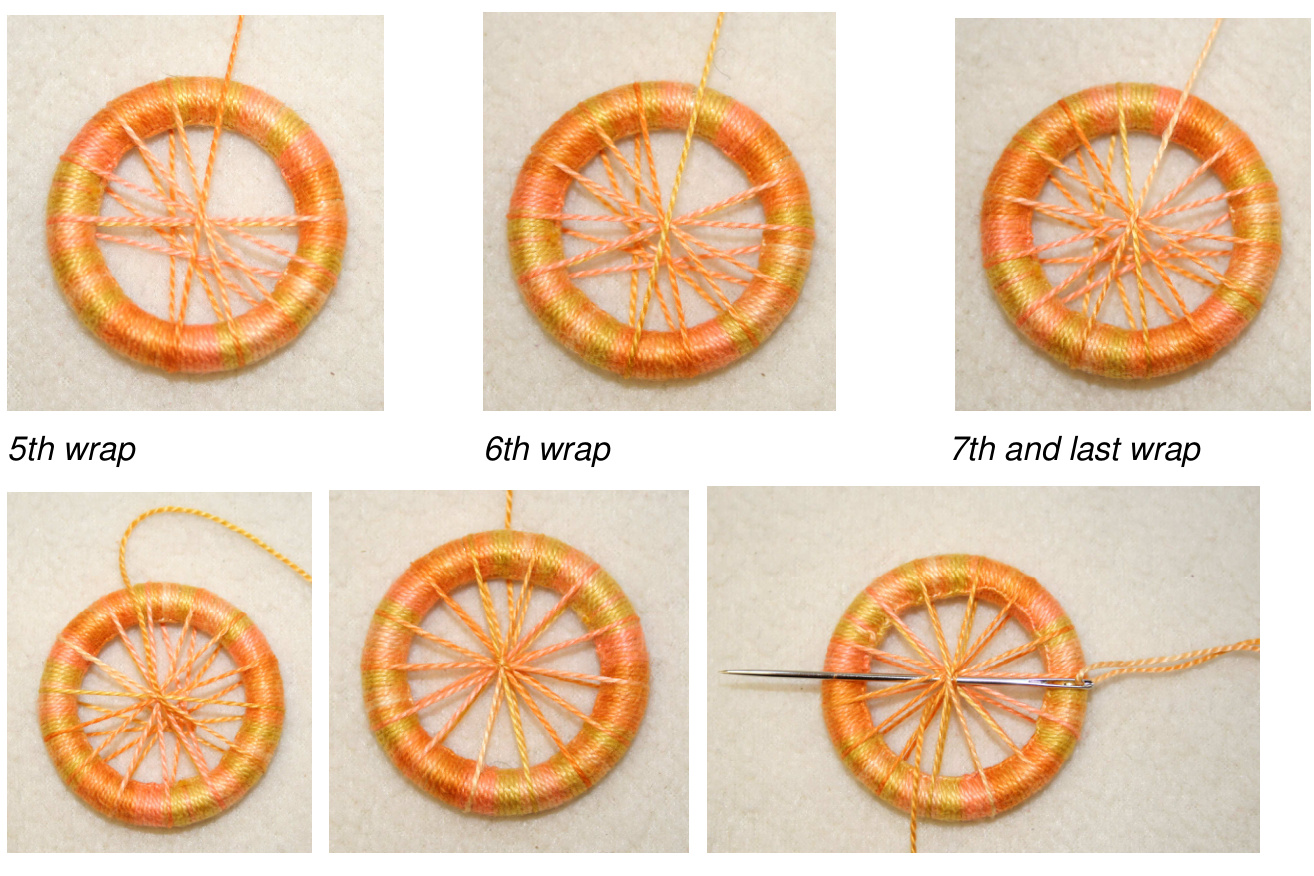
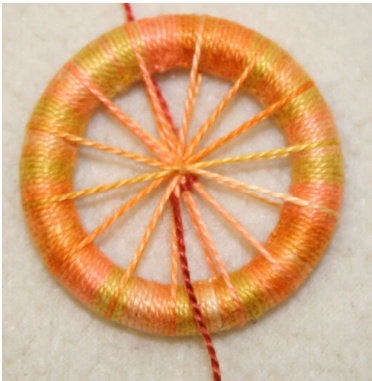
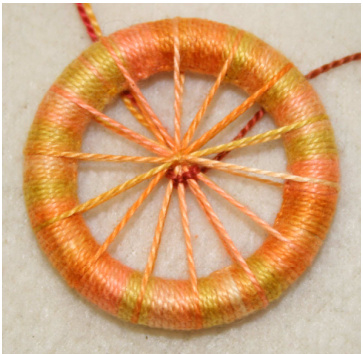
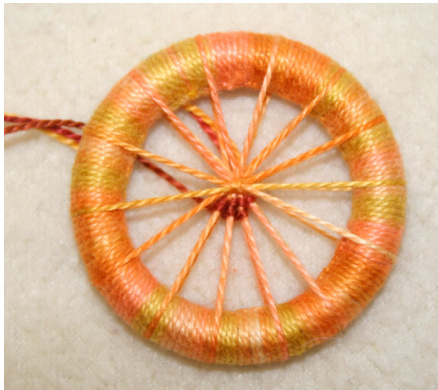
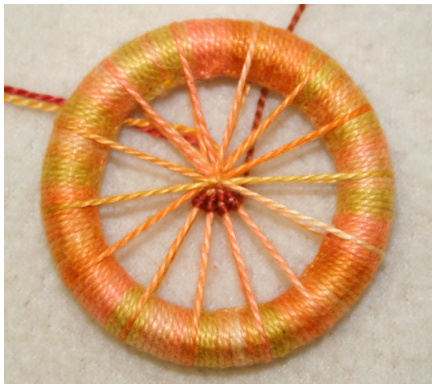
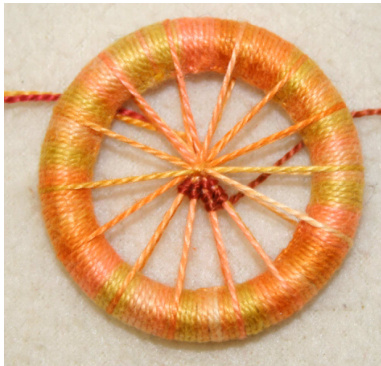
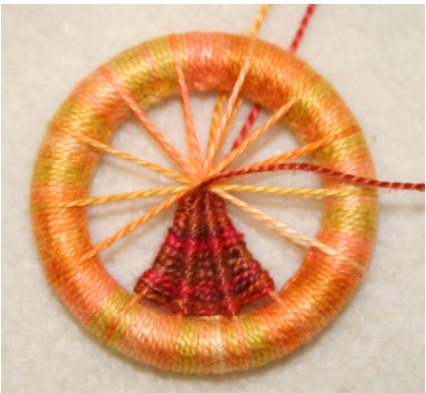
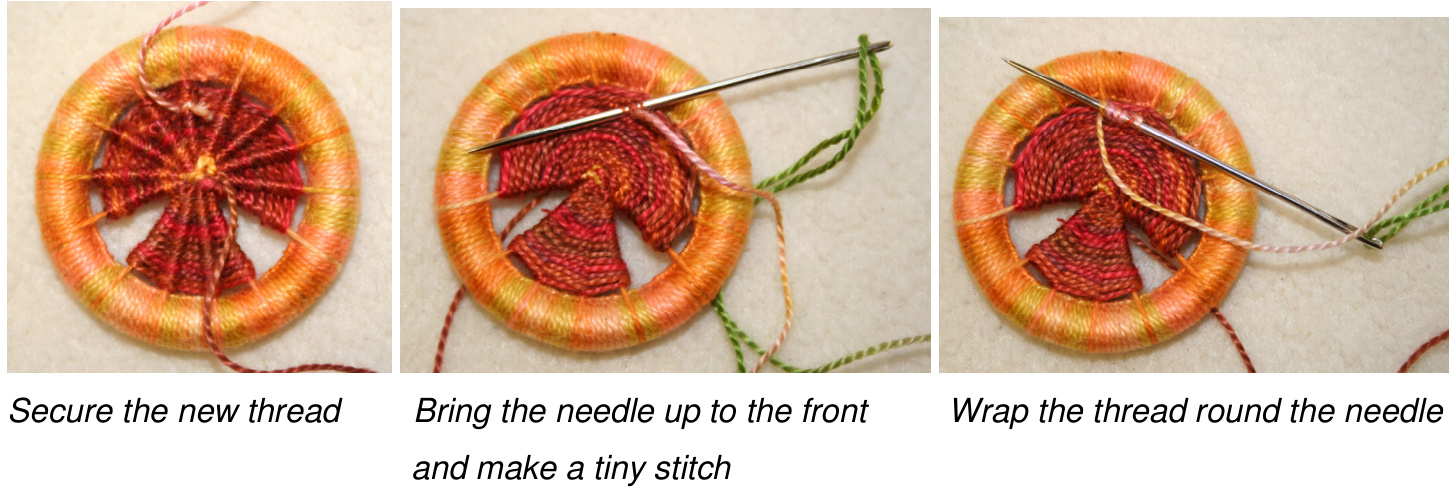
2 or 3 stitches in the centre to pull the back spokes into the middle. Thread the needle through the stitches in the centre. Rounding stage one (the trunk) Trim the peach thread so you have a tail of about 10cm. Thread the brown thread through the stitches in the centre, leaving a tail of about 10cm. The rounding on this button is done in two stages. The first stage is the bottom of the button. You are going to back stitch over four of the spokes, working across from left to right, then back from right to left until the four spokes are covered.
Thread the brown thread through the stitches.
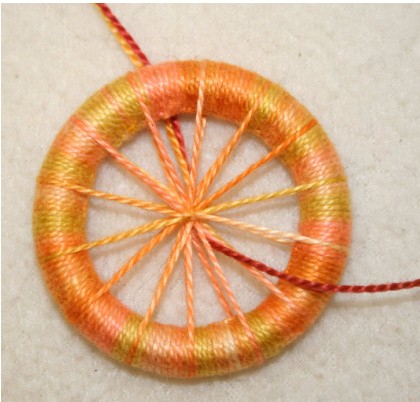
Bring the needle to the front of the button Pass the needle to the right over the spoke Bring theneedleuptotheleft of the spoke on the left (under 2 spokes)
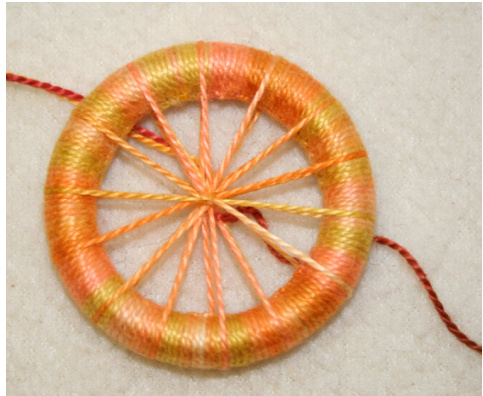
Pass the needle to the right over the spoke
Pass the needle to the right over the spoke Bring the needle up to the leftofthespokeontheleft
Bring the needle up to the leftofthespokeontheleft
Pass the needle to the right over the spoke
Bring the needle up to the right of the spoke on the right
on the right
Back stitch over the next spoke on the right
Stitch round the end spoke again to start the next row Back stitch the whole row...
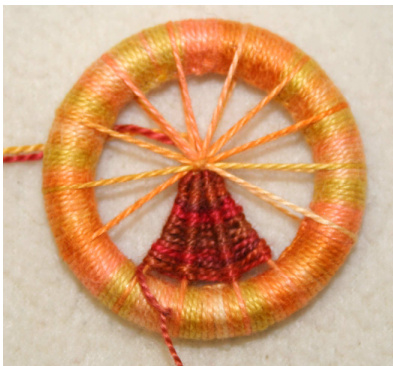
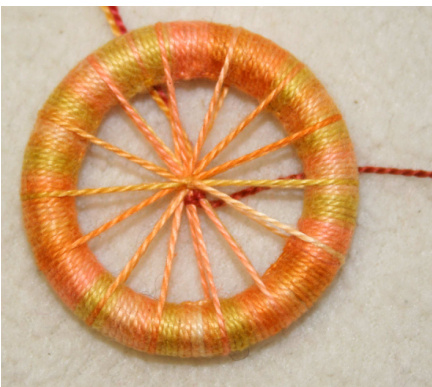
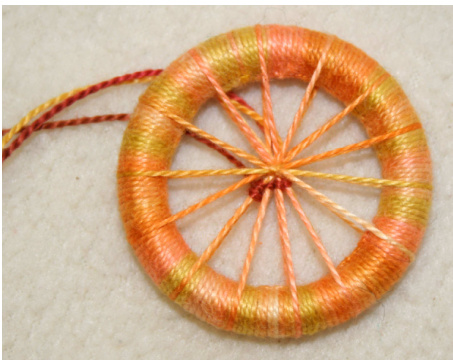
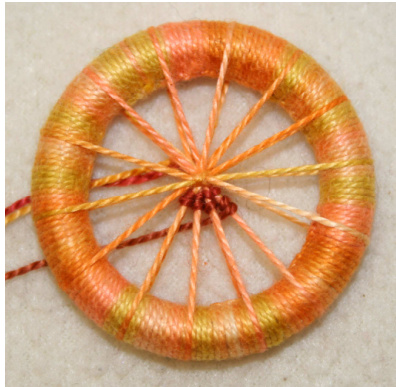
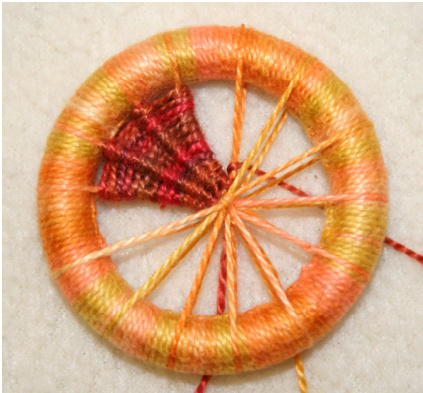
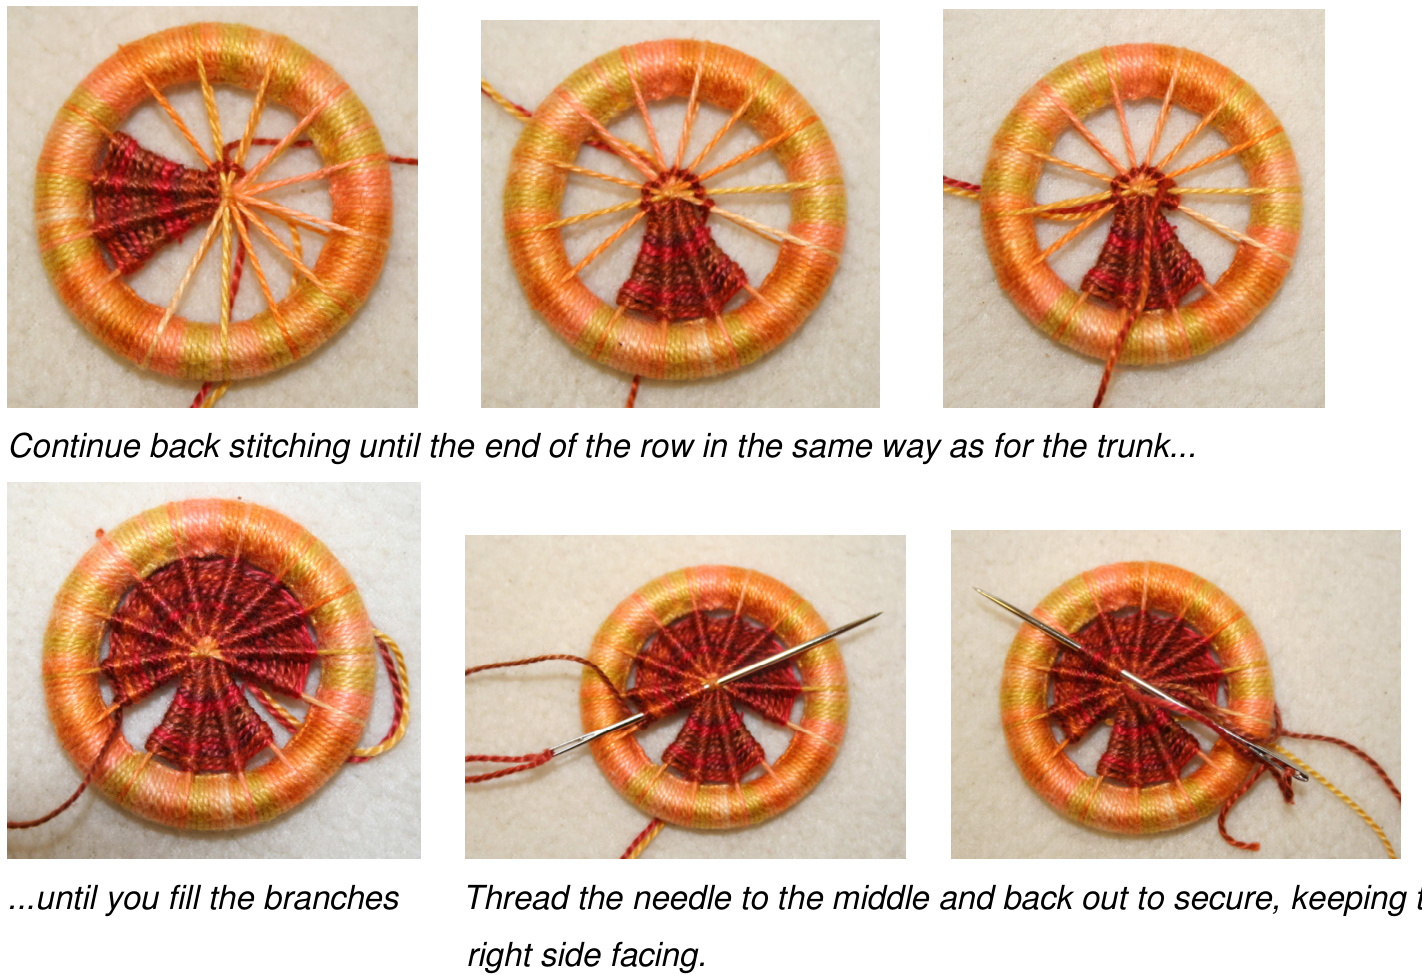
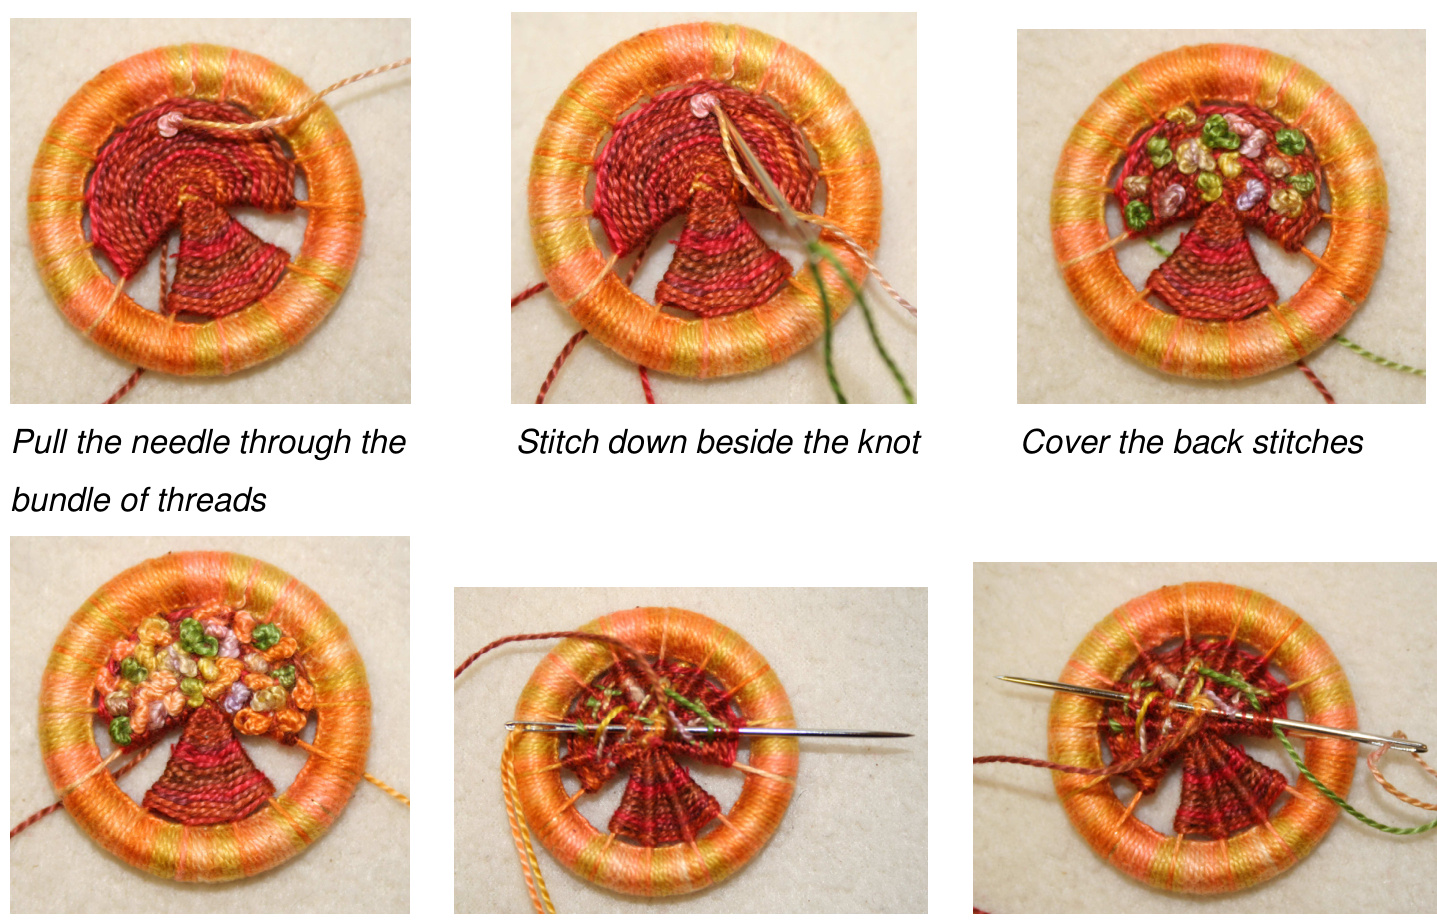
...as before... ...until you reach the bottom of the button. Rounding stage two (the branches) Before you begin stage two you need to move the thread from the bottom to the middle of the button. Slide the needle through the back of the stitches being careful not to move them about.
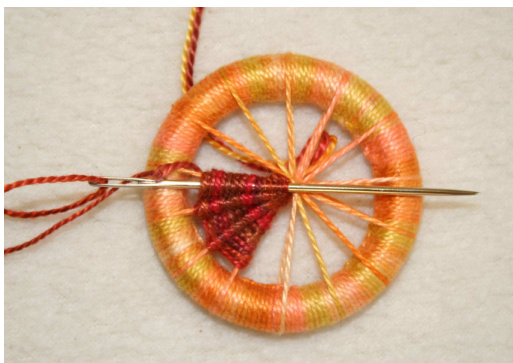
Moving the thread to the middle. Stage two is a repeat of stage one. You are going to back stitch over each of the spokes again, working from left to right, then right to left. You will have a gap either side of the trunk.
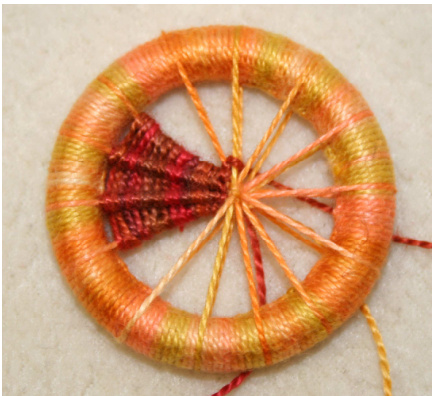
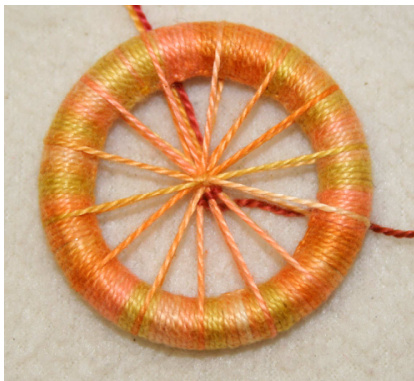
Bring the needle to the frontof the button totheleft of the farthest left spoke Pass the needle to the right over the spoke Bring the needle up to the right of the spoke on the right and then left over that spoke
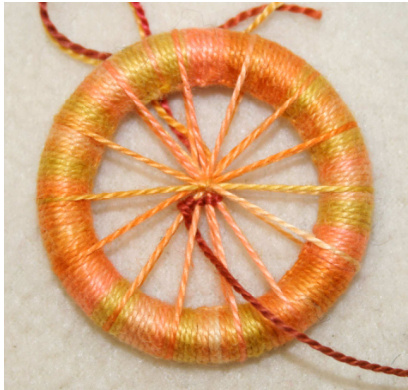
French knot leaves Use the green/yellow/orange thread to make French knot leaves. Make two tiny stitches in one of the spokes to secure the thread. Turn the button so the flat side faces. This is now the right side. To make the French knots, take a tiny stitch and leave the needle in the work with the point sticking out. Wrap the yarn round the needle tip 5 times. Pinch your thumb and finger over the threads round the needle and carefully pull the needle right through. Push the bundle of yarns down to form a knot. Pass the needle back down to the side of the thread, securing the knot. Make lots of knots close together to cover the back stitching. Thread the tail through the back to secure and trim.
Filled branches Thread through the back twice to secure and trim Finishing off and making the brooch Sew the brooch back on using the brown tail. I put two stitches in each hole then moved on to the next hole. Be careful not to let the thread show on the front of the button.
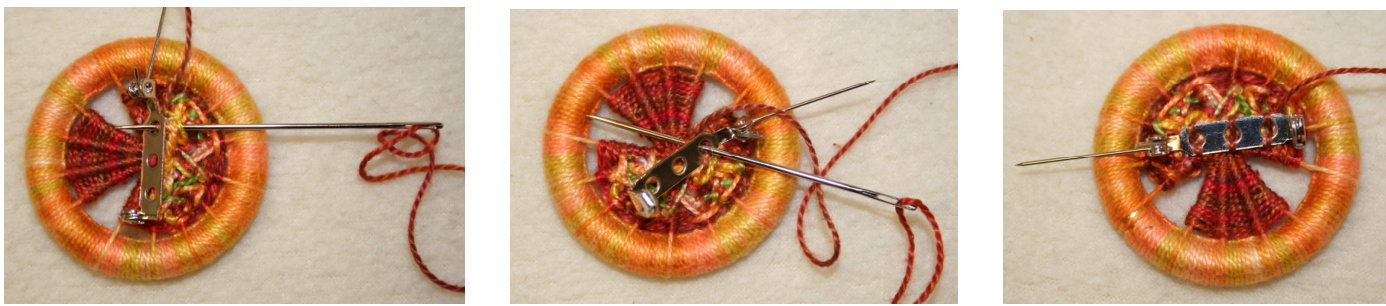
Sew the brooch back on using the brown tail Finish off by threading the needle through the back two or three times to secure the thread and trim. Pin in to your shawl and bask in all the praise it gets you!


