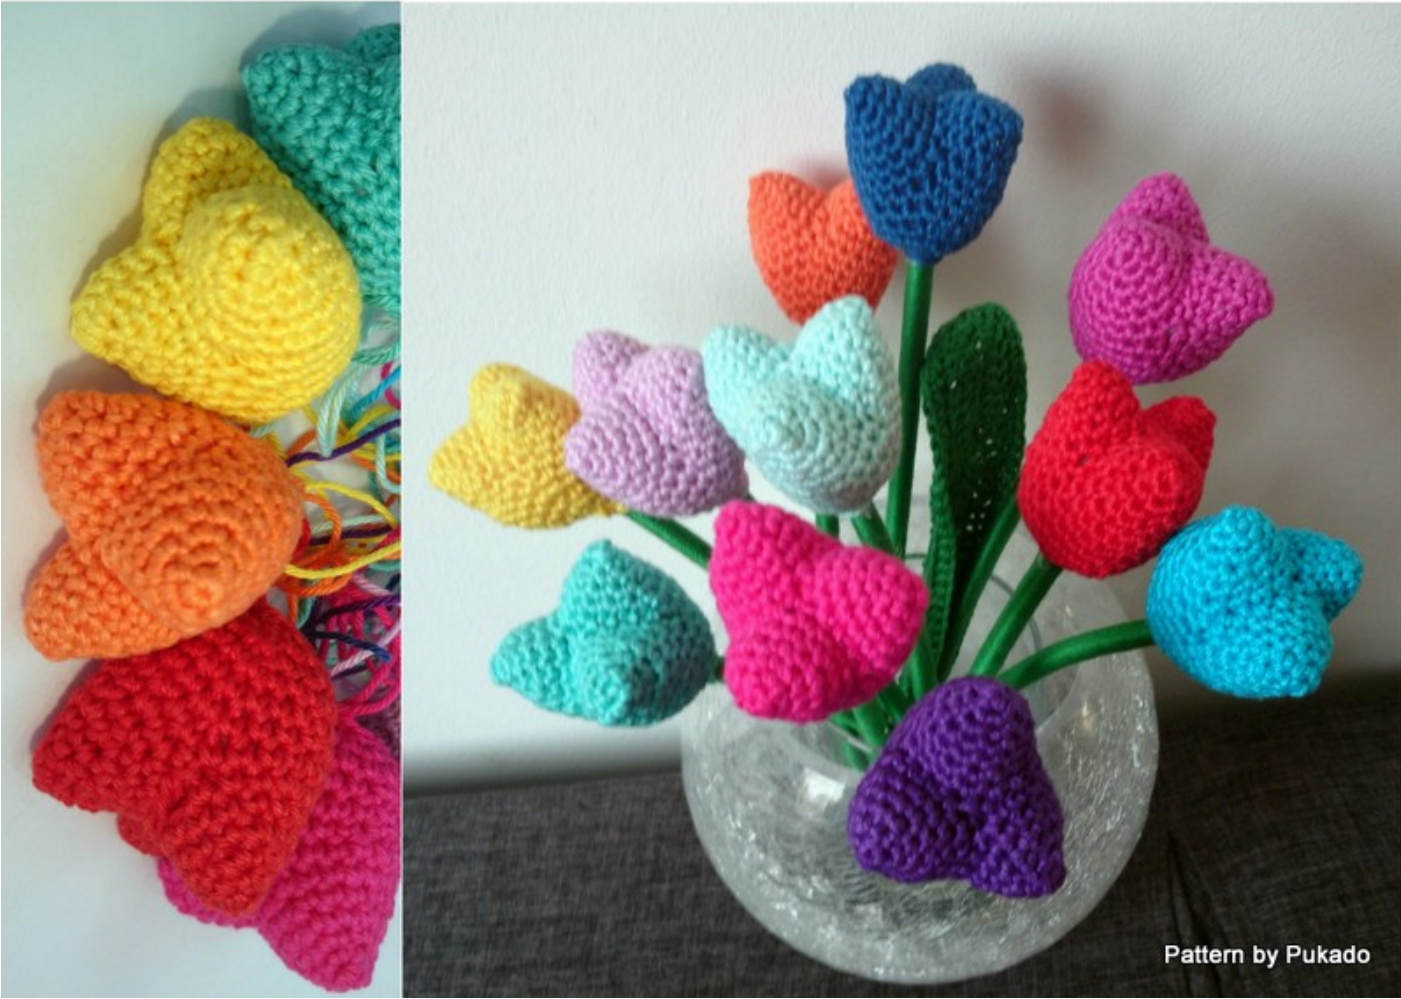
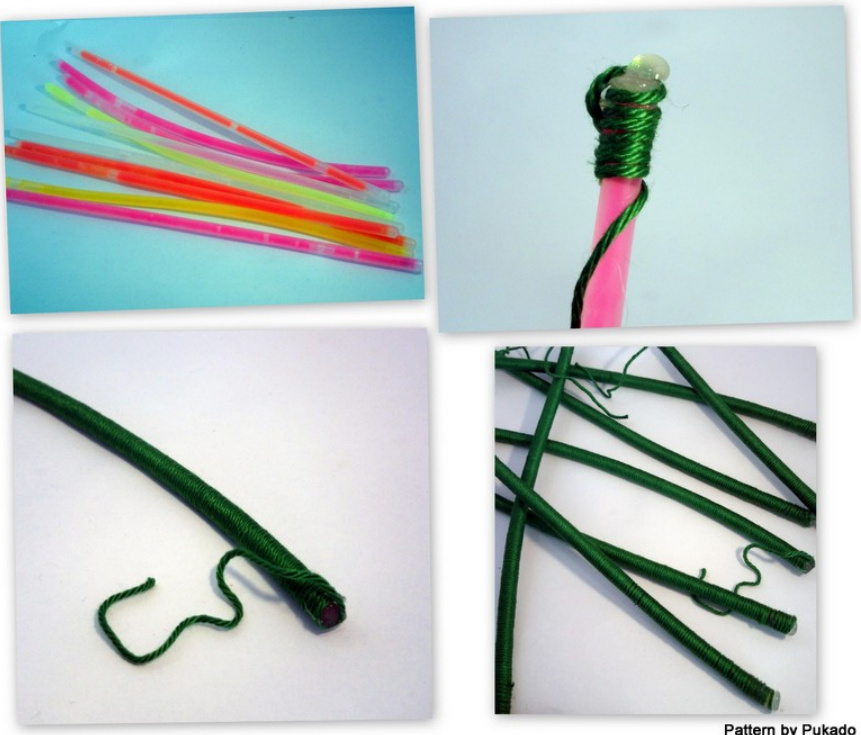
Supplies
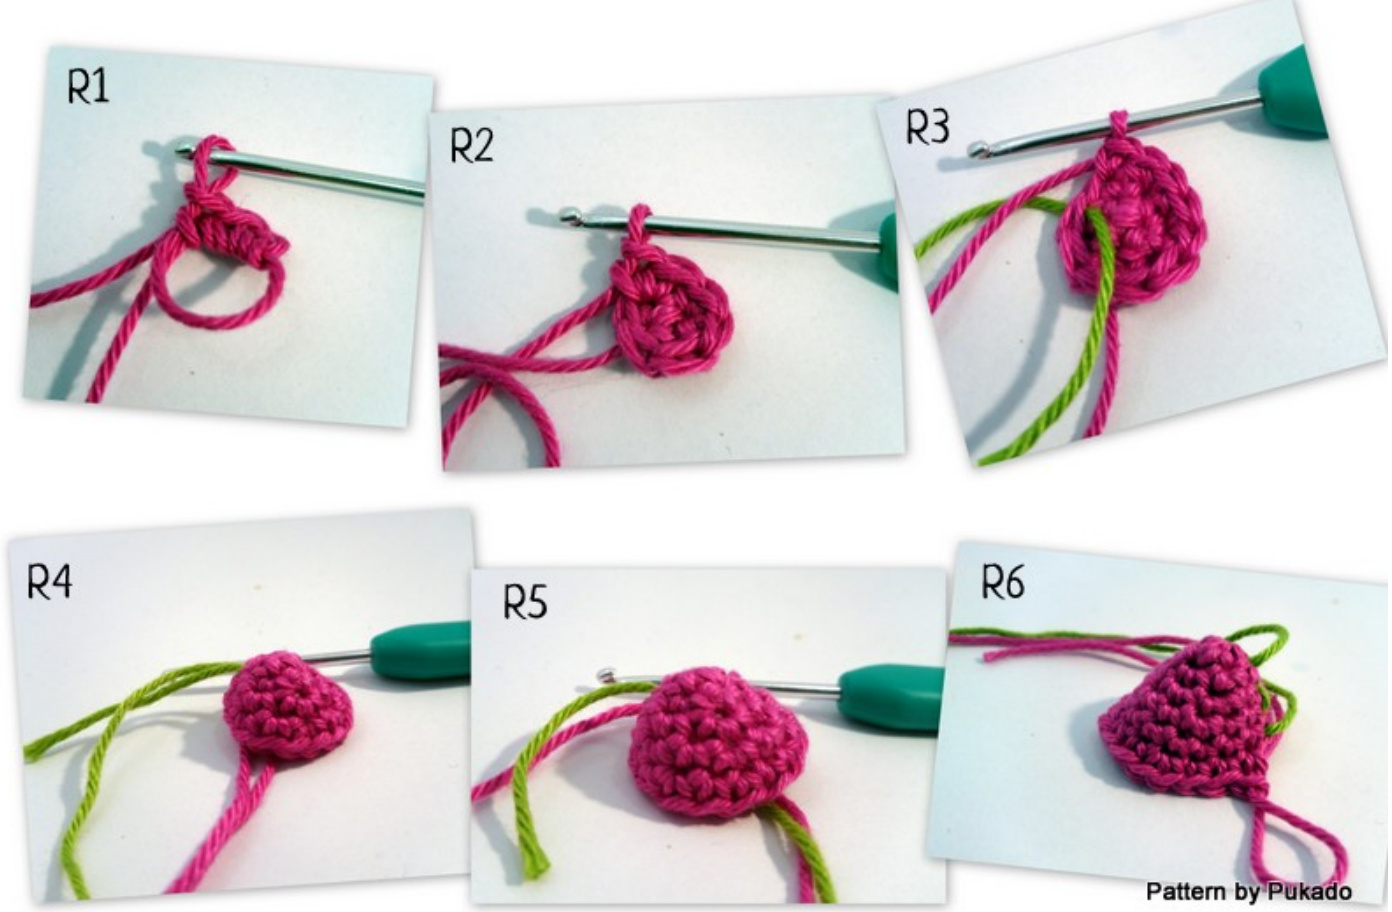
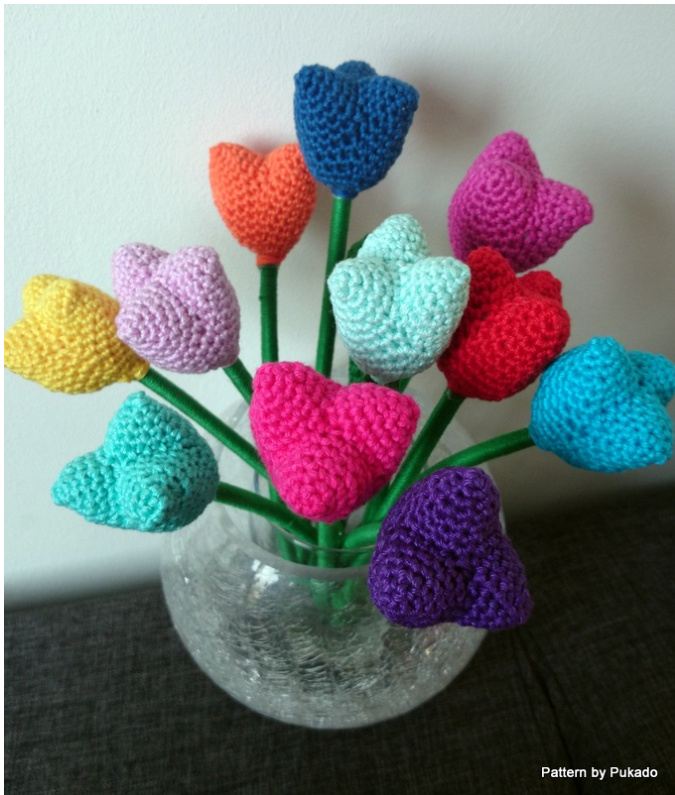
Phildar Coton 3 or similar Tulips: any color you want Stems and leaves: green Hook size 2.5mm. I crochet loose, therefore I need to use a small needle. You may want to go up in hook size to get the same result Scissors Yarn needle Sticks/dowel or in my case I use used up lightsticks my kids love to play with. I buy them in a discount store, 20 for a euro. The kids play with them before bedtime and the next morning they're all used up and I can use it for whatever! I was thinking of using old pens as well. You just need something tube like that will hold some weight and you can crochet around it. I used a bamboo skewer for the leaf. Glue gun Work in the round, use stitch marker Make 3: R1, MC, 3SC in MC - 3st R2, 2SC in each stitch - 6st R3, SC, 2SC in next 4st, SC - 10st R4, SC in next 2st, 2SC, SC, 2SC in next 2st, SC, 2SC, SC in next 2st - 14st R5, SC in each st around - 14st R6, SC in next 3st, 2SC, SC in next 2st, 2SC in next 2st, SC in next 2st, 2SC, SC in next 3st - 18st
3 pyramids together using 4 stitches each side of the first stitch. See pictur
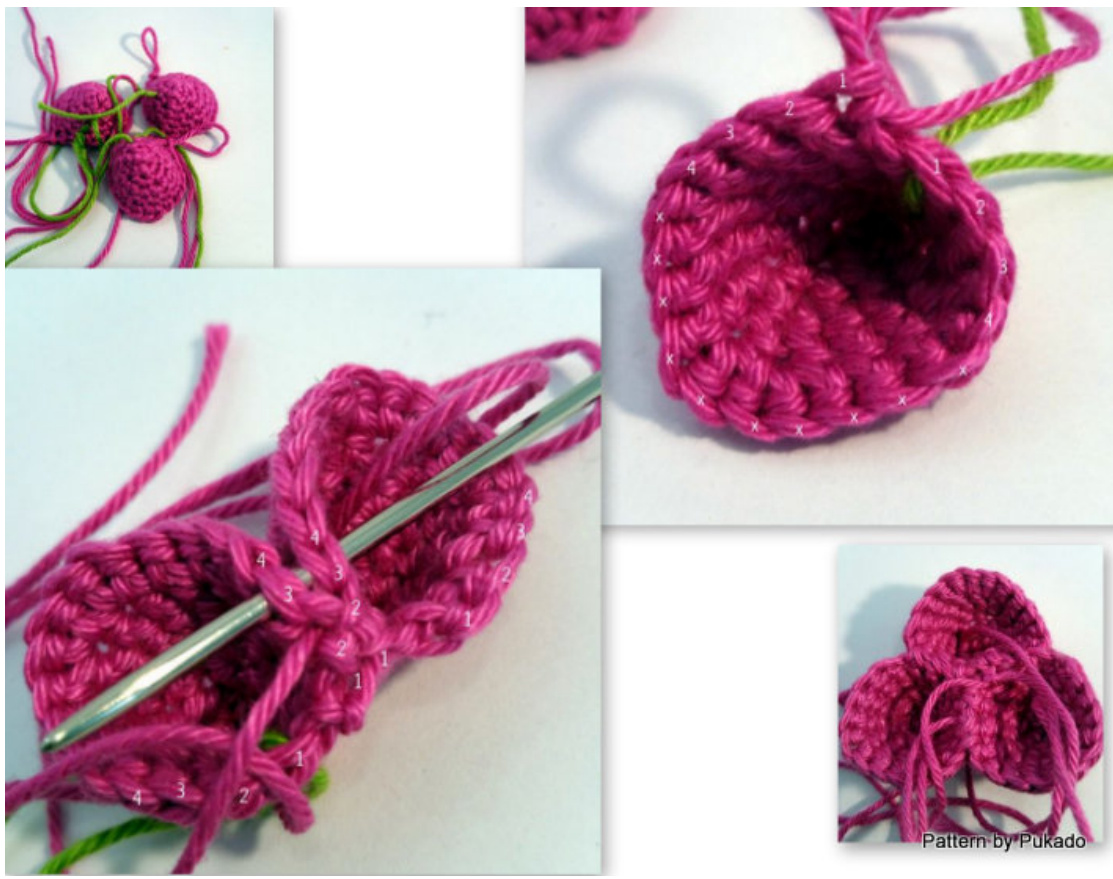
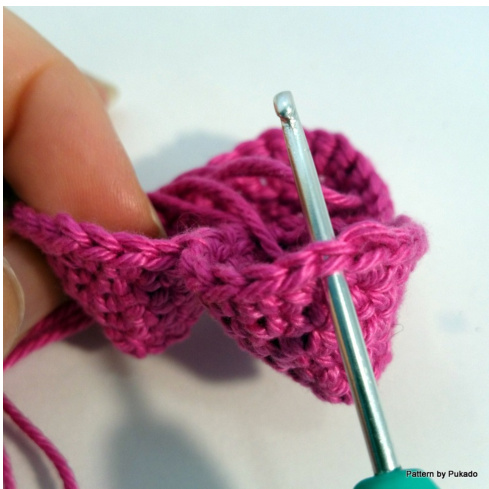
Body of tulip: You now have 10st on each side. Work in continuous rounds, use stitch marker R1, SLST to the 6th st of a side, SC in each st around - 30st R2, \*SC2tog, SC in next 3st\* repeat around - 24st R3, SC in each st around - 24st R4, \*SC2tog, SC in next 2st\* repeat around - 18st R5, SC in each st around - 18st (start stuffing) R6, \*SC2tog, SC in next st\* repeat around - 12st R7, \*SC2tog\* repeat around - 6st
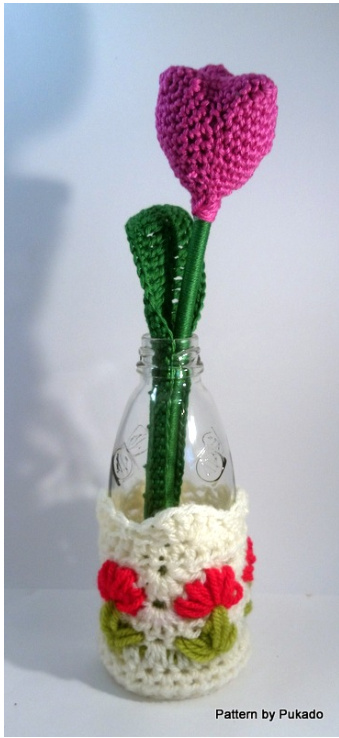
Wrap your stem (dowel/stick/old pen) with the green coton, using the hot glue on the ends. Apply some hot glue on the top of your stem and stick it in the tulip, wrap the tail of your tulip around the stem and the glue and sew in the end with a yarn needle
Long leaf
R1, CH45, SC in sec CH from hook, SC in next 3 CH, HDC in next 10CH, DC in next 10CH, HTR in next 5CH, TR in next 5CH, HTR in next 5CH, DC in next 4CH, in last CH, 2DC, picot, 2DC, Work on the other side of Chain DC in next 4CH, HTR in next 5CH, TR in next 5CH, HTR in next 5CH, DC in next 10CH, HDC in next 10CH, SC in last 5CH, 3SC in top CH R2, Edge around with SC, at the top, 2SC, picot, 2SC Cut a bamboo skewer % the size of the leaf. Wrap the skewer with the same green coton, using the hot glue on the ends. And stitch the skewer on the back of the leaf. With hot glue attach leaf to flower stem at the bottom. Or you can use a few stitches and wraps of the same green cotton. If you make a bunch of tulips, you don't need to attach the leaves to the flowers. You can just stick them in the bunch. Also, if you are making a bunch, you don't need to wrap the whole stem in coton. You can wrap half and the rest of the stems you can cover and wrap with a ribbon.
Copyright Patricia Stuart 2014 @. You are free to create from the pattern and sell the creations. Please do not copy, rewrite, resell or distribute as your own, this is prohibited. Please give credit to my shop for the pattern and if you sell finished items online, please provide a link to the shop (www.pukado.etsy.com) for the pattern. Thank you for your understanding.
Pick yarn for project you would like to make: In the different projects I made, I used Stylecraft DK and Phildar Coton 3 In the following colors: White/Cream Red Green Hook size: depends on the yarn you use. Yarn needle - to weave in ends Scissors Stitch marker - preferably one that closes CH - Chain SLST - SlipStitch SC - Single Crochet HDC - Half Double Crochet DC - Double Crochet Shell - Shell Stitch HalfDC - first part of a DC, leave last loop on hook FlowerST LeafST
Flower stitch:
You will start on the half shell at the beginning of your row. SLST to the first st, CH2, and start the FlowerST in the next st, this will be normally be the 4th stitch on the shell. Always start your FlowerST in the 4th stitch of the shell Puff Flower: YO, insert hook in next st, pull up a loop, YO insert hook in same st, pull up a loop\* repeat this in the next 4 st, YO, pull through all loops (21) on hook, SLST close, pull tight, CH5, skip st
Cluster Flower:
Your first FlowerST will begin with CH2 and DC in same st, creating your first clusterst! 2HalfDC in each of the 5 shell stitches, YO, pull through all loops (15) on hook, SLST to close, pull tight, CH5, skip st
Leaf Stitch
You will start on the half shell at the beginning of your row. SLST to the first st, CH2, and start the LeafST in the next st, this will be normally be the 4th stitch on the shell.
Puff stitch
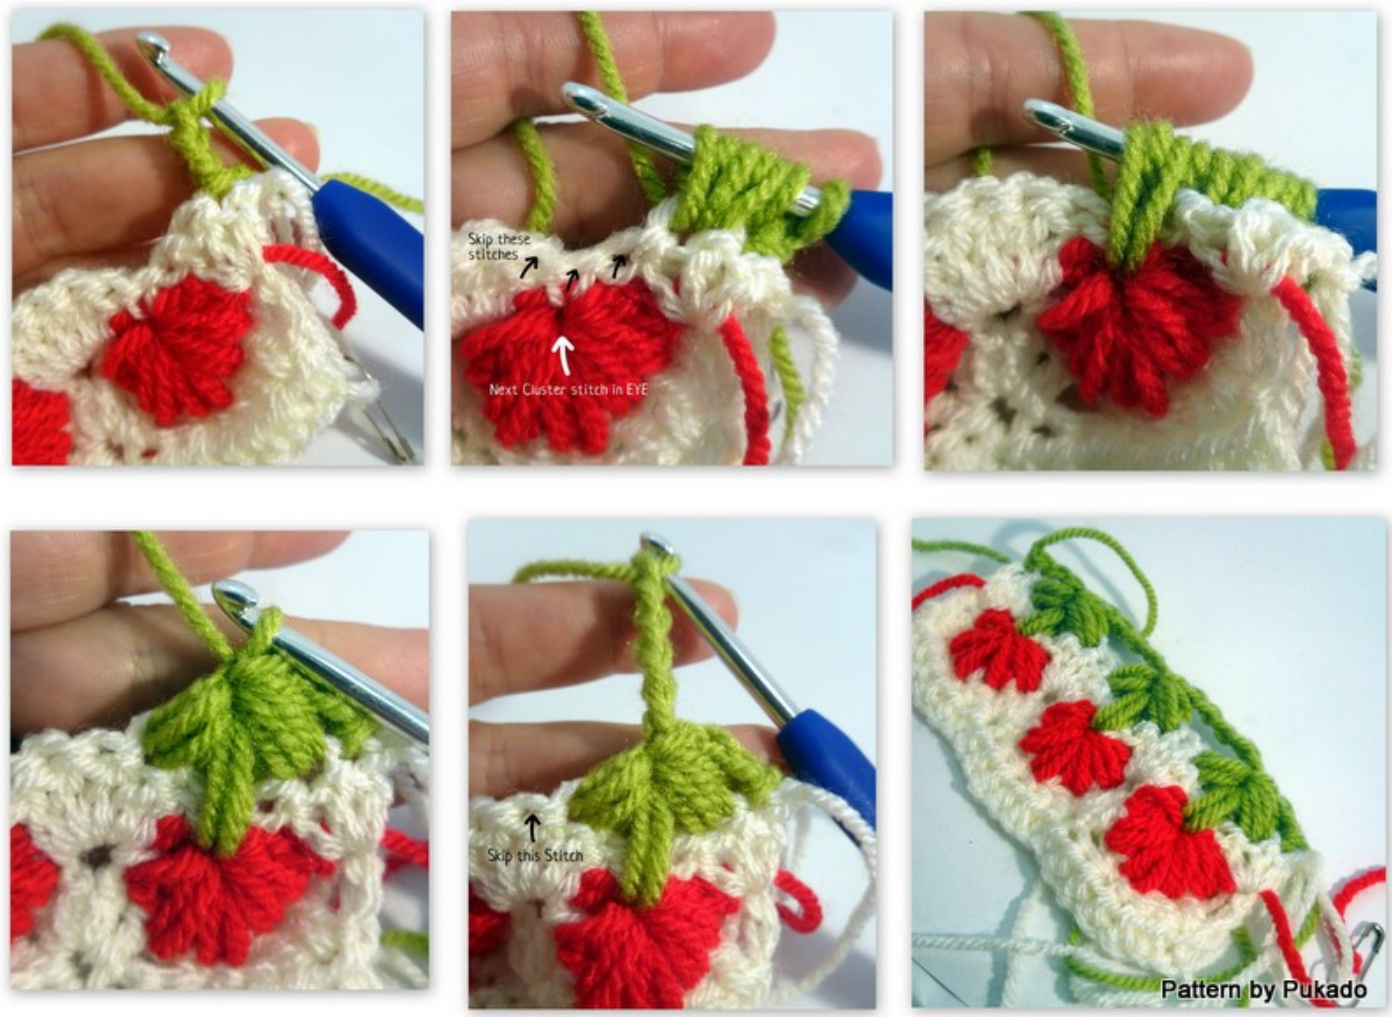
In 4th stitch of shell \*YO, pull up a loop\* 3 times (leave loops on hook) In eye of FlowerST of R3: \*YO, pull up a loop\* 2 times, skip 3st (stitch 5, 6 of shell you're working and stitch1 of next shell) In second st of next shell: \*YO, pull up a loop\* 3 times, YO, pull through alloops (17) on hook, SLST close, pull thight, CH5, skip 3rd stitch of shell
Cluster stitch
Your first LeafST will begin with CH2 and 2DC in same st, creating your first clusterst! In 4th stitch of shell: 3HalfDC (leave loops on hook) In eye of FlowerST of R3: 2HalfDC, skip 3st (stitch 5, 6 of shell you're working and stitch1 of next shell) In second st of next shell: 3HalfDC, YO, pull through all loops (8) on hook, SLST close, pul thight, CH5, skip 3rd stitch of shell
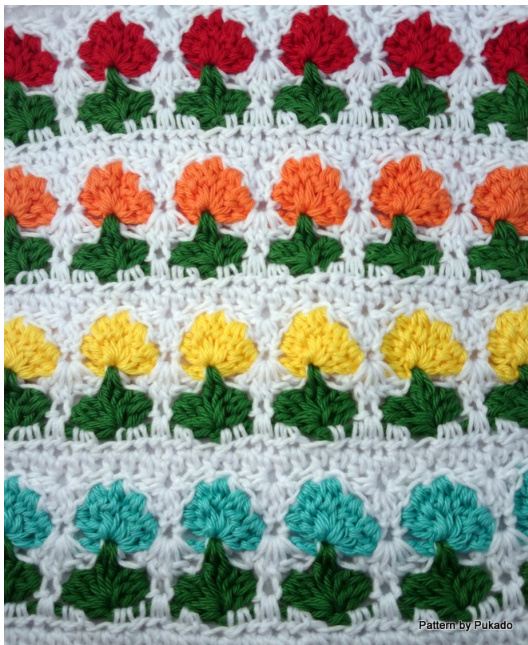
Pattern worked in rows.
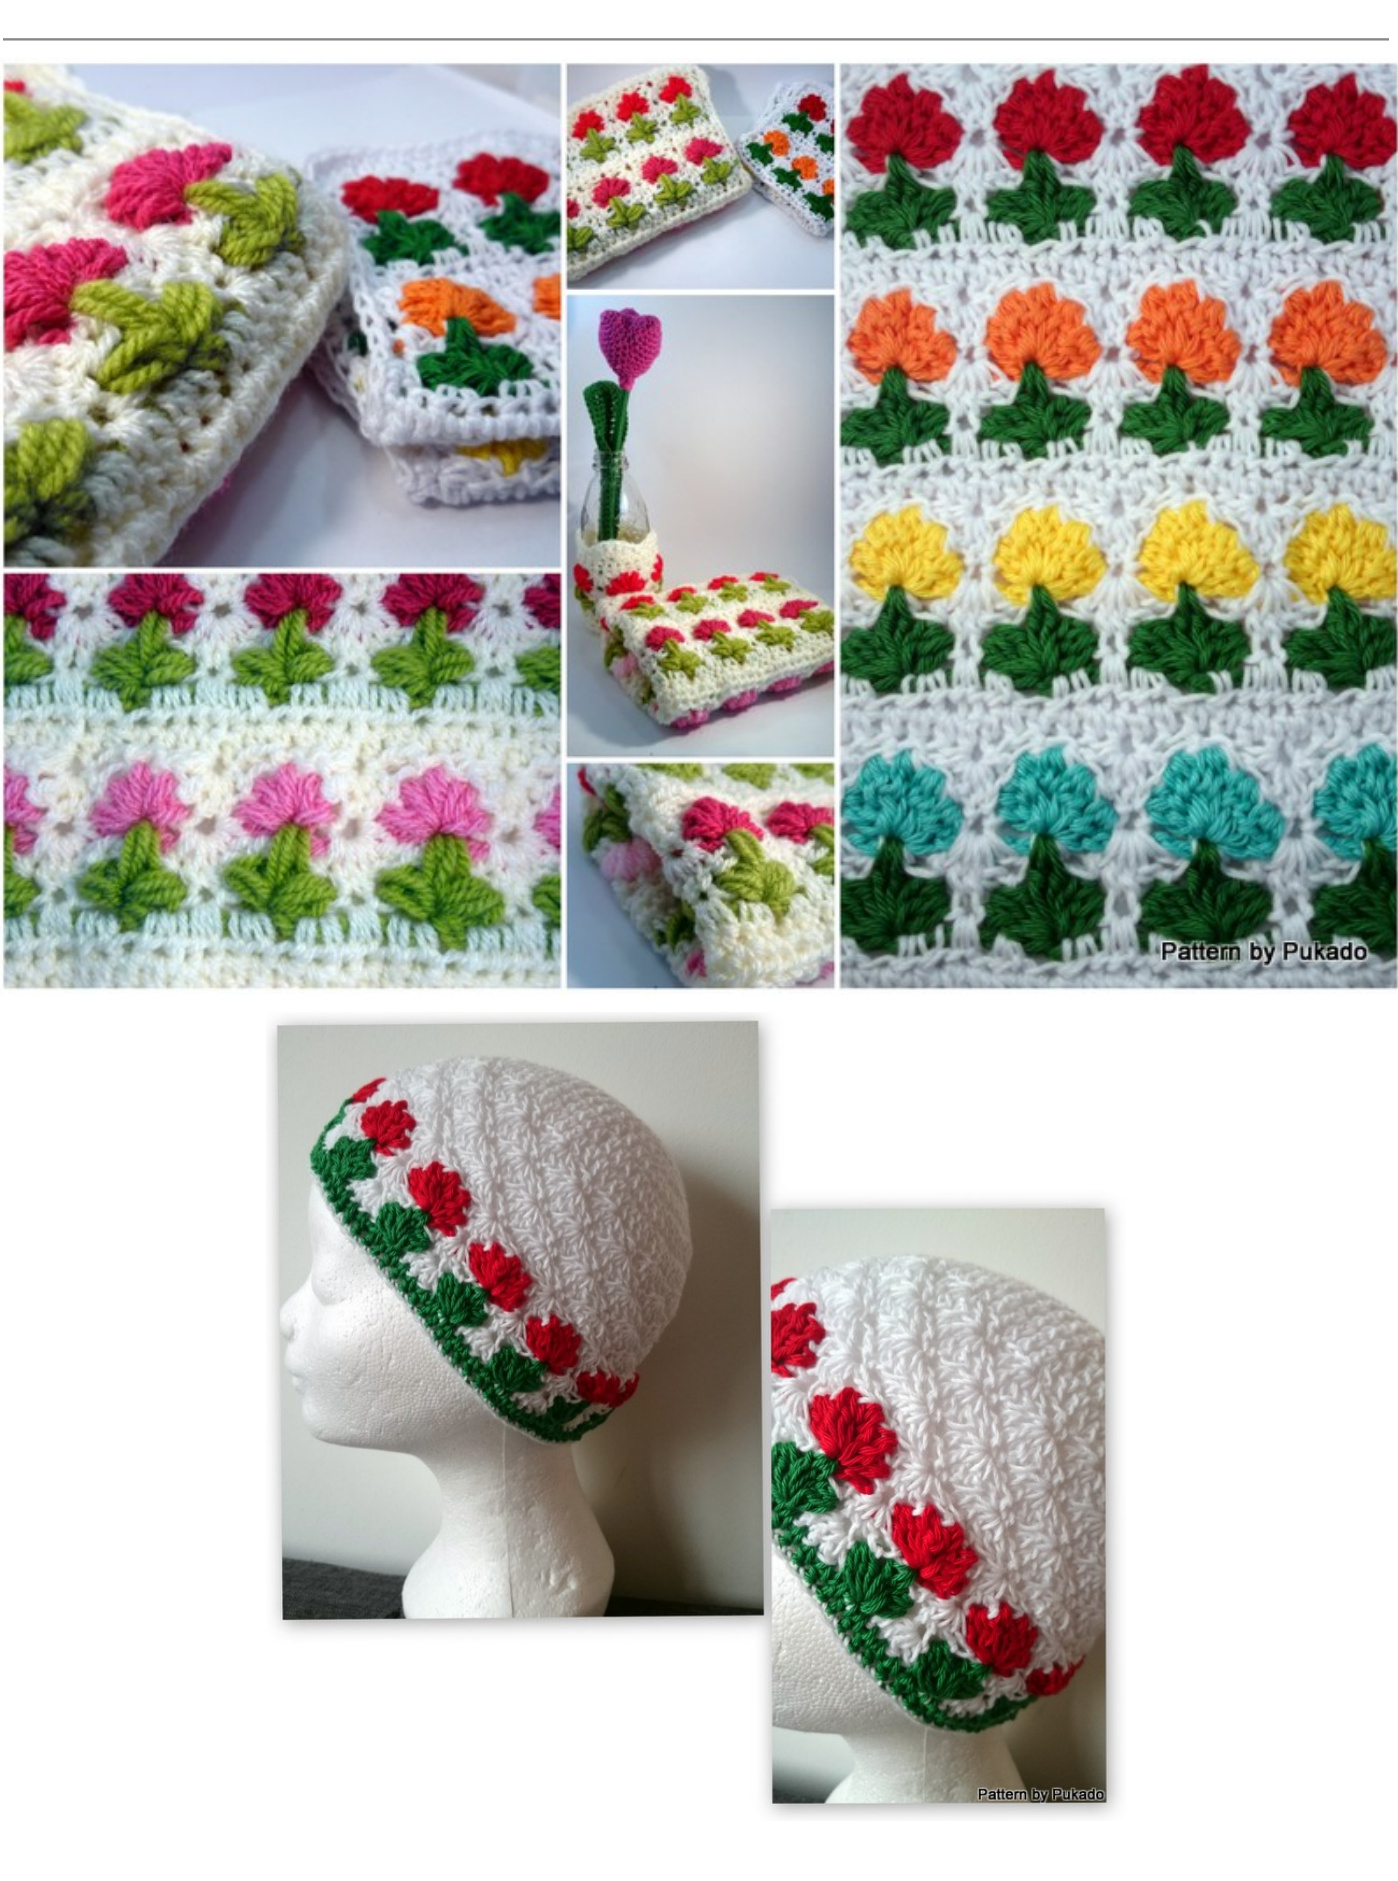
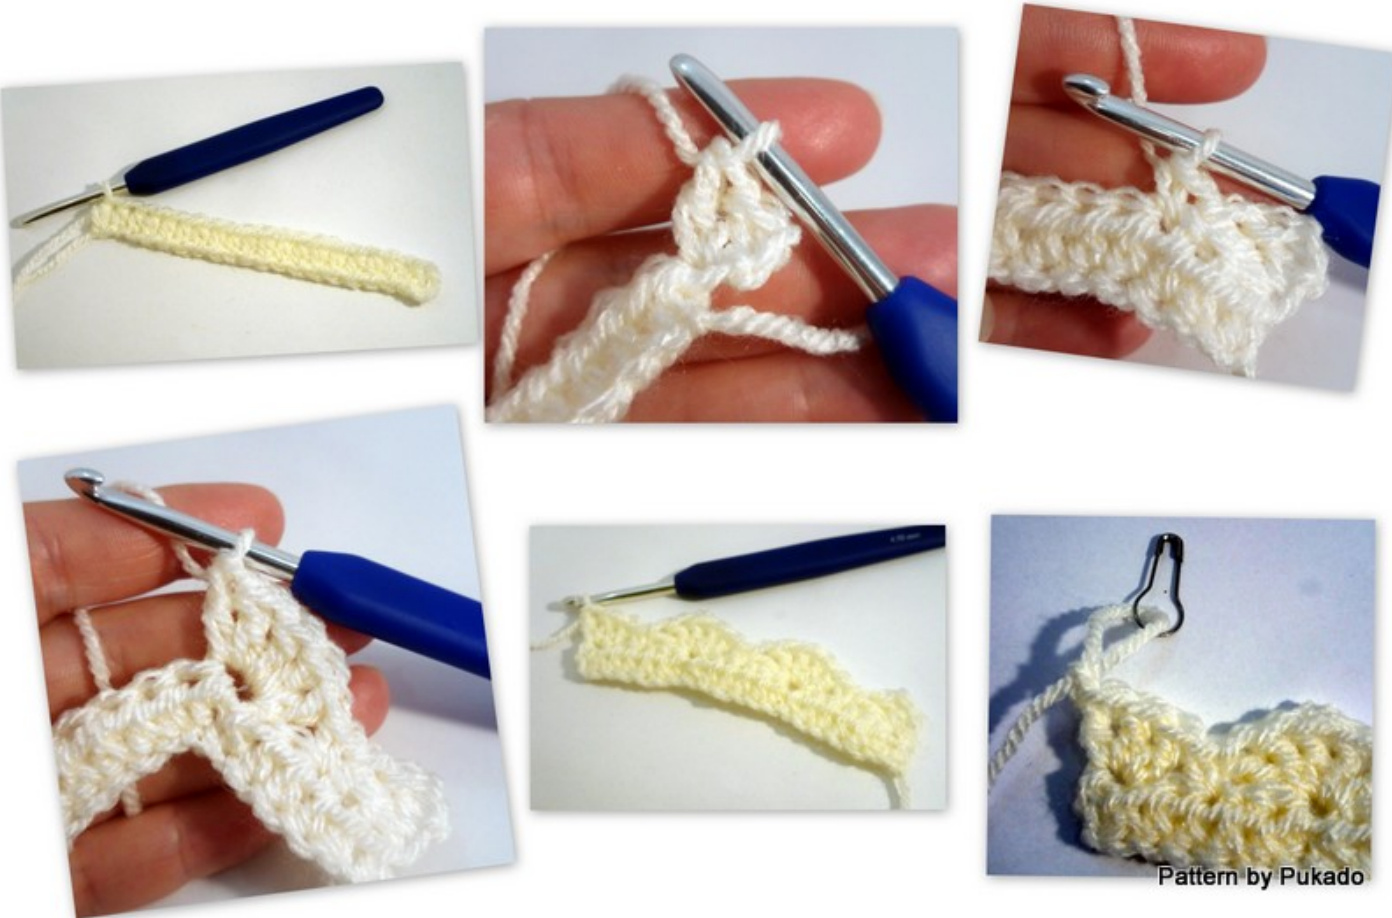
I used Stylecraft DK for the picture on the right with hook size 5mm. Chain a multiple of 6 plus 1 plus 2 that will count as your first HDC. You will need the extra stitch to make the half shells at beginning and end. For the example in the pictures below, I chained 18 plus 1 plus 2(first HDC) = 21CH You can also do a Foundation HDC Chain of 19st
R1, HDC in third CH from hook, HDC in next 18CH, CH1 and turn - 19st R2, CH3, 2DC in first st, \*skip 2st, SC in next st, skip 2st, 5DC in next st\* repeat until end, last shell only has 3DC, SLST, Pull up a loop, place stitch marker in loop. - 3shellst
With Red (or whatever color you want to use for your flower) R3, SLST to the last CH of first CH3 of R2, CH2, \*FlowerST, skip st\* repeat until end, last Flower stitch only CH2 at the end and SLST to last st of row, fasten off - 3FlowerST
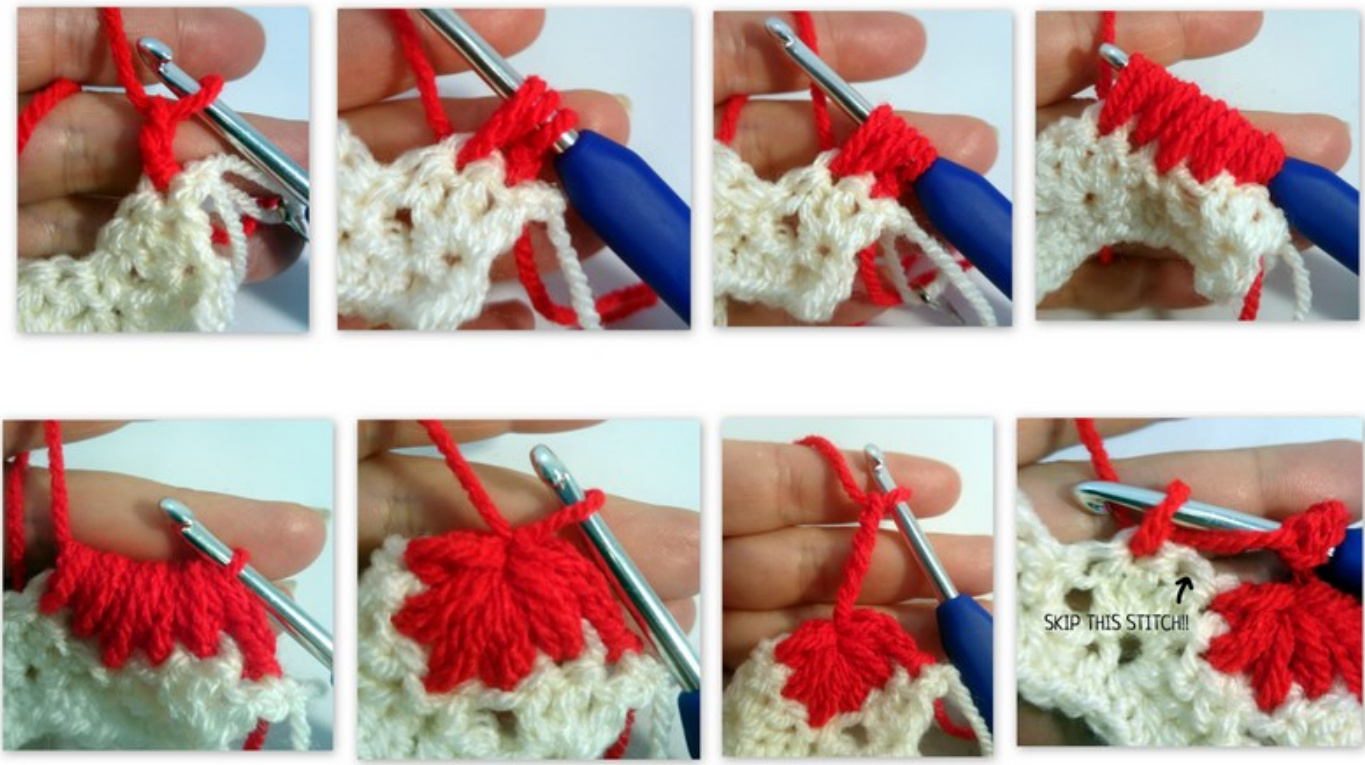
Using the Puff version for the picture, but the cluster version is basically the same.
Pick up your white, remove stitch marker R4, CH3, 2DC in first st, \*SC in eye of Flower stitch of R3, 5DC in skipped stitch of R3\* repeat until end, last shell is in first st of R3 and only has 3DC, SLST, Pull up a loop, place stitch marker in loop. - 3shellst
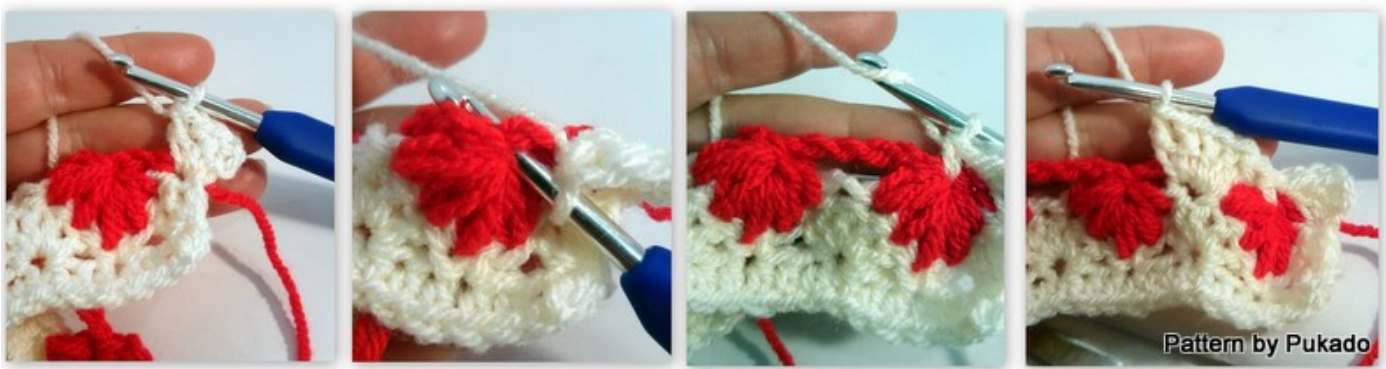
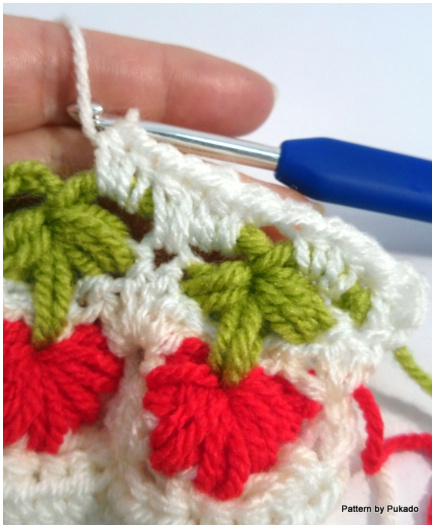
Crochet over your CH5 to secure it.See last image! With green R5, SLST to the last st of R4, CH2, \*LeafST\* repeat until end, last LeafST only CH2 at the end and SLST to first st of row, fasten off - 3LeafST
Pick up your white, remove stitch marker R6, CH2, HDC in same st, 2HDC around chain, \*2HDC around next chain, 2HDC in skipped st of R5, 2HDC around same chain\* repeat until end, last one is 2HDC around next chain, HDC in last st, CH3 (count as a HDC for next row), turn - 19st R7, HDC in same st as CH3, HDC in next 17st - make sure you have the same amount of stitches as at the beginning. - 19st
And then you're back to begin a new row of flowers. Repeat R2 - R7 until you reach desired length Use a stitch marker to secure the last WHITE stitch on the row. You will pick up the white after each color row, no need to fasten off during the work. er each color row, always start your color row on the same side of your wor
Pattern working in the Round
For the picture on the right I used Phildar no 3 and hook size3.5mm Do you want to work in the round? Maybe you want to make a teapot cozy, a coffee mug cozy or a mobile phone pouch. You can do this as well. Chain a multiple of 6, SLST to the first CH to create a circle, make sure your chain is not twisted. Here we don't need the extra stitch as in the single row version. You will start you row with half a shell, [CH3, 2DC] and end the row with 2DC in the same stitch as your half shell to create a full shell.
Make your Chain the desired length. R1, CH2, HDC in each st around, SLST to first HDC R2, CH3, 2DC in same st, \*skip 2st, SC in next st, skip 2st, 5DC in next st\* repeat until end, add 2DC to first half shell and SLST to first DC, Pull up a loop, place stitch marker in loop. With Red (or whatever color you want to use for your flower) R3, SLST to the next st of R2 (4th stitch of shell),\*FlowerST\* repeat until end, SLST to eye of first flower st, fasten off Pick up your white, remove stitch marker Crochet over your CH5 to secure it. R4, CH3, 2DC in first st, \*SC in eye of FlowerST of R3, 5DC in skipped stitch of R3\* repeat until end, add 2DC to first half shell of R3, SLST to first DC, Pull up a loop, place stitch marker in loop. With green R5, SLST to the next st of R2, pull up a loop, \*LeafST\* repeat until end, SLST to eye of first LeafST, fasten off Pick up your white, remove stitch marker R6, CH2, HDC in same st, 2HDC around chain, \*2HDC around next chain, 2HDC in skipped st of R5, 2HDC around same chain\* repeat until end, SLST to first HDC R7, HDC in same st as CH3, HDC in each st around, SLST to first HDC - make sure you have the same amount of stitches as R2 Repeat R2 - R7 until you reach desired length
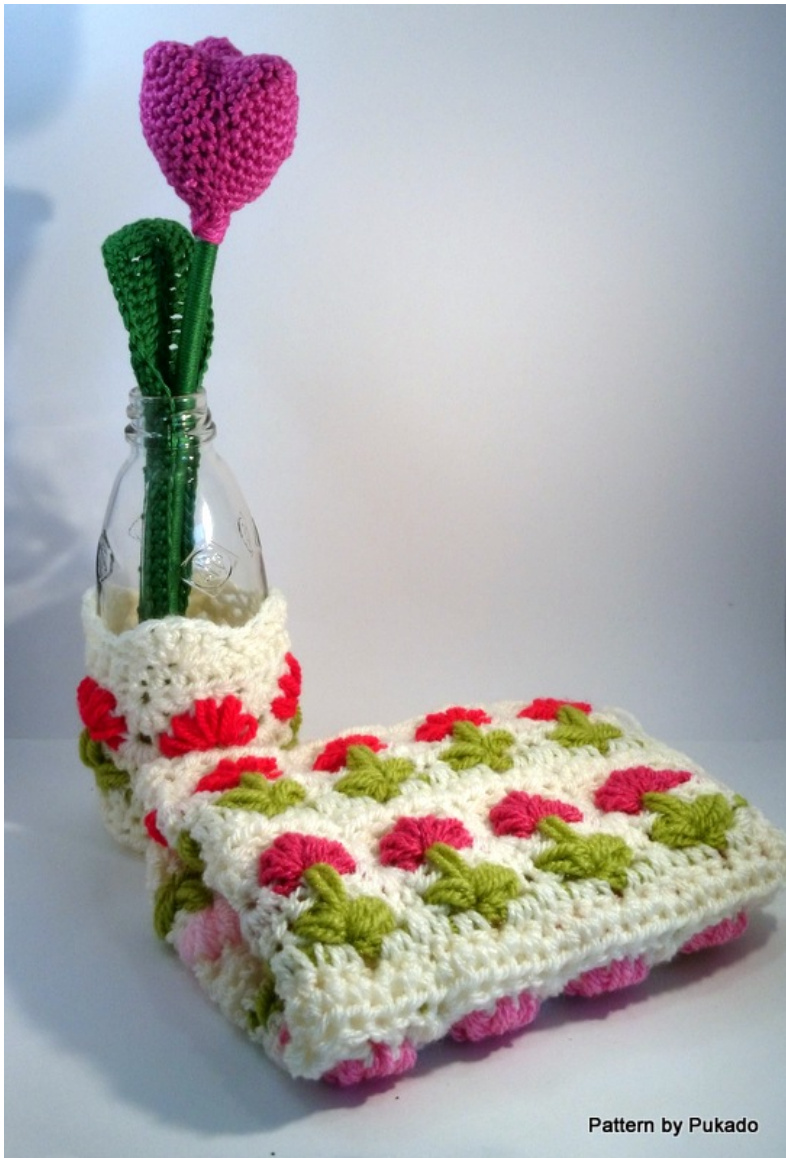
For picture on the right I used Phildar Coton 3 and hook size 5 mm. I used cotton (Phildar no 3) and a 5mm hook (as I wanted it to be loose and aery). Start with a MC and 12DC in your MC (you need a multiple of 6)
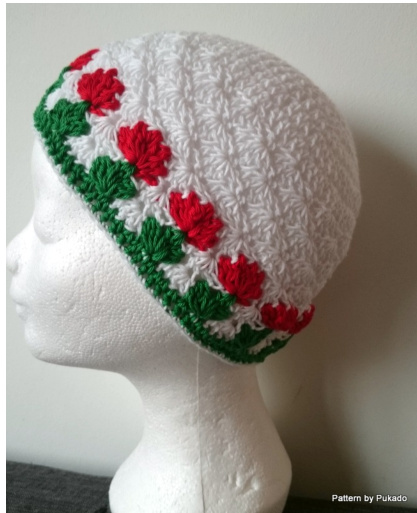
Measure the head circumference and base your hat on this. To find how to calculate this, please see my blogpost here: http://pukado.blogspot.nl/2013/10/gauge-sizing-and-my-little-pony.html I increased until I reached my desired diameter. With my gauge I need 7 increase rows: R1, MC, 11DC, SLST to first DC - 12 st R2, 2DC in each stitch around - 24 st R3, \*2DC, DC\* repeat all around - 36st R4, \*2DC, DC in next 2st\* repeat all around - 48st R5, \*2DC, DC in next 3st\* repeat all around - 60st R6, \*2DC, DC in next 4st\* repeat all around - 72st R7, \*2DC, DC in next 5st\* repeat all around - 84st This is half of the length your hat will be, the other half will be shell rows and flower rows. You will need to play around a bit with how many shell rows before you start your flower rows. I added 5 shell rows. This would be the same as the next quarter of my desired hat length. And my last quarter will be the flower row and the border. R8-R12, CH3, 2DC in same st, \*skip 2st, SC in next st, skip 2st, 5DC in next st\* repeat until end, add 2DC to first half shell and SLST to first DC - 14Shell st (place stitch marker in loop of white) With Red (or whatever color you want to use for your flower) R13, SLST to the next st of R2 (4th stitch of shell), \*FlowerST\* repeat until end, SLST to eye of first flower st, fasten off Pick up your white, remove stitch marker Crochet over your CH5 to secure it. R14, CH3, 2DC in first st, \*SC in eye of FlowerST of R13, 5DC in skipped stitch of R13\* repeat until end, add 2DC to first half shell, SLST to first DC, Pull up a loop, place stitch marker in loop. With green R15, SLST to the next st of R2, pull up a loop, \*LeafST\* repeat until end, SLST to eye of first LeafST, place stitch marker in loop Pick up your white, remove stitch marker R16, CH3, 2DC in first st, \*SC in eye of LeafST of R15, 5DC in skipped stitch of R15\* repeat until end, add 2DC to first half shell, SLST to first DC, place stitch marker in loop Pick up Green, remove stitch marker R17, CH2, \*HDC in each 6 stitches of Shell of R16\* repeat until end, fasten off - 84st Pick up White, remove stitch marker R18, Border. I just edged with SC, but you can add any border. Copyright Patricia Stuart 2014 @. You are free to create from the pattern and sell the creations. Please do not copy, rewrite, resell or distribute as your own, this is prohibited. Please give credit to my shop for the pattern and if you sell finished items online, please provide a link to the shop (www.pukado.etsy.com) for the pattern. Thank you for your understanding.


