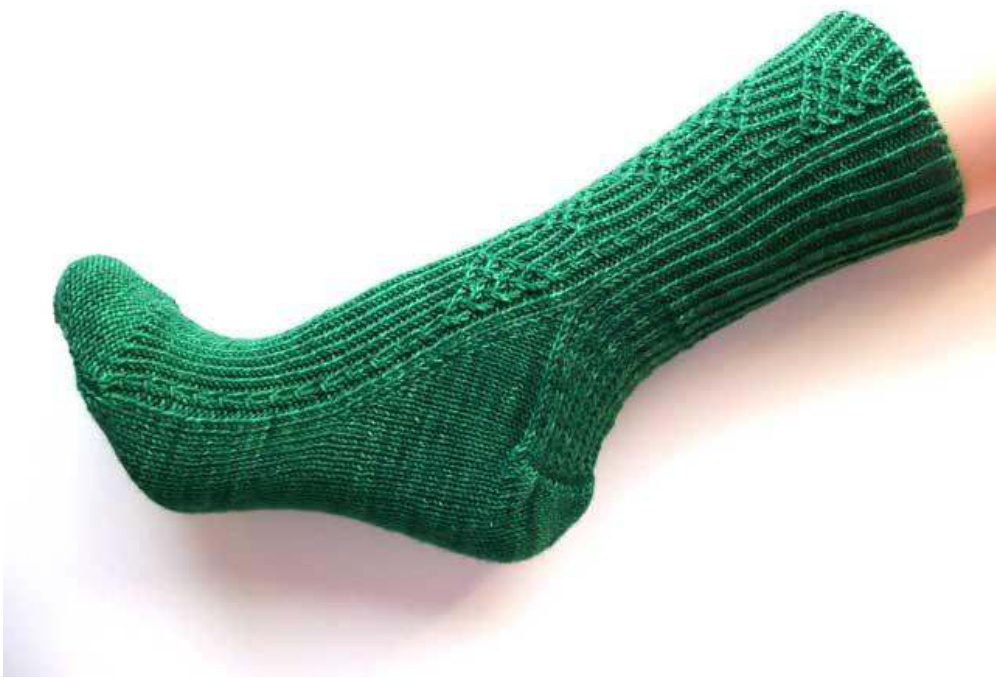
Tara was designed as a mystery sock presented in 4 clues, for the Sock Knitters Anonymous group on Ravelry (www.ravelry.com), March 2012 A journey wandering in dreams Mirrored in serenity A crossing at ancient sites Boundery of life a mystery A sequence of symbolic and lucid dreams, which mystery I am still unraveling, the movie 'Stardust', the book Tara, The Air Fairy' and the sacred site of Tara in Ireland where the sources of inspiration for this mysterysock.
requirements
A skein of 4-ply sock yarn (100 gram / 420 meters, 459 yards).The socks will look best knitted with a smooth round yarn with good stitch definition in a solid or semi-solid colorway. Suggestion: MoonWise Gems or WollmeiseSockenwolle 80/20 Twin A circular needle 80 cm or 5 DPN's 2,5 mm (US #1.5) Stitch markers and cable needle, if preferred ?A darning needle, scissors, tape measure in metric system
skill level: intermediate
Techniques used: reading charts, knitting with double-pointed needles or knitting in the round with a circular needle, shaping using increases and decreases, short rows, working wrapped stitches, cabling without a cable needle, Judy's Magic Cast On and Jeny's Surprisingly Stretchy Bind Off, working with the metric system.
gauge
32 stitches and 44 rows in stockinette on 10 cm, knit in the round with needle size 2,5 mm. Row gauge is import in this pattern! Use a larger or smaller needle to get gauge.
si3ing
Tara is designed in 4 sizes; small, medium, large and extra-large. It is knit over 66/70 stitches on a circular needle using magic loop. In this design 6 extra stitches are integrated to compensate the pull in of the used stitch pattern (compared to plain stockinette). S: 66 stitches, shoe size EU 36-37 (length 23,5 cm, width: 20 cm) M: 66 stitches, shoe size EU 38-39 (length 25 cm, width: 20 cm) L: 70 stitches, shoe size EU 40-41 (length 26,5 cm, width 22,5 cm) XL: 70 stitches, shoe size EU 42-43 (length 27,5 cm, width 22,5 Cm) In the pattern the instructions for the sizes are marked between (), divided by a /. An example: For the length 4 number are given; S(M / L / XL) = 11(12 / 13 / 14) cm. For the width only 2 numbers are given; S & M (L & xL) = 11 (13) stitches. If only 1 number is given, this is for all sizes. Do you need more width? Add one or two stitches at the begin and end of every needle and work them alternating Ktbl and P so it forms a nice ribbing. Please don't forget to add these to the number of stitches mentioned in the pattern.
stitches & abbreviations
·K-Knit ·Ktbl - Knit through the back loop ·P- Purl RT - Right twist: With right needle, insert tip into the second knit stitch. Pull the left needle out of these 2 stitches. The first knit stitch falls free behind your work. Pick this stitch up with the tip of your left needle. Place knit stitch back on the left needle. Knit both stitches through back of loop. LT - Left twist: With right needle, insert tip into the second knit st at the back side of your work. Pull the left needle out of these 2 stitches. The first knit stitch falls free on the front side of your work. Pick it up with the tip of your left needle. Place knit stitch back on the left needle. Knit both stitches through back of loop. RT PB - Right twist, purl bg: With right needle, insert tip into the knit st. Pull the left needle out of these 2 stitches. The purl stitch falls free behind your work. Pick this stitch up with the tip of your left needle. Place knit st back on the left needle. Knit this stitch through the back loop. Purl the next stitch. LT PB - Left twist, purl bg: With right needle, insert tip into the purl stitch at the back side of your work. Pull the left needle out of these 2 stitches. The knit stitch falls free on front of your work. Pick this stitch up with the tip of your left needle. Place purl stitch back on the left needle. Purl this stitch and knit the next stitch through back of loop. RS - right side of work - outside Ws - wrong side of work - inside M1L: From the front, lift loop between stitches with left needle, knit into back of loop M1R: From the back, lift loop between stitches with left needle, knit into front of loop
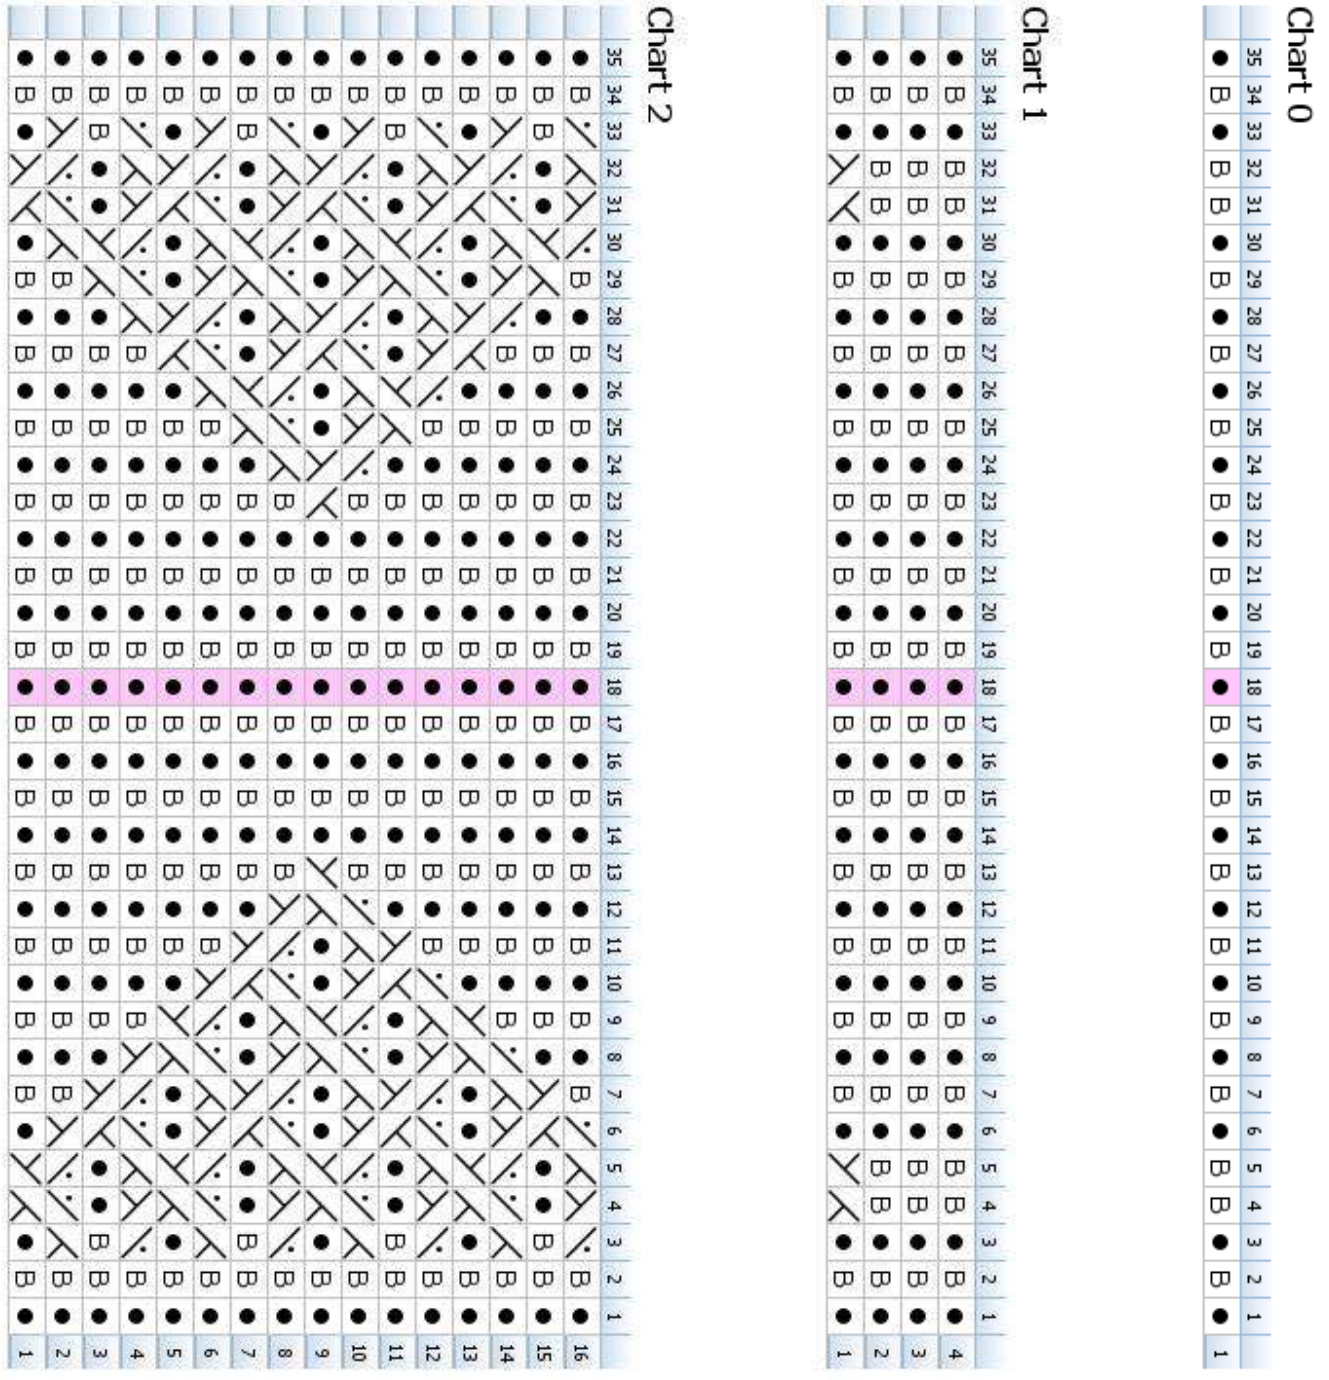
| Legend: | |
| B | knit tbl |
| purl | |
| knit | |
| Right Twist | |
| Left Twist | |
| Right Twist, purl bg | |
| Left Twist, purl bg | |
instructions
cast on:
Cast on a total of 22 (26) stitches using Judy's Magic Cast-on. On needle 1 you have 11 (13) stitches are for the sole and on needle 2 11 (13) for the instep. To complete the cast on, knit all stitches on needle 1 (sole) and purl all stiches on needle 2 (instep).
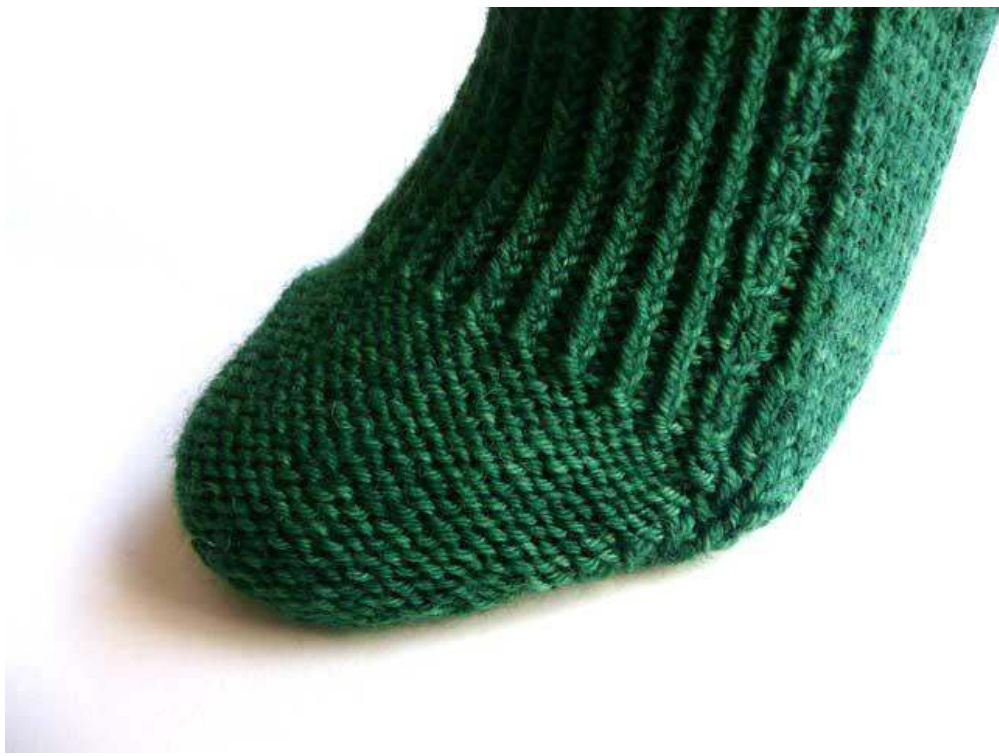
toe:
Round 1:
Needle 1: Sole: K1, M1L, knit until last stitch, M1R, K1. Needle 2: Instep: P1: M1L, purl until last stitch, M1R, P1.
Round 2:
Needle 1: Sole: Knit all stitches. Needle 2: Instep: Purl all stitches. Repeat round 1 & 2 10 times more until you have a total of 66 (70) stitches. End with a complete round 2. You now have 33 (35) instep stitches and 33 (35) sole stitches. The toe is close to 5,25 cm long.
foot:
The foot is knitted over 66 (70) stitches.
set up for size L & XL only
Needle 1: Sole: Knit the stitches. Needle 2: Instep: Work the instep according chart 0 Work this set up round 2 times. Continue for all sizes: Needle 1: Sole: Knit the stitches. Needle 2: Instep: Work the instep according chart 1 S& M;work stitches in column 2-34 L & XL; work stitches in column 1 -35 Work the pattern according chart 1, row 1 - 4 a total of 7 (9/ 10 / 11) times. The foot is close to 11,75 (13,25 / 14,75 / 15,75) cm long, measured from the tip of the toe. Before you continue knitting , read the pattern careful. The gusset will be 32 rows long, 16 stitches are increased on each side. If your gauge is off, you have to make some calculations to find out if adjustments are necessary for a good fitting sock. Work Chart 1 of clue 1 once more to add extra length to the foot. Add or subtract a complete pattern of 4 rows. You may guestimate, hope or trust that the natural negative ease for sock will be enough to compensate the difference in gauge. It's your own risk ;-) If a gusset increase of 16 stitches is not enough for your feet, you can add extra rounds in part 1 of the gusset. Please keep in mind you have to work a complete pattern of 4 rows. When in doubt, use a lifeline.
gusset:
Part 1
Round 1:
Needle 1: Sole: K1, M1L, knit until the last stitch, M1R, K1. Needle 2: Instep: Work according chart 1.
Round 2:
Needle 1: Sole: Knit all stitches. Needle 2: Instep: Work according chart 1. Work round 1 & 2 7 (7) times more. Now you have worked chart 1 4 (4) times more. Chart 1 is worked 11 (13 / 14 /15) times total.
Part 2
Continue:
Round 3:
Needle 1: Sole: K1, M1L, knit until the last stitch, M1R, K1. Needle 2: Instep: Work according chart 2, row 1.
Round 4
Needle 1: Sole: Knit all stitches. Needle 2: Instep: Work according chart 2, row 2. Work round 3 & 4 until chart 2 is completely worked; 16 rows. End with a full round 4 with a total of 98 (102) stitches. To form the gusset you have increased 16 stitches on each side of the gusset and knit a total of 32 rounds. The gusset is close to 7,5 cm long. Knit the first 16 stitches of the sole. These are the increases you made for the gusset. heel: turning the heel with short rows: Turn the heel with short rows over 33 (35) stitches. If you like you can put these stitches on a separate needle or a circular needle. Optional is the use of stitch markers to differ between gusset, instep and heel. Row 1: (RS) K31 (33) stitches, make a wrapped stitch as follows: Put the yarn in front of work. Slip next stitch purl-wise, put the yarn in the back of the work. Put stitch including wrap on left needle. You now have two stitches on the left needle. One is unknit, the other has a wrap (a little shawl around its neck). Turn the work. Row 2: (WS) P29 (31) stitches, make a wrapped stitch as follows: Put the yarn in the back of work. Slip next stitch purl-wise, put the yarn in front of the work. Put stitch including wrap on left needle. You now have two stitches on the left needle. One is unknit, the other has a wrap (a little shawl around its neck). Turn the work. Row 3: K28 (30), make a wrapped stitch. Turn the work. Row 4: P27 (28), make a wrapped stitch. Turn the work. Repeat row 3 & 4 9 times more. Now you have 11 (13) stitches left in the middle without a wrap. On either side are 10 stitches with a wrap and onewithout. RS: Knit the 11 (13) stitches for the heel. Now all 10 stitches with wraps will be processed. To knit the wrap, lift it with the tip of the right needle. Put the loop before the stitch on the left needle. Knit the wrap (the little shawl) plus the stitch through the back loop. Knit the last stitch of the heel (this is the unwrapped stitch from row 1) through the back loop with the first stitch of the gusset. Turn. WS: Slip the 1st stitch purl-wise. Purl the 21 (23) heel stitches. Now all 10 stitches with wraps will be processed. To knit the wrap, lift it with the tip of the right needle from the right side of the work and put it on the left needle. Purl the wrap (the little shawl) together with the stitch. Purl the last stitch of the heel (this is the unwrapped stitch from row 2) with the first stitch of the gusset.
reinforced heel:
Row 1: \* Slip 1 stitch purl-wise with the yarn behind the work, k1 \* . Repeat the part between the \*\* until the last stitch. Knit the last stitch through the back loop together with the first stitch of the gusset. Turn. Row 2: Slip 1 stitch purl-wise with the yarn held before the work, purl until the last stitch. Purl the last stitch of the heel together with the next stitch of the gusset. Repeat these two rows until one stitch is left of the heel on either side. End after row 2, with the right side facing you.
leg:
heel transition rounds
Round 1:
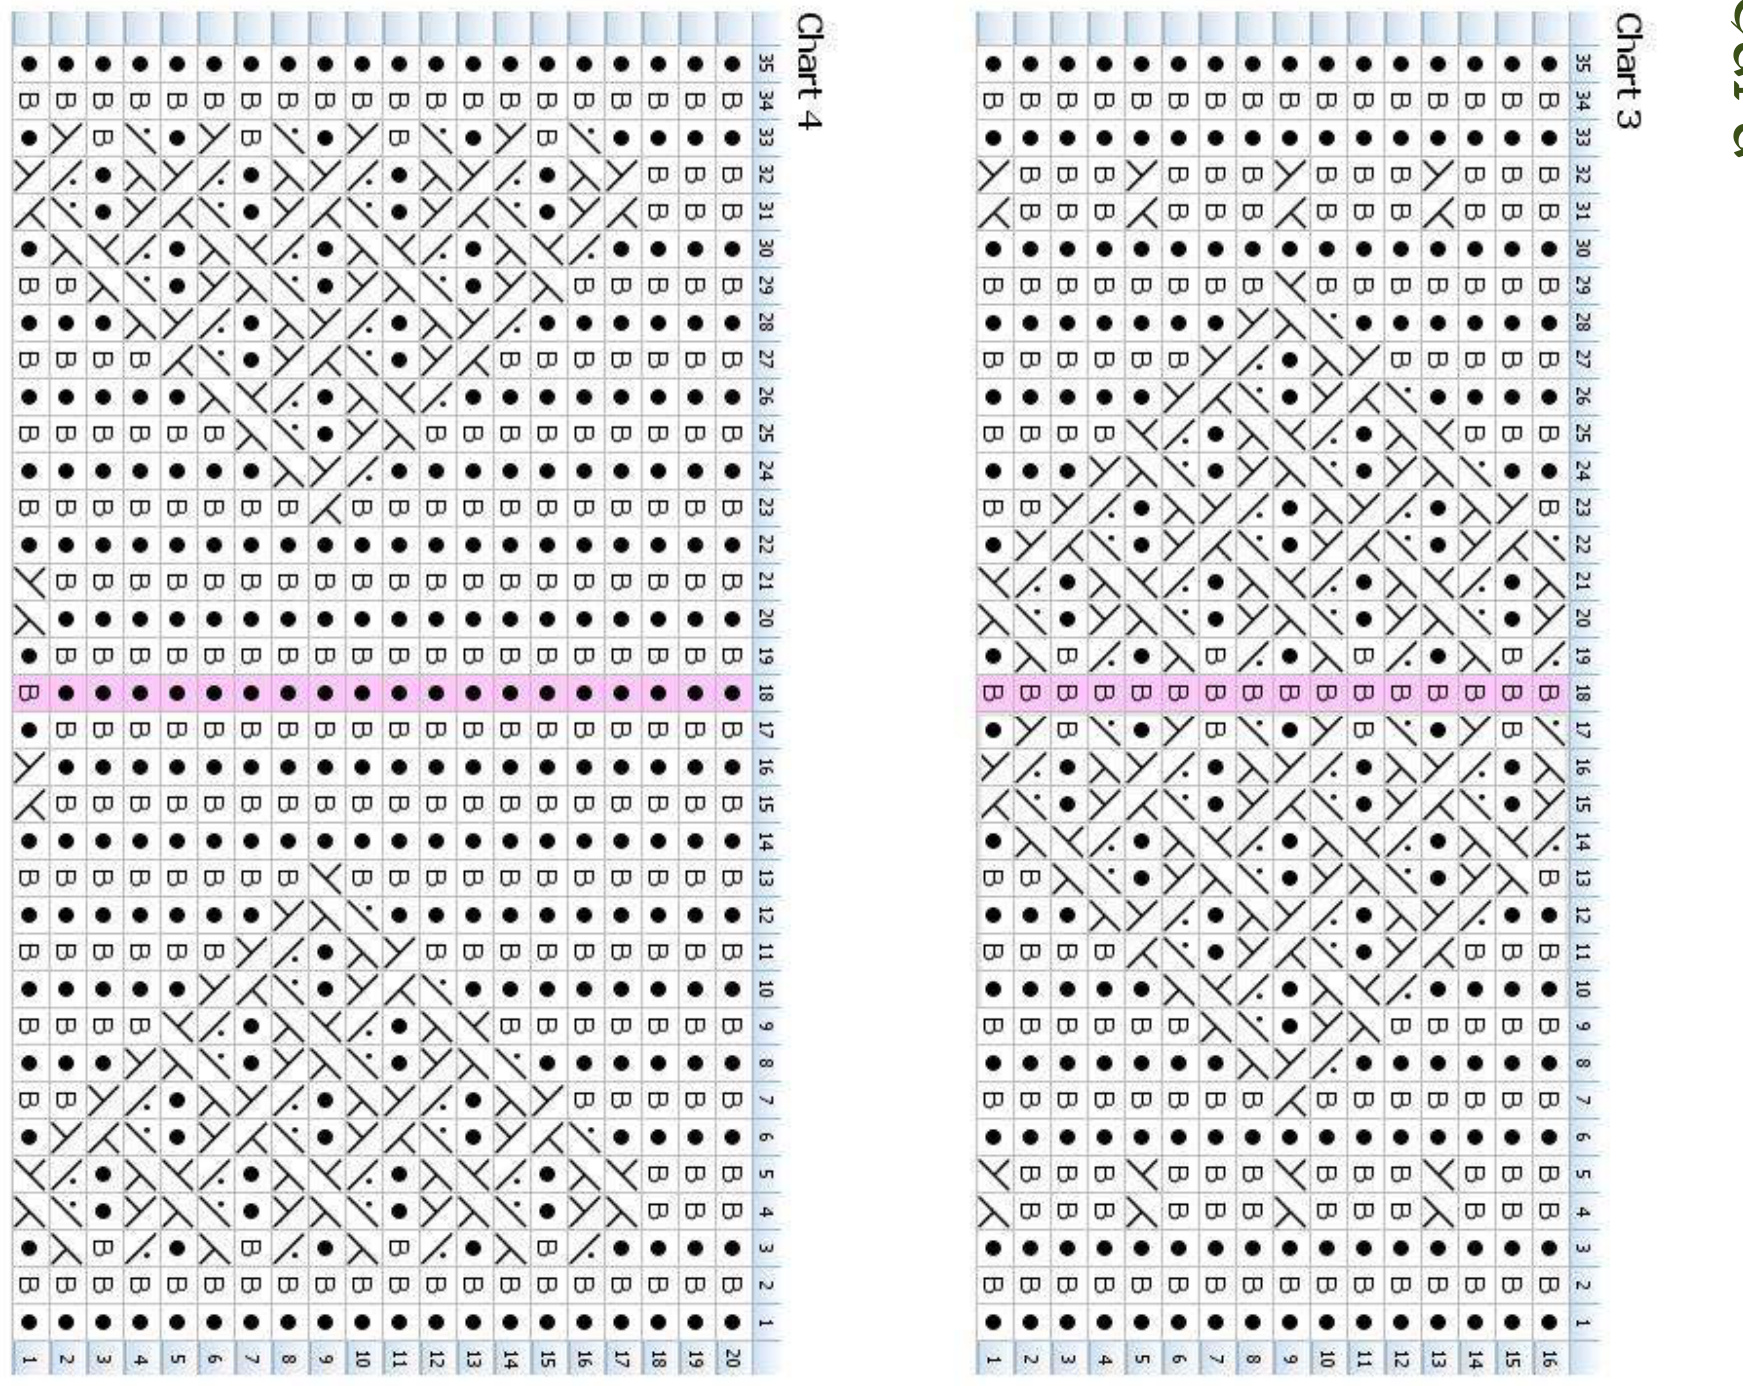
Needle 1: Heel: \* Slip 1 stitch purl-wise with the yarn behind the work, k1 \*. Repeat the part between the \*\* until the last stitch. Knit the last stitch through the back loop together with the remaining stitch of the gusset. Needle 2: Front of leg: Work according chart 3, row 1.
Round 2:
Needle 1: Heel: Knit the remaining stitch of the gusset through the back loop together with the first heel stitch. Knit all other stitches. Needle 2: Front of leg: Work according chart 3, row 2. All gusset stitches are decreased, without forming any holes in the corners. Continue knitting the leg over 66 (70) stitches.
ankle
The ankle/achilles is a sensitive part of the feet. The purl-wise slipped stiches will make the fabric of the heel a slightly thicker, it forms a nice padding, which makes its more durable.
Round 1:
Needle 1: Back of leg: \* Slip 1 stitch purl-wise with the yarn behind the work, k1 \*. Repeat the part between the \*\* until the last stitch. Needle 2: Instep: Work according chart 3.
Round 2:
Needle 1: Back of leg: Knit all stitches. Needle 2: Front of leg: Work according chart 3. Repeat these two rounds at least 5 times more.
top of leg
Needle 1: Back of leg: Work in Ktbl/p ribbing; \* Ktbl1, P1 \*. The Ktbl stitches will align with the slipped stitches. The purl stitches will align the knit stitches. Needle 2: Front of leg: Proceed working chart 3. Work chart 3 at least 3 times, so the leg is 48 rounds long.
DO YOU LOVE LONG SOCKS/STOCKINGS?
You can make the leg longer by knitting chart 3 twice or four times more. For aesthetics work an odd number of the trellis diamonds. To accommodate for your calves you may need to use a larger needle.
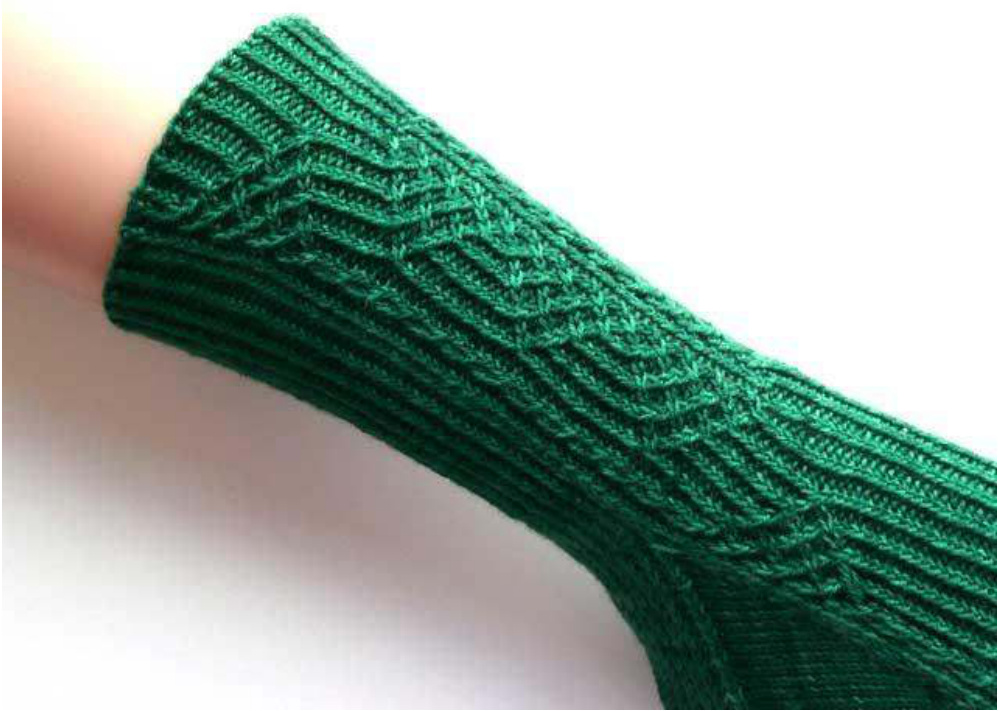
cuff: The cuff is 20 rounds long. Needle 1: Back of leg: continue in ktbl/p ribbing. Needle 2: Front of leg: work according chart 4.
bind off:
Bind off the stitches in pattern and very loosely, so it will have a enough stretch. An easy way with good results is to use a traditional bind-off with a thick needle, such as 5mm (US #8). The result looks a bit untidy when the sock is relaxed, but is comfortably roomy while wearing. Jeny's Surprisingly Stretchy Bind Off (JsSBO) is a very good and stretchy alternative. (http://knitty.com/ISSUEfall09/FEATjssbo.php)
finishing:
Weave in the ends. Give your socks a gentle soak and block them nicely. Enjoy the result - and don't forget to knit the second sock!
copqright
Copyright 2011/2012 - Janneke Maat (aka MoonWise). This pattern is for personal use only. Commercial use, including selling items made from this pattern is prohibited. Please don't distribute this pattern in any way without my permission.
contact
Feedback and constructive criticism are welcome! Send me an email on janneke.maat@gmail.com http://www.moonwise.nl http://www.ravelry.com/people/MoonWise http://www.ravelry.com/designers/janneke-maat