Top Cat began with Cat Babbie, a local fiber and clay artist who constantly shares with me the joy of just making things. Cat presented me with a skein of wool with a thick/thin two ply texture which she had recently spun and dyed. It needed to be something special; it was special. It also needed style and attitude; Cat has both. Voila! Top Cat. Size: Average adult woman, but you may knit the band to any size and adjust the top stitches at Round 3 of the increase section. See note5.
Top Cat
Materials:
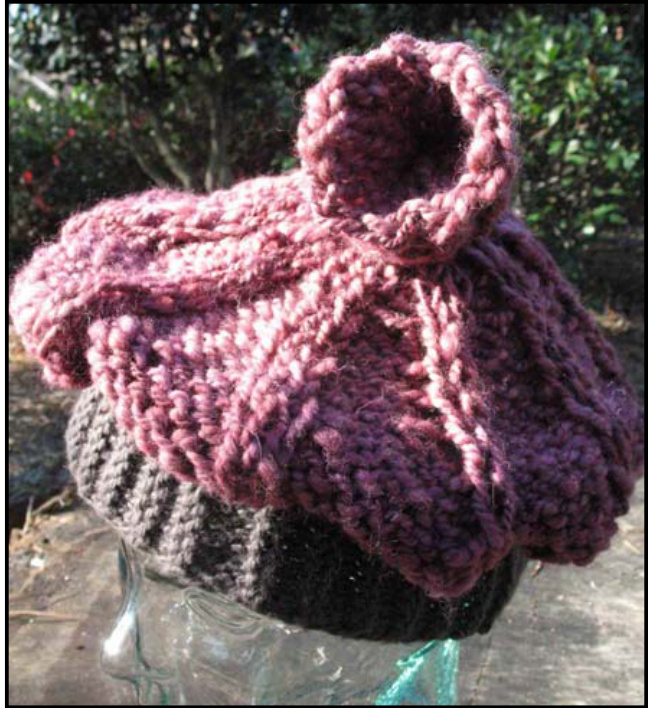
Hat top -100 yds of chunky yarn, suchas Malbrigo ChunkyorNoro Korchoran R 200 yards of worsted weight yarn held doubled throughout. Size 11 needles or size 13 with the doubled worsted. (see notes) Hat band - 75 yds of worsted weight yarn. Size 7 Needles Gauge: Not critical Cast On: Use a provisional cast on (see notes) to cast on 14 stitches with the smaller needles Hat Band Pattern Knit as a strip and joined into a circle(slip allsts as if to purl) (RS)Row 1: K3, k8 center sts, k3. Row 2: SI3, p8, sl 3. Row 3: K3, p8, k3. Row 4: SI3, k8, sl3. Repeat these four rows until hat band fits around your head while stretched. End with Row 4. Remove scrap yarn and place provisional cast on stitches ona needle. Join and finish with athree needle bind of (see notes).
Pick up stitches for the top.
Changetolargerneedle.With RSfacing, beginatthe bound offseam and pick upabout 65 sts in the edge sts of the band. (Don't obsess.) Just get close; we'll fix it at Rnd 3. Increase Section. (knit in the round) Rnd 1: $^{\star}\mathsf{P}2$ . yo; repeat from \* to end of row, end p1 if needed. Rnd 2: $^{\star}\mathsf{K}2$ , K yo tbl; repeat from \* to end of row, end K1 if needed. Count your stitches!! You have sts. If your answer is NOT 100, it is time to cheat. Rnd 3: Increase or decrease evenly around the top to get yourself to 100 sts. Rnd 4: $^{\star}\mathsf{K}\mathsf{1}\phantom{.}0$ , pm; repeat from \* to end. Rnd. 5: K all sts, slipping markers as you go. Decrease sections: (Slip allstitches as ifto purl with yarn in back.)Repeat each set of instructions in [brackets] ten time each row, one repeat between each set of markers. Rnd 6: [Purl 8, sl2] Rnd 7: [P8, K2] Rnd 8: [P2tog, p6, s2] (90 sts total) Rnd 9: [P7, k2] Copyright 2008, Jane D. Prater Rnd 10: [P2tog, p5, sl2] (80 sts total) Rnd 11: [P6, k2] Rnd 12: [P2tog, p4, sl2] (70 sts total) Rnd 13: [P5, K2] Rnd 14: [P2tog, p3, sl2] (60 sts total) Rnd 15: [P4, k2] Rnd 16: [P2tog, p2, sl2] (50 sts total) Rnd 17: [P3, k2] Rnd 18: [P2tog, p1, sl2] (40 sts total) Rnd 19: [P2, k2] Rnd 20: [P2tog, sl2] (30 sts total) Rnd 21: [P1, k2} Rnd 22. [P1, k2tog] (20 sts total) Rnd 23: [K1, p1] Remove markers as you go.
Knot tube:
Repeat row 23 until the top tube is long enough to tie in a knot. Bind off. Weaves ends. Stretch the tube and tie an overhandknot.
Wear with attitude.
Options:
1. Asa stashbuster, use three different colors or yarns. The softest for the brim, another for the top and a third for theknot. 2. For the less daring, close the top without knitting the tube, BUT it's not nearly such a happy hat.
NOTES
1. Tension
Knit the band very tight to prevent i from stretching out of shape with wear. The I-cord edges built into the first and last 3 sts will also prevent stretch out. The fabric for the top should be slightly loose to allow some drape and movement. 2. Easy provisional cast on (I'm all about easy) Select a smooth scrap yarn, sport or DK wt. Iprefer a cotton. Cast on the desired number of stitches and knit six rows of stockinette stitch. Change to the hat band yarn and begin the pattern.
3. Picking up provisional cast on stitches
When the hat band is the desired length, cut the scrap yarn sections along row 3 or 4 of the stockinete section. Pick out the scrap yarn and slide the live stitches onto your needle. (Use a much smaller needle here,like a #5. Continue with a three needle bind off.
4. Three Needle Bind off
· Fold band so that the right sides are together and both needles are parallel, pointing right. ? Knit one stitch from each needle together to join. Repeat step 2 and pass the first stitch over the second for a typical chain bind off Repeat step 3 until all stitches are bound off. Weaveends. 5. Standard head sizes here: http://www.yarnstandards.com/headsize.html Check this site if you are knitting a gift
6. Needles.
Depending on your favorite technique for knitting a tube from 100 to 20 sts around: \* 24 inch, then 16 inch, then dpns; 2 circulars \* one 40 inch Magic Loop needle


