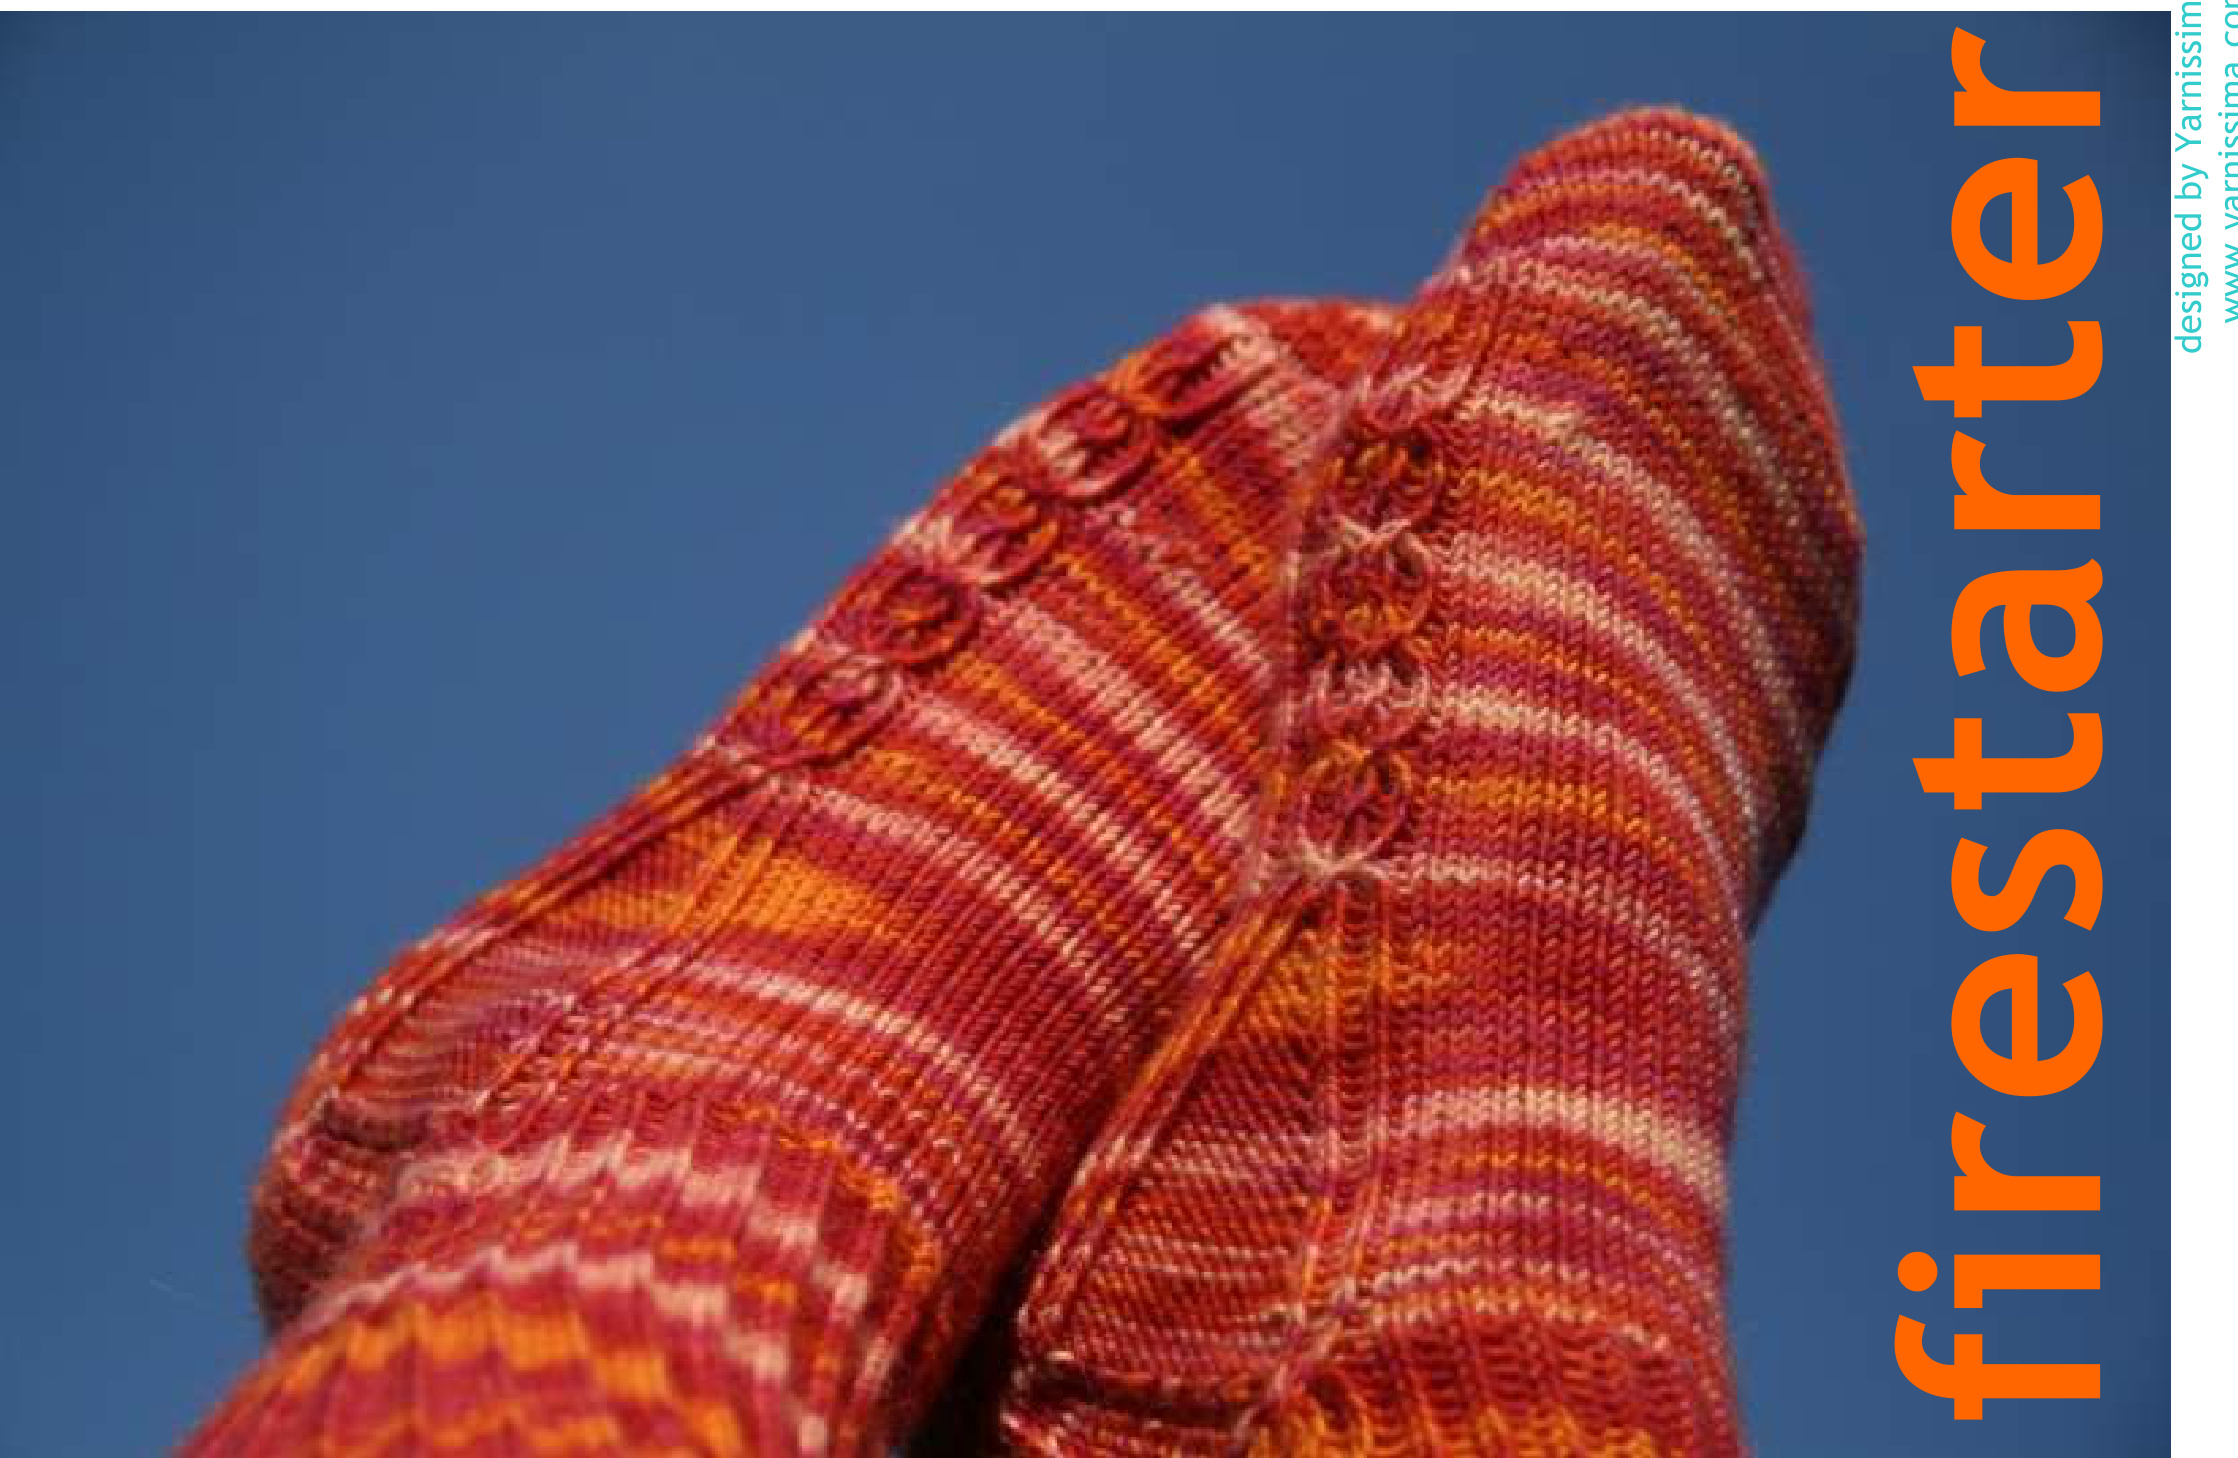
"I'm the firestarter, twisted firestarter...hey, hey, hey..." (The Prodigy) The short-row toe starts with a provisional crochet cast-on. The side cables use a twisted-stitch technique that is easy to master: you do not need a cable needle! I have included separate, detailed instructions for the provisional crochet cast-on-toe and the technique 'cabling without a cable needle'. Easily mastered, this skill will save huge amounts of time. Dear sock knitters, thank you al... To celebrate the launch of “Yarnissima', I'd like to share the Firestarter with you as a free download. It includes my special focus: an exciting gusset, naturally shaping your hand knit sock, fully belonging to the pattern, bringing out the best of your precious yarn. The Firestarter is meant to be knit toe-up on a circular needle. Hand dyed, beautiful variegated yarn hardly needs anything but a couple of smart details. And because of that, the Firestarter not only has plenty of stockinette, but both sides of the foot have twisted stitches that will pop out beautifully and nevertheless keep you busy. By the time you reach the purled gusset, the side cable will split up. After turning the heel, the cable will twist back together, smoothly ‘locking' the gusset. The ribbed cuff has a tiny bit of shaping.
GAUGE
32 sts x 41 rows $=$ 10x10 cm's or 4x4 inches in pattern stitch
SKILL REQUIREMENTS
Crochet cast-on, turning short rows, twisted or travelling stitches, knitting in the round, chart reading. Separate instructions are given for the provisional crochet cast-on and the 'cabling without a cable needle' technique.
PATTERN NOTES
The socks are worked toe-up on one circular needle. Use two circulars or dpn's if preferred. Additional information: www.knittinghelp.com, see ‘advanced techniques'
SIZE
$\mathsf{M}=$ European foot size 37-38, Us 7 - 8 To obtain gauge and to make the socks larger or smaller, use needles one or two sizes larger or smaller. Lengthen or shorten the foot as necessary. Take your time to make a swatch.
FINISHED SIZES
Total Foot Length 24 - 24.5 cm's Total Gusset Length (including heel turn!) 12 cm's Foot circumference - about 20 cm's Ankle circumference - 27 cm's
YARN
ANY Blue Moon Fiber Arts@, Socks That Rock'TM lightweight sock yarn (colours I used were “Firebird' and “Flower Power', part of the Rockin' Sock Club 2007)). These socks also look magnificent when knitted with Wollmeise sock yarn.
NEEDLES
80 or $100\mathsf{\ c m}-30$ or 40 inch $2.50\;\mathrm{mm}$ and $3.00\;\mathsf{m m}\;/\;\mathsf{U S}\;\#\;1.5$ or 2 circular needle(s) or set(s) double-point needles or size needed to obtain gauge
NOTIONS
Stitch markers Tapestry needle
CROCHET CAST ON
(See detailed instruction notes on page 6 for additional explanation) Using contrasting waste yarn, work a crochet chain several st longer than the number of stitches to be cast on. Starting 1 or 2 st from the end of chain and using working yarn, pick up and k 1 st in the back loop (the bump) of each st. Proceed until the required number of st have been worked. Later, the chain will be unravelled and the resulting live st picked up.
Toe
Using provisional crochet cast on, C0 30 sts. See page 6 for more detailed instructions Kow 1: K 3U, turn Row 2: Sl 1 pwise, p 28, wrap & turn. Row 3: Sl 1 kwise, k28, wrap & turn. Row 4 -17: Work as for rows 2 and 3, working each row 1 st shorter than the last Row18: Sl 1 pwise, p14 across the live st to the first wrapped, unworked st. On this st, place the wrap on your left needle and purl it together with the wrapped st. Wrap the next st so that it now has a double wrap, turn your work. Row 19: Slip the first double-wrapped st, knit across to the first unworked, wrapped st. Place the wrap on the left needle and knit it together with the wrapped st. Wrap the next st, turn. Rows $20\cdot31$ : Work as for rows 18 and 19, working each row 1 st longer than the last, either knitting or purling the sts together with the double wraps. Row 32: Sl 1 pwise, P 28, pick up double-wrapped st, turn Row 33: Sl 1 kwise, k 28, pick up double-wrapped st: 30 st on needle With RS facing, place provisionally cast-on sts on needle one by one and carefully remove crochet chain at the same time. You'll see that there's 29 st, so you need to increase 1 st to get the total of 60 st.
In next set-up round, place markers:
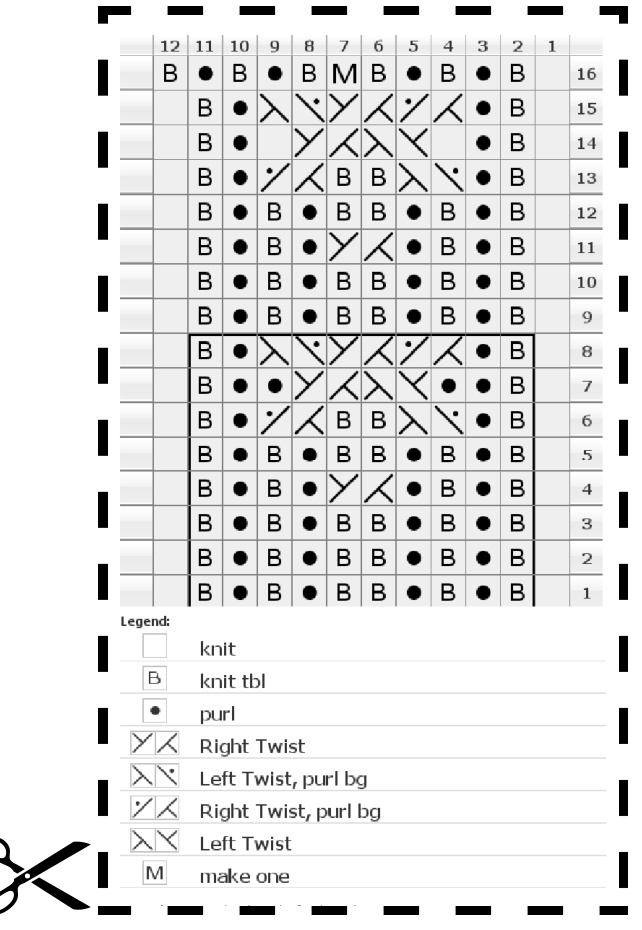
K1tbl, p1, k1tbl, p1, PM, k1tbl, k20, k1tbl, PM, p1, k1tbl, p1, k1tbl. Repeat this sequence for the other needle and don't forget the markers. Decide which needle will be upper foot needle and which will be the foot sole needle. Mark upper foot needle. As indicated in the chart, 4 sts of the cable pattern are at the end of the foot sole needle, and 4 sts of the cable pattern are at the beginning of the upper foot needle. To be able to work the cable pattern, you need to rearrange the stitches:
Instep
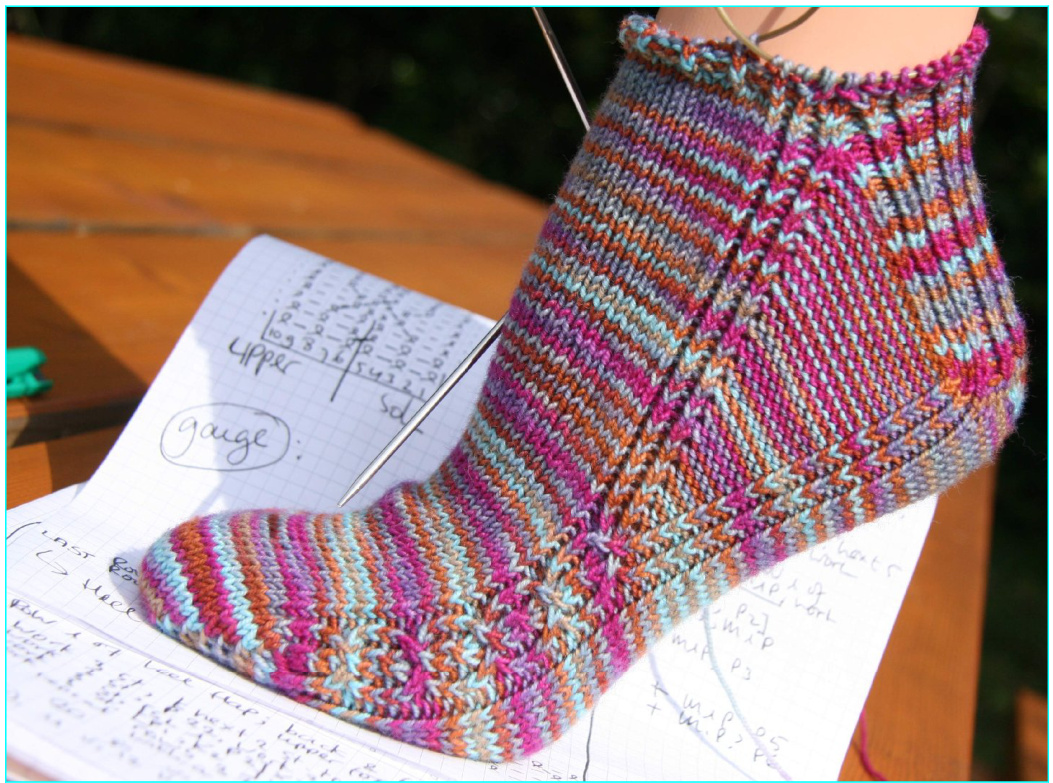
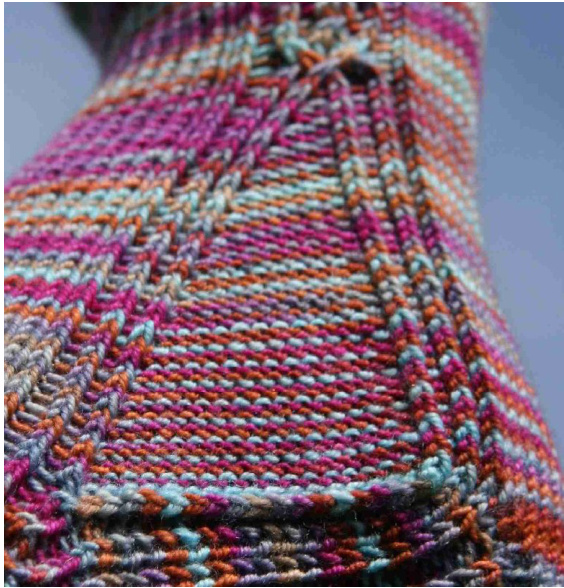
Round 1: while working chart, work first 4 sts to marker, and transfer these 4 sts from left to right to the foot sole needle. Work to end of needle. On next needle, work 4 sts to marker and transfer these sts from left to right to upper foot needle: 30 sts on both needles, with patterned sts at the ends of the needles. Only with the sts rearranged, you'li be able to work the cables in the chart. Repeat pattern 5 times until work measures $12\,\mathsf{c m}\,\mathsf{:s}$ The gusset will be created in between the cables (see photos), starting exactly at row 9 in the chart.

Gussets
The gusset, including the heel turn, measures $12\,\mathsf{c m}^{\prime}\mathsf{s}$ While making the gussets, you'll only be working row 1 of the chart all the time without cabling. Keep markers in place. M1P, work other 4 sts of chart, M, work 22 sts to M, work 4 sts of chart, M1P, work other 4 sts of chart: 62 sts. Round 2 and all even rounds: work sts Round 3: on left side of foot work across to M, work 4 sts, p1, M1P, work to M, work 22 sts; on the side for the right gusset work across to M, work 4 sts, M1P, p1, work to M: 64 sts. Round 5 and all uneven rounds: (for left gusset:) work across to M, work 4 sts, p all previously increased p sts, M1P, work to M, work 22 sts; (for right gusset:) work 4 sts, M1P, p all previously increased p sts, work 4 sts Round 35: (for left gusset) work across to M, work 4 sts, p17, M1P, work 4 sts, (for right gusset) work across to M,work 4 sts, M1P, p17, work 4 sts. (96 sts in total). You are now at the beginning of the 22 foot sole sts and ready to turn the heel. Transfer sts in such a way, that the 22 sts between markers are on one needle.
Turning The Heel
The heel turn is worked back and forth on the foot sole needle over the central knitted 22 sts between markers. The gusset sts are picked later. Row 1(RS): k1tbl, k20, wrap& turn (W&T) Row 2(WS): Sl first st p-wise, p20, w&T Row 3(RS): Sl first stitch k-wise, working each row 1 st shorter than the last,w&t Row 4(Ws): Slip 1st st p-wise, working each row 1 st shorter than the last, w&t Rows 5 - 12: repeat rows 3 and 4 until there are 10 \*live' and 6 wrapped on the left side and 6 wrapped st on the right side of your RS needle, w&t. On row 13(Rs), work 1 round as follows: Sl 1 kwise, k10, [on next wrapped st, pick up st plus wrap and knit these two together] repeat 6 times (6 wrapped sts in total picked up); work next 4 sts, p18 (the gusset), work 30 sts, p18 (other gusset), work 4 sts, pick up remaining 6 wrapped sts, but knit the wraps and the sts together through their back loops. You are ready to knit the heel flap.
Creating The Heel Flap, picking up the gusset stitches
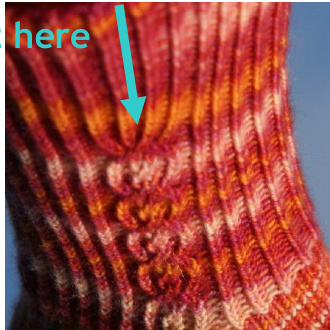
The heel flap is created working back and forth. At the same time, you'll pick up the gusset stitches: Row 1 (Rs): k16, work 3 sts, k2tog tbl, do not wrap next st, turn Row 2 (Ws): sl 1, work 3 sts, p22, work 3sts, p2sts tog, turn Row 3 (RS): sl 1, work 3 sts, [sl 1, p2]7times, sl 1, work next 3 sts, k2tog tbl, turn Row 4 (Ws): sl 1, work 3 sts, [p1, k2] 7times, p1, work next 3 sts, p2 tog, turn Repeat rows 3 and 4 to pick up all gusset sts: 60 sts. You are now in your $37^{\mathrm{th}}$ row. You have just decreased all purled right gusset sts. Work across to next marker. On RS, arrange sts similar to how you 'dislocated' them after the toe, right before making the instep (see Instep). Keep markers in place. This will allow you to make the cables again. The ribbing as set up in the heel flap at the back of the leg will be loop. At the same time, start cabling pattern as if you were in row 11 exactly. In the first 5 rounds, continue ribbing only on the back of the leg, the front side is in st st. After 5 rounds, start ribbing patt also on front of the leg between markers, keeping cable pattern intact:[k1tbl, p2] 7 times, k1tbl. After 3 cable repeats, change to $3.00\;\mathrm{mm}$ circular needle to add some shaping to upper leg. Then after another 2 repeats (so 5 repeats in total), in row 9 of patt chart, change both side cables by adding 1 st in the middle: Marker, work 4 sts, M1P, work 4 sts, marker (see photo below and row 16 in chart)
increase 1 p
CUFF & BINDOFF
Fold sock in half at heel turning area. Leg and foot section should at least be the same length. Make cuff longer to minimize yarn leftovers if desired, but at least $3\;\mathsf{c m}\,^{\bullet}\mathsf{s}$ To bind off, take strand of yarn from the end of your yarn ball. With the yarn held double, bind off loosely in pattern rib. Cut yarn. Weave in all ends. Block lightly if desired. Wear with pride. PROVISIONAL CROCHET CAST ON Using smooth, contrasting waste yarn, crochet a chain several chain stitches longer than HALF the number of knit stitches you need. Cast off last stitch and cut yarn. Tie a knot in this tail of yarn. You will unzip this provisional cast on later by undoing and pulling on this end. The knot identifies the right end. With sock yarn and circular needle, knit 1 stitch into each ‘bump' in the back side of the chain until you have your required number of stitches. You'll shape the toe with short rows, knitting back and forth. In the first half of the toe, the rows get shorter. To avoid holes, be sure to work yarn snugly on each row. Row 1 (RS): Knit to the last stitch. Wrap & turn (w&t) last st: move the working yarn as if to purl and slip the last st from the left needle to the right needle. Turn work. Row 2 (WS): Slip the first, unworked st from the left needle to the right needle. Purl across until last stitch; w&t: move the working yarn as if to knit and slip last st. Turn. Row 3 (RS): Slip the first st, knit across to the last st before the unworked st; w&t. Row 4 (Ws): Slip the first st, purl across to the st before the unworked st, w&t. Repeat Rows 3 and 4 until there are 8, 10 or 12 (however wide you prefer your toe) ‘live' middle stitches. At the Ws, the toe is half done.
Proceed to second half of the toe (rows will get longer):
Row 1: Purl across the live st to the first unworked, wrapped st. On the next st, pick up the wrap and purl it together through the back loop with the wrapped st. Wrap the next st so that it now has two wraps, turn. Row 2: Slip the first double-wrapped st, knit across to the first unworked, wrapped st. Pick up the wrap and knit it together with the wrapped st. Wrap the next st (has two wraps now), turn.
On each next row pick up both wraps and knit or purl them together with the st. Continue until all st have come 'alive'.
Place provisional stitches: Stick the point of the needle in the stitch below the crochet chain, working towards working yarn. Unzip the chain, one stitch at a time, as you stick the tip of the needle in each stitch, moving each stitch onto the needle. Count stitches. On your first round after short row toe shaping, you may want to pick up an extra stitch or two between the ‘live' stitches and the stitches you've picked up from the cast-on. To avoid holes, be sure to work yarn snugly on first round.
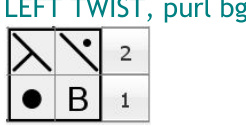
TRAVELLING STITCHES
Twisted stitches will exchange places, or travel over their background - usually purled - on every round. All knit stitches are knitted through the back of the loop. Traditional twisted stitch motifs generally avoid crossing more than two stitches in any given twist or crossing. RIGHT TWIST, purl bgover 2 sts:
In row 2: Work to the purl st before the Ktbl symbol. With right needle, insert tip into k st on the front side of your work. Pull the left needle out of these 2 sts. The purl st falls free behind your work. Pick this free st up at once with the tip of your left needle. Place $\mathsf{k}$ st back on the left needle. Knit this stitch through the back loop. Purl the next stitch.
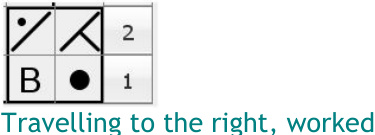
over 2 sts: In row 2: Work to the first k st before the K1tbl symbol. With right needle, insert tip into k st on the front side of your work. Pull the left needle out of these 2 sts. The k st falls free behind your work. Pick this free st up at once with the tip of your left needle. Place k st back on the left needle. Knit this stitch through the back loop. Knit the next st tbl.
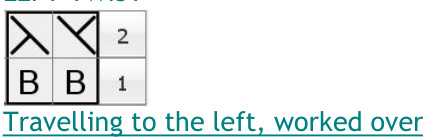
Travelling to the left, worked over
2 sts:
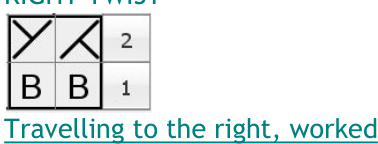
In row 2: Work to the ktbl symbol. With right needle, insert tip into the p st at the back side of your work. Pull the left needle out of these 2 sts. The k st falls free on the front side of your work. Pick this free st up at once with the tip of your left needle. Place p st back on the left needle and p it. Next stitch ktbl
2 sts:
In row 2: Work to the first ktbl symbol. With right needle, insert tip into the k st at the back side of your work. Pull the left needle out of these 2 sts. The k st falls free on the front side of your work. Pick this free st up at once with the tip of your left needle. Place $\mathsf{k}$ st back on the left needle and ktbl. An excellent video of this technique can be seen on YouTube: http://www.youtube.com/watch?v=Fo kn_CJp4EY (courtesy of WendyKnits) Marjan Hammink founded Yarnissima in March 2007. The name Yarnissima represents her deep and lasting love for beautiful yarns and what can be created with them. She lives in the Netherlands with her husband and three young sons. She's been knitting for as long as she can remember. As a small child, her grandmother patiently taught her the art of knitting and crochet. She vividly remembers all the socks and beautiful pullovers that flew off her granny's long, steel needles. Her mother - herself a multi-talented crafter/quilter/designer - taught her the finesses. And most importantly: “"Only work with the finest material and tools. This will go through your hands for hours and hours." nd all these years, knitting has always stayed with her. Recently, an infatuation with the beautiful, hand dyed Rohrspatz & Wollmeise yarns from Claudia in Germany, inspired her to design her own patterns. Literally, the socks walked off her needles. Yarnissima's fine footwear designs are down-to-earth, but always with an unexpected little twist somewhere. And as the Wollmeise's yarns are playful in themselves, they hardly need any embellishments.
Pattern:
R1 (RS): k1, ktbl, p1, ktbl, p1, (ktbl) 2 times, p1, ktbl, p1, ktbl, k1 R2: k1, ktbl, p1, ktbl, p1, (ktbl) 2times, p1, ktbl, p1, ktbl, k1 R3: k1, ktbl, p1, ktbl, p1, (ktbl) 2 times, p1, ktbl, p1, ktbl, k1 R4: k1, ktbl, p1, ktbl, p1, Right Twist, p1, ktbl, p1, ktbl, k1 R5: k1, ktbl, p1, ktbl, p1, (ktbl) 2 times, p1, ktbl, p1, ktbl, k1 R6: k1, ktbl, p1, Left Twist PB, (k tbl) 2 times, Right Twist PB, p1, ktbl, k1 R7: k1, k tbl, p2, Left Twist, Right Twist, p2, ktbl, k1 R8: k1, ktbl, p1, Right Twist PB, Right Twist, Left Twist PB, p1, k tbl, k1 R9: k1, ktbl, p1, ktbl, p1, (k tbl) 2 times, p1, ktbl, p1, ktbl, k1 R10: k1, ktbl, p1, ktbl, p1, (ktbl) 2 times, p1, ktbl, p1, ktbl, k1 R11: k1, ktbl, p1, ktbl, p1, Right Twist, p1, ktbl, p1, ktbl, k1 R12: k1, ktbl, p1, ktbl, p1, (k tbl) 2 times, p1, ktbl, p1, ktbl, k1 R13: k1, ktbl, p1, Left Twist PB, (k tbl) 2 times, Right Twist PB, p1, ktbl, k1 R14: k1, ktbl, p1, k1, Left Twist, Right Twist, k1, p1, k tbl, k1 R15: k1, k tbl, p1, Right Twist PB, Right Twist, Left Twist PB, p1, k tbl, k1 R16: k1, ktbl, p1, ktbl, p1, ktbl, m1, ktbl, p1, ktbl, p1, ktbl
Do you have a question? Found a mistake? Please email me! yarnissima@gmail.com $\circledcirc$ 2007 Marjan Hammink, yarnissima Visit my blog www.yarnissima.vox.com www.yarnissima.com


